As someone who cycles often, I understand the annoyance of experiencing a puncture while riding. It’s incredibly inconvenient to be stuck on the roadside or trail, halted in your tracks, unable to progress further. This is why mastering the art of fixing a bike tube is a crucial ability that all bike riders need to have.
With a few simple tools and some basic know-how, you can quickly and easily repair a punctured tube and get back on the road.
Picture yourself cruising down a winding country road, the wind in your hair and the sun on your face. Suddenly, you hear the unmistakable sound of air escaping from your tire. You pull over to the side of the road and inspect your bike, only to find a small hole in your tube.
With a sigh, you realize that you have two choices: abandon your ride and call for help, or fix the flat yourself. If you choose the latter, this article will guide you through the steps to patch your bike tube like a pro.
Key Takeaways
- Prevention is key: regularly check tire wear and tear and maintain proper tire pressure to reduce the risk of punctures.
- Different types of puncture damage require different repair methods, so it’s important to identify the location and assess the damage before beginning the patching process.
- Proper patching involves cleaning and roughening the surface, applying glue and a patch, and testing for leaks before reinstalling the tire and inflating to the recommended pressure.
- Avoid common mistakes such as failing to check for sharp objects or debris in the tire, applying too much or too little glue, or failing to test for leaks before reassembling the tire.
![Diyife Mini Folding Bike Lock, [2.36ft/72cm] 3-Digit Combination Bicycle Lock, 360° Rotation Waterproof Anti-Theft Alloy Steel Foldable Lock with Bracket for Ebike Scooter Motorcycle](https://m.media-amazon.com/images/I/41mKZa2q5sL._SL500_.jpg)
Diyife Mini Folding Bike Lock, [2.36ft/72cm] 3-Digit Combination Bicycle Lock, 360° Rotation Waterproof Anti-Theft Alloy Steel Foldable Lock with Bracket for Ebike Scooter Motorcycle
【Enhanced Anti-Theft Protection - 6 Steel Chains】This bike lock built with zinc alloy lock cylinder + alloy steel...
As an affiliate, we earn on qualifying purchases.
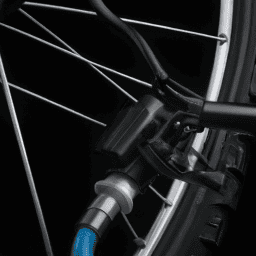
Identify the Location of the Puncture
Now, let’s find where the puncture is by gently squeezing the tire and listening for the hissing sound. Common causes of punctures are riding over sharp objects, such as glass or nails, or having worn-out tires. To prevent punctures, it’s important to regularly check your tires for wear and tear, avoid riding over debris on the road, and maintain the correct tire pressure.
There are different types of puncture damage and their repair methods. A small puncture can be repaired with a patch kit, while a larger puncture may require replacing the tube.
To identify the location of the puncture, remove the wheel and tire from the bike, and inspect the inner tube for any visible holes or tears. Once the puncture is located, mark it with a pen or chalk before proceeding to prepare the tube and patch.

Kryptonite Folding Bike Lock, Compact Lightweight High Security Anti-Theft Foldable Bicycle Lock with 2 Keys and Mount for E-Bikes Scooter Road Mountain Bikes, 88.4cm (34.8 in)
HIGH-SECURITY DESIGN: This Anti-Theft folding bike lock is made from 3mm hardened steel bars with tightened rivets for...
As an affiliate, we earn on qualifying purchases.
Prepare the Tube and Patch
First, I need to deflate the tube completely to ensure it isn’t under any pressure.
Then, I’ll use a clean cloth to wipe the area around the puncture, removing any dirt or debris.
Next, I’ll roughen the surface around the puncture with sandpaper to ensure the patch adheres properly.
Finally, I’ll apply a thin layer of glue to the patch before pressing it firmly onto the tube.
Deflate the Tube and Clean the Area Around the Puncture
Before you can patch the tube, you’ll need to deflate it and clean the area around the puncture. This is important because any dirt or debris left on the surface can affect the patch’s adhesive properties, causing it to fail.
To do this, follow these steps:
- Remove the wheel from the bike and deflate the tube completely by pressing on the valve stem.
- Use a clean rag to wipe the area around the puncture clean of any dirt or debris.
- Use a piece of sandpaper or a metal file to roughen the surface around the puncture. This will help the patch adhere properly.
- Wipe the area clean again to remove any debris from roughening the surface.
It’s important to note that different types of punctures may require different approaches. For example, if the puncture is caused by a nail or a sharp object that is still embedded in the tire, it’s important to remove it carefully before proceeding with the patching process. Additionally, choosing an appropriate patch will depend on the size and location of the puncture.
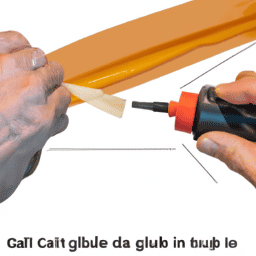
Now that the area around the puncture is clean and the surface has been roughened, the next step is to apply the patch. But before we get to that, we need to apply glue to the patch.
Roughen the Surface with Sandpaper and Apply Glue to the Patch
Once you’ve cleaned the area around the puncture, it’s time to roughen up the surface with some sandpaper and apply some glue to the patch.
First, choose the appropriate sandpaper based on the type of tube you have. For most bicycle tubes, a medium-grit sandpaper will suffice. However, if you have a high-performance tube, you may need to use a finer grit sandpaper to avoid damaging the tube.
When sanding the area around the puncture, be sure to use a circular motion to roughen up the surface. This will help the glue adhere better to the patch.
Once you’ve roughened up the surface, it’s time to apply the glue. Be sure to use the appropriate glue for the type of patch you have. There are different types of bicycle tube patches available, so be sure to read the instructions carefully before applying the glue.
With the surface roughened and glue applied, it’s time to move on to the next step of applying the patch.

Seatylock FoldyLock Compact Folding Bike Lock - Award Winning Patented Lightweight High Security Bicycle Lock - Heavy Duty Anti Theft Smart Secure Guard with Keys & Case for Bikes or Scooters
TOP RATED LIGHTWEIGHT COMPACT BIKELOCK - Best Light Weight Folding Bike Lock. Portable Solid Key Bike Lock Protects...
As an affiliate, we earn on qualifying purchases.
Apply the Patch
Now you’ll want to peel off the backing of the patch and carefully place it over the hole, pressing firmly to ensure it sticks in place. Imagine your patch as a superhero, saving your bike tube from certain doom! To ensure proper patch placement, it’s important to first locate the puncture and clean the area thoroughly. Once the surface has been roughened with sandpaper and glue has been applied, it’s time to apply the patch.
When applying the patch, it’s important to avoid common mistakes such as not pressing firmly enough or allowing air bubbles to form under the patch. To help ensure a successful repair, refer to the table below for key points to keep in mind during application.
| Patch Application Tips |
|---|
| Press firmly and evenly |
| Avoid air bubbles |
| Allow ample drying time |
With the patch firmly in place, it’s time to move on to reinstalling the tube and tire.

RAINCORE Light Weight Bike Cable Lock for Heavy Duti Anti Theft - 39inch (100cm) - 0.33lb (151g) - Bike Chain Lock with Chain Cutter Proof Fiber - Patented Korea - Security Cable (39 inches)
Crafted from patented Korean bulletproof fiber our cable is more flexible than steel chains Perfect for your kids...
As an affiliate, we earn on qualifying purchases.
Reinstall the Tube and Tire
Now that I’ve successfully patched my bicycle tube, it’s time to reinstall it back into the tire.
First, I need to make sure the tube is properly aligned with the tire and that it’s not twisted or pinched.
Once it’s in place, I can inflate the tube to the recommended pressure, which can usually be found on the side of the tire.
Insert the Tube Back into the Tire
Gently work the tube back into the tire, making sure it is not twisted or bunched up, to ensure a smooth ride. First, place the valve stem back through the hole in the rim and tuck the rest of the tube inside the tire. Then, starting at the opposite side of the valve stem, push the tire back onto the rim using your thumbs. Be sure to work slowly and methodically, checking that the tube is not getting pinched between the tire and rim as you go.
To ensure proper inflation and avoid future punctures, refer to the recommended tire pressure listed on the sidewall of the tire. Using a bike pump with a pressure gauge, inflate the tube to the recommended pressure. It is important not to overinflate the tire, as this can cause a blowout, or underinflate it, as this will make the ride sluggish and increase the risk of pinch flats. Once inflated, check the tire for any bulges or deformities before reinstalling the wheel onto the bike frame.
Inflate the Tube to the Recommended Pressure
Before you pump up the tire, make sure to check the recommended pressure listed on the sidewall and use a gauge to avoid over- or under-inflation. This is an important step in proper tire pressure maintenance. Over-inflated tires can cause the tube to burst, while under-inflation can make it more susceptible to punctures.
Additionally, don’t forget to give it a quick once-over for any bulges or irregularities before putting the wheel back on your ride. Common causes of punctures on bicycle tubes include sharp objects on the road, improper installation, and worn-out tires. By checking for irregularities, you can prevent further damage to your tube and avoid potential accidents.
Once you have confirmed the recommended pressure and checked for any irregularities, it’s time to inflate the tube. Attach the pump to the valve and start pumping, making sure to keep an eye on the pressure gauge. Stop pumping when the pressure reaches the recommended level. It’s important not to over-inflate, as this can cause the tube to burst.
With the tube now inflated, it’s time to test it for leaks before putting the wheel back on your bike.
Test the Tube
To check if the tube is the source of the problem, I’ll want to inflate it and give it a good inspection.
After inflating the tube to the recommended pressure, I’ll need to test it by feeling it for any bulges or bumps.
I’ll also want to listen for any hissing sounds, which could indicate a small puncture.
If I don’t hear anything, I’ll want to submerge the tube in water to check for bubbles. This will help me pinpoint the location of any leaks.
If I find a leak, I’ll need to use my troubleshooting techniques to find the source of the problem.
I’ll want to check the tire for any sharp objects or debris that could have caused the puncture.
If I can’t find anything, I may need to replace the tube altogether.
Once I’ve identified the problem, I can then patch the tube using my patching kit.
Testing the tube is an important step in the patching process, as it ensures that I’m not just wasting time and effort patching a tube that won’t hold air.
Frequently Asked Questions
What is the most common cause of punctures in bicycle tubes?
Coincidentally, I’ve had a fair share of punctured bicycle tubes. The most common cause is debris on the road. Preventing punctures involves choosing the right tire with a puncture-resistant layer.
How long does it typically take for the patch to dry and set after application?
After applying the patch, wait for at least 5-10 minutes for the glue to dry and set. To ensure a successful patch, make sure to clean and dry the surface before applying the patch. Avoid overstretching the patch and not allowing enough time for the glue to dry.
Can you reuse a patch if it doesn’t stick properly the first time?
If a patch doesn’t stick properly, I can reuse it by using patch reapplication techniques. Before that, I must check the patch’s adhesion by pressing it against the tube. If it sticks, I can reapply it.
How often should you check your bicycle tires for signs of wear and tear?
Did you know that improper tire pressure can lead to a 25% increase in rolling resistance? It’s crucial to regularly check tire pressure and identify signs of wear and tear to prevent accidents. Look for cracks, cuts, and bulges in the tire.
What is the recommended pressure for inflating a patched tube?
When it comes to bike tire maintenance, proper inflation techniques are crucial. The recommended pressure for inflating a patched tube varies depending on the tire size and type. Always consult the manufacturer’s guidelines for the correct pressure range.
Conclusion
Well, that’s how you patch a bicycle tube! It may seem daunting at first, but with a little practice, it becomes a routine task.
Remember, the most critical part of the process is identifying the location of the puncture. Once you’ve found it, take your time preparing the tube and patch, ensuring that all surfaces are clean and dry. Then, apply the patch, making sure to press it firmly onto the tube to create a tight seal.
After patching the tube, it’s time to reinstall it and the tire. Make sure that everything is aligned correctly and that the tire is seated evenly on the rim before inflating the tube. Finally, give it a test spin to ensure that the patch holds up under pressure.
As the old adage goes, "An ounce of prevention is worth a pound of cure."So, don’t forget to regularly inspect your tires and tubes to catch any potential issues before they become a problem.
Happy cycling!