Repairing the gears on a bicycle might seem challenging, particularly for those who are not well-acquainted with their bike’s mechanical aspects. Yet, armed with a modest amount of understanding and some patience, you can readily identify and resolve gear problems you might encounter.
In this article, I’ll walk you through the steps to identify and fix common gear problems so that you can get back to enjoying your ride.
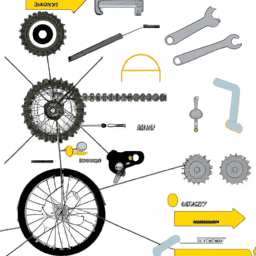
First, it’s important to understand that bicycle gears work by shifting the chain from one sprocket to another, allowing you to ride comfortably on different terrains and at different speeds. However, when gears are not working properly, you may experience issues such as skipping, chain slipping, or difficulty shifting.
By following the steps outlined in this article, you can identify the root cause of these issues and make the necessary adjustments to your gears.
So, let’s get started!
Key Takeaways
- Fixing bicycle gears can seem overwhelming, but with some knowledge and patience, it can be easily troubleshooted and fixed.
- Bicycle gears work by shifting the chain from one sprocket to another, with common issues including skipping, chain slipping, or difficulty shifting.
- Troubleshooting tips include inspecting the chain for wear, checking the cassette and chainring for damage, tightening cables, and adjusting limit screws.
- Regular maintenance, such as lubricating gears and checking cable tension, can prevent gear issues from occurring. If unsure or not confident in abilities, seek professional help from a bike mechanic.
Identify the Problem
You’ll need to identify the problem with your gears before you start tinkering, so take some time to observe and diagnose the issue. Common issues with bicycle gears include skipping, slipping, or not shifting properly.
If you’re experiencing skipping, your chain may be slipping over the teeth on your cassette or chainring. This could be due to a worn chain, cassette, or chainring, or a loose cable. Troubleshooting tips for this issue include inspecting your chain for wear, checking your cassette and chainring for damage, and tightening your cable.
If your gears are slipping, it could be due to a worn derailleur or cassette. Inspect your derailleur for any damage or wear, and check your cassette for any worn teeth.
If your gears are not shifting properly, it could be due to a cable that is not properly tensioned or a derailleur that is not properly aligned. Troubleshooting tips for these issues include checking your cable tension and adjusting your limit screws.
With these tips in mind, let’s move on to adjusting the limit screws to fix your gears.
Adjust the Limit Screws
To properly adjust the gears on my bicycle, the next step is to adjust the limit screws.
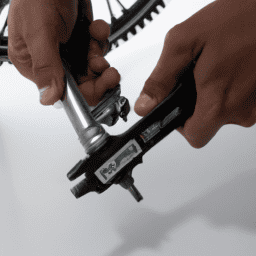
First, I need to locate these screws, which are typically found on the rear derailleur.
Once located, I’ll need to make precise adjustments to ensure proper shifting between gears.
Locate the Limit Screws
First, find the limit screws on your bicycle gears to make necessary adjustments. The limit screws are small metal screws located on the derailleur, which is the component responsible for shifting the chain between gears. It’s important to locate these screws before making any adjustments to ensure that the changes you make are effective.
To locate the limit screws, you need to look for two small screws on the derailleur. One is labeled ‘L’ for low gear, and the other is labeled ‘H’ for high gear. These screws are typically located near the cable adjuster and are easy to identify.
When adjusting the limit screws, it’s important to keep in mind the importance of lubrication and common mistakes to avoid. Lubrication is key to ensuring that the screws move smoothly and don’t get stuck, while common mistakes to avoid include turning the screws too far or in the wrong direction.
With the limit screws located, you can now adjust the screws for proper shifting.
Adjust the Screws for Proper Shifting
Once the limit screws have been located, it’s important to make small adjustments to ensure that the derailleur moves smoothly between gears without overshooting or undershooting. One common mistake is adjusting the screws too much, which can cause the chain to rub against the derailleur or even fall off. To avoid this, make adjustments in small increments, testing the shifting between each adjustment.
If the derailleur is still not shifting properly, there are troubleshooting tips to consider. First, check that the derailleur hanger is straight and not bent. A bent hanger can cause shifting issues and may need to be replaced.
Additionally, make sure the derailleur itself is clean and free of debris. A dirty derailleur can cause the chain to skip or not shift smoothly.
Once these steps have been taken, it’s time to move on to checking the cable tension.
Check the Cable Tension
Make sure you’re not skipping this crucial step – checking the cable tension – if you want your bicycle gears to perform smoothly and efficiently. The importance of maintenance can’t be stressed enough, and checking cable tension is a key part of it.
Common cable issues, such as stretching and fraying, can cause gear shifting problems and affect the overall performance of the bike. To check the cable tension, follow these steps:
- Shift your bike to the smallest chainring and the largest cog.
- Locate the barrel adjuster on the derailleur and turn it clockwise to tighten the cable or counterclockwise to loosen it.
- Shift through all gears and ensure smooth and precise shifting.
Checking and adjusting cable tension may seem like a small step, but it can make a big difference in how your bike performs. Once you’ve completed this step, it’s time to move on to the next: clean and lubricate the gears.
Clean and Lubricate the Gears
As you shift gears on your ride, you’ll want to ensure they’re running smoothly by giving them a good cleaning and lubrication.
Start by removing any grime or debris that has accumulated on the gears, chain, and derailleur. A simple solution of warm water and mild detergent can be used to clean these areas. Use a soft brush to gently scrub away any dirt or grime, and then rinse with water and dry with a clean cloth.
Once the gears are clean, it’s time to lubricate them. Choosing the right lubricants is important, as using the wrong type can actually cause more damage to your gears. Apply a small amount of lubricant to each gear, chain, and derailleur. Be sure to use a lubricant that is specifically designed for bicycles, as other types of lubricants can attract dirt and grime.
After lubricating, shift through all of the gears to ensure that the lubricant is evenly distributed. With the gears now clean and lubricated, it’s time to move on to the next step of testing and fine-tuning.
Test and Fine-Tune
Now that the gears are running smoothly after cleaning and lubricating them, it’s time to put them to the test. I recommend taking your bike for a spin around the block or on a nearby trail to see if there are any issues with shifting.
Pay attention to any hesitations or delays when shifting, and note which gears are causing the problem. It’s important to practice patience during this process, as it may take a few attempts to get everything just right.
Once you’ve identified any issues, it’s time to fine-tune the gears. If you’re comfortable doing it yourself, you can make small adjustments using the barrel adjuster on the derailleur. However, if you’re unsure or not confident in your abilities, I highly recommend seeking professional help from a bike mechanic.
They have the expertise to make precise adjustments and ensure your gears are running as smoothly as possible. Remember, taking care of your bike’s gears will make for a more enjoyable ride in the long run.
Frequently Asked Questions
How do I know if my bike’s gears need fixing?
To troubleshoot bike gear problems, I check if the chain slips or makes noise when shifting gears. I also inspect the cables, derailleur, and cassette for wear or damage. If any issues are noticed, I know my bike’s gears need repairing.
Can I fix my bike’s gears without any special tools?
It’s possible to temporarily fix common issues with bicycle gears without special tools. Troubleshooting may involve adjusting cable tension or limit screws. Quick fixes include tightening bolts and lubing components.
How often should I clean and lubricate my bike’s gears?
I clean and lubricate my bike’s gears every 100-200 miles, depending on the terrain and weather conditions. Bike gear maintenance tips include using a degreaser, lubricant, and cleaning brush. Importance of gear maintenance for bike performance is crucial for smooth shifting and avoiding wear and tear.
What should I do if the gears are still not working properly after following these steps?
If the gears are still not working properly after following the steps, I would suggest checking for common issues such as cable tension, derailleur alignment, and worn components. Troubleshooting techniques like adjusting the barrel adjuster and limit screws may also help.
Is it possible to replace just one gear on my bike, or do I need to replace the entire gear system?
Replacing individual gears on a bike is possible, but it is important to ensure compatibility with the rest of the gear system. Mixing and matching different models can cause shifting problems. Be technical and precise when making gear replacements.
Conclusion
Well, there you have it – a complete guide on how to fix your bicycle gears. From identifying the problem to test-riding your bike, we’ve covered every step you need to take to ensure your gears are functioning properly.
But I’ll be honest with you – fixing gears can be a lot like untangling a ball of yarn. It can be frustrating, time-consuming, and you might end up with a few knots.
Just like how it’s easy to get lost in the tangled mess of yarn, it’s easy to get lost in the complexity of your bike’s gears. But don’t give up! With patience and persistence, you’ll be able to untangle the knots and get your gears working smoothly again.
In fact, fixing your bike’s gears can be a metaphor for life. Sometimes, life can be as tangled and complicated as a ball of yarn. It can be overwhelming and frustrating, but just like with fixing your gears, you can’t give up. You have to keep trying, keep pushing through the knots, and eventually, you’ll find a solution.
So the next time you’re faced with a complicated problem in life, remember the process of fixing your bike gears. It might just give you the motivation and perseverance you need to succeed.