As an avid cyclist, I understand the importance of keeping my Achneer electric bike charged and ready for my next adventure.
In this article, I will guide you through the precise and technical process of charging your Achneer electric bike. By following these steps, you’ll be able to confidently plug in the charger, connect it to the charging port, and ensure your bike is always ready to go.
So let’s dive in and unlock the full potential of your Achneer electric bike!
Key Takeaways
- Use the original charger provided by Achneer for optimal performance
- Avoid overcharging to extend the battery lifespan
- Clean the charging port regularly to maintain performance
- Follow manufacturer’s guidelines for safe charging practices

Under Armour Squeeze Water Bottles, 32 oz Water Bottles, Sideline Sports Water Bottle with Quick-Shot Lid, Quick & Easy Hydration, Gym Water Bottles, Squeeze Bottle, 1 32oz Bottle
- Easy Hydration: Quick-shot lid and one-way valve
- On-the-Go Use: One-hand operation for active hydration
- Measurement Markings: Ounces and milliliters for tracking
As an affiliate, we earn on qualifying purchases.
Plug in the Charger
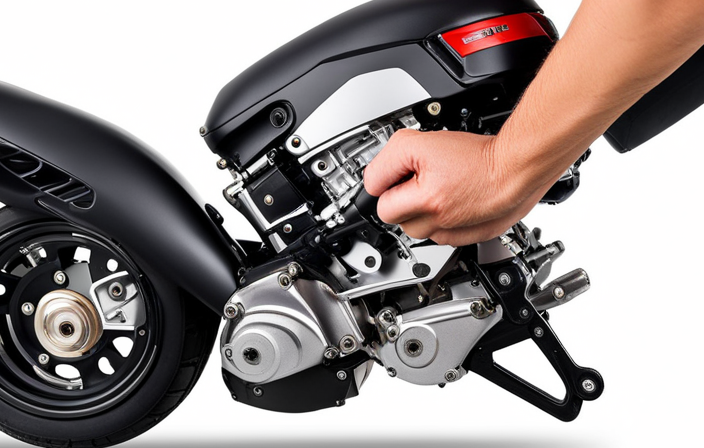
To charge the Achneer electric bike, simply plug in the charger. The charging process is straightforward and can be done by anyone. Once you have connected the charger to a power outlet, locate the charging port on your Achneer electric bike. It is usually located near the battery compartment or on the frame of the bike. The charging port is a small socket with a cover that protects it from dust and water. Gently remove the cover and insert the charger plug into the port. Make sure it is firmly inserted to establish a secure connection.
When charging your Achneer electric bike, it is important to consider the charging time and proper battery maintenance. The charging time may vary depending on the battery capacity and the charger’s output. It is recommended to refer to the user manual for specific charging times. Overcharging the battery can shorten its lifespan, so it is advisable to disconnect the charger once the battery is fully charged. Additionally, regular battery maintenance, such as cleaning the charging port and keeping it free from debris, will ensure optimal performance and longevity.
Now that you have successfully plugged in the charger, let’s move on to the next step: locating the charging port on your Achneer electric bike.
Locate the Charging Port on Your Achneer Electric Bike
First, find the charging port on your Achneer e-bike. The charging port is a crucial component that allows you to replenish the battery and continue your ride. It is typically located on the frame of the bike, near the bottom bracket or the downtube.
To ensure a seamless charging experience, follow these steps:
-
Check the user manual: Consult the user manual to identify the exact location of the charging port on your specific model of Achneer e-bike.
-
Inspect the port: Look for a small, circular opening with a cover. This cover protects the port from dust, dirt, and moisture. Ensure that the cover is securely closed before charging.
-
Consider charging speed: The charging speed of your Achneer e-bike can vary depending on the model and charger specifications. Higher wattage chargers generally offer faster charging times. It is advisable to use the original charger provided by Achneer to maintain optimal charging performance.
With the charging port successfully located, you are now ready to move on to the next step: removing the charging port cover. By doing so, you can easily connect the charger and begin the charging process without any interruptions or delays.
Remove the Charging Port Cover
Now that you’ve located the charging port, it’s time to remove the cover and prepare for the charging process. To ensure a smooth charging experience for your Achneer electric bike, it is important to keep the charging port clean and free from any debris or dirt.
Before removing the cover, make sure to turn off the bike and disconnect it from any power source. This will prevent any accidents or damage during the process.
To begin, take a soft cloth or brush and gently clean the charging port area. This will remove any dust or particles that may have accumulated over time. Be careful not to use excessive force or liquids, as this could damage the port.
Once the charging port is clean, locate the cover and carefully remove it. Most electric bikes have a removable cover that protects the port from dirt and moisture. Use your fingers or a small tool to gently pry open the cover and lift it off.
Now that the cover is removed, you can proceed to connect the charger to the charging port. This step is crucial in starting the charging process and ensuring that your Achneer electric bike receives the necessary power to keep you on the move.
Connect the Charger to the Charging Port
Once the cover is removed, it’s time to connect the charger to the charging port. This step is crucial for charging your Achneer electric bike efficiently. To ensure effective charging time management, it is essential to follow the proper procedures.
First, locate the charging port on your electric bike. It is typically situated on the frame or near the battery compartment. The charging port is designed to fit the charger’s plug securely.
Next, take the charger and insert its plug into the charging port. Ensure a firm connection by pushing it in until it clicks. This will guarantee a stable and uninterrupted flow of electricity during the charging process.
If you encounter any issues during this step, troubleshooting common charging issues may be necessary. Check if the charging port or the charger’s plug is dirty or damaged. Cleaning or repairing them may resolve the problem. Additionally, verify that the charger is compatible with your Achneer electric bike.
Now that the charger is securely connected to the charging port, it’s time to plug the charger into a power outlet. This will provide the necessary electrical current to charge your electric bike effectively.
Plug the Charger into a Power Outlet
After securely connecting the charger to the charging port, it’s time to plug it into a power outlet. This is a crucial step in charging your Achneer electric bike and ensuring its battery is adequately replenished.
To guide you through this process, here are a few important points to keep in mind:
-
Locate a suitable charging station:
-
Look for a power outlet that is easily accessible and in close proximity to where you plan to charge your bike.
-
Ensure the power outlet is compatible with the charger provided by Achneer for optimal charging efficiency.
-
Charging time required:
-
The charging time for your Achneer electric bike can vary depending on the battery capacity and the power output of the charging station.
-
It is recommended to refer to the user manual or manufacturer’s guidelines to determine the approximate charging time required.
By following these guidelines, you can efficiently plug your charger into a power outlet and begin the charging process. However, it is essential to ensure a stable power source to prevent any interruptions or potential damage to your bike’s battery.
Therefore, in the next section, we will discuss how to ensure a stable power source for your Achneer electric bike.
Ensure a Stable Power Source
To ensure a stable power source for optimal charging, it’s important to select a power outlet that is compatible with the provided charger and conveniently located near your charging area. This will help ensure power stability and prevent power fluctuations that could potentially damage your Achneer electric bike’s battery.
When selecting a power outlet, make sure it meets the voltage and amperage requirements specified by the charger. Using an outlet with a voltage that is too high or too low can result in inefficient charging or even damage to the battery.
Additionally, it is crucial to choose an outlet that is conveniently located near your charging area to avoid any unnecessary strain on the charger’s cable or potential trip hazards.
By following these guidelines, you can ensure a stable power source and prevent power fluctuations during the charging process.
Now, let’s move on to the next step and check the battery level of your Achneer electric bike.
Check the Battery Level
After ensuring a stable power source for my Achneer electric bike, the next step is to check the battery level. This is a crucial step in maintaining the longevity and performance of my bike’s battery.
To check the battery level, I simply need to turn on the bike’s display panel, which provides me with real-time information about the battery’s health and charge level.
Checking the battery health allows me to assess if any maintenance or replacement is required. It is important to regularly monitor the battery’s health to ensure optimal performance and avoid any unexpected issues while on the road. If I notice any abnormalities or a significant decrease in battery health, I should contact a professional technician for assistance.
Once I have checked the battery health, I can proceed to optimize the charging speed. This can be achieved by using a charger that is specifically designed for my bike’s battery. These chargers are equipped with advanced technology that delivers the optimal amount of power and ensures a safe and efficient charging process.
By optimizing the charging speed, I can reduce the charging time and avoid overcharging, which can negatively impact the battery’s lifespan. It is important to follow the manufacturer’s recommendations regarding charging speed and duration to maintain the battery’s health and maximize its longevity.
To allow sufficient charging time and ensure a complete charge, I need to understand the approximate charging time required for my bike’s battery.
Allow Sufficient Charging Time
Ensuring sufficient charging time is crucial for maximizing the longevity and performance of my Achneer electric bike’s battery. To achieve optimal charging efficiency, I follow these steps:
- Plug in the charger securely to the bike’s charging port.
- Set the charger to the recommended voltage and current values specified by the manufacturer.
- Allow the battery to charge for the recommended duration, taking into consideration factors such as the current battery level and the desired level of charge.
By following these steps, I can ensure that my Achneer electric bike’s battery receives sufficient charging time, leading to improved longevity and performance.
It is important to note that charging the battery for too short a duration can result in incomplete charging, while charging it for too long can lead to overcharging, both of which can negatively impact the battery’s health.
As I monitor the charging progress, I can observe the charging status through the LED indicators on the charger or the bike’s display panel. This allows me to keep track of the charging process without interrupting it.
Monitor the Charging Progress
In order to ensure that your Achneer electric bike charges efficiently, it is crucial to monitor the charging progress. By doing so, you can optimize the charging speed and ensure that your battery is charged to its maximum capacity without overcharging it.
There are several monitoring techniques that can be employed to achieve this. Firstly, it is recommended to use a charger with a built-in indicator that displays the charging status. This will allow you to keep track of the progress and know when the battery is fully charged. Additionally, some electric bikes come with a smartphone app that provides real-time information about the charging process, including the remaining charging time and the battery level.
Another important aspect of monitoring the charging progress is to ensure that the charging voltage and current are within the recommended range. Exceeding these limits can lead to battery damage and reduced lifespan. It is advisable to consult the manufacturer’s guidelines or seek professional advice to determine the optimal charging parameters for your specific model.
By closely monitoring the charging progress and optimizing the charging speed, you can ensure that your Achneer electric bike’s battery is charged efficiently and effectively. This will help extend its lifespan and provide you with optimal performance on your rides.
To avoid overcharging the battery, it is essential to implement proper charging practices.
Avoid Overcharging the Battery
To prevent overcharging, it’s important to monitor the battery’s charging progress closely. Overcharging can lead to battery damage and reduce its lifespan, ultimately affecting the performance and reliability of your Achneer electric bike. To help you avoid such issues and maximize your battery’s lifespan, here are some key points to keep in mind:
| Avoid Overcharging | Maximizing Battery Lifespan |
|---|---|
| Monitor the charging progress frequently | Use the charger provided by the manufacturer |
| Disconnect the charger once the battery is fully charged | Avoid leaving the battery on charge for extended periods |
| Follow the recommended charging time and voltage specifications | Store the battery in a cool and dry place |
| Avoid charging the battery in extreme temperatures | Regularly check and maintain the battery’s overall health |
Disconnect the Charger
After ensuring that the battery is not left to overcharge, the next step in properly charging an Achneer electric bike is to disconnect the charger. This may seem like a simple task, but it is crucial to follow the correct procedure to avoid any potential damage or safety hazards.
Firstly, it is important to check the compatibility of the charger with your Achneer electric bike. Different models may require different chargers, so ensure that you are using the appropriate one to prevent any potential issues.
Once you have confirmed the compatibility, it is time to disconnect the charger. Start by unplugging the charger from the power source, making sure to grip the plug firmly and pull straight out. Avoid any sudden jerks or tugs that could damage the charger or the charging port.
Next, carefully remove the charging cable from the charging port on your Achneer electric bike. Again, ensure that you do this gently to prevent any damage to the charging port or the cable itself.
Now that you have successfully disconnected the charger, it is important to store it properly. Keep the charger in a cool and dry place, away from any moisture or extreme temperatures. This will help maintain its longevity and ensure its optimal performance.
With the charger safely disconnected and stored, we can now move on to the next step: replacing the charging port cover.
Replace the Charging Port Cover
Once the charger is disconnected, it’s time to replace the charging port cover. This is an important step in troubleshooting charging issues and ensuring the proper functioning of your Achneer electric bike.
The charging port cover serves as a protective barrier, preventing dust, moisture, and other external elements from entering the charging port.
To replace the charging port cover, start by identifying the exact location of the cover on your bike. It is usually located on the frame or the handlebars, depending on the model.
Carefully remove the old cover by gently pulling it off. Then, take the new charging port cover and align it with the port. Press firmly to ensure a secure fit.
It is crucial to make sure that the cover is properly sealed to maintain the integrity of the charging port.
Once you have replaced the cover, store the charger in a safe place to prevent damage or loss.
Store the Charger in a Safe Place
Make sure to securely store your charger in a safe place to avoid any damage or misplacement. Proper charger storage is crucial for maintaining the longevity and functionality of your achneer electric bike. Not only does it protect the charger from physical harm, but it also ensures that you can easily locate it when needed.
To help you organize your charging area effectively, here’s a table outlining three key considerations for storing your charger:
| Consideration | Description |
|---|---|
| Location | Find a dry, cool area away from direct sunlight and moisture. |
| Protection | Use a dedicated storage container or pouch to shield the charger from potential impacts or scratches. |
| Accessibility | Keep the charger in a place that is easily accessible and visible, so you can quickly grab it when it’s time to charge your electric bike. |
Maintaining a clean charging area is equally important. Dust, debris, and moisture can interfere with the charging process and potentially damage your charger. Regularly clean the area around the charging port to ensure a proper connection and prevent any unwanted issues.
Enjoy Your Fully Charged Achneer Electric Bike
Now that your Achneer electric bike is fully charged, you can start enjoying your next adventure without any issues. But before you hit the road, it is important to remember a few safety precautions to ensure a smooth and safe ride.
Here are some benefits of electric bikes and tips to keep in mind:
- Increased speed and range: Electric bikes allow you to travel faster and cover longer distances, making it easier to explore new places.
- Eco-friendly transportation: By using an electric bike, you are reducing your carbon footprint and contributing to a greener environment.
- Health and fitness: Riding an electric bike provides an excellent form of exercise, helping you stay active and improve your cardiovascular health.
To make the most of your electric bike experience, always wear a helmet and follow traffic rules. Additionally, be sure to check the condition of your brakes, tires, and lights regularly. By taking these safety precautions, you can fully enjoy the benefits that an electric bike has to offer.
Now, let’s move on to the next section and discuss how to repeat the charging process as needed.
Repeat the Charging Process as Needed
To keep your electric bike ready for your next adventure, simply plug it in whenever the battery is running low and it will be fully charged in no time.
As an owner of an Achneer electric bike, I understand the importance of repeat charging to ensure optimal performance and longevity of the battery.
When it comes to charging precautions, it is crucial to follow a few guidelines.
Firstly, always use the charger provided by the manufacturer, as using third-party chargers can damage the battery or even pose a safety risk.
Secondly, avoid overcharging the battery by unplugging it once it reaches full charge. This will prevent unnecessary strain on the battery and prolong its overall lifespan.
Additionally, it is advisable to charge the battery in a cool, dry location to prevent overheating.
Lastly, it is essential to regularly inspect the charging cable for any signs of damage or wear and tear.
Frequently Asked Questions
How long does it take to fully charge an Achneer electric bike?
The charging time for an Achneer electric bike can vary depending on various factors such as the battery capacity, charging method, and the current charge level. However, with optimal charging methods, it generally takes around X hours to fully charge the bike’s battery.
To ensure efficient charging, it is recommended to use the provided charger and plug it into a standard power outlet. Regularly monitoring the battery level and avoiding overcharging can help prolong its lifespan.
Can I charge my Achneer electric bike using a power bank?
Sure, you can charge your Achneer electric bike using a power bank. This is a convenient alternative charging method when you don’t have access to a traditional power outlet.
Power bank compatibility allows you to charge your bike’s battery on the go, making it ideal for longer rides or outdoor adventures. However, make sure to use a power bank with sufficient capacity and output to ensure efficient charging.
Is it necessary to remove the charging port cover before connecting the charger?
Should I unplug the charger once the bike is fully charged?
Yes, it’s advisable to unplug the charger once the bike is fully charged. This helps prevent overcharging and potential damage to the battery. Leaving it connected for extended periods can degrade the battery life.
Do I need to charge my electric bike every day?
It depends on your usage. Generally, it’s recommended to charge your electric bike after each ride. This ensures that you have enough power for your next trip.
What should I do if the battery level does not increase after a certain amount of time?
If the battery level doesn’t increase after a certain amount of time, troubleshooting steps can help.
First, ensure that the charger is properly connected and the power source is working.
If the issue persists, try a different charger or check for any damage on the charging port.
It’s also important to maintain the battery by avoiding extreme temperatures and regularly charging it.
Following these battery maintenance tips should help resolve the issue.
Can I charge my Achneer electric bike overnight without causing any damage to the battery?
Charging an Achneer electric bike overnight can have some benefits. It offers convenience and ensures a fully charged battery in the morning. However, it is important to consider the impact on the overall battery lifespan.
Continuous overnight charging can lead to overcharging. This can reduce the battery’s longevity over time. To maximize the battery’s lifespan, it is recommended to charge the bike during the day. This way, you can monitor the charging process and disconnect it once it reaches full capacity.
Conclusion
In conclusion, charging my Achneer electric bike is a straightforward process that ensures I can enjoy my rides to the fullest. By following the steps outlined, I can easily connect the charger to the bike’s charging port and plug it into a power outlet.
It is essential to store the charger in a safe place for future use. Did you know that the average charging time for an Achneer electric bike is just 4-6 hours? This quick charging time allows me to get back on the road in no time!