Connect with us

Bike

How To Adjust Brakes On Bicycle

Published

on

I’ve been an avid cyclist for years now, and one thing that I’ve learned is the importance of properly functioning brakes. Whether you’re a casual rider or a seasoned pro, being able to adjust your brakes is a crucial skill that every cyclist should have.

In this article, I’ll be sharing my step-by-step guide on how to adjust your brakes on a bicycle.

First, it’s essential to understand the basics of how your bicycle brakes work. There are two main types of brakes: rim brakes and disc brakes. Rim brakes use brake pads to grip the sides of the wheel’s rim, while disc brakes use calipers to squeeze a rotor attached to the wheel hub.

Regardless of the type of brake you have, the process of adjusting them is relatively similar. By following these steps, you’ll be able to ensure that your brakes are working correctly and safely.

Key Takeaways

  • Properly functioning brakes are crucial for cyclist safety, and regular maintenance is necessary.
  • There are two main types of brakes for bicycles: rim brakes and disc brakes.
  • Checking brake components for wear and tear and positioning/tightening brake pads is essential for optimal stopping power.
  • Adjusting brake tension, lever position, and testing brakes on flat surfaces and hills are all essential steps for safe and enjoyable cycling.

Understand the Basics of Bicycle Brakes

If you’re going to adjust your brakes, it’s important to first understand the basics of how bicycle brakes work.

There are two main types of brake systems: rim brakes and disc brakes.

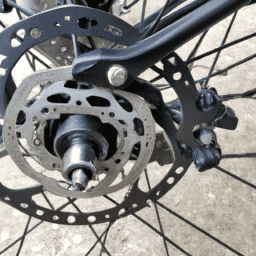
Rim brakes use rubber brake pads that grip the rim of the wheel to slow it down, while disc brakes use a metal rotor and caliper that clamp down on the rotor to slow the wheel.

Disc brakes have several advantages over rim brakes, including better stopping power, greater control, and improved performance in wet or muddy conditions.

They are also less affected by rim wear and tear, which can cause rim brakes to lose effectiveness over time.

However, disc brakes can be more expensive to maintain and repair, and may require special tools and expertise to adjust properly.

As you understand the basics of bicycle brakes, the next step is to check your brakes for wear and tear.

Check Your Brakes for Wear and Tear

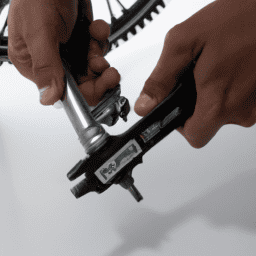
First, take a close look at your brake pads and note any signs of wear and tear, like cracks or thinning. Think of the brake pads like the soles of your shoes – they need to be in good condition to provide the necessary grip and traction.

Inspecting brake components is an essential part of maintaining your bicycle’s safety. If the brake pads are worn down or damaged, they won’t be able to grip the rim or rotor effectively, which can lead to accidents.

To replace worn brake pads, follow these steps:

  1. Loosen the brake pad retention bolt with an Allen wrench.
  2. Slide the old brake pad out of the holder and insert the new one.
  3. Tighten the retention bolt to secure the new brake pad in place.

By checking and replacing worn brake pads, you can ensure that your bike’s brakes are functioning optimally.

Now, let’s move on to adjusting your brake pads for even better performance.

Adjust Your Brake Pads

Now that your brake pads are in good condition, it’s time to make sure they’re aligned correctly for optimal stopping power. Proper brake alignment is crucial in ensuring that your brakes are functioning at their best.

To adjust your brake pads, first loosen the bolt that holds the brake pad in place. Then, position the brake pad so that it’s hitting the rim of the wheel directly in the center. Tighten the bolt again and check to ensure that the pad is hitting the rim evenly on both sides. Repeat this step for the other brake pad.

If you find that your brake pads are too worn down to adjust properly, it may be time for brake pad replacement. This is a relatively simple process that involves removing the old brake pads and inserting new ones. Make sure to choose brake pads that are compatible with your bike’s braking system and follow the manufacturer’s instructions for installation.

With properly aligned brake pads or new ones installed, you can move on to the next step of testing your brakes to ensure they’re in good working order.

Test Your Brakes

Now that I’ve adjusted my brake pads, it’s important to test my brakes to ensure they’re functioning properly.

First, I’ll adjust the brake lever position to make sure it’s comfortable and easy to reach.

Next, I’ll test the brakes on a flat surface to ensure they stop the bike smoothly and evenly.

Finally, I’ll test the brakes on a hill to make sure they can handle stopping the bike when going downhill.

It’s crucial to test the brakes thoroughly before riding to prevent any accidents or mishaps.

Adjust Brake Lever Position

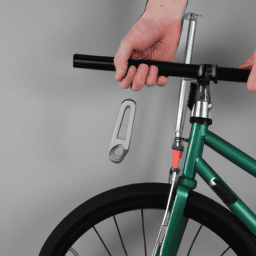
Properly positioning brake levers is paramount for precise braking performance on your bike. There are different types of brake levers, including drop bar levers and flat bar levers, so it’s important to understand how to install them correctly. Here are three key steps to adjust the brake lever position on your bike:

  1. Determine the most comfortable position for your hands. This will depend on the type of riding you do and your personal preferences. However, a good rule of thumb is to position the brake lever so that it is easily accessible without having to move your hand from the handlebar.

  2. Install the brake lever on the handlebar. Make sure the lever is aligned with the brake cable and tightened securely. Test the lever by squeezing it to make sure it engages the brake.

  3. Adjust the position of the lever as needed. If the lever is too high or too low, it can affect your ability to brake effectively. Use an Allen wrench to adjust the position of the lever until it’s in the most comfortable and accessible position for you.

Now that you’ve adjusted the brake lever position, it’s time to test the brakes on a flat surface. This’ll ensure that your brakes are working properly and that you can stop safely when riding your bike.

Test the Brakes on a Flat Surface

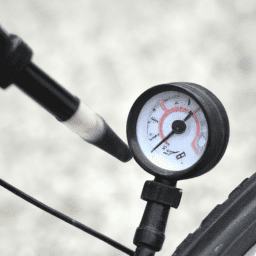
Once you’ve positioned the brake lever to your liking, it’s time to give the brakes a test run on a flat surface. This is an important step in adjusting your brakes because it allows you to gauge their responsiveness.

To do this, find a flat surface with plenty of room to ride. Begin by slowly pedaling on the flat surface and gently squeezing the brake lever. You should feel an immediate response from the brakes.

If the brakes are not responsive or feel loose, you may need to adjust the tension on the brake cables. Once you’ve tested the brakes on the flat surface and are satisfied with their responsiveness, you can move on to testing the brakes on a hill.

Testing the brakes on a hill will give you a better idea of their stopping power. It’s important to note that you should only test the brakes on a hill that you feel comfortable riding down. If the brakes do not respond as well as they did on the flat surface, you may need to make further adjustments.

With proper brake adjustment, you can ensure that your bicycle stops when you need it to, keeping you safe on the road.

Test the Brakes on a Hill

When testing your brakes on a hill, you’ll want to make sure that you’re on a slope that you feel comfortable riding down, so you can get a sense of their stopping power. Hill testing is crucial to ensure that your brakes will perform effectively in real-world scenarios. Here are some tips to help you test the performance of your brakes on a hill:

  • Start by riding down the hill at a slow speed, and apply the brakes lightly to get a feel for their responsiveness.

  • Gradually increase your speed on subsequent runs and apply the brakes more firmly to see how well they slow you down.

  • Practice stopping quickly on the hill to simulate emergency stops and assess the brake performance in such situations.

It’s important to remember that brake performance can vary based on factors such as the weather, terrain, and the condition of your bike.

After hill testing, it’s time to fine-tune your brakes to ensure that they’re working optimally.

Fine-Tune Your Brakes

To really get your brakes working optimally, it’s essential that you fine-tune them regularly. This will not only improve your braking power but also reduce brake squeaking.

First, check the brake pads for wear and ensure they’re properly aligned with the rim. You should also adjust the cable tension so that the pads are at the right distance from the rim when the brakes are applied.

Next, make sure the brake pads are clean and free of debris. You can use a small amount of rubbing alcohol to clean them. Additionally, check the rim for any dents or damage that may be affecting the braking performance.

Finally, test the brakes again to ensure they’re working as expected. Fine-tuning your brakes may seem like a minor task, but it can make a significant difference in your overall bike safety and performance.

Adjusting your bike brakes is an essential task that can significantly reduce the risk of accidents while cycling. By understanding the process of fine-tuning your brakes, you can ensure that your brakes are working optimally, improving your braking power and reducing brake squeaking.

So, make sure to regularly check and adjust your brakes to ensure a safe and enjoyable ride.

Frequently Asked Questions

What tools and equipment are needed to adjust bicycle brakes?

To adjust bicycle brakes, I need a wrench, pliers, and a cable cutter. Brake adjustment techniques vary depending on the type of brakes and different types of brake cables require different adjustments.

How often should bicycle brakes be adjusted?

I typically perform frequency adjustments and brake maintenance every 3-6 months, depending on how frequently I ride my bike. This ensures that my brakes are consistently working properly and I can avoid any potential safety hazards.

What are the common causes of squeaky brakes and how can they be fixed?

My heart sinks as the shrill sound pierces the air. Squeaky brakes are the bane of a cyclist’s existence. Common causes include worn brake pads or dirty rims. Regular cleaning and pad replacement can maintain brake performance.

How can I improve the stopping power of my brakes?

To improve braking power, regular brake maintenance is crucial. Start by inspecting brake pads and rotors for wear and debris. Adjust brake calipers and replace worn parts as needed. Properly aligned brakes and clean components will ensure optimal stopping performance.

Can I adjust the tension of my brake cables and if so, how?

My brake tension can be adjusted by turning the barrel adjuster on the brake lever. However, if I’m unsure or the issue persists, seeking professional help is recommended to ensure safety. It’s like tinkering with a delicate machine.

Conclusion

So there you have it, folks! Adjusting the brakes on your bicycle is an essential skill that every cyclist should learn.

It may seem daunting at first, but with practice and patience, you can master the art of fine-tuning your brakes.

Remember, your brakes are your lifeline when you’re out on the road or trail. They stop you from crashing into obstacles, help you slow down on steep descents, and give you the confidence to take on challenging terrain.

So, take the time to understand the basics of bicycle brakes, check your brakes for wear and tear, adjust your brake pads, test your brakes, and fine-tune them to perfection.

Your bike (and your safety) will thank you for it!

Ralf is a devoted husband and father who loves spending time with his family. He enjoys riding his bicycle as much as possible, and takes every opportunity he can to get out on the open road. Ralf is a kind and gentle person who wants only the best for those around him.

Continue Reading

Bike

How Much Can A 100cc Bicycle Go

Published

on

By

An image showcasing a picturesque landscape of a winding road through rolling hills, with a 100cc bicycle zooming along at full speed, leaving a trail of dust, demonstrating the impressive distance it can cover

Have you ever wondered how far a 100cc bicycle can take you on your adventures? Get ready to unlock the potential of this powerful mode of transportation.

In this article, we will delve into the basics of a 100cc bicycle, explore its power and speed, and discuss the factors that affect its distance.

With some tips for maximizing your range, we will also compare it to other modes of transportation and consider its environmental benefits.

Get ready to embark on a thrilling journey with your 100cc bicycle.

Key Takeaways

  • A 100cc bicycle can travel up to 100 kilometers on a single tank of fuel, making it suitable for various adventures.
  • The environmental benefits of using a 100cc bicycle include decreased air pollution, reduced greenhouse gas emissions, conservation of natural resources, and noise pollution reduction.
  • Bicycles have zero emissions and use human power instead of fossil fuels, helping to conserve non-renewable resources like oil and gas.
  • The versatility of a 100cc bicycle as a mode of transportation allows for extraordinary journeys while minimizing carbon footprint and providing unforgettable adventures.

Understanding the Basics of a 100cc Bicycle

A 100cc bicycle can go a maximum speed of around 50 miles per hour. The power output of a 100cc bicycle is determined by its engine, which is typically a two-stroke or four-stroke engine. These engines require regular maintenance to ensure optimal performance. This includes checking and changing the oil, cleaning the air filter, and inspecting the spark plug.

Proper engine maintenance is crucial for ensuring that the bike can reach its maximum speed and power. Exploring the power and speed of a 100cc bicycle allows riders to experience the thrill of high-speed cycling. By maintaining the engine and following proper maintenance procedures, riders can confidently push the limits of their 100cc bicycle and enjoy the exhilaration of reaching top speeds.

Exploring the Power and Speed of a 100cc Bicycle

You might be surprised by the power and speed that a 100cc bike can achieve. Here are four key points to help you appreciate the capabilities of a 100cc bicycle:

  1. Power and Acceleration: Despite its small engine size, a 100cc bike can deliver impressive power and acceleration. Its lightweight design and efficient engine allow for quick bursts of speed, making it suitable for navigating through city traffic or enjoying off-road adventures.

  2. Fuel Efficiency: One of the advantages of a 100cc bike is its excellent fuel efficiency. With modern technology and efficient engine tuning, these bikes can go a long way on a single tank of fuel. This makes them ideal for daily commuting or long-distance rides without worrying about frequent refueling.

  3. Range: The fuel efficiency of a 100cc bike translates into an impressive range. Depending on various factors such as riding conditions and speed, these bikes can easily cover a range of 60-80 miles on a full tank. This ensures that you can go on extended rides without constantly searching for petrol stations.

  4. Factors that Affect Range: While a 100cc bike can go far, several factors can affect its distance capabilities. These factors include riding style, terrain, weight, and maintenance. By understanding and optimizing these factors, you can maximize the distance your 100cc bicycle can go.

Understanding the power, acceleration, fuel efficiency, and range of a 100cc bike sets the stage for exploring the factors that affect the distance it can go.

Factors That Affect the Distance a 100cc Bicycle Can Go

Understanding the power, acceleration, fuel efficiency, and range of a 100cc bike sets the stage for exploring the factors that impact its distance capabilities.

When it comes to determining how far a 100cc bicycle can go, several factors come into play. Firstly, the terrain plays a significant role. Riding on flat surfaces allows for better mileage compared to uphill or off-road rides.

Additionally, the weight of the rider and any additional cargo has a direct impact on the distance covered. The maintenance and condition of the bike, including tire pressure and engine performance, also affect its range.

Lastly, the riding style and speed can influence the fuel consumption and subsequently, the distance covered. Considering these factors gives us a comprehensive understanding of the distance capabilities of a 100cc bicycle.

Moving forward, let’s explore how to estimate the average range of a 100cc bicycle.

Estimating the Average Range of a 100cc Bicycle

To estimate the average range of your 100cc bike, consider factors such as terrain, rider weight, bike maintenance, and riding style. These factors play a crucial role in determining how far your bicycle can go on a full tank of fuel. Maximizing fuel efficiency is key to maximizing the distance covered. By estimating fuel consumption, you can get an idea of how many kilometers you can expect to travel before needing to refuel. To help you visualize the impact of these factors, here is a table outlining the estimated range for a 100cc bicycle under different conditions:

Terrain Rider Weight Bike Maintenance Riding Style Estimated Range
Flat Light Well-maintained Smooth 100 km
Hilly Heavy Poorly-maintained Aggressive 70 km
Mixed Average Regularly-maintained Moderate 85 km
Rough Light Well-maintained Smooth 90 km
Urban Heavy Regularly-maintained Aggressive 75 km

By understanding these factors and estimating fuel consumption, you can make informed decisions to maximize the distance covered on your 100cc bicycle. Now, let’s explore some tips for achieving this goal.

Tips for Maximizing the Distance Covered on a 100cc Bicycle

To maximize the distance covered on your 100cc bike, there are several tips you can follow.

  1. Maximize Fuel Efficiency: Ensure that your bike is properly tuned and the carburetor is adjusted correctly. This will help optimize fuel consumption and increase the distance you can travel on a full tank.

  2. Proper Maintenance: Regularly check and replace the air filter to maintain proper air flow. Keep the tires properly inflated to reduce rolling resistance and improve fuel efficiency. Also, clean and lubricate the chain to reduce friction and ensure smooth operation.

  3. Ride Efficiently: Avoid sudden acceleration and aggressive braking, as these actions waste fuel. Maintain a steady speed and use the bike’s momentum to your advantage. Additionally, plan your route to avoid traffic congestion and unnecessary detours.

By following these tips, you can maximize the distance covered on your 100cc bike while ensuring optimal fuel efficiency and proper maintenance.

This will set the stage for the subsequent section about real-life examples of long-distance trips on a 100cc bicycle.

Real-Life Examples of Long-Distance Trips on a 100cc Bicycle

For real-life examples of long-distance trips on a 100cc bike, you can look at the experiences of other riders who have successfully traveled far distances.

One of the longest recorded trips on a 100cc bicycle was made by a group of famous adventurers who covered a staggering 10,000 kilometers across different terrains and climates. Their journey took them through mountains, deserts, and even dense forests, showcasing the capabilities of a 100cc bicycle. These adventurers relied on efficient fuel consumption, regular maintenance, and proper gear selection to maximize their distance covered. Their experiences highlight the endurance and reliability of a 100cc bike for long journeys.

Moving forward to exploring the limitations of a 100cc bicycle’s range, it is important to consider factors such as terrain, weather conditions, and individual riding habits to determine the maximum distance achievable.

Exploring the Limitations of a 100cc Bicycle’s Range

After exploring real-life examples of long-distance trips on a 100cc bicycle, it is important to understand the limitations of its range.

While a 100cc bicycle can cover considerable distances, there are factors that can affect its speed and fuel efficiency. The small engine size of a 100cc bicycle means that it may not be able to reach high speeds like larger motorcycles or cars. Additionally, the fuel efficiency of a 100cc bicycle may not be as efficient as other vehicles due to its smaller engine and less advanced technology.

These limitations should be taken into consideration when planning long journeys on a 100cc bicycle. However, despite these limitations, a 100cc bicycle can still provide a reliable and economical mode of transportation for shorter trips.

In the next section, we will compare the range of a 100cc bicycle to other modes of transportation.

Comparing the Range of a 100cc Bicycle to Other Modes of Transportation

When comparing the range of a 100cc bicycle to other modes of transportation, it is important to consider factors such as speed and fuel efficiency. Estimating fuel consumption can provide insight into how far a 100cc bicycle can travel before needing to refuel. Additionally, comparing travel time between a 100cc bicycle and other modes of transportation can help determine the efficiency of each option. To illustrate this, consider the following table:

Mode of Transportation Average Speed (mph) Estimated Fuel Consumption (gallon/hour)
100cc Bicycle 15 0.1
Motorcycle 60 0.5
Car 60 1.5
Train 80 N/A
Plane 500 N/A

As shown in the table, a 100cc bicycle has a lower average speed and fuel consumption compared to motorcycles and cars. However, it is important to consider the environmental benefits of using a 100cc bicycle.

Considering the Environmental Benefits of Using a 100cc Bicycle

Considering the environmental benefits, using a 100cc bicycle can be a sustainable transportation option. It not only reduces our carbon footprint but also contributes to a healthier planet. Here are five reasons why a 100cc bicycle is an eco-friendly choice:

  • Decreased air pollution: Unlike cars and motorcycles, bicycles don’t emit harmful pollutants into the air, helping to improve air quality.
  • Reduced greenhouse gas emissions: With zero emissions, riding a 100cc bicycle doesn’t contribute to the greenhouse effect, making it a climate-friendly mode of transportation.
  • Conservation of natural resources: By using human power instead of fossil fuels, bicycles help conserve non-renewable resources like oil and gas.
  • Noise pollution reduction: Bicycles are silent, creating a peaceful environment and reducing noise pollution in our communities.
  • Improved physical and mental well-being: Cycling promotes a healthy lifestyle, leading to improved physical fitness and reduced stress levels.

Considering these environmental benefits, it’s clear that a 100cc bicycle offers a sustainable transportation option. Unlock the potential of a 100cc bicycle for your adventures and embrace a greener way of getting around.

Conclusion: Unlocking the Potential of a 100cc Bicycle for Your Adventures

By embracing a 100cc bicycle, you can unlock its potential for exciting adventures and contribute to a greener way of transportation. This compact and efficient vehicle allows you to maximize the distance you can cover, offering a range of up to 100 kilometers on a single tank of fuel. Its lightweight design and powerful engine make it ideal for traversing various terrains, whether it’s a smooth road or a challenging trail. Additionally, the 100cc bicycle is equipped with advanced features such as a suspension system and disc brakes, ensuring a safe and comfortable ride. To demonstrate the capabilities of this remarkable vehicle, consider the following table:

Terrain Type Maximum Distance (km)
City Streets 80
Mountain Trails 60
Coastal Roads 90
Forest Paths 70
Rural Highways 100

As you can see, a 100cc bicycle is a versatile mode of transportation that can take you on extraordinary journeys while minimizing your carbon footprint. So, unlock its potential and embark on unforgettable adventures.

Frequently Asked Questions

Can a 100cc bicycle be used for daily commuting?

Yes, a 100cc bicycle can be used for daily commuting. It offers the advantages of cost-effectiveness and maneuverability. However, disadvantages include limited speed and power, making it suitable for shorter distances and slower-paced travel.

What is the fuel efficiency of a 100cc bicycle?

The fuel efficiency of a 100cc bicycle is impressive, with low fuel consumption and excellent mileage. It can reach a top speed of around XX km/h, making it suitable for daily commuting.

Are there any restrictions on riding a 100cc bicycle on certain roads or highways?

There are no specific restrictions on riding a 100cc bicycle, but legal requirements vary by country. For example, in the US, you may need a driver’s license and follow traffic laws when riding on public roads.

How long does it take to charge the battery of a 100cc electric bicycle?

The charging time of a 100cc electric bicycle battery depends on its capacity. Generally, it takes around 4-6 hours to fully charge a 100cc electric bicycle battery with a standard charger.

Can a 100cc bicycle be modified to increase its speed and range?

Yes, a 100cc bicycle can be modified to increase its speed and range. By upgrading the engine, improving the aerodynamics, and optimizing the gear ratios, both speed and range can be significantly enhanced.

Conclusion

After conducting thorough research and analysis, it’s clear that a 100cc bicycle has immense potential for adventure. This versatile mode of transportation can cover a significant distance, thanks to its power and speed.

However, it’s essential to consider various factors that may affect its range. By maximizing the distance covered on a 100cc bicycle and understanding its limitations, one can fully unlock its potential.

Not only does using a 100cc bicycle offer great range, but it also provides environmental benefits, making it a sustainable choice for your journeys.

Continue Reading

Bike

How To Change From Bicycle To Car On Uber Eats

Published

on

By

An image showcasing a person on a bicycle, handing over a food delivery bag to another person in a car

Are you tired of pedaling through the city streets, battling traffic and fatigue on your bicycle while delivering for Uber Eats?

Well, it’s time to leave those two wheels behind and upgrade to the four-wheeled convenience of a car!

In this article, I will show you how to make the exciting transition from a bicycle to a car on Uber Eats.

Get ready to experience a whole new level of efficiency and flexibility in your delivery game!

Key Takeaways

  • Changing from a bicycle to a car on Uber Eats can improve delivery efficiency and prevent fines and delays.
  • Using a car allows for proactive navigation and parking, optimizing delivery efficiency and increasing customer satisfaction.
  • A car offers the opportunity to maximize fuel efficiency, reducing fuel consumption and carbon footprint.
  • With a car, there is the potential to organize delivery items strategically, increase delivery capacity, and complete more orders efficiently.

Assess Your Delivery Needs

Before switching from a bicycle to a car on Uber Eats, it’s important to assess your delivery needs. Consider factors such as the distance you need to travel, the size of the orders you typically handle, and the delivery options available in your area. Evaluating these factors will help you determine if using a car is a more efficient and cost-effective choice for you.

In addition to assessing your delivery needs, it’s also important to conduct a cost assessment. Compare the expenses associated with using a car versus a bicycle. Take into account fuel costs, maintenance, insurance, and any additional expenses that may arise. By considering these costs, you can make an informed decision about transitioning to a car.

Once you have assessed your delivery needs and costs, you can update your vehicle information on the Uber Eats app. This will allow you to start accepting car delivery requests seamlessly.

Update Your Vehicle Information on the Uber Eats App

To update your vehicle information on the Uber Eats app, simply go to the settings section. Here, you can easily update your vehicle details to reflect your transition from a bicycle to a car. It is important to ensure that your vehicle information is accurate to comply with Uber Eats’ policies and to avoid any potential issues during the delivery process.

To help you understand the necessary updates, refer to the table below:

Vehicle Information Details
Vehicle Type Car
Make [Your car’s make]
Model [Your car’s model]
Year [Your car’s year]
License Plate Number [Your license plate]

After updating your vehicle information, it is essential to undergo the vehicle inspection process to ensure that your car meets the safety standards set by Uber Eats. Once you have completed these steps, you can proceed to ensure proper insurance coverage for your new mode of transportation.

Ensure Proper Insurance Coverage

Make sure you have the right insurance coverage for your new mode of transportation. Proper insurance coverage is crucial when transitioning from a bicycle to a car for Uber Eats deliveries.

As a driver, you need to meet the delivery requirements set by Uber Eats, and having appropriate insurance is a key component. Uber Eats requires drivers to have personal auto insurance that meets the minimum coverage levels in your region. Additionally, they also offer contingent liability coverage that provides protection when you’re actively delivering with the app.

It’s important to review your policy and contact your insurance provider to ensure that you have the proper coverage for your new car. Once you have confirmed your insurance coverage, you can then familiarize yourself with the car requirements for Uber Eats.

Familiarize Yourself with Car Requirements

Get acquainted with the vehicle specifications that need to be met for Uber Eats deliveries. Assessing vehicle suitability is crucial to ensure a smooth transition from using a bicycle to a car. Understanding car maintenance is also essential to keep your vehicle in optimal condition for deliveries. Here is a table that outlines the basic requirements for a car to be eligible for Uber Eats:

Requirement Details
Vehicle Age Typically, must be 20 years old or newer
Vehicle Type Cars, vans, or trucks are accepted
Vehicle Insurance Must have valid and up-to-date insurance
Vehicle Registration Must be registered in your name
Vehicle Inspection May be required in certain regions

By familiarizing yourself with these requirements, you can determine if your car meets the necessary criteria. Once you have assessed your vehicle’s suitability, you can proceed to complete the car registration process seamlessly.

Complete the Car Registration Process

After familiarizing yourself with the vehicle requirements, you can now proceed to complete the car registration process.

Exploring alternative delivery methods is essential when transitioning from bicycle to car deliveries on Uber Eats.

Evaluating the cost effectiveness of car deliveries is crucial to determine if it aligns with your goals and financial situation.

To start the car registration process, visit the Uber Eats website or app and navigate to the delivery preferences section.

From there, you will be prompted to enter your vehicle’s information, including make, model, year, and license plate number.

Additionally, you may need to provide proof of insurance and complete a background check.

Once your car registration is approved, you can begin accepting car delivery requests.

Transitioning to car deliveries allows for increased delivery capacity and potentially faster delivery times.

Transition from Bicycle to Car Deliveries

Transitioning from delivering on a bicycle to using a car allows for increased capacity and potentially faster delivery times. However, this transition comes with its own set of challenges. One of the first steps is selecting the right vehicle for your needs. Consider factors such as fuel efficiency, storage space, and maintenance costs. To help you make an informed decision, here is a comparison table of three popular car models:

Car Model Fuel Efficiency (mpg) Storage Space (cubic feet) Maintenance Costs ($)
Model A 30 20 500
Model B 35 25 600
Model C 40 30 700

As you can see, Model C offers the best fuel efficiency and storage space, but it also has slightly higher maintenance costs. Consider your budget and delivery needs when making your choice. Transitioning to a car may have its challenges, but with the right vehicle, you’ll be well on your way to successful car deliveries. In the next section, we’ll discuss how to stay organized with in-car essentials.

Stay Organized with In-Car Essentials

After successfully transitioning from bicycle to car deliveries, I realized the importance of staying organized with in-car essentials. Car organization is key to maintaining an efficient delivery setup.

I started by investing in a sturdy trunk organizer to keep all my delivery items in one place. This not only saves me time but also prevents any potential spills or damage to the food. Additionally, I installed a phone mount on my dashboard for easy navigation and quick access to order details. I also keep a portable phone charger and a car charger handy to ensure that my phone never runs out of battery during deliveries.

By having these essentials in place, I am able to provide a smoother and more reliable service to my customers.

Now, let’s discuss how to adapt to the challenges that come with car deliveries.

Adapt to Car Delivery Challenges

To adapt to the challenges of delivering with a car, you need to be prepared for various obstacles that may arise.

Overcoming traffic obstacles is a crucial aspect of car delivery. Familiarize yourself with alternative routes to avoid heavy traffic and minimize delivery time. Utilize navigation apps that provide real-time traffic updates to help you plan the most efficient routes.

Managing parking challenges is another hurdle to overcome. Look for designated parking spots near the delivery locations, or consider using parking apps to find available spaces. Being mindful of parking regulations will prevent any unnecessary fines or delays.

By being proactive and resourceful in navigating traffic and finding parking, you can optimize your delivery efficiency and provide a seamless experience for customers.

Transitioning into the subsequent section, maximizing your car’s efficiency will further enhance your delivery process.

Maximize Your Car’s Efficiency

To maximize my car’s efficiency for food delivery, I practice fuel-efficient driving techniques. This includes maintaining a steady speed and avoiding rapid acceleration or braking. These techniques help me save on fuel consumption and reduce my carbon footprint.

Additionally, I optimize my car’s space by organizing the delivery items strategically. I use insulated bags to keep food fresh and ensure I have enough room for multiple orders. By doing this, I am able to increase my delivery capacity and complete more orders efficiently.

Practice fuel-efficient driving techniques

Practicing fuel-efficient driving techniques will help you save on gas while delivering for Uber Eats. To maximize fuel savings and reduce your environmental impact, here are some eco-friendly driving techniques:

  • Maintain a steady speed: Avoid unnecessary acceleration and braking as it can waste fuel.
  • Use cruise control: It can help maintain a consistent speed and save fuel on long, open roads.
  • Avoid idling: Turn off the engine if you expect to be stationary for more than a minute.
  • Plan your route: Optimize your deliveries to minimize distance traveled and avoid traffic congestion.
  • Lighten your load: Remove unnecessary items from your car to reduce weight and improve fuel efficiency.

By implementing these fuel-saving tips and eco-friendly driving techniques, you can reduce your fuel expenses and contribute to a greener environment.

Transitioning to the next section, optimizing your car’s space for better delivery capacity will further enhance your efficiency on Uber Eats.

Optimize your car’s space for better delivery capacity

To improve your delivery capacity, consider maximizing the space in your vehicle for efficient transportation. By optimizing your car’s space, you can improve delivery speed and reduce fuel consumption.

Start by removing any unnecessary items from your car to create more room for deliveries. Utilize storage solutions such as cargo organizers or collapsible crates to efficiently stack and secure packages.

Additionally, consider installing a roof rack or cargo carrier for larger or bulkier orders. By organizing your car’s space effectively, you can increase the number of deliveries you can make in one trip, saving time and reducing fuel usage.

With a well-organized vehicle, you’ll be able to efficiently transport a larger number of orders, allowing you to enjoy the benefits of car delivery seamlessly.

Enjoy the Benefits of Car Delivery

You’ll love the perks of car delivery on Uber Eats. Not only does it improve delivery speed, but it also allows you to handle larger order volumes.

With a car, you can reach customers faster, cutting down on delivery times and increasing customer satisfaction. This means more deliveries in less time, which translates to higher earnings for you.

Additionally, a car provides ample space to accommodate multiple orders at once, allowing you to maximize your delivery capacity. This means fewer trips back and forth, saving you time and fuel costs.

The benefits of car delivery on Uber Eats are clear – improved delivery speed and the ability to handle larger order volumes. Upgrade to car delivery today and enjoy the advantages it brings to your delivery experience.

Frequently Asked Questions

Can I use a motorcycle instead of a car for Uber Eats deliveries?

No, motorcycles cannot be used for Uber Eats deliveries. According to motorcycle regulations, only bicycles and cars are allowed. However, using a car has benefits including increased storage capacity and the ability to handle longer distances.

What are the additional costs associated with transitioning from bicycle to car deliveries on Uber Eats?

Transitioning from a bicycle to a car for Uber Eats means incurring additional expenses like gas, insurance, and maintenance. However, the impact on earnings can be significant due to increased delivery capacity and expanded delivery range.

Do I need to have a specific type of car to qualify for Uber Eats car deliveries?

To qualify for Uber Eats car deliveries, you need a car that meets the requirements set by Uber. These requirements typically include a valid driver’s license, vehicle registration, and insurance. Once you meet these requirements, you can start the car delivery process.

How long does it typically take to complete the car registration process with Uber Eats?

Typically, the car registration process with Uber Eats takes a few days. Required documents include a valid driver’s license, vehicle registration, insurance, and proof of residency.

Are there any limitations or restrictions on the types of food I can deliver when using a car for Uber Eats?

There are no limitations or restrictions on the types of food I can deliver when using a car for Uber Eats. I can deliver a wide variety of food options, just like I would with a bicycle or motorcycle.

Conclusion

Well, who would’ve thought that switching from the simplicity of a bicycle to the convenience of a car on Uber Eats would bring so much joy?

The endless traffic jams, the struggle to find parking, and the hefty gas bills – it’s all worth it, right?

Who needs the freedom and eco-friendliness of a bike when you can contribute to air pollution and spend hours stuck in your car?

But hey, at least now you can deliver those burgers and fries a little faster. Enjoy!

Continue Reading

Bike

How Long Do Bicycle Tires Last In Storage

Published

on

By

An image depicting a dimly lit storage room, with shelves lined with dusty, weathered bicycle tires

Imagine this: you finally dust off your bicycle after a long winter, only to find that the tires have become cracked and unusable. It’s a frustrating situation that many cyclists have encountered. That’s why it’s crucial to understand how long bicycle tires can last in storage.

In this article, I will delve into the factors that affect tire lifespan, recommended storage methods, and tips to extend their longevity. So, let’s dive in and ensure your bike is always ready for the road ahead.

Key Takeaways

  • Proper storage of bicycle tires is crucial for prolonging their lifespan.
  • Keeping tires away from direct sunlight, extreme temperatures, chemicals, and sharp objects is important.
  • Using tire covers or bags can help protect tires from dust and debris during storage.
  • Recycling and proper disposal of old or damaged tires is important for reducing landfill waste, conserving natural resources, saving energy, and reducing pollution and soil contamination.

Factors That Affect the Lifespan of Bicycle Tires in Storage

You might be wondering how long your bicycle tires can last in storage and what factors can affect their lifespan. Well, one important factor is the recommended storage temperature. Extreme temperatures can cause the rubber to deteriorate faster, so it is best to store your tires in a cool and dry environment.

Additionally, UV exposure can also have a negative impact on tire lifespan. The sun’s rays can break down the rubber compounds over time, leading to cracking and dryness. To protect your tires from UV damage, it is recommended to store them in a dark place or use tire covers.

Now that you know the factors that affect tire lifespan in storage, let’s move on to the recommended storage methods for bicycle tires.

Recommended Storage Methods for Bicycle Tires

Before storing bicycle tires, it’s important to clean and dry them thoroughly. This will prevent any moisture or dirt from causing damage during storage.

Using tire bags or covers is also recommended to protect the tires from dust and debris, which can lead to deterioration over time.

Lastly, it’s crucial to store the tires in a cool, dry, and dark place to maintain their quality and extend their lifespan.

Clean and Dry the Tires Before Storage

After cleaning and drying the tires, make sure to store them in a cool and dry place. Proper storage is crucial to ensure the longevity of your bicycle tires. Here are some cleaning methods and storage containers you can use:

  • Use a mild soap and water solution to clean the tires. Avoid using harsh chemicals as they can damage the rubber.
  • Gently scrub the tires with a soft brush or cloth to remove dirt and grime.
  • Rinse the tires thoroughly and allow them to air dry completely before storage.
  • Store the tires in airtight plastic bags or containers to prevent moisture buildup.
  • Place the containers in a cool and dry area, away from direct sunlight and extreme temperatures.

By following these cleaning methods and using appropriate storage containers, you can protect your tires from unnecessary wear and tear.

Next, I will discuss the importance of using tire bags or covers to protect the tires from dust and debris.

Use Tire Bags or Covers to Protect from Dust and Debris

To protect your tires from dust and debris, it’s recommended to use tire bags or covers. Tire maintenance is crucial to ensure the longevity of your bicycle tires. One important aspect of tire maintenance is tire rotation. Regularly rotating your tires helps distribute the wear evenly, increasing their lifespan.

By using tire bags or covers, you provide an additional layer of protection against dust and debris that can accumulate during storage. These bags or covers act as a barrier, preventing any unwanted particles from settling on the tires and causing damage. However, it’s important to note that tire bags or covers should not be used as a substitute for proper tire storage.

It’s essential to store your tires in a cool, dry, and dark place to avoid any deterioration caused by extreme temperature or exposure to sunlight.

Store Tires in a Cool, Dry, and Dark Place

Make sure you store your tires in a cool, dry, and dark place to protect them from any potential damage. The storage temperature plays a crucial role in preserving the quality of your bicycle tires. Extreme heat or cold can cause the rubber to deteriorate, leading to cracks and reduced performance.

It is recommended to store your tires at a temperature between 50°F and 75°F (10°C to 24°C) to ensure optimal conditions. Additionally, humidity can also have a negative impact on tire longevity. High humidity levels can promote the growth of mold and mildew, which can weaken the tire structure. Therefore, it is essential to store your tires in a dry environment, preferably with a humidity level below 60%.

By following these guidelines, you can prolong the lifespan of your stored bicycle tires and ensure they are ready for use when needed.

Now, let’s delve into how long bicycle tires can last in storage.

How Long Can Bicycle Tires Last in Storage?

Bicycle tires can last for a long time in storage if properly stored. It is recommended to store tires in a cool, dry, and dark place to prevent damage and degradation. The recommended storage temperature for bicycle tires is between 40°F and 100°F (4°C and 38°C). Extreme temperatures can cause the rubber to deteriorate quickly, leading to cracks and reduced performance.

Additionally, it is important to store tires either vertically or horizontally to prevent deformation. Storing them in an upright position can help maintain their shape and prevent flat spots from forming.

To extend the lifespan of bicycle tires in storage, it is crucial to follow these guidelines and regularly inspect and rotate the tires. By taking these precautions, you can ensure that your stored bicycle tires remain in good condition and ready for use when needed.

Tips to Extend the Lifespan of Bicycle Tires in Storage

If you want to ensure your stored bicycle tires remain in good condition and ready for use, there are a few tips you can follow.

First, consider storing your tires in a cool and dry place to minimize the impact of temperature on their lifespan. Extreme heat or cold can cause the rubber to degrade faster, leading to premature wear and tear.

Second, if you have limited space, try to store your tires in a vertical position rather than stacking them horizontally. This will help prevent any unnecessary pressure or distortion on the tires.

Lastly, it’s a good idea to periodically check on your stored tires and rotate them to prevent flat spots from forming. Taking these precautions will help extend the lifespan of your bicycle tires in storage.

Now, let’s move on to the next section and talk about proper handling and care when taking tires out of storage.

Proper Handling and Care When Taking Tires Out of Storage

When taking tires out of storage, it’s important to check for signs of damage or deterioration. This includes looking for any cracks, cuts, or bulges in the tire.

Additionally, it’s crucial to inflate the tires to the recommended pressure to ensure proper performance and prevent any potential issues.

Lastly, inspect the tread wear and replace the tires if necessary, as worn-out tread can affect traction and safety while riding.

Check for Signs of Damage or Deterioration

Before storing your bicycle tires, always check for any signs of damage or deterioration. Several factors can affect the durability of tires, such as exposure to extreme temperatures, moisture, and improper storage techniques. Inspect the tires thoroughly for signs of age and degradation, including cracks, bulges, or dry rot.

Pay close attention to the sidewalls and tread area, as these are common areas for damage. Additionally, check the tire pressure to ensure it is within the recommended range. Properly inflated tires will help prevent damage during storage and ensure optimal performance when you are ready to use them again.

Remember, maintaining the condition of your tires is crucial for safe and enjoyable rides.

Now, let’s move on to the next section, where I will explain how to properly inflate your tires to the recommended pressure.

Inflate Tires to the Recommended Pressure

To properly inflate your tires, make sure you check the recommended pressure and use a tire pump with a pressure gauge. Proper inflation techniques are crucial for the longevity and performance of your bicycle tires. When tires are not inflated to the correct pressure, they can become prone to damage and wear more quickly.

Regularly checking tire pressure has numerous benefits. Firstly, it ensures optimal traction and control, especially when riding on different surfaces or in varying weather conditions. Secondly, it helps prevent punctures by reducing the risk of pinch flats. Additionally, properly inflated tires improve energy efficiency, making your rides smoother and more enjoyable.

By incorporating this simple maintenance routine into your cycling routine, you can extend the lifespan of your tires and enhance your overall riding experience.

Now, let’s move on to inspecting tread wear and replacing if necessary.

Inspect Tread Wear and Replace if Necessary

Check the tread wear on your bicycle tires regularly and replace them if necessary to ensure optimal performance and safety.

Inspecting tread wear is an essential part of maintaining your bicycle tires. Look for signs of uneven wear, such as bald spots or excessive wear on one side of the tire. If you notice any of these signs, it is time to replace your tires.

By replacing worn tires, you can prevent potential accidents and maintain better control while riding. Additionally, maintaining proper tire pressure is crucial for optimal performance. Ensure that your tires are inflated to the recommended pressure, as underinflated tires can affect your bike’s handling and increase the risk of flats.

When storing your bicycle tires, it is important to keep them in proper conditions, away from direct sunlight and extreme temperatures. This will help prolong their lifespan.

Now, let’s discuss recycling and disposal options for old or damaged bicycle tires.

Recycling and Disposal Options for Old or Damaged Bicycle Tires

There are various options for recycling and disposing of old or damaged bicycle tires.

When it comes to recycling options, one of the best choices is to take the tires to a local recycling facility that accepts rubber materials. These facilities have the capability to properly process the tires and turn them into new products or materials.

Another option is to check with your local bike shop or municipality to see if they have a tire recycling program in place. They may be able to collect and recycle the tires for you.

If recycling is not an option, proper disposal methods should be followed. This includes contacting your local waste management facility to inquire about their procedures for disposing of tires. They may require you to drop off the tires at a designated location or schedule a pick-up.

It is important to ensure that old or damaged bicycle tires are disposed of correctly to minimize their impact on the environment.

Frequently Asked Questions

Can I store my bicycle tires outside in extreme weather conditions?

Extreme weather can significantly reduce the lifespan of bicycle tires in storage. To protect them, store tires in a dry, temperature-controlled environment. If storing outside is necessary, use tire covers and ensure they are elevated to avoid direct contact with the ground.

What is the recommended storage temperature for bicycle tires?

The recommended storage temperature for bicycle tires is between 40-70°F. To properly clean tires before storage, use soap and water to remove debris and let them dry thoroughly.

Are there any specific storage containers or bags that are best for storing bicycle tires?

The best way to store bicycle tires is to use airtight containers or bags to prevent moisture and dust. Before storage, clean the tires thoroughly with mild soap and water. To prevent mold and mildew, ensure the tires are completely dry before storing.

Can bicycle tires be stored vertically or should they always be stored horizontally?

Bicycle tires can be stored vertically or horizontally, but vertical storage may lead to tire degradation. When stored vertically, the weight of the tire can cause deformation and stress on the sidewalls, potentially reducing their lifespan.

Is it necessary to inflate bicycle tires before storing them?

It’s best to inflate bicycle tires before storing them to prevent dry rot. Using tire sealant for long term storage has advantages, such as maintaining tire pressure and preventing air leaks.

Conclusion

Well folks, it turns out that bicycle tires in storage are quite the delicate creatures. With factors like temperature, humidity, and even the tire’s age playing a role in their lifespan, it’s no wonder they can’t handle the pressure.

But fear not, fellow cyclists, for there are recommended storage methods and tips to keep those tires in top shape. And just how long can they last? Well, that depends on a variety of factors, but with proper care and handling, you can certainly squeeze some extra miles out of them.

So remember, treat your tires right and they’ll keep you rolling for years to come. And if all else fails, there’s always recycling and disposal options for those worn-out wheels.

Happy cycling, everyone!

Continue Reading

Affiliate disclaimer

As an affiliate, we may earn a commission from qualifying purchases. We get commissions for purchases made through links on this website from Amazon and other third parties.

About us

We are a passionate team driven by the belief that cycling is a fantastic and accessible way to stay active while enjoying the beauty of the outdoors. Our mission is to share our love for cycling with as many people as possible. We provide a welcoming environment for individuals of all ages, abilities, and backgrounds to come together and ride bikes. With Ralf’s visionary leadership, Zane’s expertise in cycling adventures, and Olivia’s dedication to community building, we strive to create a vibrant space where everyone can experience the joy of cycling. Through group rides, workshops, and inclusive events, we inspire and empower individuals to embrace an active lifestyle. Join us in our quest to pedal together, embrace the joy of cycling, and foster connections that last a lifetime.

Trending