As someone who loves cycling, I recognize the significance of regular maintenance of my bicycle. The brakes are among the most essential parts of a bike, as they guarantee your safety while riding.
Hand brakes, in particular, are essential for controlling your speed and coming to a complete stop. However, if your hand brakes are not adjusted properly, they may not work effectively, putting you in danger.
In this article, I will guide you through the process of adjusting your hand brakes on a bicycle. Whether you’re a seasoned cyclist or a novice, this step-by-step guide will help you maintain your bike’s braking system in top condition.
With a few simple tools and some patience, you can adjust your hand brakes to ensure they are working correctly, giving you the confidence to ride safely and enjoyably.
Key Takeaways
- Well-maintained brakes are essential for safety on the road and can prevent accidents and injuries.
- Signs that hand brakes need adjusting include the bike not stopping quickly, brake levers being too loose or tight, and brake pads rubbing against the wheel rim.
- Proper brake pad positioning and cable tension are crucial for maximum braking power, and troubleshooting tips include inspecting brake pads, checking cable tension, and cleaning brake components.
- Regular testing of hand brakes is important for safety, and there are two types of brake cables: traditional inner wire and compressionless type, with the latter providing better braking performance and durability.
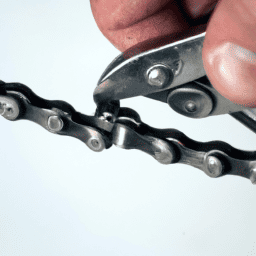
Gather the Necessary Tools
You’ll need to grab a few tools before you can get started adjusting those hand brakes on your bike. First, make sure you have the correct types of brake cables for your particular bicycle. There are two types of brake cables: the traditional inner wire and the newer compressionless type. The traditional inner wire is cheaper, but it’s also more prone to stretching and breaking. The compressionless type is more expensive, but it provides better braking performance and is more durable.
The importance of properly maintaining hand brakes cannot be overstated. A poorly maintained brake system can lead to accidents and injuries. That’s why it’s critical to make sure your hand brakes are functioning correctly.
You’ll need a few hand tools, such as a hex wrench, a cable cutter, and pliers, to make the necessary adjustments. Once you have everything you need, you’re ready to identify when your hand brakes need adjusting.
Identify When Your Hand Brakes Need Adjusting
Feeling a lack of control when trying to slow down can be a frustrating and potentially dangerous symbol that your bike’s stopping system may need attention. Before trying to adjust your hand brakes, it’s important to identify when they need adjusting.
Common issues that indicate your hand brakes need adjustment include your bike not stopping as quickly as it once did, the brake levers feeling too loose or too tight, or the brake pads rubbing against the wheel rim.
To troubleshoot these issues, start by checking the brake pads. Look for signs of wear or damage, and ensure they’re properly aligned with the rim. Next, check the brake cable tension. If the cable’s too loose, the brakes won’t engage properly. If the cable’s too tight, the brake pads will rub against the rim even when the brake lever is released.
Once you’ve identified the issue, you can begin adjusting your hand brakes to restore proper function and control to your bike’s stopping system.
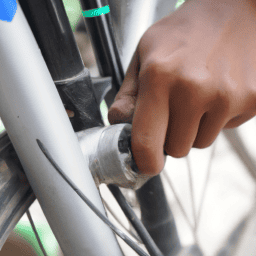
Adjust the Brake Cable Tension
To adjust the brake cable tension on my bicycle, I first need to loosen the cable by turning the barrel adjuster counterclockwise.
Then, I can pull the brake lever to check the tension and tighten the cable by turning the barrel adjuster clockwise until the desired tension is achieved.
It’s important to make sure the brake pads are properly aligned before adjusting the cable tension to ensure optimal braking performance.
Loosen the Cable
Once the brake lever’s released, I gently squeeze the brake caliper arms together and loosen the cable pinch bolt using a 5mm Allen key. This is an important step in hand brake maintenance as it allows me to have access to the cable and make adjustments as necessary.
Additionally, I make sure to lubricate the cable regularly to prevent it from becoming stiff or rusty. By loosening the cable, I’m able to adjust the tension to ensure that my brakes are working properly.
After loosening the cable, I move on to tightening it to the appropriate level. This ensures that my brakes are responsive and safe for me to use.
Tighten the Cable
Now that the cable has been loosened, it’s time to tighten it up to the appropriate level, ensuring that my brakes are in tip-top shape for my next ride.
First, I need to make sure that the cable is properly lubricated. This is important because a dry cable can cause friction, making it difficult to pull the brake lever. I’ll apply a small amount of lubricant to the cable and work it in by pulling the lever a few times.
Next, I’ll use my wrench to tighten the cable. It’s important to avoid over-tightening, which can cause the brake pads to rub against the rim even when the lever is released. I’ll make small adjustments and test the brakes after each one to ensure that they are working properly.
By avoiding common mistakes such as over-tightening and maintaining proper lubrication, I can safely and effectively adjust my hand brakes.
With the cable tightened, it’s time to move on to the next step: aligning the brake pads.
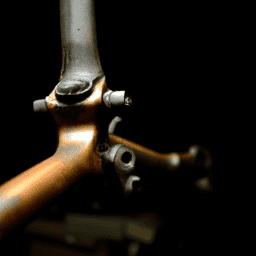
Align the Brake Pads
Get ready to feel more confident on your bike with properly aligned brake pads. Proper brake pad positioning is crucial when adjusting hand brakes on a bicycle.
The brake pads should be aligned with the rim of the wheel and positioned symmetrically on either side of the wheel. This ensures that the brake pads make contact with the rim of the wheel evenly, providing the maximum amount of braking power.
It’s also important to consider brake pad wear and tear when aligning the brake pads. If the brake pads are worn unevenly or have a sloped surface, they may not make proper contact with the rim of the wheel, reducing braking power.
By properly aligning the brake pads, you can ensure that they make even contact with the rim, maximizing the stopping power of your hand brakes.
Now, let’s move on to testing your hand brakes.
Test Your Hand Brakes
To ensure your safety while riding, you’ll want to try out your hand brakes by gently squeezing them to make sure they engage smoothly and bring your bike to a complete stop. If your brakes don’t seem to be working properly, there may be some common brake issues that need to be addressed.
Here are some troubleshooting tips to help you diagnose and fix any problems:
-
Check the brake cable tension: If the cable is too loose or too tight, it can affect the performance of your brakes. Make sure the cable is properly tensioned and adjusted according to your bike’s specifications.
-
Inspect the brake pads: Worn or damaged brake pads can reduce the effectiveness of your brakes. Check the pads for wear and replace them if necessary.
-
Clean the brake components: Dirt and debris can build up on your brake components, which can affect their performance. Clean your brake components regularly to ensure they are working properly.
-
Test your brakes on a regular basis: Don’t wait until you’re in an emergency situation to test your brakes. Make sure to test them regularly to ensure they are working properly.
By following these troubleshooting tips and testing your hand brakes on a regular basis, you can ensure that your bike is safe and ready for any ride. Don’t let common brake issues get in the way of your cycling experience – take the time to properly maintain your brakes and enjoy a smoother ride.
Frequently Asked Questions
What should I do if my hand brakes are still not working properly after adjusting them?
If my hand brakes are still not working properly after adjusting them, there may be common causes such as worn brake pads or cable tension issues. If these don’t solve the problem, seeking professional help is recommended.
How often should I check and adjust my hand brakes?
Determining when to adjust hand brakes on my bicycle is crucial for my safety. I check them before every ride and adjust as needed. Regular cleaning, lubrication, and replacing worn parts can maintain hand brake performance over time.
Can I adjust the hand brakes on my bicycle without any specialized tools?
Yes, there are alternative solutions and DIY techniques to adjust hand brakes on a bicycle without specialized tools. However, it’s important to note that these methods may not be as precise as using proper tools and may require more frequent adjustments.
What should I do if the brake pads on my bicycle are worn out?
When my bicycle’s brake pads wear out, I replace them with the right material for my riding conditions. It’s important to choose the right type and follow proper installation procedures to ensure safe stopping.
Is it normal for hand brakes to make a squeaking noise when they are applied?
Yes, it is normal for hand brakes to make a squeaking noise when applied. This can be caused by worn brake pads or a lack of lubrication. Applying lubrication techniques can reduce the noise and improve brake performance.
Conclusion
In conclusion, adjusting hand brakes on a bicycle is a straightforward process that can save you from accidents. With the right tools, you can easily identify when your brakes need adjusting and proceed to adjust the cable tension and align the brake pads. As you work on your bike, remember to take your time and be precise in your adjustments.
Imagine a crisp autumn day, the leaves rustling under your bike tires as you cruise along a winding road. Suddenly, a car pulls out in front of you, and you need to come to a stop quickly. Without properly adjusted hand brakes, you could find yourself in a dangerous situation.
By following the simple steps outlined in this article, you can ensure that your brakes are always in top shape, allowing you to enjoy your bike rides safely and confidently. Keep your bike well-maintained, and you’ll be on the road to many more memorable rides.