As someone who bikes, I understand the essential nature of having brakes that work correctly. Ensuring your safety on the go, it also empowers you to tackle more difficult paths with confidence.
One crucial aspect of maintaining your brakes is centering them. In this article, I will guide you through the process of centering your bicycle brakes step by step, so you can do it yourself and avoid the cost of a professional mechanic.
Before we dive into the technical details, let’s first understand why centering your brakes is essential. When your brakes are not centered, one brake pad may be closer to the rim than the other, causing uneven wear and reduced stopping power. Over time, this can lead to brake failure or even cause the wheel to lock up, resulting in a dangerous crash.
By centering your brakes, you ensure that both brake pads are evenly spaced and aligned, providing consistent braking power and increasing the lifespan of your brake pads. So, let’s get started and learn how to center your bicycle brakes.
Key Takeaways
- Centering brakes is crucial for even wear and consistent braking power, which is important for safety and confidence in cycling.
- Proper brake pad alignment ensures even contact with the rim and helps to increase the lifespan of brake pads.
- Misaligned brakes can lead to reduced stopping power and dangerous accidents, so it’s important to check and adjust brakes regularly.
- Using the right tools, such as a 5mm Allen wrench and screwdriver, can make the task of centering brakes easier and more efficient, but optional tools like a brake alignment tool or cable cutters may also be helpful.
Understand the Importance of Centering Your Brakes
It’s crucial to understand the significance of centering your brakes before diving into the process. The importance of alignment cannot be overstated when it comes to bicycle brakes.
Misaligned brakes can result in poor performance and decreased stopping power, both of which can put the rider in danger. The consequences of misalignment can vary depending on the severity of the issue.
At best, poorly aligned brakes can be a nuisance, causing squeaking or rubbing. At worst, they can make it difficult to stop the bike, leading to accidents and injuries. Therefore, taking the time to properly center your brakes is not only important for optimal performance but also for your safety on the road.
With that in mind, let’s move on to gathering the necessary tools.
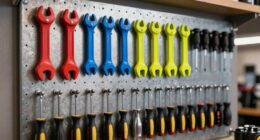
Gather the Necessary Tools
Before I can begin centering my brakes, I need to make sure I have all the necessary tools.
The required tools for this task include a 5mm Allen wrench, a screwdriver, and a clean rag. However, there are also optional tools that can make the task easier, such as a brake alignment tool or a spoke wrench.
So, I’ll gather all the required tools and any optional ones that I have to make the process smoother.
Required Tools for Centering Your Brakes
To get your brakes centered, you’ll need a few essential tools. Bicycle brake adjustment requires a wrench and a screwdriver. These tools will help you to loosen the bolts and position the brake pads correctly.
You may also need a pair of pliers to hold the cable while adjusting the brake pads. Brake centering techniques require precision, and the right tools can make all the difference.
Using the right tools will help you to make quicker and more accurate adjustments. In addition to the essential tools, you may want to consider purchasing optional tools to make the task easier.
These tools can include a brake pad alignment tool or a brake cable adjuster. With the right tools and techniques, you can center your brakes and enjoy a smooth and safe ride.
Optional Tools to Make the Task Easier
Using optional tools can make adjusting your brake pads easier and more efficient, allowing you to spend less time on maintenance and more time enjoying your ride.
Here are some efficient techniques and advanced methods that you can use:
-
Brake Alignment Tool – This tool helps you align your brake pads precisely, ensuring that they hit the rim at the same time and with equal force. This is especially useful when your brakes are misaligned or if you’re installing new brake pads.
-
Cable Cutters – Cutting cables can be a tricky task, but with cable cutters, you can make a clean cut without fraying the cables. This ensures that your brakes work smoothly and don’t get stuck.
-
Torque Wrench – A torque wrench is useful when tightening bolts to a specific torque value. This ensures that your brakes are adjusted to the correct tension, preventing them from slipping or skidding.
By using these optional tools, you can make the task of centering your bicycle brakes much easier and more efficient. Once you have these tools, you can proceed to adjust your brake pads to ensure that they’re centered and working properly.
Adjust the Brake Pads
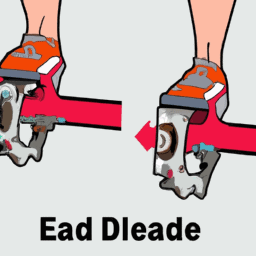
First, make sure the brake pads are properly aligned before tightening them. Brake pad alignment is crucial to ensure that the brake pads make even contact with the rim. Misaligned brake pads can cause uneven wear on the pads and reduce braking efficiency.
To check the alignment, hold a straight edge, such as a ruler, against the rim and check the distance between the rim and the brake pad. The distance should be the same on both sides. If not, adjust the brake pad by loosening the bolt that holds it in place and moving it until it’s properly aligned. Once the brake pad is aligned, tighten the bolt securely.
It’s also important to check the brake pad wear. Worn brake pads can reduce braking power and cause damage to the rim. To check the wear, look at the brake pads and check if they’re worn down to the wear line. If they are, replace the brake pads.
After adjusting the brake pads, it’s important to test your brakes to ensure they’re working properly. A quick test is to squeeze the brake lever and check if the brake pads make even contact with the rim. If they do, you’re ready to ride.
Test Your Brakes
Now that I’ve adjusted my bicycle brake pads, it’s important to test the brakes to ensure they’re working properly.
First, I check the brake lever tension to make sure it’s not too loose or too tight.
Next, I test the brakes on a flat surface to ensure they can stop the bike effectively.
If I find any issues, I’ll make any necessary adjustments to the brake system before hitting the road.
Check the Brake Lever Tension
As I gently squeeze the brake lever, I can feel for any resistance or looseness. Checking the brake lever tension is an essential step in centering the bicycle brakes.
Here are three things to keep in mind when assessing the brake lever tension:
-
Begin by checking the brake cable tension. The cable should be taut, but not too tight. If the cable is too loose, then the brake lever will feel spongy and won’t engage the brake shoes properly.
-
Next, check the brake shoe alignment. The brake shoes should be centered and parallel to the rim. Misaligned shoes will cause uneven wear and reduce the effectiveness of the brakes.
-
Finally, check the brake lever tension. The lever should have a firm but comfortable feel when squeezed. If the lever feels too stiff or too loose, then it may need to be adjusted.
Now that I’ve checked the brake lever tension, it’s time to move on to the next step: testing the brakes on a flat surface.
Test Your Brakes on a Flat Surface
Before you hit the road, it’s crucial to ensure that your brakes are in top-notch condition by testing them on a flat surface. To do this, find a level and safe area, like an empty parking lot, where you can ride your bike at a moderate speed.
Squeeze the brake levers and observe how quickly the bike stops. If the brakes feel loose or do not stop the bike within a reasonable distance, it’s time to inspect them for common mistakes and apply some troubleshooting tips.
One common mistake that can affect your brakes’ performance is having dirty or worn brake pads. Check the brake pads for wear and tear, and clean them with a soft cloth and rubbing alcohol if necessary.
Another mistake is having loose or misaligned brake calipers. Check the alignment of the calipers and tighten any loose bolts. If you still have issues, consider replacing the brake cables or housing.
Once you’ve identified and fixed any issues, you can make any necessary adjustments to fine-tune your brakes’ performance.
Make Any Necessary Adjustments
To get your bike ready for the road, you’ll need to fine-tune your brakes by making any necessary adjustments. Here are some common mistakes to avoid and troubleshooting tips to help you get the job done right:
-
Check the brake pads: Make sure they’re properly aligned with the rim and aren’t excessively worn. If they are, replace them with new ones.
-
Adjust the cable tension: Use the barrel adjuster to adjust the cable tension until the brake pads are properly aligned with the rim. If the brakes still feel spongy, you may need to bleed the brake system or check for any air bubbles.
-
Test the brakes: After making any adjustments, test your brakes again on a flat surface to ensure they’re functioning properly.
By following these steps, you should be able to center your bicycle brakes with ease. Remember to take your time and double-check your work to avoid any potential issues.
Once you’ve successfully centered your brakes, you can move on to maintaining them for optimal performance.
Maintain Your Brakes
Maintaining my bicycle brakes is critical to my safety. I regularly inspect and adjust my brakes to prevent misalignment. Signs that my brakes need adjustment include squeaking, difficulty in braking, and excessive wear on the brake pads.
If I can’t fix these issues on my own, I seek professional help to ensure my brakes are in top condition.
Regular Maintenance to Prevent Misalignment
One of the best ways to ensure your bicycle brakes stay aligned is by regularly checking and adjusting them. Preventive measures include keeping your bike clean and dry, and avoiding riding in wet or muddy conditions. Dirt and grime can accumulate on your brake components, leading to misalignment over time.
Troubleshooting techniques involve checking the brake pads for wear, making sure they are properly aligned with the rim, and adjusting the cable tension if necessary. Another way to maintain proper brake alignment is by checking the wheel trueness. A wobbly or out-of-true wheel can cause your brakes to rub or drag, leading to unnecessary wear and tear.
Make sure your wheels are properly tightened and that the spokes are evenly tensioned. Additionally, check the brake caliper bolts for tightness to ensure that they are secure. By taking these regular maintenance steps, you can prevent misalignment and ensure that your brakes are functioning properly.
In the next section, we will discuss signs that your brakes may need adjustment.
Signs that Your Brakes Need Adjustment
If your brakes are acting like a car with worn-out brake pads, screeching like a banshee, it’s time for you to adjust them. Brake maintenance is crucial to ensure your safety while riding your bicycle. One of the signs that your brakes need adjustment is when they start to make a loud noise. This noise is caused by the brake wear indicators, which are small metal tabs that are attached to the brake pads. When the brake pads wear down to a certain point, these tabs will start to rub against the rim, producing a loud screeching sound.
To determine if your brakes need adjustment, you can check the brake wear indicators by looking at the brake pads. If the pads are worn down to the point where the wear indicators are touching the rim, it’s time to adjust your brakes. Another sign that your brakes need adjustment is when they feel spongy or loose. This can be caused by air in the brake lines or worn brake pads. Adjusting your brakes can be done at home with the right tools and knowledge, but if you’re not confident in your abilities, it’s best to seek professional help.
When it comes to your safety, it’s always better to be safe than sorry. In the next section, we’ll discuss when it’s time to seek professional help for your bicycle brakes.
When to Seek Professional Help
It’s always wise to have a professional check your brakes if you’re unsure about their performance. While some simple adjustments can be made at home, there are times when it’s best to leave it to the experts.
For example, if you have little to no experience with bike maintenance, it’s best to seek professional help. Attempting to fix your brakes without proper knowledge can lead to more problems and even accidents.
Additionally, if you’ve tried basic troubleshooting tips and your brakes are still not functioning properly, it’s time to seek professional help. A bike mechanic can properly diagnose the issue and make the necessary repairs.
Remember, your brakes are a critical safety component of your bike and it’s important to ensure they are working properly before riding. Don’t take chances with your safety – if in doubt, seek professional help.
Frequently Asked Questions
Can I center my brakes without any specialized tools?
Absolutely! Adjusting brake tension is easy with household items as brake centering tools. Use pliers or a screwdriver to adjust the tension and center the brakes. No need for specialized tools.
How do I know if my brake pads need to be replaced?
To know if my brake pads need replacing, I check for signs of worn pads such as reduced braking power, squeaking, or visual wear. Proper brake pad alignment is also important for optimal performance.
What should I do if my brakes are still not centered after following these steps?
If my brakes are still not centered after following steps to center them, I would check the brake alignment and adjust cable tension. Ensuring the brake components are properly aligned and tight can help improve brake performance.
Is it normal for my brakes to make noise after centering them?
Yes, it is common for brakes to make noise after centering them. Common brake issues include worn brake pads, loose or dirty components, and misaligned calipers. Troubleshooting tips vary for different types of brake systems, each with their own pros and cons.
How often should I check and maintain my brakes to ensure optimal performance?
Proper brake alignment is paramount to optimal performance. Regular brake maintenance is necessary to ensure safety. Brake maintenance tips include inspecting pads and rotors, cleaning and lubricating components, and adjusting as needed.
Conclusion
Well folks, that’s how you center your bicycle brakes!
It may seem like a daunting task at first, but with the right tools and a bit of patience, you’ll be cruising down the street with perfectly aligned brakes in no time.
I won’t lie, it can be a bit frustrating at times, but trust me when I say the end result is worth it. Your brakes will be more responsive and effective, giving you the peace of mind you need while riding.
So go ahead, give it a try! You’ll feel like a bike mechanic extraordinaire once you’ve mastered this skill. And who knows, you may even find yourself enjoying the process – I know I did.
Happy riding!