
Switching out a bike chain might appear intimidating at first, but it’s actually quite manageable with the correct equipment and some basic knowledge. As an experienced biker, I’ve replaced numerous chains over my cycling career and picked up several helpful tips I’m eager to pass along to you.
Before we get started, it is essential to have the necessary tools on hand. You will need:
- a chain tool
- a new chain
- a cassette lockring tool
- a cassette removal tool
- a wrench
It is also a good idea to have a rag and some lubricant handy. With these tools at the ready, we can begin the process of changing the chain on your bicycle.
So, let’s get started!
Key Takeaways
- Properly measuring and selecting the correct chain for your bike is crucial to avoid mistakes when changing it.
- Regularly checking the chain for wear and tear and cleaning and lubricating it can extend its lifespan and prevent costly repairs.
- Shifting to the smallest chainring before removing the old chain and adjusting the rear derailleur properly are essential steps in the process.
- Using the right lubricant for the conditions and applying it correctly can ensure a smooth ride and prevent dirt and debris buildup.

Under Armour Squeeze Water Bottles, 32 oz Water Bottles, Sideline Sports Water Bottle with Quick-Shot Lid, Quick & Easy Hydration, Gym Water Bottles, Squeeze Bottle, 1 32oz Bottle
- Easy Hydration: Quick-shot lid and one-way valve
- On-the-Go Use: One-hand operation for active hydration
- Measurement Markings: Ounces and milliliters for tracking
As an affiliate, we earn on qualifying purchases.
Gather the Necessary Tools
You’ll need a few tools to get started, like a chain tool, pliers, and a chain whip. These tools are essential for changing a bicycle chain. The chain tool is used to push the pins out of the old chain, while the pliers are used to remove the master link. The chain whip is used to keep the cassette from turning while removing or installing the chain.
Common mistakes to avoid when changing a bicycle chain include not measuring the old chain properly, not selecting the right chain for the bike, and not lubricating the new chain enough. Maintenance tips to keep in mind include checking the chain regularly for wear and tear, cleaning and lubricating the chain frequently, and replacing the chain every 2,000 to 3,000 miles.
With the proper tools and knowledge, changing a bicycle chain can be a straightforward process. Next, we’ll move on to removing the old chain.
Remove the Old Chain
First, I shift to the smallest chainring on my bike so it’ll be easier to remove the old chain. I use a chain tool to break the chain, pushing out the pins that hold the links together. Finally, I carefully remove the old chain from the bike to avoid damaging other components, such as the derailleur.
Adjusting the paragraph structure for these complete sentences makes the instructions easier to follow and understand. Using contractions also helps make the text more conversational and approachable.
Shift to the Smallest Chainring
Before shifting to the smallest chainring, it’s important to ensure that your bike is in a low gear to prevent any unnecessary strain on the chain. Being in a low gear will allow the chain to move more smoothly and easily, making it easier to shift to the smallest chainring. Additionally, being in a low gear will help prevent the chain from slipping or jumping off the smallest chainring.
To shift to the smallest chainring, follow these steps:
- Slowly pedal the bike while simultaneously pushing the left shifter lever towards the bike’s handlebars.
- Keep pedaling while the chain moves to the smallest chainring. This will ensure that the chain smoothly and easily moves onto the smallest chainring.
- Once the chain is on the smallest chainring, shift the rear derailleur to a higher gear to match the effort needed for pedaling on the smallest chainring.
- Finally, check that the chain is properly seated on the smallest chainring and that it is running smoothly.
Using the smallest chainring has several advantages, including better control and stability when climbing steep hills, and a reduction in the amount of pedal force needed to maintain a desired speed. Proper technique for shifting to the smallest chainring is essential to ensure that the chain moves smoothly and easily onto the smallest chainring without causing any damage to the chain or drivetrain. Once the chain is on the smallest chainring, it’s time to move on to the next step: using a chain tool to break the chain.
Use Chain Tool to Break the Chain
To break the chain, it’s essential to use a chain tool. A chain tool is a simple device that allows you to push out the pins that hold the chain links together. Before using the tool, it’s important to check its maintenance and ensure it’s in good working condition. A damaged chain tool can damage the chain and even cause injury.
Using the tool, position the chain in the tool’s jaws and align the tool’s pin with the chain’s pin. Turn the handle of the tool to push the pin out of the chain link. Once the pin is out, you can separate the chain. This step is crucial, especially if you’re experiencing common chain problems such as skipping gears, chain slipping, or chain breakage.
With the chain broken, you can now remove the old chain.
Remove the Old Chain
Now that you’ve successfully broken the chain with the chain tool, it’s time to get rid of the old one. Removing the old chain is an important part of chain maintenance and ensures that your new chain will work properly. Here are four steps to help you remove the old chain:
-
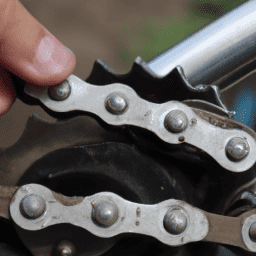
Inspect the chain for wear: Before removing the chain, check for any signs of wear or damage. Look for stretched links, broken links, or rusted areas. If you notice any of these issues, it may be time to replace the chain altogether.
-
Identify the master link: Most chains have a master link that can be easily removed without the need for a chain tool. Look for a link that is slightly different from the others and has a clip holding it together.
-
Remove the master link: Use your fingers or pliers to remove the clip holding the master link in place. Once the clip is off, you can slide the link out of the chain.
-
Remove the rest of the chain: Once the master link is removed, you can pull the chain off of the bike. Be sure to keep track of the length of the old chain so you can size the new one correctly.
Now that the old chain is off, it’s time to size and install the new chain.
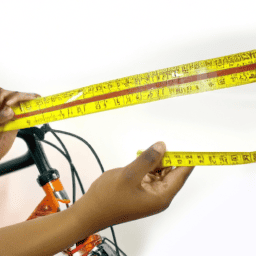
Size and Install the New Chain
Surely you already know the importance of selecting the correct size when installing your new chain, and you wouldn’t want to risk damaging your bike by guessing. Chain sizing tips are crucial to ensure that the new chain fits perfectly and functions smoothly. To determine the correct length of the chain, you can use a chain sizing chart or count the number of links on your old chain. Make sure to choose the right chain for your bike as there are different types of chains available, such as single-speed chains, multi-speed chains, and narrow chains.
Once you have determined the correct length and type of chain, you can install it onto the bike. First, thread the chain through the derailleur and cassette, making sure it is positioned correctly. Then, connect the ends of the chain using a chain tool. It is important to use a chain tool that is compatible with the chain you are using. After connecting the chain, check the tension by pulling the chain away from the cassette and ensuring there is a slight amount of play. With the new chain installed, the next step is to adjust the chain tension.
Adjust the Chain Tension
Now that I’ve installed the new chain, it’s important to check the chain tension before taking the bike out for a ride.
To do this, I’ll need to shift the bike into the smallest chainring and the smallest cog. Then, I’ll need to check the chain tension by lifting it at the midpoint between the front and rear chainrings.
If it’s too loose or too tight, I’ll need to adjust the rear derailleur accordingly.
Check Chain Tension
To ensure a smooth and efficient ride, you’ll want to check the tension of your bicycle chain regularly. Proper chain tension is important because a loose chain can cause it to slip or skip gears, while a tight chain can cause unnecessary wear on the drivetrain.
To check the chain tension, shift your bike to the smallest chainring and smallest cog. Next, lift the chain off the chainring and use a ruler or chain checker tool to measure the amount of slack in the chain. The ideal amount of slack is between 1/2 to 3/4 of an inch. If your chain is too loose, you’ll notice it sagging and slapping against the chainstay as you ride. On the other hand, if your chain is too tight, it will be difficult to pedal and create excessive noise.
Checking the chain tension is an easy and quick maintenance task that can save you from costly repairs later on.
Now that you’ve checked the tension of your bicycle chain, you may need to adjust the rear derailleur to ensure that the chain runs smoothly and quietly. The rear derailleur is responsible for moving the chain from one cog to the next, and it needs to be properly aligned to work effectively.
With the correct chain tension and a properly adjusted rear derailleur, you’ll be able to enjoy a smooth and efficient ride.
Adjust the Rear Derailleur
If you notice your gears skipping or making noise while you ride, you may need to adjust the rear derailleur on your bike. A properly aligned rear derailleur is crucial for shifting smoothly and efficiently.
To ensure proper derailleur alignment, start by shifting your bike into the smallest chainring and the largest cog on the rear wheel. Next, use a 5mm Allen wrench to loosen the pinch bolt located on the derailleur cable.
With the pinch bolt loosened, use the barrel adjuster located on the derailleur to make small adjustments until the chain lines up with the cog. If you’re still having issues, try troubleshooting derailleur issues such as checking for bent derailleur hangers or loose limit screws.
Once you’ve properly adjusted the rear derailleur, you can move on to the next step of changing your bike chain: lubricating the new chain.
Lubricate the New Chain
Don’t forget to give your new chain some love with a good lubrication, ensuring a smooth and quiet ride every time. Lubricating your chain is an important step that should not be overlooked.
Here are some benefits of lubrication and common lubricant mistakes to avoid:
-
Benefits of lubrication: Lubricating your chain reduces friction and wear, which extends the life of your chain and improves its performance. It also helps to prevent rust and corrosion, which can damage your chain and other components of your bike.
-
Common lubricant mistakes: One common mistake is over-lubrication, which can attract dirt and debris and cause your chain to get gunked up. Another mistake is using the wrong type of lubricant, such as using a wet lubricant on a dry day, which can also attract dirt and debris. Additionally, it’s important to avoid using too much pressure when applying lubricant, as this can push dirt and debris into the chain.
-
Choose the right lubricant: Choose a lubricant that is specifically designed for bike chains and the conditions you typically ride in. There are wet and dry lubricants available, and each has its own advantages depending on the conditions. Wet lubricants are best for wet and muddy conditions, while dry lubricants are better for dry and dusty conditions.
-
How to apply lubricant: Apply a drop of lubricant to each link of the chain while turning the pedals backwards. After applying the lubricant, wipe off any excess with a clean rag. It’s important to let the lubricant dry and soak in before riding your bike.
Frequently Asked Questions
What type of chain should I buy for my specific bike model?
To ensure chain compatibility and durability for my bike, I must first determine the chain’s required speed, length, and width. Consulting with a bike shop or researching my bike’s specifications online will provide me with the necessary information.
How often should I replace my bicycle chain?
I replace my bicycle chain every 2,000-3,000 miles, or when chain wear indicators show 0.75% or greater elongation. To extend chain life, I use the best lubrication practices, including cleaning and applying lubricant regularly.
Can I reuse my old chain’s master link on the new chain?
Like a puzzle piece that doesn’t quite fit, reusing an old chain’s master link on a new chain could compromise strength and durability. It’s important to ensure master link compatibility and consider chain strength comparison when replacing a bicycle chain.
What are some signs that my bicycle chain needs to be replaced?
When my bicycle chain starts skipping gears or making noise, I know it’s time for a replacement. Regular chain maintenance and lubrication can prolong its life, but eventually wear and tear will require a new chain.
How do I know if the chain tension is correct after installation?
To check chain tension after installation, I measure wear with a chain wear tool. Adjusting tension is done by loosening the bolts on the rear derailleur and pulling the derailleur back. It’s important to get it right to avoid slipping or skipping.
Conclusion
Changing a bicycle chain may seem daunting, but with the right tools and a little know-how, it can be a simple and rewarding experience. As I finished installing my new chain, I felt accomplished and satisfied knowing my bike was ready for another season of riding.
I tightened the chain and added lubricant, feeling the smoothness and efficiency of each pedal stroke that awaited me on my next ride. The rhythmic sound of the chain spinning around the gears was like music to my ears. My diligence and attention to detail had put my bike in top condition.
Learning how to change a bicycle chain is a valuable skill for both seasoned cyclists and beginners. It not only saves money but also makes riding more enjoyable. Grab your tools and tackle this task with confidence, knowing you have the knowledge and expertise to keep your bike running smoothly for years to come.