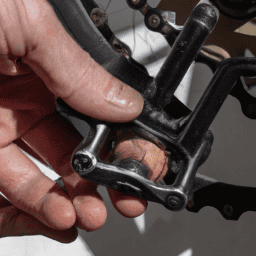
Are you fed up with the old pedals on your bike? Is your feet slipping off the pedals while riding? It’s the right moment to switch those pedals and make an upgrade to a superior pair.
Changing a bicycle pedal may seem like a daunting task, but with the right tools and instructions, it’s a straightforward process that you can do yourself.
Just like any bike maintenance task, changing a pedal requires some basic knowledge and a few key tools. But don’t worry, you don’t have to be a bike mechanic to do this.
With our step-by-step guide, you can easily change your pedals and be back on the road in no time.
So, let’s get started and learn how to change a bicycle pedal.
Key Takeaways
- There are two main types of pedals: clipless and platform.
- Use a wrench to remove the pedal in a counterclockwise direction, applying lubrication to the spindle first to avoid stripping threads.
- Apply anti-seize compound to the threads of the new pedal before installing it and make sure it is threaded in the correct direction.
- Check the new pedal for smooth rotation and unusual noises or resistance, and prioritize safety and maintenance for optimal bike function.
Gather the Necessary Tools
Before you can change a bicycle pedal, you’ll need to gather the necessary tools – don’t worry, it won’t take long! First, you’ll need to identify the type of pedal that your bike has. There are two main types of bicycle pedals: clipless pedals and platform pedals. Clipless pedals require a special tool to remove them, while platform pedals can be removed with a standard wrench. It’s important to know which type of pedal you have before you start the process of changing it.
It’s also a good idea to inspect your pedals for any common issues before you start. Some common pedal issues include loose bearings, worn-out threads, or damaged bearings. If you notice any of these issues, you may need to replace the entire pedal instead of just the pedal body.
Once you’ve gathered the necessary tools and inspected your pedals, you can move on to the next step of removing the old pedal.
Remove the Old Pedal
Now that you’ve gathered the necessary tools, it’s time to remove the old pedal.
The first step is to use a wrench to loosen the pedal. Make sure to turn the wrench in a counterclockwise direction.
If the pedal is difficult to remove, don’t be afraid to use force, but be careful not to damage the threads or the crank arm.
Loosen the Pedal with a Wrench
Alright, let’s grab our pedal wrench and start loosening that pedal! Before you begin, make sure to double-check which direction is counterclockwise.
Here are some guidelines to follow for proper technique when loosening pedals:
-
Use the appropriate size wrench: It’s important to use a pedal wrench that fits the size of your pedal. Using the wrong size wrench can cause damage to the pedal and the crank arm.
-
Apply force in the correct direction: Remember that the left pedal is reverse threaded, meaning you need to turn it clockwise to loosen it. The right pedal is standard threaded, so turn counterclockwise to loosen it.
-
Avoid stripping threads: Use firm, steady pressure when turning the wrench. Avoid applying too much force or jerky movements that can cause the wrench to slip and damage the threads.
Understanding the differences between left and right pedals, and how to identify them, is crucial for successful removal. It’s also important to pay attention to proper threading to avoid any damage to the crank arm.
Once you’ve loosened the pedal, it’s time to move on to the next step: using force if necessary.
Use Force if Necessary
If you’re struggling to loosen your stubborn steel steppers, it’s time to apply a bit of brawny brute force! Before you attempt to do so, however, it’s important to check if you’ve applied enough lubrication to the pedal. The Importance of lubrication cannot be overstated as it can make a world of difference in terms of ease of removal. If you haven’t already, apply some lubricant to the pedal spindle and allow it to soak in for a few minutes. This can help break up any rust or corrosion that may be causing the pedal to stick.
When using force, it’s important to remember some common mistakes to avoid. For example, don’t try to use your foot or a hammer to hit the wrench as this could cause damage to the wrench, pedal or your foot! Instead, use your arm strength to push down on the wrench and turn it in a counterclockwise direction. If necessary, you can use a longer wrench or a pipe for more leverage.
Once the pedal is loose, repeat the process for the other side of the bike.
Now that you’ve successfully loosened the pedals, it’s time to prepare the new pedal by following a few simple steps.
Prepare the New Pedal
Get ready to attach the new pedal by grabbing your pedal wrench and anti-seize compound. Here are some maintenance tips to keep in mind before you start:
- Check the threads on the crank arm to make sure they’re clean and undamaged.
- Apply a small amount of anti-seize compound to the threads of the new pedal to prevent it from seizing up in the future.
- Make sure the new pedal is threaded in the correct direction – the left pedal is threaded counter-clockwise, while the right pedal is threaded clockwise.
- Tighten the new pedal snugly, but don’t overtighten it as this can damage the threads.
- Finally, give the pedal a quick test to make sure it’s securely attached before you take it for a spin.
With the new pedal prepared and ready to go, it’s time to install it onto your bike.
Install the New Pedal
You’re about to witness the glorious moment of attaching the new pedal to your trusty two-wheeled companion, so let’s dive right in.
Make sure the threads of the pedal and the crank arm are clean before installing the new pedal. If you have any doubts about the threads, clean them with a rag or an old toothbrush.
Next, you’ll need to align the new pedal correctly. The pedal spindle should be perpendicular to the crank arm.
Tighten the pedal by turning it clockwise with a pedal wrench. Don’t forget to apply a small amount of lubricant to the threads of the pedal before attaching it.
Proper alignment and lubrication techniques will ensure that your new pedal works smoothly and lasts for a long time.
Now, let’s move on to testing the new pedal.
Test the New Pedal
Now that you’ve installed the new pedal, it’s important to test it out before hitting the road. Start by spinning the pedal to ensure smooth rotation and check for any unusual noises or resistance.
Next, take your bike for a test ride in a safe area to ensure proper function and comfort. Remember to always prioritize safety and maintenance to keep your bike in optimal condition.
Spin the Pedal to Ensure Smooth Rotation
Simply give the pedal a spin and feel the smooth rotation to ensure it’s properly installed. Proper lubrication and pedal maintenance are crucial to ensure the longevity and efficiency of your bike pedals.
If you notice any grinding or resistance when spinning the pedal, it may be an indication that it’s not installed correctly or needs further maintenance. It’s important to note that smooth rotation doesn’t necessarily mean loose pedals. If the pedals feel loose, it may mean that they need to be tightened further.
Once you’re confident that the new pedal is properly installed and spinning smoothly, it’s time to take the bike for a test ride and ensure that everything’s functioning properly.
Take the Bike for a Test Ride
After ensuring the smooth rotation of your newly installed bike pedal, hop on your bike and take it for a test ride to ensure everything is functioning properly.
Before hitting the road, make sure that the pedal is properly fitted and tightened. Improper fitting may cause the pedal to come off while in use, which can lead to serious accidents.
During the test ride, pay attention to any unusual sounds or vibrations. If you notice anything out of the ordinary, stop immediately and check the pedal and other parts for any signs of damage or looseness.
Always remember to take safety precautions while riding your bike, such as wearing a helmet and using hand signals when turning or changing lanes.
With proper fitting and safety measures, you can enjoy a smooth and worry-free ride on your newly installed bike pedal.
Frequently Asked Questions
What if the old pedal is stuck and won’t come off?
If the old pedal is stuck, try using the heat method by using a torch to heat the crank arm, and then using a wrench to turn the pedal. Alternatively, use a lubricant method by spraying a penetrating oil on the pedal threads and letting it sit for a few minutes before attempting to remove it.
Can I use any type of pedal on my bicycle or only specific ones?
When considering new pedals for your bicycle, it is important to check for compatibility considerations and matching pedal types. Not all pedals will fit all bikes, so be sure to research and select the appropriate model for your specific bike.
Do I need to use any lubricant when installing the new pedal?
To ensure a smooth installation of the new pedal, using a lubricant is like adding butter to a pan. Yes, it’s recommended, but not necessary. A light oil or grease works best, avoiding heavy-duty lubricants that may attract dirt and debris.
How do I know if the pedal is tightened enough or too tight?
To check the tightness of your bicycle pedal, use a torque wrench to apply the recommended amount of tension. Adjust as needed until the pedal feels snug and secure. Be careful not to overtighten, which can damage the threads.
What should I do if the new pedal keeps coming loose while riding?
If your new pedal keeps coming loose while riding, ensure you are using proper tightening techniques. Common causes of loose pedals include worn threads or insufficient tightening. Seek professional help if necessary.
Conclusion
Congratulations! You’ve successfully changed your bicycle pedal, and now you’re ready to hit the road with confidence.
It may have seemed daunting at first, but with the right tools and steps, it’s a relatively simple process.
Remember, a bike pedal is a crucial component of your ride, so it’s important to ensure it’s functioning properly. By taking the time to replace a worn-out or damaged pedal, you’re not only improving your own ride but also extending the life of your bike.
Now, go ahead and ‘coast’ on your newly installed pedal! You’ll feel the difference with every rotation and enjoy a smoother, more efficient ride.
Don’t forget to keep up with regular bike maintenance to ensure your pedals and other parts are always in top shape. Happy cycling!


