I have a secret to tell you about your electric bike: replacing the disc brake pads is simpler than you may believe.
In just a few simple steps, you can give your bike the stopping power it needs to keep you safe on the road. So, grab your tools and let’s get started.
Don’t worry if you’re not a seasoned mechanic – I’ll walk you through each step, providing all the technical details and insider tips you need to become a brake pad-changing pro.
Are you ready to take control of your electric bike’s braking system? Let’s dive in.
Key Takeaways
- Regularly inspect and replace worn brake pads to maintain optimal braking performance.
- Choose the appropriate type of brake pads for your electric bike, considering factors such as noise, stopping power, and durability.
- Clean and inspect the rotors and calipers regularly to remove dirt, debris, and signs of damage.
- Bleed the brakes if necessary to remove air bubbles and improve braking efficiency while preventing sponginess.

ZTZ 700C Road Bike Wheelset, Ultralight Aluminum Alloy 30mm Road Bike Wheel, 20H Front/24H Rear High-Strength Bike Rims, 700c Clincher, Rim Brake, Compatible 8-12 Speed Cassettes (Front+Rear Wheels)
Featherweight and Strong: This 700c road bike wheelset is crafted from high-strength aluminum alloy with 20H front/24H rear...
As an affiliate, we earn on qualifying purchases.
Gather the Necessary Tools and Materials
You’ll need a few tools and materials to get started on changing your disc brake pads. First, you’ll need to choose the right brake pads for your electric bike. Make sure to check the specifications provided by the manufacturer to ensure compatibility.
Common mistakes to avoid while changing disc brake pads on an electric bike include using the wrong size pads or failing to properly align them with the rotor. It’s also important to avoid contaminating the pads with grease or oil, as this can affect performance.
Once you have the correct brake pads, the next step is to remove the wheel. This will allow you easier access to the brake caliper and pads for replacement.

SUPERTEAM Carbon Wheelset 700C Tubeless Gravel Wheelset Disc Braking 45TU-28 (Rim Depth 45MM, Center Lock Thru AXLE 12 * 100-12 * 142)
Material: Toray T700c Full Carbon Fiber
As an affiliate, we earn on qualifying purchases.
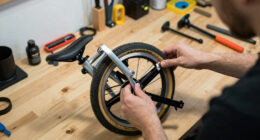
Remove the Wheel
To remove the wheel, first, make sure it’s securely placed on a stable surface. Here are some discussion ideas on the proper technique for removing the wheel on an electric bike and common mistakes to avoid:
- Loosen the quick release lever or axle nuts on both sides of the wheel. This will allow the wheel to slide out of the dropouts.
- Lift the bike slightly off the ground to take the weight off the wheel. This will make it easier to remove.
- Carefully slide the wheel out of the frame, making sure not to damage the brake rotor or derailleur.
- Once the wheel is removed, set it aside in a safe place to avoid any damage.
Now that the wheel is removed, let’s move on to removing the old brake pads.

SUPERTEAM Carbon Disc Brake Road Bike Wheelset 28mm Tubeless Wheels 50mm Rim Depth (FIT for SHIMAN0 8-12 Speed, Thru-Axle Type 12 * 100/12 * 142mm)
Material:Carbon Wheels are Light but the Strength is Very Strong, and the Impact Absorption Performance is Good,It Can...
As an affiliate, we earn on qualifying purchases.
Remove the Old Brake Pads
Once the wheel’s off, it’s time to take out the worn brake pads. To do this, I begin by locating the brake caliper, which houses the brake pads. Using a suitable wrench, I carefully remove the bolts securing the caliper to the bike frame.
With the caliper free, I can now access the old brake pads. I gently pull them out, being mindful not to damage the caliper or rotor.
Before installing the new brake pads, I take the opportunity to clean the brake caliper, removing any dirt or debris that may have accumulated. Additionally, I lubricate the brake rotor to ensure smooth and efficient braking performance.
With the old brake pads removed and the caliper cleaned and rotor lubricated, I’m now ready to inspect the brake caliper and rotor for any signs of wear or damage.

700c Clincher Carbon Wheelset Disc Brake 50mm Depth 28mm Width Quality Carbon ud Finish Rim Road Cycling Tubeless Compatible Clincher
1:Customers who purchase this product will receive a 1000-day guarantee. We will provide the necessary repair support, excluding...
As an affiliate, we earn on qualifying purchases.
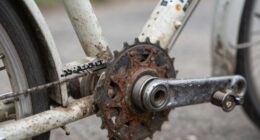
Inspect the Brake Caliper and Rotor
After removing the old brake pads, I inspect the brake caliper and rotor for any signs of wear or damage. This step is crucial to ensure the safety and optimal performance of the braking system. Here are some things I look for:
- Signs of wear on the brake caliper, such as cracks or excessive corrosion.
- Any damage to the brake rotor, such as deep grooves or warping.
- I check for proper alignment between the brake caliper and rotor, making sure there is no rubbing or misalignment.
By thoroughly inspecting the brake caliper and rotor, I can identify any issues that may affect the braking performance. This allows me to take appropriate action, such as cleaning the brake calipers to remove dirt and debris, or troubleshooting brake rotor noise by adjusting the caliper position.
Once I am satisfied with the inspection, I can move on to the next step of installing the new brake pads.
Install the New Brake Pads
I carefully position the new brake pads onto the brake caliper, ensuring they are aligned properly for optimal performance. Installing brake pads correctly is crucial for the safe and efficient operation of your electric bike. Here are some installing techniques and troubleshooting tips to help you with this process:
| Installing Techniques | Troubleshooting Tips |
|---|---|
| Clean the caliper and rotor | Check for uneven wear |
| Apply a thin layer of grease | Inspect for debris |
| Insert the pads into the caliper | Verify proper alignment |
| Tighten the pad retaining bolts | Ensure smooth movement |
| Test the brakes for proper function | Listen for any unusual noise |
Adjust the Brake Caliper
To ensure optimal performance without compromising safety, it’s important to adjust the brake caliper correctly.
Start by loosening the mounting bolts that secure the caliper to the frame or fork. This allows you to adjust the position of the caliper to ensure proper alignment with the brake rotor.
Once loosened, squeeze the brake lever to engage the caliper with the rotor. While holding the lever, tighten the mounting bolts to secure the caliper in place.
If you encounter any issues, such as uneven pad wear or rubbing, troubleshoot by checking the caliper alignment and adjusting as needed.
Remember to test the brakes before riding to ensure they are functioning properly.
With the brake caliper adjusted, you are now ready to reinstall the wheel, ensuring a smooth and safe ride.
Reinstall the Wheel
Make sure you align the axle of the wheel with the dropouts on the frame or fork. This step is crucial to ensure proper installation and alignment of the wheel.
Here are some key points to keep in mind when reinstalling the wheel on your electric bike:
- Place the wheel onto the dropouts, making sure the axle sits securely in the slots.
- Tighten the quick release lever or axle nuts to secure the wheel in place.
- Double-check the alignment of the brake rotor with the caliper. If it is misaligned, loosen the bolts holding the caliper and adjust the rotor until it is centered.
Realigning the brake rotor is an essential step in preventing issues such as rubbing or ineffective braking. By following these steps, you can troubleshoot common issues and ensure a smooth reinstallation of the wheel.
Now, let’s move on to the next section and test the brakes.
Test the Brakes
Before testing the brakes, ensure the wheel is properly aligned and secured in the dropouts. Testing the brakes is a crucial step in maintaining the safety and performance of your electric bike.
There are several common brake testing techniques that can help you assess the condition of your brakes. One technique is the squeeze test, where you apply gradual pressure to the brake lever and observe the brake response. Another technique is the spin test, where you spin the wheel and check for any rubbing or dragging.
Regular brake maintenance is of utmost importance to ensure optimal braking performance. This includes regular inspection of brake pads, rotors, and cables, as well as cleaning and lubricating the brake system.
Make Necessary Adjustments
You should regularly inspect and adjust the alignment and tension of your wheel to ensure optimal performance.
Troubleshooting common brake issues is an important part of maintaining your electric bike. One common issue is brake pad wear. Understanding the different types of brake pads can help you determine which ones are best for your bike. There are three main types: organic, semi-metallic, and metallic.
Organic pads are quiet and provide good stopping power, but they wear out faster. Semi-metallic pads offer a balance between stopping power and durability. Metallic pads are the most durable, but they can be noisy and may wear down your rotor faster.
By inspecting and adjusting your brake system regularly and choosing the right type of brake pads, you can ensure your electric bike’s brakes perform optimally.
To maintain and care for your disc brake system, you should also regularly clean your rotors and calipers to remove any debris and check for any signs of damage.
Maintain and Care for Your Disc Brake System
Regularly cleaning and inspecting your rotors and calipers is essential for maintaining and caring for your disc brake system. It is crucial to keep them in optimal condition as they are the primary components responsible for stopping your electric bike. Here are some key steps to help you maintain your disc brake system:
-
Clean the rotors and calipers using a non-abrasive cleaner and a soft brush to remove any dirt or debris that may have accumulated.
-
Inspect the brake pads for wear and replace them if necessary. Worn brake pads can reduce braking performance and should be replaced promptly.
-
Bleed the brakes to remove any air bubbles that may have entered the system. This can help improve braking efficiency and prevent sponginess.
Frequently Asked Questions
How often should I change my disc brake pads on an electric bike?
You should clean your disc brake pads on an electric bike every 500-700 miles or if you notice decreased braking power, noise, or vibrations. Signs that your disc brake pads need replacement include excessive wear or a thickness of less than 1.5mm.
Can I use any type of brake pads for my electric bike’s disc brakes?
No, you cannot use any type of brake pads for your electric bike’s disc brakes. Brake pad compatibility is crucial to ensure proper functioning and safety. Using incompatible brake pads can lead to common issues such as reduced braking power and increased wear.
Do I need any special tools to change the disc brake pads on my electric bike?
To change the disc brake pads on an electric bike, you’ll need a few specialized tools. Some disc brake pad installation tips include cleaning the rotor and aligning the caliper properly. Common mistakes to avoid are over-tightening the bolts and not properly bedding in the new pads.
How do I know if my brake caliper or rotor needs to be replaced?
To determine if brake calipers or rotors need replacement, look for signs of wear such as uneven surfaces, deep grooves, or cracks. Proper cleaning and maintenance involve removing dirt and debris, inspecting for damage, and lubricating moving parts for optimal performance.
Are there any specific maintenance steps I should follow to keep my disc brake system in good condition?
To properly maintain disc brake pads, it is important to regularly inspect them for wear and replace them when necessary. Common issues with disc brake systems include contamination, uneven wear, and brake squeal.
Conclusion
In conclusion, changing the disc brake pads on your electric bike is a simple yet crucial task that every rider should know how to do. By following the step-by-step instructions outlined in this article, you can ensure the safety and efficiency of your braking system.
Imagine the feeling of confidently cruising down the road, knowing that your brakes are in top-notch condition. The satisfaction of a smooth and responsive braking experience will surely bring a sense of joy and peace of mind.
So, grab your tools and get ready to embark on this empowering maintenance journey. Your electric bike and your safety will thank you.