
Did you know that the average lifespan of an electric bike battery is around 2-4 years?
As an avid electric bike rider, I’ve learned that changing the battery cells inside the bike is a crucial skill to have.
In this article, I will guide you through the step-by-step process of changing the battery cells in your electric bike.
From understanding the battery components to safely disposing of old cells, you’ll become well-equipped to extend the lifespan of your electric bike.
Key Takeaways
- Understanding the components of the battery and their role is crucial for safe replacement.
- It is important to gather the necessary tools such as screwdrivers, pliers, wire cutters, multimeter, and soldering iron.
- Proper handling and protective gear, such as gloves and goggles, should be used when removing and disassembling the battery.
- When replacing and reassembling the battery pack, it is important to align the battery cells correctly, secure them with tape or a holder, and reconnect the balance wires.

Under Armour Squeeze Water Bottles, 32 oz Water Bottles, Sideline Sports Water Bottle with Quick-Shot Lid, Quick & Easy Hydration, Gym Water Bottles, Squeeze Bottle, 1 32oz Bottle
- Easy Hydration: Quick-shot lid and one-way valve
- On-the-Go Use: One-hand operation for active hydration
- Measurement Markings: Ounces and milliliters for tracking
As an affiliate, we earn on qualifying purchases.
Understand the Battery Components
To change the battery cells inside an electric bike, it’s important to first understand the components of the battery. Battery maintenance is crucial for ensuring the longevity and optimal performance of your electric bike.
The battery consists of several key parts, including the battery housing, the battery management system (BMS), and the individual battery cells. The battery housing protects the cells and provides a secure enclosure. The BMS monitors the battery’s voltage, temperature, and overall health. The individual battery cells are the heart of the battery, storing and releasing electrical energy.
Understanding how these components work together is essential for safely replacing the battery cells. Now that we have a good grasp of the battery components, let’s move on to gathering the necessary tools for the battery cell replacement process.
Gather the Necessary Tools
First, you’ll need to gather all the tools you’ll need for the task. The tools needed for changing the battery cells inside an electric bike include a set of screwdrivers with various sizes, pliers, wire cutters, a multimeter, and a soldering iron. These tools will help you in removing the old battery cells and replacing them with new ones.
To begin, make sure the electric bike is turned off and the battery is disconnected. Then, use the screwdrivers to remove the screws holding the battery cover in place. Carefully lift off the cover and locate the battery cells. Use the pliers to disconnect the wires attached to the cells, making note of their positions. Next, use the wire cutters to remove the cells from the battery pack.
Incorporate these step by step instructions into the subsequent section about ‘safety precautions’, emphasizing the importance of disconnecting the battery and handling the tools with caution to avoid any accidents.
Safety Precautions
Before starting the process, it’s important to take safety precautions to ensure a secure and accident-free procedure. Proper handling of the battery cells is crucial to avoid any potential risks and hazards. Here are some key safety measures to follow:
- Wear protective gloves and goggles to shield yourself from any harmful substances or chemicals.
- Make sure to disconnect the electric bike from any power source to prevent electrical shocks.
- Work in a well-ventilated area to minimize exposure to fumes or toxic gases.
- Use insulated tools specifically designed for working with batteries to avoid short circuits.
- Keep a fire extinguisher nearby in case of any unforeseen accidents.
By adhering to these safety precautions, you can mitigate the dangers involved in handling battery cells. Now, let’s move on to the next section and learn how to remove the battery from the electric bike.
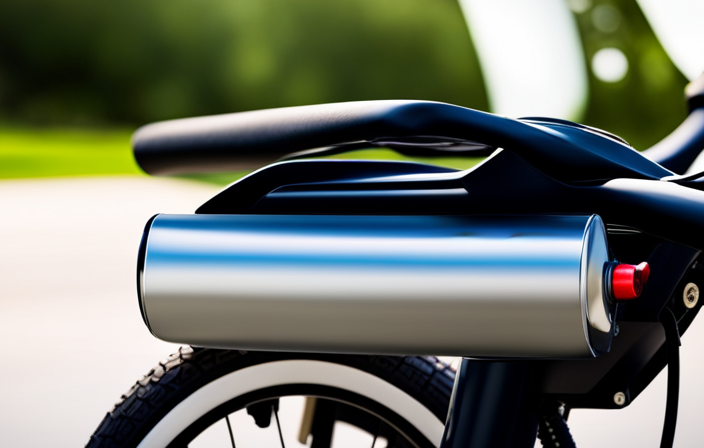
Remove the Battery from the Electric Bike
To remove the battery from your electric bike, follow these steps:
-
Carefully locate the battery compartment and ensure the bike is powered off. This step is crucial to prevent any accidental electrical shocks or damage.
-
Remove any covers or panels that may be securing the battery in place.
-
Disconnect the battery’s power cables by gently pulling them apart. Be sure to grip the connectors and not the wires themselves.
-
Once the cables are disconnected, carefully lift the battery out of the compartment, using both hands to support its weight.
Remember, handling battery cells properly is essential for your safety. Always wear protective gloves and eyewear when working with batteries.
Now that the battery is removed, we can proceed to the next section where we will disassemble the battery pack.
Disassemble the Battery Pack
Now that the battery has been removed, it’s time to disassemble the battery pack. Battery disassembly is a crucial step in battery maintenance, especially when it comes to replacing old battery cells.
To begin, locate the screws that secure the battery pack cover in place. Using the appropriate screwdriver, carefully remove these screws and set them aside. Once the cover is off, you will see the individual battery cells that make up the pack. Take note of their arrangement and connections to ensure proper reassembly later.
Gently disconnect the wires that connect the cells, making sure to label them for easy reconnection. With the cells separated, you can now proceed to replace the old battery cells.
Replace the Old Battery Cells
After disassembling the battery pack, it’s time to replace the old battery cells. To ensure optimal battery cell performance and longevity, proper battery cell maintenance is crucial.
Here are the steps to replace the old battery cells:
- Step 1: Carefully remove the old cells from the battery pack, ensuring you don’t damage any surrounding components.
- Step 2: Clean the battery pack thoroughly, removing any dust or debris that may have accumulated.
- Step 3: Insert the new battery cells into the pack, making sure they are securely in place.
- Step 4: Connect the battery cells to the appropriate terminals, ensuring proper polarity.
By following these steps, you can ensure that your electric bike’s battery pack operates at its best. Once the old cells have been replaced, it’s time to reassemble the battery pack and move on to the next step of the process.
Reassemble the Battery Pack
Once the battery pack has been disassembled, it’s time to reassemble it.
Start by carefully aligning the battery cells in the correct orientation, ensuring that the positive and negative terminals are properly connected.
Secure the cells together using electrical tape or a battery holder, making sure they are tightly packed.
Next, reconnect the balance wires to their respective terminals, ensuring they are properly insulated to prevent any short circuits.
Once all the connections are secure, carefully place the battery pack back into its housing, ensuring it fits snugly.
Finally, reattach the battery pack cover and tighten any screws or fasteners.
Properly reassembling the battery pack is crucial for maintaining its longevity and extending battery life.
Next, we will move on to testing the battery to ensure it is functioning correctly.
Test the Battery
To test the battery, you can use a multimeter to measure the voltage and ensure that it is within the desired range. Here is a step-by-step guide on how to test the battery:
- Set your multimeter to DC voltage mode and turn it on.
- Connect the positive probe of the multimeter to the positive terminal of the battery and the negative probe to the negative terminal.
- Read the voltage displayed on the multimeter. It should be within the specified range for your electric bike’s battery.
- If the voltage is too low, it indicates that the battery is not holding a charge properly and may need to be replaced. If the voltage is too high, it could be a sign of an overcharged battery, which can reduce battery life.
Now that you have tested the battery, you can proceed to the next step of reinstalling it in the electric bike.
Reinstall the Battery in the Electric Bike
Now, you can simply put the battery back into your e-bike. Make sure the battery is fully charged before reinstalling it. This is crucial for recharging the battery and extending its life.
Carefully align the battery with the mounting bracket on the bike and slide it into place. Ensure that the battery securely clicks into position. Double-check all connections to ensure they are tight and secure.
Once the battery is properly installed, you can proceed to the next step of properly disposing of old battery cells. This is important to ensure the safe and environmentally friendly disposal of the old battery cells.
Properly Dispose of Old Battery Cells
When disposing of old battery cells, it is important to follow proper procedures for safe and environmentally friendly disposal. Battery cell recycling is crucial in minimizing the environmental impact of these discarded cells.
Here are four key steps to properly dispose of old battery cells:
-
Research recycling facilities: Look for authorized battery recycling facilities in your area. These facilities have the expertise and equipment to safely handle and recycle battery cells.
-
Remove battery cells: Carefully remove the old battery cells from the electric bike, taking precautions to avoid any damage or leakage.
-
Store cells in a safe container: Place the battery cells in a sturdy, leak-proof container to prevent any potential hazards during storage and transportation.
-
Transport to recycling facility: Once you have collected a sufficient quantity of old battery cells, transport them to the recycling facility. Follow any specific guidelines provided by the facility to ensure safe transportation.
By following these steps, you can contribute to the responsible disposal and recycling of old battery cells, minimizing their environmental impact.
Frequently Asked Questions
What are the signs that indicate the battery cells in my electric bike need to be changed?
Signs that indicate the need to change battery cells in an electric bike include a significant decrease in battery life, reduced power output, slower charging, and frequent battery failures. Avoid common mistakes like mishandling cells and improper installation to extend the battery’s lifespan.
Can I use any type of battery cells to replace the old ones in my electric bike?
No, not all battery cells can be used to replace the old ones in an electric bike. Different types of battery cells have their own pros and cons, such as capacity, weight, and lifespan. It’s important to choose the right type for optimal performance.
How long does it typically take to disassemble and replace the battery cells in an electric bike?
Typically, it takes around 1-2 hours to disassemble and replace the battery cells in an electric bike. It’s crucial to know how to safely dispose of old battery cells and avoid common mistakes during the replacement process.
Are there any specific safety precautions I should take when handling the old battery cells?
When handling old battery cells, it is crucial to take safety precautions. Wear protective gloves and goggles, as the chemicals inside can be hazardous. Dispose of the batteries properly at a recycling center to avoid environmental harm.
What should I do if I encounter any difficulties during the battery cell replacement process?
If I encounter any difficulties during the battery cell replacement process, I should refer to troubleshooting tips. Common mistakes include improper connection, incorrect polarity, and not securely fastening the battery.
Conclusion
In conclusion, replacing the battery cells inside an electric bike requires careful understanding of the components and following proper safety precautions.
By disassembling and reassembling the battery pack with the necessary tools, you can ensure a successful replacement.
Testing the battery afterwards is essential to ensure its functionality.
Finally, reinstalling the battery in the electric bike and disposing of the old cells properly completes the process.
Just like a well-oiled machine, this meticulous procedure guarantees a smooth and efficient ride for your electric bike.