If you have a 79cc predator engine mini bike and you’re fed up with pulling that cord every time you want to ride, I have the perfect solution for you.
In this article, I’ll show you how to convert your trusty mini bike to electric start. With a few tools, some elbow grease, and a bit of know-how, you’ll be cruising in no time.
Say goodbye to sore arms and hello to the convenience of electric start. Let’s get started, shall we?
Key Takeaways
- Connect the battery to the starter button and key switch to enable the electric start system.
- Ensure the battery is fully charged and connected properly, and check for any damage or looseness in the wiring connections.
- Troubleshoot common issues such as weak battery or faulty wiring by inspecting battery charge, wiring, and testing the starter motor.
- Seek professional assistance if the problem persists or consult the manufacturer’s troubleshooting guide for further guidance.
Assess the Compatibility of Your Mini Bike
Before proceeding with the conversion, it’s important to assess if your mini bike is compatible for an electric start.
Evaluating compatibility involves determining modifications needed to ensure a successful conversion.
Firstly, check if your mini bike has a compatible engine. Most mini bikes with a 79cc Predator engine can be converted to electric start with the right modifications.
Next, evaluate the wiring and electrical system. Ensure that the bike’s wiring can handle the additional load of an electric starter.
Additionally, check if there is enough space on the mini bike’s frame to accommodate the electric start components.
If modifications are needed, gather the necessary tools and materials to make the required adjustments.
Assessing compatibility is crucial to ensure that your mini bike is suitable for an electric start conversion.
Gather the Necessary Tools and Materials
To gather the necessary tools and materials, you’ll need to make a list of everything you’ll need for the conversion. Here is a step-by-step guide for the electric start conversion, along with the tools and materials needed:
-
Tools:
- Socket set
- Screwdrivers (both Phillips and flathead)
- Wire cutters
- Wire strippers
- Multimeter
- Soldering iron
-
Materials:
- Electric starter kit
- Battery
- Battery box
- Wiring harness
- Ignition switch
- Solenoid
Before we can proceed to the next section on disconnecting the existing pull-start system, it is crucial to gather these tools and materials. They will be essential for the conversion process, ensuring a smooth transition from pull-start to electric start.
Disconnect the Existing Pull-Start System
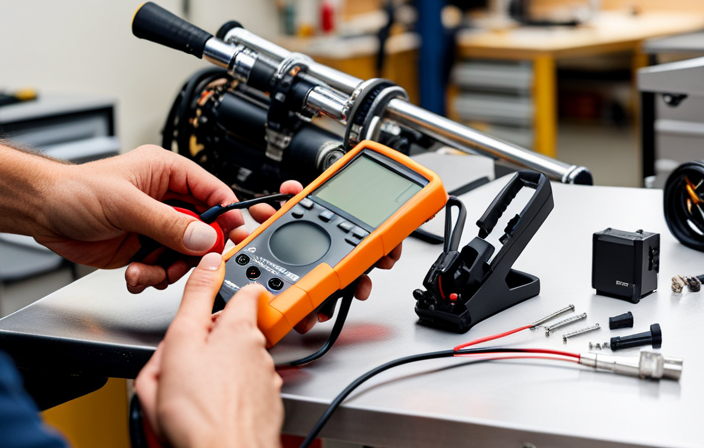
You’ll need a socket set, screwdrivers, wire cutters, wire strippers, a multimeter, and a soldering iron for this step.
To disconnect the existing pull-start mechanism and prepare for the electric start conversion, begin by locating the pull-start assembly on the engine. Use the socket set and screwdrivers to remove any bolts securing the pull-start mechanism in place.
Once detached, carefully disconnect the wires connected to the pull-start system, taking note of their positions and connections.
To reroute the wires for the electric start, use the wire cutters and strippers to remove any excess wire length and strip the ends for proper connection.
Use the multimeter to test the continuity of the wires and ensure proper insulation is in place.
With the pull-start mechanism removed and the wires rerouted, you’re ready to move on to installing the electric starter motor.
Install the Electric Starter Motor
Once the pull-start mechanism has been disconnected and the wires rerouted, it’s time to install the electric starter motor. Installing an electric starter is a convenient upgrade that eliminates the need for manual pulling to start the engine.
To begin, locate a suitable mounting location for the starter motor on the engine block. Ensure that the motor is securely fastened using the provided bolts and brackets.
Next, connect the necessary wiring from the starter motor to the ignition switch and battery. It is crucial to double-check all connections for proper alignment and tightness.
Troubleshooting the electric start may involve checking the battery voltage, inspecting the wiring for any damage, and testing the starter motor for functionality.
With the electric starter motor properly installed, the next step is to connect it to the battery to complete the conversion process.
Connect the Starter Motor to the Battery
After securely fastening the starter motor to the engine block, the next step is to connect it to the battery. This is a crucial step in the conversion process as it enables the electric start functionality.
To ensure a successful connection, follow these steps:
-
First, locate the positive and negative terminals on the battery. The positive terminal is usually marked with a ‘+’ sign, while the negative terminal is marked with a ‘-‘ sign.
-
Connect the positive wire from the starter motor to the positive terminal of the battery. It is essential to ensure a secure and tight connection to avoid any electrical issues.
-
Next, connect the negative wire from the starter motor to the negative terminal of the battery. Again, make sure the connection is tight and secure.
By following these steps, you will have successfully connected the starter motor to the battery. If you encounter any issues during this process, such as loose connections or weak power, it is recommended to troubleshoot common wiring problems.
Now, let’s move on to the next section about mounting the starter button and key switch, which is an important aspect of the electric start conversion.
Mount the Starter Button and Key Switch
To successfully mount the starter button and key switch, locate a suitable location on the handlebars. The mounting location should be easily accessible and within reach while riding. Once you have found the right spot, secure the button and key switch using the provided hardware or clamps.
Make sure the wiring connections are properly attached to the starter button and key switch. Follow the manufacturer’s instructions for wiring, ensuring that the positive and negative terminals are correctly connected. It is crucial to double-check the wiring connections to prevent any electrical issues or malfunctions.
Once the starter button and key switch are securely mounted and the wiring connections are in place, you can move on to the next step: installing a battery box and securing the battery. This will provide the necessary power for the electric start system.
Install a Battery Box and Secure the Battery
Before proceeding, ensure that you have a suitable location for the battery box and have gathered the necessary hardware and tools. Installing a battery box is crucial for the proper functioning of the electric start system.
Here are some important points to consider for battery maintenance and troubleshooting common issues:
- Place the battery box in a secure and easily accessible location.
- Use sturdy mounting brackets to secure the battery box.
- Connect the battery to the starter button and key switch using appropriate wiring.
- Regularly check the battery connections for any signs of corrosion or loose connections.
Proper battery maintenance is essential for the reliable operation of the electric start system. Troubleshooting common issues such as a dead battery or faulty wiring can help avoid any inconveniences.
Now, let’s move on to testing the electric start system to ensure its functionality without delay.
Test the Electric Start System
Make sure you have properly connected the battery to the starter button and key switch before testing the electric start system.
To test the system, turn the key switch to the ‘On’ position and press the starter button. If the engine starts smoothly, then congratulations! Your electric start system is functioning properly.
However, if nothing happens when you press the button, there may be a few common issues to troubleshoot.
First, check the battery to ensure that it is fully charged and properly connected.
Next, inspect the wiring connections to make sure they are secure and free from any damage.
If these steps don’t resolve the issue, you may need to consult the manufacturer’s troubleshooting guide or seek professional assistance.
Regular maintenance and care tips for the electric start system include keeping the battery charged, cleaning the connections, and inspecting for any signs of wear or damage.
By following these steps, you can ensure that your electric start system remains reliable and functional.
Now, let’s move on to the next section where we will discuss how to make adjustments and fine-tune the system for optimal performance.
Make Adjustments and Fine-Tune the System
Now, let’s take a look at how you can adjust and fine-tune the system for optimal performance. Here are some important steps to follow:
-
Adjust the throttle response: Ensure that the throttle is responding smoothly and consistently. If there is any lag or delay, you may need to adjust the throttle cable or the throttle position sensor.
-
Troubleshoot common electric start issues: If you experience any problems with the electric start system, start by checking the battery voltage and connections. Make sure the battery is fully charged and the terminals are clean and secure. If the battery is good, inspect the starter motor and solenoid for any signs of damage or wear.
-
Fine-tune the ignition timing: Proper ignition timing is crucial for the electric start system to function smoothly. Use a timing light to adjust the timing and ensure that it is in sync with the engine’s specifications.
-
Optimize the fuel-air mixture: A well-balanced fuel-air mixture is essential for reliable electric starting. Adjust the carburetor to achieve the ideal air-fuel ratio for your engine.
Enjoy the Convenience of Electric Start
After making the necessary adjustments and fine-tuning my electric start system, I was finally able to enjoy the convenience it offers.
The advantages of electric start are undeniable. Gone are the days of straining my muscles to pull a recoil starter cord. With just the push of a button, my mini bike engine comes to life effortlessly. Not only does electric start save me time and energy, but it also eliminates the hassle of a manual start.
However, like any system, electric start can encounter issues. Common problems include a weak battery, faulty wiring connections, or a faulty starter motor. Troubleshooting these issues involves checking the battery charge, inspecting the wiring, and testing the starter motor for proper functionality.
Frequently Asked Questions
How much time does it typically take to convert a 79cc predator engine mini bike to electric start?
Converting a 79cc predator engine mini bike to electric start typically takes around 2-4 hours. The necessary tools include a starter motor, battery, ignition switch, wiring harness, and various hand tools for installation.
Can the electric start system be installed on any type of mini bike, or are there specific models that are not compatible?
The electric start system can be installed on most mini bike models, but compatibility may vary. It offers several benefits, including convenience and ease of use.
Are there any safety precautions that need to be taken when connecting the starter motor to the battery?
Before connecting the starter motor to the battery, it is crucial to observe proper battery safety precautions. One must ensure correct wiring, use appropriate insulation, and avoid short circuits to prevent any potential hazards or damage.
What type of battery is recommended for the electric start system, and where can it be purchased?
For the electric start system, it is recommended to use a high-quality, maintenance-free lead-acid battery. These batteries have a decent lifespan and can be purchased at most automotive supply stores or online retailers.
Are there any additional maintenance or troubleshooting steps that should be followed after the electric start system is installed?
After installing the electric start system, it’s important to follow proper maintenance steps and troubleshooting tips for optimal performance. Regularly check the battery, wiring connections, and ignition switch for any issues or wear.
Conclusion
In conclusion, converting my 79cc Predator engine mini bike to electric start has been a game-changer.
The process wasn’t easy, but the convenience it offers is worth it. As I press the electric start button, the engine roars to life effortlessly. It’s like magic.
No more struggling with pull-starts or dealing with a dead battery. This modification has truly made my mini bike experience more enjoyable and hassle-free.
I highly recommend it to anyone looking for a seamless and convenient way to start their mini bike.