Have you ever wondered how to take your bike to the next level? Well, look no further.
In this article, I will guide you through the process of customizing your bike with an electric motor. With a few simple steps, you’ll be able to transform your ordinary bike into a high-powered machine.
So, let’s get started and turn your two-wheeler into an electrifying ride!
Key Takeaways
- Assess current riding techniques and determine if you are a casual or avid cyclist.
- Choose the right electric motor based on power output and compatibility with your bike’s frame.
- Gather necessary tools and supplies, including a motor kit, battery pack, controller, throttle, and wiring harness.
- Prepare your bike for electric conversion by removing unnecessary components, assessing drivetrain and brakes for upgrades, and ensuring the bike is in good condition.
Assess Your Riding Needs and Goals
You’ll need to assess your riding needs and goals before customizing your bike with electric.
Start by evaluating your current riding techniques. Are you a casual rider, using your bike for leisurely rides around the neighborhood? Or are you an avid cyclist, looking to enhance your performance and speed? Understanding your riding style will help you choose the right electric motor for your bike.
Next, set realistic goals for yourself. Do you want to increase your average speed? Improve your endurance? Or maybe tackle more challenging terrains? Having clear goals in mind will guide you in selecting the appropriate features and specifications for your electric bike customization.
With a thorough assessment of your needs and goals, you can now move on to choosing the right electric motor for your bike, ensuring a customized riding experience tailored to your preferences.
Choose the Right Electric Motor for Your Bike
When looking for the perfect electric motor, it’s important to consider factors such as power output and compatibility with your bike’s frame.
Electric motor power refers to the maximum amount of power the motor can produce, which determines how fast and how far your bike can go. Higher power output means better acceleration and higher top speed.
On the other hand, electric motor efficiency is a measure of how well the motor converts electrical energy into mechanical energy. A more efficient motor will provide longer battery life and better overall performance.
It’s crucial to find a balance between power and efficiency that suits your riding needs and goals.
Once you have chosen the right electric motor, it’s time to gather the necessary tools and supplies for the installation process.
Gather the Necessary Tools and Supplies
To gather the necessary tools and supplies for the installation process, make sure you have a wrench, screwdriver, and wire cutters readily available. Choosing the right tools is crucial for a successful electric conversion of your bike.
A wrench will be necessary for removing and tightening various components, while a screwdriver will come in handy for removing screws and bolts. Wire cutters are essential for cutting and splicing wires during the installation process.
In addition to tools, selecting the appropriate supplies for customization is equally important. These supplies may include a motor kit, battery pack, controller, throttle, and wiring harness. These components will be used to convert your bike into an electric one.
Now that you have gathered the necessary tools and supplies, let’s move on to preparing your bike for the electric conversion.
Prepare Your Bike for the Electric Conversion
Before beginning the electric conversion of my bike, I need to make sure it’s prepared for the process.
This entails removing any unnecessary components that may hinder the installation of the electric kit, such as fenders or racks.
Additionally, I must ensure that my bike is in good condition, as any existing mechanical issues could affect the overall performance of the electric system.
Remove any unnecessary components
You can start by removing any unnecessary components from your bike to create space for the electric customization. This step is crucial in assessing components and optimizing performance. Here’s a breakdown of what you can do:
-
Evaluate the existing bike accessories and determine if they are essential for your electric conversion. Remove any racks, fenders, or baskets that may hinder the installation process.
-
Take a look at the drivetrain components such as the front and rear derailleurs, chainrings, and cassette. Consider upgrading them to more efficient options that can handle the increased power of the electric motor.
-
Assess the brakes and determine if they need an upgrade. Stronger brakes are crucial for safely stopping the bike with the added weight of the electric components.
By removing unnecessary components, you’ll have more space and freedom to install the electric conversion kit.
Now, let’s move on to ensuring your bike is in good condition for the customization process.
Ensure your bike is in good condition
Before we dive into the exciting process of installing an electric motor on your bike, it is crucial to ensure that your bicycle is in good condition.
Assessing the safety of your bike will help prevent any potential issues during the installation process and ensure a smooth riding experience once the motor is installed.
Start by checking the frame for any cracks or structural damage. Inspect the wheels and tires for proper inflation and any signs of wear and tear. Make sure the brakes are in good working order and the chain is properly lubricated.
Troubleshooting any problems at this stage will save you time and frustration later on.
Now that we have ensured the bike’s safety, let’s move on to the next section and install the electric motor.
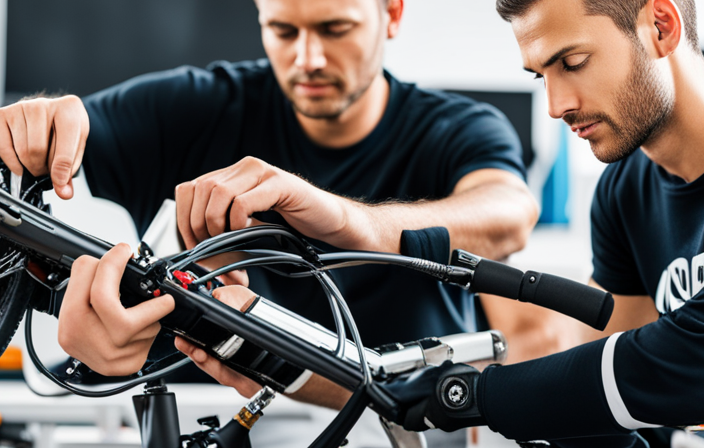
Install the Electric Motor
When installing an electric motor onto your bike, it’s crucial to follow the manufacturer’s instructions carefully. This will ensure that the installation is done correctly and that the motor functions optimally.
Additionally, it’s important to make sure that all connections between the motor and other components are secure. This will prevent any potential issues during operation.
Follow the manufacturer’s instructions
To properly customize your bike with electric components, make sure to carefully follow the manufacturer’s instructions. Assessing your riding goals is crucial in determining the type of electric components you need. Whether you want to increase speed, improve uphill performance, or simply enjoy a smoother ride, understanding your goals will help you choose the right components. Additionally, troubleshooting common issues is an important part of the customization process. Some common issues include motor overheating, battery drainage, and controller malfunctions. By following the manufacturer’s instructions, you can effectively troubleshoot these issues and ensure optimal performance. Remember to refer to the table below for a better understanding of the emotional impact of customizing your bike with electric components.
| Emotion | Description | Example |
|---|---|---|
| Excitement | Eager anticipation | Riding effortlessly |
| Empowerment | Feeling in control | Conquering hills |
| Freedom | Liberation | Exploring new paths |
Once you have followed the manufacturer’s instructions, it is important to make sure all connections are secure in order to prevent any potential issues.
Make sure all connections are secure
After carefully following the manufacturer’s instructions, it is crucial to ensure that all connections are secure before proceeding further. This step is essential to guarantee the proper functioning of your electric bike.
To start, assess the battery capacity by checking the voltage levels using a multimeter. A fully charged battery should have a voltage close to its rated capacity.
Next, examine all the electrical connections, including the battery terminals, motor connections, and controller wiring. Inspect for any loose or damaged wires and tighten any loose connections.
Additionally, it is advisable to test the electrical connections using a continuity tester to ensure there are no breaks or shorts.
By meticulously assessing battery capacity and testing electrical connections, you can ensure a safe and efficient operation of your customized electric bike.
Now, let’s move on to the next section where we will install the battery and controller.
Install the Battery and Controller
When it comes to installing the battery and controller for your electric bike, there are a few key points to consider.
First and foremost, it is crucial to choose the right battery for your needs. Factors such as voltage, capacity, and weight should all be taken into account to ensure optimal performance.
Additionally, properly mounting the battery and controller is essential for both safety and functionality. This involves securely fastening them to the frame using appropriate brackets or mounts, taking care to avoid any interference with other components or cables.
Choose the right battery for your needs
Make sure you pick the right battery for your specific needs when customizing your bike with electric. The battery capacity is an important factor to consider. It determines how far you can ride before needing to recharge. If you plan on longer rides, a battery with a higher capacity is recommended.
Additionally, consider the battery lifespan. Lithium-ion batteries are commonly used for electric bikes due to their long lifespan and high energy density. They can last for several years if properly maintained. It’s important to choose a battery from a reputable manufacturer to ensure quality and reliability.
With the right battery, you can enjoy extended rides without worrying about running out of power.
Now, let’s move on to properly mounting the battery and controller for a seamless integration into your bike.
Properly mount the battery and controller
To ensure a seamless integration into your ride, it’s important that you properly mount the battery and controller. Here’s how to do it:
-
Choose the right mounting accessories: Different e-bike kits come with different mounting options. Make sure you have the appropriate brackets, clamps, or straps to securely attach the battery and controller to your bike frame.
-
Consider battery compatibility: Check if the battery you’ve chosen is compatible with your bike’s frame. Some bikes have limited space or specific mounting points for the battery. Make sure the battery fits snugly and doesn’t interfere with other components or cables.
-
Positioning matters: Mount the battery and controller in a location that is accessible and doesn’t affect your bike’s balance. Consider factors like weight distribution and protection from the elements.
Now that you have successfully mounted the battery and controller, it’s time to connect and test the electric system.
Connect and Test the Electric System
You should definitely check if all the electrical connections are properly installed and give the system a test to ensure it’s working correctly. Testing the electric system is crucial to troubleshoot any issues that may arise. To help you understand the process, let’s take a look at the following table:
| Component | Connection | Test Result |
|---|---|---|
| Battery | Positive Terminal | Voltage: 48V |
| Negative Terminal | Voltage: 0V | |
| Controller | Throttle | Functioning |
| Brake Cutoff | Functioning | |
| Motor | Power Cables | Spinning |
| Sensor Cables | Functioning |
Adjust and Fine-tune Your Electric Bike
Once you’ve completed the testing process, it’s time to fine-tune and make adjustments to optimize performance. Fine tuning techniques are crucial in ensuring that your electric bike functions at its best.
Here are some key techniques to consider:
-
Battery Placement:
-
Adjust the position of the battery to achieve better weight distribution.
-
Securely fasten the battery to minimize vibrations and ensure a stable connection.
-
Motor Configuration:
-
Fine-tune the motor settings to match your riding style and terrain.
-
Optimize the motor assist levels to balance power output and battery life.
By applying these fine tuning techniques, you can optimize the performance of your electric bike, resulting in a smoother and more efficient ride.
Now that you’ve fine-tuned your electric bike, it’s time to enjoy the exhilarating experience it offers.
Enjoy Your Electric Bike
After fine-tuning my electric bike to perfection, it’s time to hit the road and enjoy the thrilling experience it offers. To enhance the speed of your electric bike, consider a few tips.
First, ensure that your tires are properly inflated, as this reduces rolling resistance.
Secondly, reduce wind resistance by wearing aerodynamic clothing and accessories.
Additionally, you can upgrade your battery to a more powerful one, which will provide a boost in speed.
When it comes to choosing accessories for your electric bike, consider your specific needs and preferences. Popular options include baskets or panniers for carrying groceries or other items, fenders to protect against splashes, and lights for increased visibility and safety.
Now that you’re ready to ride, let’s delve into how to maintain and care for your electric bike. Just like any other vehicle, regular maintenance is crucial to prolonging the lifespan of your electric bike.
Maintain and Care for Your Electric Bike
When it comes to maintaining and caring for your electric bike, there are a few key points to keep in mind.
First and foremost, it’s crucial to regularly check and charge the battery. This will ensure that your bike is always ready to go when you need it.
Additionally, it’s important to keep the motor and components clean and properly lubricated. This will help to extend the lifespan of your bike and ensure optimal performance.
Regularly check and charge the battery
To ensure your bike is ready for every ride, make sure you regularly check and charge the battery. Checking the battery capacity is crucial to maintain optimal performance.
Start by inspecting the battery for any physical damage or signs of wear. Next, check the voltage level using a multimeter to ensure it is within the recommended range. If the battery capacity is low, it’s time to charge it.
When charging, it is important to optimize the charging time. Use a charger specifically designed for your bike’s battery and follow the manufacturer’s instructions. Avoid overcharging, as it can reduce the overall battery lifespan.
By regularly checking and charging the battery, you can ensure a reliable and efficient ride every time.
Keeping the motor and components clean and lubricated further enhances the performance and longevity of your electric bike.
Keep the motor and components clean and lubricated
Make sure you regularly clean and lubricate the motor and components to maintain their performance and longevity. Regular maintenance is crucial for the smooth operation of your bike’s electric motor and other components.
Cleaning the motor helps remove any dirt or debris that may accumulate over time, preventing it from causing damage or reducing efficiency. Lubrication, on the other hand, ensures that the moving parts of the motor and other components work optimally, reducing friction and wear.
When choosing a lubricant, make sure it is specifically designed for electric bike motors and components. Look for lubricants that are non-corrosive, provide excellent protection against wear, and have a high temperature resistance.
Regular maintenance and proper lubrication will not only extend the lifespan of your motor and components but also enhance the overall performance of your electric bike.
Frequently Asked Questions
What are the different types of electric motors available for bike customization?
There are three main types of electric bike motors: hub motors, mid-drive motors, and friction drive motors. Hub motors are simple and reliable, but can affect balance. Mid-drive motors provide better weight distribution and efficiency, while friction drive motors are lightweight but less efficient.
How do I know if my bike is compatible for an electric conversion?
To choose the right electric motor for your bike conversion, first determine the compatibility of your bike. Consider factors like frame size, weight, and type of brakes. Next, follow steps such as removing the pedals, installing the motor, and connecting the wiring.
Can I use any type of battery for my electric bike or are there specific requirements?
When it comes to battery compatibility for electric bikes, there are specific requirements. Not all batteries will work, so it’s important to choose one that is compatible with your bike’s motor and voltage specifications. Proper battery compatibility ensures optimal performance and longevity. The benefits of electric bike customization include increased speed, extended range, and a more efficient and enjoyable riding experience.
Do I need any special tools or equipment to install the electric motor?
To install an electric motor on a bike, you will need some special tools and installation equipment. These may include wrenches, screwdrivers, wire cutters, and a torque wrench. Having the right tools will make the installation process easier and ensure a secure and efficient setup.
Are there any safety precautions I need to take when connecting and testing the electric system on my bike?
Safety is paramount when connecting and testing the electric system on your bike. Before starting, ensure you have proper safety gear like gloves and goggles. Follow testing procedures carefully to avoid any accidents or damage to the system.
Conclusion
In conclusion, customizing a bike with an electric motor can be a rewarding and enjoyable project.
By assessing your riding needs and goals, choosing the right electric motor, gathering the necessary tools and supplies, preparing your bike, installing the motor, connecting and testing the electric system, and adjusting and fine-tuning your bike, you can create a personalized electric bike that suits your needs perfectly.
Remember to maintain and care for your electric bike regularly to ensure its longevity and optimal performance.
Now, go out and enjoy the thrilling experience of riding your own customized electric bike!