
Did you realize that having the appropriate chain length on your bike can significantly affect its performance and lifespan? It is a critical part of bike maintenance that is frequently ignored.
In this article, I will guide you through the process of determining the ideal chain length for your bike. By following these technical and precise steps, you’ll be able to ensure optimal performance and avoid any unnecessary wear and tear on your bike’s drivetrain.
Let’s get started!
Key Takeaways
- Proper chain length is crucial for bike performance and longevity.
- Measuring chainstay length accurately helps in calculating the correct chain length needed for the drivetrain.
- Knowing the number of gears on your bike is essential for adjusting the chain length correctly.
- Regular chain maintenance and checking chain tension are important for optimal performance and longevity.
Understand the Importance of Proper Chain Length
You should understand the importance of having the proper chain length on your bicycle. Common chain length mistakes can lead to a variety of issues that can affect your cycling experience.
One common mistake is having a chain that is too long. This can cause excessive slack, leading to poor shifting performance and potential chain drop.
On the other hand, a chain that is too short can put excessive strain on the drivetrain components, leading to premature wear and possible damage.
These consequences of improper chain length can not only affect the performance of your bike but also increase the risk of accidents and injuries. Therefore, it is crucial to ensure that your bicycle’s chain is of the correct length.
To do so, gather the necessary tools and follow the proper steps.
Gather the Necessary Tools
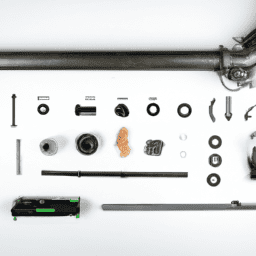
To measure the chain, make sure you have all the necessary tools. Here are the tools needed:
-
Chain Checker: This tool helps determine if the chain is worn and needs to be replaced. It measures the distance between the links.
-
Chain Breaker: Used to remove and install pins in the chain, this tool is essential for adjusting the chain length.
-
Tape Measure: A precise measurement of the chain length is crucial, and a tape measure helps with accuracy.
-
Bike Stand: Positioning your bike correctly is essential for an accurate chain measurement. A bike stand allows you to elevate the bike and access the chain easily.
Common mistakes when measuring chain length include not using a chain checker, relying on visual inspection alone, or not positioning the bike correctly. By gathering these tools and avoiding these mistakes, you will be ready to accurately measure your bicycle chain length.
Now, let’s move on to positioning your bike correctly for the next step.
Position Your Bike Correctly
Positioning your bike correctly is crucial for obtaining an accurate measurement of the chain. To ensure proper bike positioning, start by placing your bike on a level surface. Make sure the bike is stable and not leaning to either side.
Then, shift the chain onto the smallest chainring in the front and the smallest cassette cog in the back. This will provide the most slack in the chain, allowing for an easier measurement.
Next, pull the chain tight by pushing the rear derailleur forward. This will eliminate any sag in the chain. It’s important to avoid common chain length mistakes, such as measuring the chain when the bike is not in the correct gear combination.
By following these steps, you can confidently move on to determining the number of gears on your bike and proceed with adjusting the chain accordingly.
Determine the Number of Gears on Your Bike
First, take a look at how many gears your bike has. To determine the number of gears on your bike, locate the gear shifters on your handlebars. Count the number of distinct positions or clicks as you shift through the gears. Each distinct position or click represents a different gear.
Once you have determined the number of gears, you can calculate the gear ratios and determine the gear range of your bike. To calculate gear ratios, divide the number of teeth on the chainring (the front gears) by the number of teeth on the cassette (the rear gears). This will give you a ratio for each gear. The gear range is the difference between the highest and lowest gear ratios.
Now that we have established the number of gears, we can move on to the next step and measure the chainstay length.
Measure the Chainstay Length
Now that we know the number of gears on your bike, let’s move on to measuring the chainstay length.
To accurately determine the correct chain length for your bicycle, it is crucial to measure the chainstay length. The chainstay is the part of the frame that connects the bottom bracket to the rear wheel dropout.
Start by measuring the distance from the center of the bottom bracket to the center of the rear wheel axle. This measurement will give you the chainstay length.
Additionally, it is important to consider the chainstay angle, which can vary depending on the bike’s design. The frame material also plays a role as it affects the chainstay length.
Once you have measured the chainstay length and considered these factors, you can proceed to calculate the chain length needed for your bike’s drivetrain.
Calculate the Chain Length
To calculate how long your chain needs to be, start by taking into account the chainstay length and any variations in chainstay angle or frame material. This will help ensure proper tension and optimal performance. To determine the chain length, you can use the following formula:
[Chain Length = (Chainstay Length + (2 Largest Chainring) + (2 Largest Rear Cog)) + 2]In this formula, the chainstay length is measured from the center of the bottom bracket to the center of the rear axle. The largest chainring refers to the front chainring with the highest number of teeth, and the largest rear cog refers to the rear sprocket with the highest number of teeth. Adding 2 to the overall calculation accounts for the extra length needed for the chain to wrap around the gears properly.
After calculating the chain length, you can move on to the next step of checking for proper tension. This will ensure optimal performance and prevent any potential issues.
Check for Proper Tension
Checking for proper tension is essential to ensure optimal performance and prevent any potential issues. Adjusting chain tension for optimum performance is crucial, as an overly tight chain can cause excessive wear on the drivetrain components, while a loose chain can result in poor shifting and even chain drop.
To check for proper tension, start by shifting the chain onto the smallest chainring and smallest rear cog. Then, apply pressure on the chain midway between the front and rear sprockets. Ideally, the chain should have a slight amount of up-and-down movement, around 0.5-1 centimeter.
Avoid common mistakes such as overtightening the chain, as this can lead to premature wear and a loss of efficiency. With the correct tension set, we can now proceed to the next step and test the chain length.
Test the Chain Length
After properly adjusting the chain tension, it’s important to test if the chain length is correct. To do this, follow these steps:
-
Check chain tension: Ensure that the chain is not too loose or too tight. If it’s too loose, it may skip or fall off the gears. If it’s too tight, it can put excessive strain on the drivetrain components.
-
Consider chain wear: Over time, chains can stretch and wear out. If your chain has worn beyond its recommended limit, it may be time to replace it. A worn chain can cause poor shifting performance and premature wear on your cassette and chainrings.
-
Measure chain length: Use a chain checker tool to determine if the chain is the correct length. The tool will indicate if the chain has stretched beyond its usable limit.
-
Make adjustments if necessary: If the chain length is incorrect, you may need to add or remove links to achieve the proper length. This will ensure smooth and efficient shifting.
Now that you have tested the chain length, let’s move on to making adjustments if necessary.
Make Adjustments if Necessary
After testing the chain length, it is important to make any necessary adjustments to ensure proper tension. Adjusting chain tension is crucial for optimal performance and to prevent any potential issues while riding. Common chain length mistakes include having a chain that is too tight or too loose. To make adjustments, refer to the table below for guidance on how to adjust the chain tension properly:
| Chain Tension | Action Required |
|---|---|
| Too tight | Loosen the chain by adjusting the rear derailleur or by using a chain tensioner. |
| Too loose | Tighten the chain by adjusting the rear derailleur or by removing a link if necessary. |
By addressing these common chain length mistakes and adjusting the tension accordingly, you can ensure a smooth and efficient ride. Maintaining your chain for optimal performance is the next step in achieving a well-functioning bicycle.
Maintain Your Chain for Optimal Performance
To ensure your bike’s chain performs optimally, it’s important to regularly maintain it. Proper lubrication techniques are crucial for a smooth chain.
First, clean the chain thoroughly with a degreaser to remove any dirt or debris. Then, apply a high-quality bicycle chain lubricant to all the links, ensuring it penetrates each one. Avoid over-lubricating, as excess oil can attract more dirt and cause the chain to wear out faster.
Secondly, avoid common chain maintenance mistakes. One such mistake is using WD-40 as a lubricant, as it tends to attract dirt and does not provide proper lubrication. Another mistake is neglecting to regularly check the chain for wear and tear.
By following these maintenance tips and avoiding common mistakes, you can keep your bike’s chain in optimal condition and enhance your riding experience.
Frequently Asked Questions
What are the consequences of having a chain that is too long or too short?
Having a chain that is too long or too short can have serious consequences. A chain that is too long can cause poor shifting, chain drops, and excessive wear. On the other hand, a chain that is too short can damage the derailleur or frame and lead to poor shifting and chain breakage. Proper chain tension is crucial for optimal performance and longevity. To adjust chain tension correctly, follow the manufacturer’s guidelines and ensure the chain has the proper amount of slack.
Can I use a chain that is longer than the recommended chain length?
Yes, you can use a longer chain, but it has pros and cons. The main advantage is increased compatibility with larger gears. However, it may negatively affect shifting performance due to excessive slack.
How often should I check the tension of my bicycle chain?
I check the tension of my bicycle chain regularly to ensure optimal performance. Proper chain tension reduces wear on the drivetrain components, improves shifting accuracy, and prevents chain skipping.
Are there any tools or techniques to make measuring the chainstay length easier?
To measure chainstay length, specialized tools called chain measurement tools are available. These tools accurately measure the distance between the bottom bracket and the rear axle, making it easier to determine the correct chain length for your bicycle.
What are some signs that indicate my chain needs to be replaced?
When my chain starts skipping and shifting poorly, I know it’s time for a replacement. Regular cleaning and lubrication can help delay wear, but eventually the signs of chain wear become inevitable.
Conclusion
In conclusion, determining the correct chain length for your bicycle is crucial for optimal performance and longevity of your drivetrain. By following the steps outlined in this article, you can ensure that your chain is the right length and properly tensioned.
Remember to regularly maintain your chain to keep it in top condition. With the right chain length and proper maintenance, you can enjoy a smooth and efficient ride every time.
Keep exploring and discovering the truth behind bicycle mechanics to enhance your cycling experience.