
Repairing a flat bicycle tire might appear to be an overwhelming job, yet it becomes a simple and swift task when equipped with the appropriate tools and understanding. Being a passionate cyclist, I’ve experienced numerous flat tires and have grown accustomed to the method of repairing them.
In this article, I will guide you through the steps to identify the cause of the flat tire, remove the tire and tube, patch or replace the tube, reassemble the tire, and test the tire to ensure it is ready for your next ride.
The first step in fixing a flat tire is identifying the cause of the flat. This could be a puncture from a sharp object, a pinch flat from hitting a pothole or curb, or a damaged valve stem.
Once you have identified the cause, you can move on to removing the tire and tube. This involves releasing the air from the tire, removing the tire from the rim, and then removing the tube from inside the tire.
From there, you can determine whether the tube needs to be patched or replaced, and reassemble the tire before testing it to ensure it is ready for use.
Key Takeaways
- Regularly checking tire pressure and avoiding obstacles on the road can prevent flat tires.
- Proper tire inflation and maintenance, as well as inspecting tire pressure and tread, are crucial for preventing flat tires.
- Identifying the cause of the flat, removing the tire and tube, patching or replacing the tube, and reassembling the tire are the steps to fix a flat tire.
- Choosing the right type of bicycle tire for your needs, and understanding the pros and cons of thin vs thick tires, is important for preventing punctures and achieving optimal performance.

Kryptonite Folding Bike Lock, Compact Lightweight High Security Anti-Theft Foldable Bicycle Lock with 2 Keys and Mount for E-Bikes Scooter Road Mountain Bikes, 88.4cm (34.8 in)
HIGH-SECURITY DESIGN: This Anti-Theft folding bike lock is made from 3mm hardened steel bars with tightened rivets for...
As an affiliate, we earn on qualifying purchases.
Identify the Cause of the Flat Tire
Before you can fix the flat tire, it’s important to identify the cause of the problem. Start by inspecting the tire damage. Look for any punctures, cuts, or tears on the tire. If you find any, remove the tire from the wheel and check the inner tube for corresponding damage.
Another cause of flat tires is pinch flats, which occur when the tire is compressed between the rim and an obstacle. Preventing future flats involves ensuring that your tires are properly inflated and avoiding obstacles on the road. Regularly checking your tire pressure and maintaining the recommended level will also help prevent pinch flats.
Now, it’s time to remove the tire and tube to fix the flat.

Master Lock Black Hardened Steel Link Folding Bike Lock with Key, Heavy Duty Anti-Theft Lock for Bicycles, Electric Scooters, 2-3/4ft (84cm) Length x 0.13 in (3.5 mm), 8335EC
HARDENED STEEL SECURITY: The folding bike lock has hardened steel links that resist cutting, sawing, and prying
As an affiliate, we earn on qualifying purchases.
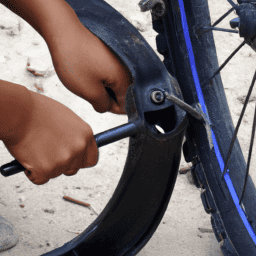
Remove the Tire and Tube
To start, you’ll wanna loosen the tire by deflating it completely and using a tire lever to pry it off the rim. It’s important to note that proper tire inflation and tire maintenance tips can help prevent flat tires in the future.
Different types of bicycle tires also have their pros and cons. For example, thin, lightweight tires are great for speed but are more prone to punctures, while thicker, heavier tires offer more durability but can slow you down. It’s important to choose the right tire for your needs and to maintain it properly to avoid flats.
Once the tire is off, remove the tube from the tire by pulling the valve out first and then gently pulling the rest of the tube out.
Check the tube for any holes or punctures, and if it can’t be patched, it will need to be replaced. This leads us to the next step of patching or replacing the tube.

Seatylock FoldyLock Compact Folding Bike Lock - Award Winning Patented Lightweight High Security Bicycle Lock - Heavy Duty Anti Theft Smart Secure Guard with Keys & Case for Bikes or Scooters
TOP RATED LIGHTWEIGHT COMPACT BIKELOCK - Best Light Weight Folding Bike Lock. Portable Solid Key Bike Lock Protects...
As an affiliate, we earn on qualifying purchases.
Patch or Replace the Tube
Now it’s time to deal with the pesky puncture in your trusty steed’s inner tube. You’ll want to assess the damage and decide whether you can patch the hole or if it’s time to bid farewell to the old tube and replace it with a new one. First, let’s discuss the pros and cons of patching versus replacing the tube.
| Patching | Replacing |
|---|---|
| Cheaper | More expensive |
| Less wasteful | Easier and quicker |
| May not hold up as well | Fresh start, less chance of future flats |
| Requires more time and effort | Guaranteed fix |
When patching a tube, you’ll need to locate the hole, rough up the area around it with sandpaper, apply the patch and allow it to dry for several minutes. Popular brands for bicycle tubes include Continental, Schwalbe, and Michelin. However, if the hole is too large or the tube is old and worn, it’s best to replace it entirely. Once you’ve decided which route to take, it’s time to get to work and fix that flat.
Let’s now move on to the next step and reassemble the tire.

ROCKBROS Folding Bike Lock 120cm/47.24inch with 2 Keys Bike Locks E Bicycle Non Theft Heavy Duty Electric Scooter Lock for Ebike Motorcycle E Bicycle
STRONG AND DURABLE:The folding lock is made of alloy structural steel with high tensile strength of 5mm steel...
As an affiliate, we earn on qualifying purchases.
Reassemble the Tire
Alright, it’s time to put that tire back together and get back on the road!
First, make sure the tire is properly seated on the rim by running your fingers around the circumference of the tire, ensuring that the bead is evenly spaced all the way around.
Next, insert the valve stem into the hole in the rim and tighten the locknut using a valve stem tool or pliers.
Now, it’s time to inflate the tire to the recommended pressure, which can be found on the sidewall of the tire. Proper inflation is crucial to ensure a smooth and safe ride.
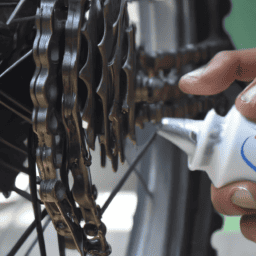
Maintaining your tire pressure is just as important as fixing a flat tire. Check your tire pressure regularly and make sure it is within the recommended range. Proper tire maintenance, such as keeping the tires clean and avoiding sharp objects on the road, can also help prevent future flat tires.
Once you have inflated the tire to the correct pressure, give it one final check to make sure it is seated properly and there are no bulges or deformities.
Now, it’s time to test the tire on the road and make sure it’s ready to go!
Test the Tire
After reassembling the tire, it’s important to take it for a spin and ensure that it’s rolling smoothly and without any wobbling, like a well-oiled machine on a freshly paved road. Before starting your ride, it’s essential to inspect the pressure of the tire and ensure it’s within the recommended range. You can find the recommended pressure range on the sidewall of the tire, usually measured in PSI (pounds per square inch).
In addition to inspecting the tire pressure, it’s important to check the tread as well. The tread is the pattern on the tire that comes into contact with the road, and it’s essential for proper traction. If the tread is worn down or uneven, it can affect your bike’s handling and overall safety. To check the tread, look for any signs of wear or damage, such as cracks, cuts, or bald spots. If you notice any issues with the tread, it’s best to replace the tire before riding again.
Frequently Asked Questions
How often should I check my bike tires for flats?
I check my bike tires for flats every time I ride. Frequency of inspection depends on usage and terrain. Proper tire inflation is key to preventing flats. Check for debris and wear regularly.
Can I use any patch kit or do I need a specific one for my bike tire?
When it comes to patching a bike tire, it’s important to use a patch kit that is specifically designed for bike tires. Common patching mistakes include not properly cleaning the area and not applying enough pressure to the patch. Patch kit options range from basic to more advanced kits with multiple patches and tools.
What is the best way to prevent future flat tires?
Coincidentally, I used to get flat tires all the time until I learned the importance of maintaining proper tire pressure and using tire liners. These simple techniques can prevent most future flats.
How do I know if I need to replace my bike tire instead of just patching it?
To determine if a bike tire needs replacement, inspect for signs of irreparable damage such as large tears or punctures along the sidewall or tread. Cost effective alternatives include purchasing a new tire or seeking professional help.
Is it safe to ride my bike with a patched tire or should I replace it as soon as possible?
While a patched tire can be safe to ride on, it’s important to consider the longevity of the patch and whether it was done professionally. If in doubt, it’s best to replace the tire.
Conclusion
Well, that’s all for now on fixing a bicycle flat. I hope this guide has been helpful and informative to you.
Remember that prevention is key to avoiding flat tires, so make sure to keep your tires properly inflated and check them regularly for any signs of wear and tear.
It’s also important to note that sometimes a flat tire may be caused by a more serious issue, such as a damaged rim or tire. In these cases, it’s best to take your bike to a professional mechanic for repair.
And always wear a helmet and practice safe cycling habits to prevent accidents and injuries. Overall, fixing a flat tire may seem daunting at first, but with a little practice and patience, it can be a simple and satisfying task.
Happy cycling!