Do you find yourself constantly stumbling over your bicycle whenever you step into your garage? Are you looking to clear out some room and ensure your bicycle is neatly stored and not obstructing your path? Mounting your bike on the garage wall serves as an effective method for saving space, regardless of the garage’s size.
In this article, we will guide you through the process of hanging your bike in the garage, step by step. To start, you will need some basic tools and equipment, including a bike hanger, a stud finder, a drill, screws, and a level.
Once you have gathered these items, you can choose the perfect spot to hang your bike. Consider the height, the amount of clearance required, and the accessibility of the location. With the right spot in mind, you can then proceed to install the bike hanger securely.
By following these instructions, you can easily hang your bike in your garage and create more space for your other belongings.
Key Takeaways
- Choose a suitable spot for hanging your bike by considering height, clearance, and accessibility.
- Follow manufacturer’s instructions and use necessary tools/hardware to hang the bike securely.
- Regularly check the hanger and adjust/clean it to prevent damage, rust, or corrosion.
- Hanging your bike in the garage can save space and reduce the risk of damage to your bike.
Gather the Necessary Tools and Equipment
You’ll need to gather all the tools and equipment you’ll need before you can start hanging your bicycle in the garage. First, decide which type of bike hanger you want to use. There are several options available, including wall-mounted hooks, ceiling pulleys, and floor stands. You can either purchase a pre-made hanger from a store or try a DIY option using materials like PVC pipes or wooden dowels.
Once you’ve decided on the type of hanger, make sure you have all the necessary tools to install it. This may include a drill, screws, anchors, and a level. If you’re unsure about what tools are required, consult the instructions that come with the hanger or do some research online.
With all the tools and equipment gathered, you’re ready to move on to the next step: choosing the right spot to hang your bike.
Choose the Right Spot to Hang Your Bike
When considering where to store your trusty two-wheeler, it’s important to find a suitable location that won’t get in the way of your daily routine. Start by choosing a spot that is easily accessible and won’t obstruct your path when entering and exiting the garage.
Additionally, take into consideration the optimal height for hanging your bike. A height of around 4 to 6 feet from the ground is usually ideal for most people. This allows for easy access to your bike without requiring too much effort to lift it up or bring it down.
It’s also important to check the weight limit of the hanger you plan to use. Make sure it can support the weight of your bike and any additional accessories, such as a basket or panniers.
Once you have found the perfect spot and checked the weight limit, you’re ready to move on to the next step: installing the bike hanger.
Install the Bike Hanger
Congratulations, you’ve made it to the fun part: getting your bike hanger up and ready for action!
First, you need to choose the right type of bike hanger for your needs. There are several options to consider, including wall-mounted hangers, ceiling-mounted hangers, and pulley systems.
Wall-mounted hangers are a good choice if you have a lot of wall space and want to keep your bike out of the way. Ceiling-mounted hangers are ideal if you have limited wall space or want to keep your bike up and out of the way. Finally, pulley systems are a great option if you have a high ceiling and want to easily raise and lower your bike.
Once you’ve chosen the right type of hanger, it’s time to install it. Follow the manufacturer’s instructions carefully and make sure you have all the necessary tools and hardware. Most bike hangers require screws, anchors, and a drill or screwdriver.
If you’re unsure about the installation process, consider seeking the help of a professional or consulting online tutorials. It’s important to note that alternative installation methods, such as using a ladder to hang your bike from the ceiling, can be dangerous and are not recommended.
Now that your bike hanger is securely installed, it’s time to hang your bike!
Hang Your Bike
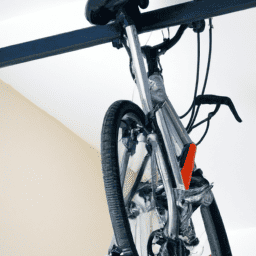
To hang your bike on the hanger, lift it up and place the wheels onto the hooks. Make sure your bike is securely attached by checking that the hooks are properly engaged with the frame or wheel spokes.
It’s important to ensure your bike is properly secured to avoid any accidents or damage to the bike.
Lift Your Bike onto the Hanger
First, make sure the hanger is properly secured to the ceiling and can support the weight of the bike. You don’t want to risk the bike falling and causing injury or damage.
Once the hanger is secured, follow these steps to lift your bike onto it:
- Stand facing the wall with your bike in front of you.
- Lift your bike onto its back wheel and hold it by the seat.
- With your other hand, grab the handlebars and lift the front wheel up towards the ceiling.
- Hook the front wheel onto the hanger and release your grip on the handlebars.
By following these steps, you can safely and efficiently hang your bike in your garage. Make sure the bike is securely attached before moving on to the next step.
Ensure Your Bike is Securely Attached
Make sure you have your bike firmly secured before proceeding, as you don’t want to risk it coming loose and causing a potential disaster down the road.
Hanging your bike in the garage has many benefits, such as saving space and reducing the risk of damage from leaning against walls or other objects. There are various types of bike hangers available, including pulley systems, hooks, and wall-mounted racks. Choose the one that best suits your needs and space constraints.
Once you have securely hung your bike, it’s important to periodically check that it is still securely attached. This will help ensure that your bike is safe from falling and that your garage remains free from clutter and hazards.
In the next section, we’ll explore how to maintain your bike hanger to ensure it remains sturdy and reliable.
Maintain Your Bike Hanger
You should regularly check and adjust your bike hanger to ensure it’s secure and won’t damage your bike. One important aspect of maintaining your bike hanger is to keep it clean. Dirt, dust, and debris can accumulate on the hanger, which can cause it to become less effective over time.
To clean your bike hanger, wipe it down with a clean cloth or use a soft-bristled brush to remove any dirt or debris. You can also use a mild detergent or bike cleaner to remove any stubborn dirt or stains. Be sure to dry the hanger completely after cleaning to prevent rust from forming.
Another important aspect of maintaining your bike hanger is rust prevention. Rust can weaken the hanger and cause it to fail over time. To prevent rust, you should regularly inspect your hanger for any signs of rust or corrosion. If you notice any rust or corrosion, use a wire brush or sandpaper to remove it.
You can also apply a rust inhibitor or rust-resistant paint to the hanger to prevent future rust from forming. By regularly cleaning and inspecting your bike hanger, you can ensure that it remains secure and effective for years to come.
Frequently Asked Questions
What is the weight limit for bike hangers and how do I know if my bike is too heavy for the hanger I have chosen?
Choosing an appropriate hanger is crucial. Factors affecting weight limit include material, design, and installation. To know if your bike is too heavy, check the hanger’s weight capacity and compare it to your bike’s weight.
Can I hang multiple bikes on one hanger or do I need a separate hanger for each bike?
To hang multiple bikes, you can use a hanger designed for multiple bikes or use separate hangers. When hanging multiple bikes on one hanger, make sure to balance the weight distribution by hanging each bike at the same height.
How do I adjust the height of the bike hanger to make sure my bike hangs at the right level?
Achieving the ideal hanging position requires adjusting the mechanism. Use the provided tools to loosen the screws, reposition the hanger, and tighten accordingly. Ensure the bike hangs level for maximum efficiency.
What should I do if my garage ceiling is too high to easily reach the installation point for the bike hanger?
If your garage ceiling is too high for easy installation of your bike hanger, use a garage pulley system to lift and lower your bike. Alternatively, use a ladder extension to reach the installation point safely.
How do I ensure that my bike is securely fastened to the hanger and won’t fall down over time?
Ensure your bike is securely fastened by properly installing the hanger and using bike storage accessories. Start by positioning the hanger at the correct height and angle. Then, add accessories such as hooks and bungee cords to keep your bike stable.
Conclusion
Congratulations! You’ve successfully learned how to hang your bicycle in your garage. Now, your bike is out of the way and safely stored until your next adventure.
But there’s more to it than just hanging your bike. It symbolizes more than just a means of transportation; it represents your freedom and adventure. As you hang your bike, take a moment to appreciate the adventures that await you and the memories you will create.
Just as you carefully chose where to hang your bike, choose your next adventure with the same care and attention to detail. Remember to maintain your bike hanger, just as you maintain your bike, to ensure it lasts for many more adventures to come.
By following these clear and concise instructions, you’ve not only learned how to hang your bike but also gained a deeper appreciation for what it represents. Now, go out and explore the world on your trusty bicycle, and don’t forget to hang it up safely when you return.
Happy riding!


