Putting on a new bike chain might appear to be a challenging endeavor, yet it’s genuinely a simple procedure that can be done with just a few fundamental tools and a bit of patience. In this article, I’ll walk you through the procedure for installing a bike chain, starting from determining the proper length to executing the last tweaks.
Before you begin, it’s important to gather the necessary tools and materials. You will need a chain breaker tool, a new chain, a ruler or tape measure, and some chain lubricant. It’s also a good idea to have a clean workspace and a towel or rag on hand to wipe away any excess lubricant or debris.
Once you have everything you need, you can begin the process of installing your new bicycle chain.
Key Takeaways
- Measuring the correct chain length is crucial for optimal bike performance and avoiding common mistakes like not accounting for derailleur cage length or chain stretch.
- Proper lubrication is essential for reducing friction and prolonging chain life, and choosing the right lubricant is important for different weather conditions and avoiding dirt and debris buildup.
- Installing a new chain requires basic tools and patience, including a chain breaker tool, a new chain, a ruler or tape measure, and chain lubricant.
- Testing the chain and making final adjustments, such as adjusting tension and troubleshooting any issues, is important for a smooth ride.

Sportneer Bike Lock: Heavy Duty Anti Theft Bike U Lock with 5ft Security Steel Cable - 17mm Shackle Bicycle U-Locks with 2 Keys & Mounting Bracket for Road Mountain Bike, Size 7.76''x5.02'', 1.64lb
Portable & Rugged: The Sportneer bike u lock is both portable and heavy-duty. It measures 7.76x5.02inches, with a...
As an affiliate, we earn on qualifying purchases.
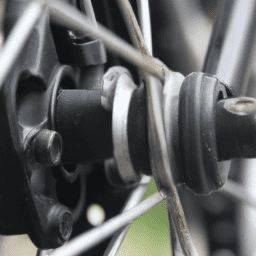
Gather Necessary Tools and Materials
Before you start, make sure you’ve got all the tools and materials you need. You’ll need a chain tool, chain lubricant, and a rag to clean up any messes. The chain tool is essential because it allows you to break the chain and remove links to fit the chain to your bike. A chain sizing guide can also be helpful to ensure you get the right length of chain for your bike.
It’s important to have the right tools to make the installation process go smoothly. Additionally, using chain lubricant will help extend the life of your chain and ensure it runs smoothly.
Once you have all the necessary tools and materials, you can move on to measuring the correct chain length.
Blackburn Outpost Fat Front or Rear Bike Rack (Outpost Pewter, One Size)
FITS FAT AND MOST TIRE SIZES - Our patent-pending adjustable width design will work with most fat bike...
As an affiliate, we earn on qualifying purchases.
Measure the Correct Chain Length
To get the right fit, wrap the chain around the largest chainring and the largest cog and use a piece of string to measure the length needed. This is one of the most common chain sizing techniques that’s used by bike mechanics and enthusiasts alike.
Make sure the chain isn’t too tight or too loose when measuring the length, as this can affect the performance of your bike.
When measuring the chain length, it’s important to avoid some common mistakes that can lead to an inaccurate measurement. One of the most common mistakes is not accounting for the derailleur cage length.
The derailleur cage length is the distance between the two jockey wheels of the derailleur, and it needs to be factored in when measuring the chain length. Another mistake is not taking into account the chain stretch, which can happen over time and can affect the length of the chain.
By avoiding these common mistakes and following the correct chain sizing techniques, you can ensure that you get the right fit for your bike’s new chain.
To ensure a smooth and easy installation of the new chain, it’s important to follow the correct steps.

Blackburn Outpost Front and Rear World Touring Bike Rack (Grey, Front)
UNIVERSAL FIT SYSTEM - This rack offers more fitment flexibility than other systems, to fit more bikes. That's...
As an affiliate, we earn on qualifying purchases.
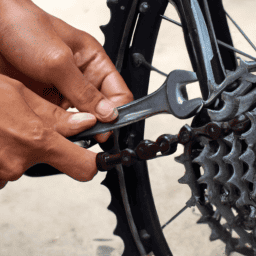
Install the New Chain
Now that you’ve got the correct chain length, it’s time to attach it to your bike and start riding! Here’s how:
-
First, thread the chain through the derailleur and around the cassette. Make sure the chain is sitting on the smallest cog.
-
Next, thread the chain through the derailleur on the front of the bike. Make sure the chain is sitting on the smallest chainring.
-
Finally, connect the ends of the chain using the chain tool. Make sure the chain is properly connected and that the pin is fully seated.
Chain maintenance is crucial for ensuring optimal bike performance. Common mistakes when installing a new chain include not properly seating the pin, not threading the chain correctly, and not checking the length before installation.
Now that the new chain is installed, it’s time to move on to the next step: lubricating the chain.

ROCKBROS Rear Bike Cargo Rack Quick Release Bike Carrier Rack with Fender Mountain Road Bicycle Rear Racks
QUICK RELEASE CLAMP for easily mount on the seat post or take the rear bike rack off, you...
As an affiliate, we earn on qualifying purchases.
Lubricate the Chain
Now that I’ve installed the new chain, it’s time to make sure it stays in top condition by properly lubricating it.
Choosing the right lubricant is important as it can affect the chain’s performance and lifespan.
Once I’ve chosen the right lubricant, I’ll need to apply it evenly and thoroughly to ensure the chain is adequately lubricated and protected from wear and tear.
Choose the Right Lubricant
Using the correct lubricant is essential when installing a bicycle chain, as it helps to reduce friction and prolong the life of the chain. One of the benefits of regular lubrication is that it prevents rust and corrosion from building up on the chain. This is especially important if you frequently ride in wet or muddy conditions.
Another benefit is that it reduces the amount of wear and tear on the chain, which in turn extends its lifespan. When choosing a lubricant, it’s important to avoid common mistakes such as using too much or too little, or using the wrong type of lubricant for your specific chain.
Different types of lubricants are designed for different conditions, such as wet or dry weather. It’s also important to choose a lubricant that won’t attract dirt and debris, as this can cause additional wear and tear on the chain. By choosing the right lubricant and applying it correctly, you can ensure that your bicycle chain stays in good condition for as long as possible.
Next, I’ll explain how to apply the lubricant to your chain.
Apply the Lubricant
To keep your ride smooth and your bike running smoothly, it’s essential to apply lubricant correctly. Regular lubrication of your bike chain can increase its lifespan by up to 30%, which is why it’s important to know how to apply it properly.
Here are some tips on how to avoid common lubrication mistakes and reap the benefits of regular lubrication:
-
Clean the chain thoroughly before lubrication. Use a degreaser to remove any dirt or grime buildup on the chain. This will ensure that the lubricant can penetrate deep into the chain links and work effectively.
-
Apply lubricant evenly along the length of the chain. Too much or too little lubrication can cause problems, so be sure to apply it in the right amount. Use a clean rag to wipe off any excess lubricant on the outer plates of the chain.
-
Let the lubricant soak in for a few minutes before wiping off any excess. This will allow the lubricant to penetrate the chain links and provide long-lasting protection.
By following these tips, you can ensure that your bike chain is properly lubricated and working at its best. Once you’ve finished applying the lubricant, it’s time to test the chain and make any final adjustments before hitting the road.
Test the Chain and Make Final Adjustments
Before you take your newly installed bicycle chain for a spin, it’s important to test it and make any final adjustments to ensure a smooth ride.
Start by adjusting the tension of the chain to make sure it’s not too loose or too tight. If it’s too loose, it can jump off the gears, and if it’s too tight, it can cause excessive wear on the chain and the gears.
To adjust the tension, shift the bike to the smallest chainring in the front and the largest cog in the back. Pull the chain down in the middle of the chainstay and measure the distance between the chain and the bottom bracket. The ideal distance should be around half an inch.
If it’s too tight or too loose, use the derailleur adjustment screws to fine-tune the tension. Once you’ve adjusted the tension, spin the crank to make sure the chain moves smoothly and quietly.
If you notice any noise or skipping, troubleshoot the issue by checking for any stiff links or bent teeth on the gears.
With these final adjustments, you’re now ready to hit the road with your newly installed bicycle chain!
Frequently Asked Questions
How often should I replace my bicycle chain?
I’ve found through my experience with bicycle chain maintenance that it’s best to replace a chain every 1,000 to 2,000 miles depending on use. Signs of wear and tear include chain stretch, skipping, and rust.
Can I reuse the master link from my old chain on the new chain?
For chain maintenance, it’s best to use a new master link with a new chain. However, if the old and new chains have the same number of links and are compatible, the old link may be reused with caution.
What type of lubricant should I use on my bicycle chain?
Did you know that a dirty chain can reduce your bike’s efficiency by up to 12%? To maintain optimal performance, use a degreaser and a stiff brush for cleaning techniques. Try alternative products like wax-based lubes for a cleaner and quieter ride.
How do I know if my chain is too loose or too tight?
To determine if my bike chain is too loose or tight, I measure the wear using a chain wear gauge. Adjusting tension can be done by loosening the rear wheel axle bolts and moving the wheel forward or backward.
Is it necessary to replace my cassette or freewheel when installing a new chain?
Before installing a new chain, it’s important to check chain compatibility and measure chain wear. Whether to replace the cassette or freewheel depends on their condition. I recommend a thorough inspection and replacement if necessary for optimal performance.
Conclusion
In conclusion, installing a bicycle chain may seem like a daunting task, but with the right tools and materials, it can be done easily and efficiently. As I tighten the final bolts and wipe away any excess lubricant, I can’t help but feel a sense of accomplishment.
The chain, with its intricate links and interlocking patterns, represents the interconnectedness of both the bicycle and its rider. It is a vital component that ensures a smooth and safe ride, much like how our relationships and connections with others are essential for a fulfilling life.
Just like a well-maintained bicycle chain, our relationships require effort and attention to keep them running smoothly. We must measure the correct length and make necessary adjustments to ensure they are strong and reliable.
And just like how we lubricate our chains to prevent rust and wear, we must communicate and show appreciation to those we care about to keep our connections strong. So, let’s take a lesson from the humble bicycle chain and remember to maintain and nurture the important relationships in our lives.