
I’ve always loved riding my bike, but I wanted to give it a little extra power. That’s when I decided to install an electric bike motor.
In this article, I’ll guide you through the step-by-step process of how to install an electric bike motor. From gathering the necessary tools and choosing the right motor kit, to preparing your bike and installing the motor, I’ll provide you with detailed instructions to make the conversion a success.
So let’s get started and give your bike the boost it deserves!
Key Takeaways
- There are two types of electric bike motors: hub motors and mid-drive motors.
- Hub motors provide a smoother ride, while mid-drive motors offer better weight distribution.
- When choosing an electric bike motor kit, consider factors such as power, compatibility, and installation difficulty.
- Before installation, inspect the bike frame for damage and ensure the bike is in good condition.

50 Strong Sports Water Bottles 6-Pack – Reusable 22 oz BPA-Free Plastic Bottles with Pull Top Cap – Made in USA – Top Rack Dishwasher Safe – Fits Most Bike Cages Brand - Clear
- Capacity: 22 oz per bottle
- Material: BPA-Free polyethylene
- Dishwasher Safe: Top rack dishwasher safe
As an affiliate, we earn on qualifying purchases.
Gather the Necessary Tools and Equipment
Now, you’ll need to gather all the necessary tools and equipment.
Before beginning the installation process, it’s important to understand the different types of bike motors available. There are generally two types of electric bike motors: hub motors and mid-drive motors.
Hub motors are located in the center of the wheel, while mid-drive motors are positioned near the bottom bracket. Each type has its advantages, such as hub motors providing a smoother ride and mid-drive motors offering better weight distribution.
Once you’ve decided on the type of motor, it’s time to gather the tools and equipment you’ll need for the installation. Some essential items include wrenches, screwdrivers, cable cutters, and a torque wrench.
With all the necessary tools in hand, you can now move on to choosing the right electric bike motor kit.
Choose the Right Electric Bike Motor Kit
When choosing the right electric bike motor kit, it’s important to consider factors such as power, compatibility, and installation difficulty.
There are various types of electric bike motors available, including hub motors and mid-drive motors. Hub motors are easier to install and maintain, while mid-drive motors offer better power and efficiency.
One of the benefits of electric bike motor kits is the ability to convert a regular bike into an electric one, allowing you to enjoy the benefits of both worlds. These kits usually come with all the necessary components such as the motor, battery, controller, and wiring.
It’s important to choose a kit that is compatible with your bike’s specifications and frame size. Additionally, consider the power output of the motor to ensure it meets your desired riding needs.
With the right kit, you can easily transform your bike into an electric powerhouse.
Now, let’s move on to preparing your bike for the conversion.
Prepare Your Bike for the Conversion
To get your bicycle ready for the conversion, you’ll need to make sure it’s in good condition and has the necessary components. Here’s a step-by-step guide to prepare your bike for the electric motor installation:
-
Inspect the bike frame for any cracks, dents, or damage that may affect the motor’s stability and performance. Ensure the frame is strong enough to handle the extra weight and torque.
-
Check the chain, derailleur, and gears for wear and tear. Replace any worn-out components to ensure smooth operation and prevent issues with the motor’s power transmission.
-
Prepare the bike frame by removing any unnecessary accessories or attachments that may interfere with the battery placement or motor installation.
-
Determine the optimal battery placement on the bike frame. Consider factors such as weight distribution, accessibility for charging, and protection from the elements.
With your bike now prepped for the conversion, let’s move on to the next step: installing the motor mounting bracket.
Install the Motor Mounting Bracket
To successfully install the motor mounting bracket, it is crucial to properly position and align it on your bike frame. This ensures optimal performance and stability.
Once positioned correctly, securely fasten the bracket to your bike frame using the provided hardware, ensuring a tight and secure fit.
Positioning and Aligning the Bracket
Aligning the bracket is crucial for proper installation of the electric bike motor. Here are some positioning techniques and bracket alignment tips to ensure a secure and efficient setup:
-
Locate the desired position on your bike frame for the motor bracket. Consider factors such as weight distribution and accessibility.
-
Use a level to ensure the bracket is aligned horizontally. This will prevent any tilting or imbalance during operation.
-
Align the bracket vertically, making sure it is parallel to the ground. This will optimize the motor’s performance and prevent unnecessary strain on the frame.
-
Double-check the alignment by measuring the distance between the bracket and other components, such as the chainstay or bottom bracket. Maintain a consistent gap to avoid interference.
Secure the Bracket to Your Bike Frame
Now that I have positioned and aligned the bracket properly, the next step is to secure it to my bike frame. This is a crucial step in the installation process, as it ensures that the motor remains stable and doesn’t cause any damage to the frame or other components.
To secure the bracket, I will use the provided mounting bolts and washers. It is important to tighten the bolts evenly and securely, making sure that the bracket is firmly attached to the frame. One common mistake to avoid is over-tightening the bolts, as this can lead to stripped threads or even damage the frame. On the other hand, under-tightening the bolts can cause the bracket to come loose during riding.
With the bracket securely attached, I am now ready to move on to the next section and attach the electric bike motor.
Attach the Electric Bike Motor
To attach the electric bike motor, start by connecting it to the mounting bracket using the provided screws and bolts.
Ensure that the motor is properly aligned with the bracket to prevent any strain or damage.
Once aligned, tighten the screws securely to ensure a stable and secure connection.
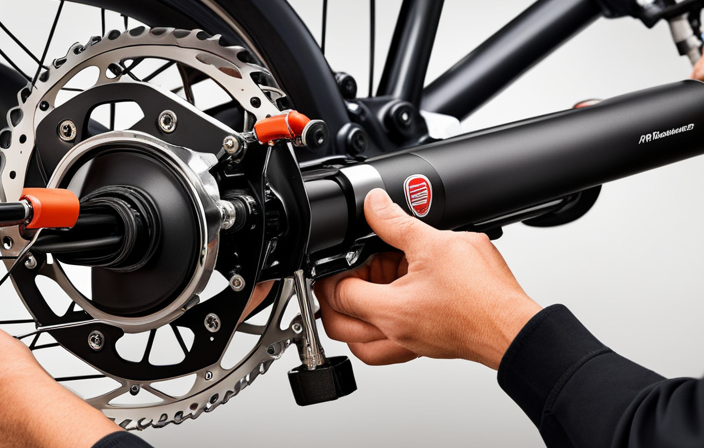
Connect the Motor to the Mounting Bracket
You’ll want to make sure you’ve securely connected the motor to the mounting bracket. Here are the positioning techniques and mounting process to follow:
-
Begin by aligning the motor with the mounting bracket, ensuring that the bolt holes on both are properly aligned.
-
Carefully slide the motor onto the mounting bracket, making sure it sits flush against it.
-
Insert the bolts provided through the aligned holes and tighten them with a wrench or socket set. Be careful not to overtighten, as it may damage the threads.
-
Double-check the positioning of the motor to ensure it is straight and centered on the bracket.
With the motor securely connected to the mounting bracket, we can now move on to the next section.
To ensure proper alignment and tighten the screws, we need to follow a few additional steps.
Ensure Proper Alignment and Tighten the Screws
Make sure the screws are tightened and the alignment is correct.
Proper positioning of the electric bike motor is crucial for optimal performance and safety.
To ensure correct alignment, position the motor on the mounting bracket, aligning the screw holes on both components. Once aligned, tightly secure the screws using a screwdriver or wrench.
It is important to tighten the screws evenly to prevent any imbalance or misalignment.
If the motor does not fit properly or the alignment seems off, double-check the compatibility of the motor and mounting bracket. Additionally, inspect the mounting bracket for any damage or defects that may affect the alignment.
Troubleshooting steps may include adjusting the position of the motor or replacing the mounting bracket if necessary.
With the screws tightened and the alignment set, we can now move on to connecting the electric bike motor to the battery.
Connect the Electric Bike Motor to the Battery
First, make sure the electric bike motor is properly connected to the battery. To do this, start by locating the connecting wires on both the motor and the battery. The wires should have clear markings for positive (+) and negative (-) terminals. Align the corresponding terminals on the motor and the battery, ensuring a secure connection. It is crucial to double-check that the wires are tightly connected to avoid any potential disconnections during operation.
Once the battery connection is secure, you can proceed to the next step of installing the controller and throttle. This ensures proper control and functionality of the motor.
Install the Controller and Throttle
To properly connect the controller and throttle, ensure that the corresponding wires are securely attached and the markings for positive and negative terminals are aligned.
Start by installing the throttle cable onto the handlebars of the electric bike. Connect the throttle cable to the throttle on the handlebars, making sure it is firmly in place.
Next, locate the controller and connect it to the battery. Match the positive and negative terminals on the controller to the corresponding terminals on the battery. Tighten the screws or bolts to secure the connection.
Once the controller and throttle are installed, you can move on to adjusting and testing the electric bike motor to ensure it is functioning properly.
Adjust and Test the Electric Bike Motor
Once you’ve connected the controller and throttle, it’s important to adjust and test the motor to ensure it’s working correctly.
Electric bike motor troubleshooting is crucial to optimize electric bike motor performance.
Start by checking that all the connections are secure and free of any loose wires.
Then, turn on the power and listen for any unusual sounds or vibrations.
Next, engage the throttle and observe the motor’s response. Does it start smoothly and accelerate as expected?
If not, you may need to adjust the throttle sensitivity or check for any error codes.
Additionally, make sure the motor is not overheating during operation, as this can affect its performance.
Fine-tune the Electric Bike Motor Settings
While adjusting and testing the electric bike motor, it’s important to fine-tune the motor settings for optimal performance. Tuning the settings allows you to optimize the motor’s power output and efficiency, ensuring a smooth and enjoyable riding experience.
Begin by accessing the motor controller’s programming interface, which may vary depending on the specific model. Adjust the parameters such as throttle response, maximum speed, and torque to suit your preferences and riding style. Experiment with different settings to find the perfect balance between performance and battery life.
Keep in mind that the optimal settings may differ for each rider, so it’s crucial to fine-tune according to personal preferences. Once you have fine-tuned the motor settings, it’s time to shift focus to securing and protecting the wiring, ensuring a reliable and safe electrical connection.
Secure and Protect the Wiring
When it comes to securing and protecting the wiring on an electric bike, there are a few key points to keep in mind.
First, I recommend using zip ties or cable clips to secure the wiring in place. This will help prevent any loose wires from getting tangled or damaged during rides.
Additionally, wrapping the wiring in protective sleeves or tubes can provide an extra layer of protection against potential wear and tear. These sleeves or tubes can be easily found at hardware stores and are typically made of durable materials that can withstand the elements.
Use Zip Ties or Cable Clips to Secure the Wiring
First, make sure to use zip ties or cable clips to secure the wiring of your electric bike motor. This method has several benefits, including keeping the wires organized and preventing them from getting tangled or caught in moving parts. It also helps to reduce vibrations and protect the wires from damage.
However, there are a few drawbacks to consider. Zip ties can be difficult to remove if you need to make changes or repairs to the wiring, and they may not provide as secure of a hold as other methods. As an alternative, you can use adhesive-backed mounts or Velcro straps, which offer easier installation and removal. These options allow for flexibility and can be adjusted as needed.
Now, let’s move on to the next step of securing the wiring by wrapping it in protective sleeves or tubes.
Wrap the Wiring in Protective Sleeves or Tubes
To protect the wiring, wrap it in protective sleeves or tubes. This is a crucial step in ensuring the longevity and functionality of your electric bike motor.
The benefits of using protective sleeves are numerous. Firstly, they provide insulation, preventing any damage that could be caused by rubbing against other components or surfaces. Secondly, they offer protection against moisture, dust, and debris, which can all negatively impact the performance of the motor.
When installing the protective sleeves, it is important to follow proper techniques. Make sure the sleeves are the appropriate size for your wiring and secure them tightly to prevent any movement. Additionally, ensure that the sleeves are properly routed and positioned away from any sharp edges or heat sources.
By taking these precautions, you can ensure the optimal performance and durability of your electric bike motor.
Now, let’s move on to installing additional accessories (optional) to enhance your riding experience.
Install Additional Accessories (Optional)
You can add extra accessories to your electric bike motor if desired. Here are some options to consider:
-
Installing lights: Adding lights to your electric bike motor can improve visibility and safety, especially when riding at night or in low-light conditions. Make sure to choose lights that are compatible with your bike’s electrical system and follow the manufacturer’s instructions for installation.
-
Adding a cargo rack: If you frequently carry items with you while riding, a cargo rack can be a useful accessory. It provides a stable platform for attaching bags, baskets, or panniers, allowing you to transport groceries, work supplies, or other belongings effortlessly.
-
Upgrading the display: Some electric bike motors come with basic displays that show speed and battery level. Consider upgrading to a more advanced display that provides additional information such as distance traveled, trip time, and even GPS navigation.
-
Installing a horn or bell: Enhance your safety and alert others on the road by adding a horn or bell to your electric bike motor. This will help you communicate your presence and intentions to pedestrians and other cyclists.
Once you have installed any additional accessories, it’s important to regularly maintain and inspect your electric bike motor to ensure optimal performance and longevity.
Regularly Maintain and Inspect Your Electric Bike Motor
Don’t forget to regularly maintain and inspect your electric bike motor to keep it running smoothly and extend its lifespan. Proper maintenance is crucial for optimal performance and safety.
Start by visually inspecting the motor for any signs of wear or damage, such as loose wires or excessive dirt buildup. Clean the motor using a soft brush and mild detergent, being careful not to get any water inside.
Lubricate the moving parts, such as the bearings and gears, with a suitable lubricant to reduce friction and prevent premature wear. Check the tension of the drive belt or chain and adjust it if necessary.
Additionally, regularly check the battery connections and ensure they are clean and secure. Following these maintenance tips will help ensure your electric bike motor operates at its best.
Now, let’s move on to the next section about following safety guidelines and regulations.
Follow Safety Guidelines and Regulations
When it comes to riding an electric bike, safety should always be a top priority.
To ensure your protection, it is crucial to wear a helmet and other protective gear while riding.
Additionally, it is important to observe traffic laws and ride responsibly to avoid any accidents or collisions.
Wear a Helmet and Protective Gear While Riding
Always remember to wear a helmet and protective gear when riding an electric bike. Helmet safety is of utmost importance to protect your head from potential injuries in case of accidents. A properly fitted helmet should cover your forehead and sit snugly on your head, with the straps securely fastened under your chin. Look for helmets that meet safety standards, such as the CPSC or ASTM certifications.
In addition to a helmet, wearing protective gear such as knee and elbow pads, as well as gloves, can greatly reduce the risk of injuries to other parts of your body. By prioritizing your safety and wearing the necessary gear, you can enjoy your electric bike rides with peace of mind.
Now, let’s discuss how to observe traffic laws and ride responsibly.
Observe Traffic Laws and Ride Responsibly
Make sure to follow all traffic laws and ride responsibly to ensure a safe and enjoyable experience on your electric bike. When riding, it’s important to practice proper riding etiquette and be mindful of sharing the road with other vehicles.
Here are some key points to keep in mind:
- Always obey traffic signals and signs, just like you would in a car.
- Signal your intentions using hand signals to communicate with other road users.
- Ride in a predictable manner, maintaining a straight line and avoiding sudden maneuvers.
- Be aware of your surroundings and constantly scan for potential hazards.
- Yield to pedestrians and give them ample space when passing.
- When riding in a group, ride single file to allow other vehicles to safely pass.
By following these guidelines, you can contribute to a safer riding environment for everyone.
Now, let’s move on to troubleshooting common issues with electric bike motors.
Troubleshooting Common Issues
If you’re having trouble with your electric bike motor, one common issue to check for is a loose connection. Make sure that the motor is properly ventilated and not covered by any obstructions that could restrict airflow. Additionally, check the battery connectivity to ensure a secure and stable connection. Loose battery connections can cause intermittent power issues or complete loss of power. Inspect the battery terminals for any signs of corrosion or damage and tighten them if necessary.
When troubleshooting motor overheating, ensure that the motor is not overloaded by carrying excessive weight or going up steep inclines for long periods. By addressing these common issues, you can ensure optimal performance and prevent any potential problems.
With your electric bike motor running smoothly, you can now enjoy your newly converted electric bike!
Enjoy Your Newly Converted Electric Bike!
Now that your electric bike is up and running smoothly, you can fully enjoy your newly converted ride!
The benefits of electric bike conversion are numerous. First and foremost, you have the ability to effortlessly ride up hills and tackle challenging terrains. The added power from the electric motor makes your cycling experience more enjoyable and less strenuous.
Additionally, converting your bike to electric allows for longer rides without worrying about fatigue.
To maximize the performance of your electric bike, follow these tips: regularly check the tire pressure to ensure optimal traction and efficiency, keep the battery charged to its recommended level, and maintain the chain and gears for smooth and efficient pedaling.
With these tips in mind, you’ll be able to fully enjoy the benefits of your newly converted electric bike.
Frequently Asked Questions
Can I install an electric bike motor on any type of bike?
Yes, an electric bike motor can be installed on most types of bikes. The benefits include increased speed, reduced effort while pedaling, and the ability to navigate hilly terrains with ease.
How long does it typically take to install an electric bike motor?
Typically, the installation of an electric bike motor takes around 2-3 hours. The cost of installing an electric bike motor varies depending on the type of motor and bike. The benefits include increased speed, reduced effort, and extended range.
Will installing an electric bike motor affect the warranty on my bike?
Installing an electric bike motor may void the bike’s warranty, but it can significantly impact bike performance and make uphill rides easier. The cost of installation depends on factors like motor type and complexity.
Are there any legal restrictions or regulations regarding the use of electric bike motors?
There are legal restrictions and regulations regarding the use of electric bike motors. These include speed limits, age restrictions, and requirements for lights and reflectors. It’s important to familiarize yourself with local laws before using an electric bike motor.
What are some common issues that can arise after installing an electric bike motor, and how can they be resolved?
Ah, the joys of installing an electric bike motor. While it may seem like a piece of cake, let me enlighten you with some troubleshooting tips. Common motor installation mistakes include incorrect wiring, loose connections, and misalignment. Fear not, my friend, for these issues can be resolved by carefully checking the wiring diagram, tightening all connections, and ensuring proper alignment.
Conclusion
In conclusion, installing an electric bike motor is a rewarding and exciting process. By gathering the necessary tools and equipment, choosing the right motor kit, and carefully preparing your bike, you can successfully transform your regular bike into an efficient and eco-friendly electric one.
Remember to follow safety guidelines and regulations, and regularly maintain and inspect your motor to ensure optimal performance. Just like a well-oiled machine, your newly converted electric bike will provide you with a smooth and exhilarating ride, taking you on new adventures with ease.