
As an avid cyclist, I take immense pleasure in acquiring and perfecting various bike maintenance techniques. One crucial skill that every cyclist ought to master is the method of threading a 36-spoke bicycle wheel.
Lacing a wheel not only ensures that it performs optimally, but it also saves you the cost of hiring a professional mechanic to do it for you. In this article, I will guide you through the step-by-step process of lacing a bicycle wheel with 36 spokes, from gathering your tools and supplies to performing the final adjustments.
Before we get started, it’s important to note that lacing a wheel requires a certain level of technical expertise and patience. The process can be time-consuming, but with practice and perseverance, you can become an expert at it.
The tools and materials you will need include a wheel truing stand, a spoke wrench, a nipple driver, a spoke key, a set of 36 spokes, a rim, and a hub. With these items in hand, let’s dive into the process of lacing a bicycle wheel with 36 spokes.
Key Takeaways
- Lacing a bicycle wheel requires technical expertise and patience, as well as specific tools and materials such as a wheel truing stand, spoke wrench, nipple driver, 36 spokes, rim, and hub.
- The process involves following a cross pattern for even tension, gradually increasing tension using a spoke tension meter, and checking for lateral or radial trueness using a truing stand or brake pads.
- Proper maintenance of bike wheels involves keeping them clean and free of debris, regularly checking spoke tension and rim alignment, and using the right type of lubricant for the bike’s specific needs.
- Proper installation and maintenance are essential for both performance and safety, ensuring a smooth and safe ride for years to come.

Varstrom 48V 1000W 1500W Rear & Front Hub Motor Kit - Ebike Conversion Kit for 26"/27.5"/28"/29"/700C Front Rear Wheel,Electric Bike Conversion Set with Display & Ebike Battery (Optional)
【POWERFUL 48V 1000W Front Hub Motor Kit】: 48V 1000W front wheel motor kit is designed for a variety...
As an affiliate, we earn on qualifying purchases.
Gather Your Tools and Supplies
Now, you’re gonna need some tools and supplies to get this wheel laced up right. Firstly, you’ll need a spoke wrench to adjust the tension of the spokes. You’ll also need a pair of pliers to hold the spoke in place while you tighten it.
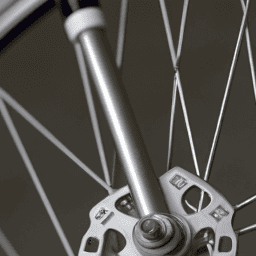
Additionally, you’ll need a hub, rim, and 36 spokes. Before you get started, it’s important to understand the bicycle wheel components. The hub is the center part of the wheel that attaches to the bike frame. The rim is the outer circle of the wheel that holds the tire.
Lastly, the spokes are the metal rods that connect the hub to the rim. There are various types of bicycle spokes, such as stainless steel, titanium, and aluminum. Each type has different strengths and weights, so choose the appropriate type for your riding needs.
With all the necessary tools and supplies, let’s get started on lacing the wheel.

Wahoo Fitness KICKR CORE 1
CONTROLLED RESISTANCE - When connected to your smartphone, tablet, computer, or GPS bike computer, KICKR CORE indoor smart...
As an affiliate, we earn on qualifying purchases.
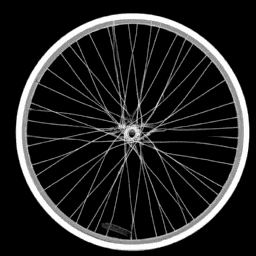
Lacing the Wheel
As you begin threading the spokes through the hub, it’s important to remember that a majority of all bicycle accidents involve wheel failure. Therefore, taking extra care in lacing your wheel is crucial. First, ensure that you have the correct spoke lengths by measuring the distance between the hub and the rim. Once you have the correct spokes, start with the first spoke hole on the hub and thread the spoke through the corresponding hole on the rim. Repeat this process until all the spokes have been threaded.
As you lace the wheel, it’s important to follow a cross pattern to ensure even tension. This pattern involves threading the first spoke through the hub and then skipping a spoke, threading the next spoke through the next available hole, and then skipping a spoke again. This continues until all the spokes have been threaded. As you lace the wheel, you’ll start to see a pattern emerge. Refer to the table below to help you visualize the pattern.
| Spoke 1 | Spoke 2 | Spoke 3 | Spoke 4 |
|---|---|---|---|
| Rim Hole 1 | Rim Hole 5 | Rim Hole 9 | Rim Hole 13 |
| Rim Hole 2 | Rim Hole 6 | Rim Hole 10 | Rim Hole 14 |
| Rim Hole 3 | Rim Hole 7 | Rim Hole 11 | Rim Hole 15 |
| Rim Hole 4 | Rim Hole 8 | Rim Hole 12 | Rim Hole 16 |
Incorporating a cross pattern will help distribute the tension evenly and prevent the wheel from becoming warped. Once you have successfully laced the wheel, you can move onto tensioning and truing the wheel to ensure it is properly aligned and safe for riding.

Wahoo KICKR V6 Smart Indoor Trainer
WiFi Connectivity - Offering a robust 2.4 GHz Wi-Fi connection, the new KICKR transfers ride data to your...
As an affiliate, we earn on qualifying purchases.
Tensioning and Truing the Wheel
To ensure a smooth ride, you’ll want to make sure your new wheel is properly tensioned and aligned. Here are some steps to follow:
-
Properly lubricate the spoke threads and nipples with oil or grease before starting the tensioning process. This will reduce friction and make it easier to achieve the desired tension.
-
Use an online spoke calculator or a spoke length chart to determine the appropriate spoke length for each side of the wheel. It’s important to use the correct length spokes for your specific wheel build.
-
Begin by tightening all the spokes to the same level of tension. Then, gradually increase the tension using a spoke tension meter until it reaches the desired level. Check for any lateral or radial trueness by using a truing stand or the brake pads on your bike. Make small adjustments to the spoke tension as needed to achieve proper alignment.
Once you’ve completed the tensioning and truing process, it’s time for final adjustments to ensure optimal performance.

Wahoo Fitness KICKR CORE 2 ZWIFT COG and Click - Orange Cog 3rd Generation
KICKR CORE Zwift is the smarter way to start riding indoors. The new KICKR CORE builds on the...
As an affiliate, we earn on qualifying purchases.
Final Adjustments
Don’t forget to give your new ride a test run after completing the tensioning and truing process – after all, a smooth ride is worth its weight in gold!
Once you’ve ensured that your wheel is tensioned and trued properly, it’s time to make final adjustments to guarantee that the wheel is aligned perfectly with your bike frame. This step is crucial to ensure that your wheel doesn’t rub against the frame or brake pads, which could cause accidents while riding.
First, check the spoke tension on all spokes. Using a spoke wrench, gently turn each spoke until it’s snug against the rim. Ensure that all spokes are tightened to the same degree, so that the wheel is evenly tensioned.
Then, check the rim alignment by spinning the wheel and observing the distance between the rim and the frame. If the rim is too close to one side, adjust the spokes on the opposite side to shift the rim towards the center.
Finally, give the wheel a final spin to ensure that it rotates smoothly without any wobbles. With these final adjustments, your wheel is ready for a test ride!
Before we discuss maintenance and care, it’s important to note that proper installation and maintenance of your bike wheel is essential for both performance and safety. Keeping your wheel clean and free of debris will extend its lifespan and prevent damage. Regularly checking spoke tension and rim alignment will also ensure that your wheel is performing at its best. Remember, a well-maintained bike wheel will provide a smooth and safe ride for years to come.
Maintenance and Care
Maintaining and caring for your bike’s wheels is crucial for the longevity and performance of your ride, ensuring a smooth and safe experience every time. Proper cleaning is the first step in ensuring your wheels last as long as possible. Dirt, grime, and debris can accumulate on the surface of your wheels, which can cause damage over time.
To clean your wheels, use a soft brush and warm, soapy water to remove any dirt or debris. Be sure to dry your wheels thoroughly after cleaning to prevent rust from forming.
In addition to proper cleaning, lubrication techniques are also important for maintaining your bike’s wheels. Applying lubricant to the bearings and other moving parts of your wheels will help prevent wear and tear and ensure a smooth ride. However, it’s important to use the right type of lubricant for your bike’s specific needs.
Consult your bike’s manual or a professional mechanic for recommendations on the best lubricant to use. Regularly maintaining and caring for your bike’s wheels will not only help prolong their lifespan but also ensure a safe and enjoyable riding experience every time.
Frequently Asked Questions
What is the recommended amount of tension for each spoke on a 36 spoke bicycle wheel?
The recommended spoke tension for a 36 spoke bicycle wheel depends on factors such as rider weight and wheel size. Spoke tensioning techniques vary, but it is crucial to maintain proper tension for optimal wheel performance. Importance of spoke tension in wheel performance cannot be overstated.
Can I use any type of spoke wrench for tensioning the spokes?
To ensure proper spoke tensioning techniques, it is important to use a spoke wrench that is compatible with the spoke nipples. Using an incorrect tool can damage the nipples and affect the wheel’s integrity.
How long does it typically take to lace a bicycle wheel with 36 spokes?
On average, lacing a 36-spoke bicycle wheel should take around 1-2 hours using efficient techniques. Common mistakes include uneven tension and improper spoke alignment, leading to decreased wheel durability and performance.
Should I use lubricant on the nipples when tensioning the spokes?
When tensioning spokes, nipple lubrication can be beneficial for ease of adjustment. However, excess lubricant can attract dirt and affect tension accuracy. Temperature can also play a role in spoke tension when using lubricant. Pros and cons should be considered.
What is the maximum weight limit for a bicycle wheel with 36 spokes?
As a seasoned cyclist, I know that the maximum weight limit for a bicycle wheel with 36 spokes depends on the spoke count correlation and optimal spoke tensioning techniques. Technical precision is key to ensure safety and longevity of the wheel.
Conclusion
So there you have it, a step-by-step guide on how to lace a bicycle wheel with 36 spokes. It may seem daunting at first, but with the right tools and a bit of patience, you’ll have a perfectly functioning wheel in no time.
Remember to take your time and double-check your work at each step to ensure that everything is properly aligned and tightened. Once you’ve finished lacing the wheel, be sure to properly tension and true it before making any final adjustments.
And don’t forget to regularly maintain and care for your wheel to ensure its longevity. Coincidentally, I had to lace my own bicycle wheel just last week, and following these steps made the process much smoother and easier than I anticipated.
Now, my bike is back in action and running smoothly thanks to the knowledge and skills I gained from lacing my own wheel. I hope this guide can do the same for you.
Happy riding!