
The sensation of biking, with the wind rushing past and a sense of liberation, has always been something I cherish. However, there are moments when I desire more speed or the ability to conquer steep inclines without having to dismount and push. It was these instances that led me to consider the idea of equipping my bike with a motor.
After some research and trial and error, I finally figured out how to make a bicycle motor, and I’m excited to share my knowledge with you.
Before we get started, let me warn you that making a bicycle motor is not a simple task. It requires some mechanical knowledge, patience, and time. But if you’re up for the challenge and willing to put in the effort, the end result will be worth it – a motorized bicycle that can take you anywhere you want to go, without breaking a sweat.
So, let’s get started on this exciting journey of making your own bicycle motor.
Key Takeaways
- Choose the right motor type and assess skill level before starting installation process.
- Always wear protective gear and follow safety precautions during installation and operation.
- Thoroughly clean bicycle and check necessary components before attaching motor.
- Test and fine-tune motor for smooth and efficient operation before riding.
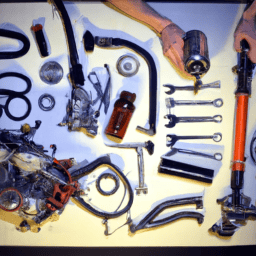
Gather Your Materials and Tools
Gather your materials and tools.
You’re gonna need some basic tools like a wrench and pliers, as well as some specific materials like a motor kit and a bicycle frame. Make sure to choose the right motor type for your bike and assess your skill level before starting this project. Safety precautions are crucial, so wear protective gear like gloves and goggles when working with the motor kit.
It’s also important to follow the instructions that come with the motor kit carefully. Some kits may require additional materials like bolts and screws, so make sure you have everything you need before starting.
Once you have all the materials and tools, you can move on to preparing your bicycle by removing the back wheel and attaching the motor.
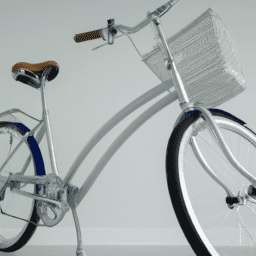
Prepare Your Bicycle
Before beginning, it’s important to ensure that your chosen bicycle is in good condition and has all necessary components for the motor installation. Start by giving your bicycle a thorough cleaning, especially in the areas where the motor will be installed. This will ensure that dirt and debris won’t interfere with the motor’s operation.
Additionally, make sure that your bicycle’s brakes, gears, and tires are in good working order. A malfunctioning component can be dangerous when paired with a motor.
When preparing your bicycle for the motor installation, it’s also important to take safety precautions. Wear gloves and safety glasses to protect your hands and eyes. Make sure to disconnect the battery before working on the motor to avoid electric shock.
Finally, double-check that all tools and materials are within reach before starting the installation process. By taking these cleanliness tips and safety precautions, you’ll ensure a smoother and safer installation process.
With your bicycle fully prepped, it’s time to move on to installing the motor.
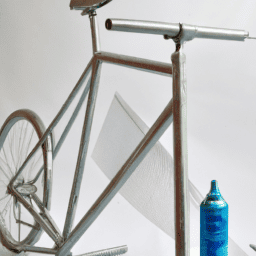
Install the Motor
Now it’s time to get your hands dirty and start attaching the motor to your trusty two-wheeled companion. First, you’ll need to mount the motor onto the bike frame using the mounting kit that came with it.
Make sure to follow the manufacturer’s instructions carefully to avoid damaging the motor or the bike. The mounting kit should include brackets, bolts, and screws that will secure the motor onto the bike frame.
Once the motor is securely mounted, you’ll need to make the necessary wiring connections. This will involve connecting the motor to the battery and throttle. Again, it’s important to follow the manufacturer’s instructions carefully to ensure that the wiring is done correctly.
Make sure to test the motor before taking it out for a spin to ensure that everything is working properly. Now that the motor is installed and wired, it’s time to fine-tune your motor to ensure it’s running smoothly and efficiently.
Fine-Tune Your Motor
After mounting and wiring the motor, it’s essential to give it a little TLC to ensure it’s running like a well-oiled machine, just like a musician tunes their instrument before a performance.
One important factor to consider is adjusting throttle sensitivity. This can be done by adjusting the tension of the throttle cable or by tweaking the throttle settings in your motor’s control unit. A poorly adjusted throttle can lead to jerky acceleration or difficulty maintaining a constant speed, which can be frustrating and even dangerous while riding.
Another important aspect of fine-tuning your motor is troubleshooting common motor issues. These can include problems with spark plugs, fuel delivery, or overheating. Knowing how to diagnose and fix these issues can save you time and money in the long run.
It’s important to consult your motor’s instruction manual or seek advice from a knowledgeable mechanic to ensure proper maintenance and repair techniques.
With a well-tuned motor, you can enjoy a smooth and efficient ride on your new motorized bicycle.
Enjoy Your New Motorized Bicycle
Get ready to hit the streets and experience the thrill of effortless cruising on your newly motorized ride! Now that you’ve successfully installed and fine-tuned your bicycle motor, it’s time to enjoy the benefits of motorized bicycles.
With your new motor, you can travel faster and farther than ever before, without having to worry about fatigue or physical exertion. You can also tackle hills and inclines with ease, making your commute or leisurely ride much more enjoyable.
However, it’s important to keep in mind safety considerations when using a motorized bicycle. Firstly, always wear a helmet and other protective gear to minimize the risk of injury in case of an accident. Secondly, make sure that your motorized bicycle is legal to use in your area and that you have any necessary permits or licenses.
Finally, be aware of your surroundings and follow traffic laws to avoid collisions or other accidents. By following these safety guidelines, you can enjoy the many benefits of your new motorized bicycle while minimizing the risk of injury or legal issues.
Frequently Asked Questions
How much horsepower does a typical bicycle motor have?
Hold onto your handlebars, folks! A typical bicycle motor outputs around 1 to 2 horsepower, depending on factors such as speed and torque. Let’s explore the capabilities of these motors when it comes to balancing power and efficiency.
Are there any laws or regulations regarding the use of motorized bicycles on public roads?
There are laws and regulations regarding the use of motorized bicycles on public roads. Safety precautions must be taken and the bike must comply with certain specifications, such as maximum speed and engine size.
How often should the motor oil be changed on a bicycle motor?
I recommend changing the oil every 500-1000 miles, depending on usage and oil type. For 2-stroke motors, use a high-quality, synthetic oil. Signs of degradation include dark color and low viscosity. Replace the oil filter annually.
Is it possible to retrofit a motor onto any type of bicycle, or are there specific models that work best?
When retrofitting a motor onto a bicycle, compatibility concerns must be taken into account. Certain motor types work better with specific bike models. It’s important to research and choose the best motor for your particular bike.
Can the motor be easily removed from the bicycle if needed, or is it a permanent installation?
Removable motors have pros and cons. DIY installation can save money, but professional installation ensures proper fitting. It’s important to consider the weight and size of the motor, as well as the ease of removal for maintenance.
Conclusion
So there you have it, folks! With some basic tools and materials, a little bit of elbow grease, and some patience, you can turn your regular bicycle into a motorized machine.
It may seem like a daunting task at first, but with the right instructions and a bit of practice, anyone can do it.
In conclusion, making a bicycle motor is like building a puzzle – you start with a bunch of scattered pieces and work to put them together until the final product is complete. But unlike a puzzle, this project allows you to create something that’s not only functional but also fun and exciting to ride.
So go ahead, give it a try – you may just surprise yourself with what you can accomplish!