As an avid cyclist, I’ve always been fascinated by the potential of combining solar power with electric bikes.
In this article, I’ll share my knowledge and experience on how to make your very own solar electric bike.
From understanding the necessary components to selecting the right frame and installing the solar panels, I’ll guide you through the entire process.
With proper maintenance and charging techniques, as well as tips for riding efficiently, you’ll soon be enjoying the benefits of this innovative and eco-friendly mode of transportation.
Key Takeaways
- Solar electric bikes combine solar power with electric bikes to create an innovative and eco-friendly mode of transportation.
- The selection and installation of solar panels should consider factors such as efficiency, size, and ideal mounting location.
- The battery storage system and electric motor play crucial roles in harnessing and utilizing the solar energy efficiently.
- Maintenance, charging, and riding techniques are important for optimizing the performance and longevity of the solar electric bike.
Introduction to Solar Electric Bikes
If you’re interested in sustainable transportation options, you’ll love learning about solar electric bikes. These innovative bikes combine the power of the sun with the convenience of electric bikes, making them an excellent choice for eco-conscious commuters.
The building process of a solar electric bike involves installing solar panels on the bike’s frame to harness solar energy and convert it into electricity. This electricity is then used to power the bike’s motor, providing a clean and efficient mode of transportation.
One of the main advantages of a solar electric bike is its eco-friendly nature, as it relies on renewable energy. However, there are some disadvantages to consider, such as the initial cost of the solar panels and the limited range of the bike compared to traditional electric bikes.
Understanding the components needed for a solar electric bike is the next important step in building your own.
Understanding the Components Needed
To understand the components needed for a solar electric bike, you’ll want to familiarize yourself with the key elements involved. Here are the four crucial items that will make your solar electric bike a reality:
-
Solar Panel Efficiency: The efficiency of your solar panels determines how much energy they can convert from sunlight. Higher efficiency means more power for your bike.
-
Battery Capacity: The capacity of your battery determines how long your bike can run on solar power alone. A larger capacity will allow for longer rides without needing to recharge.
-
Motor Power: The power of your motor determines how fast and how smoothly your bike can move. It is important to choose a motor that is compatible with your desired speed and terrain.
-
Controller: The controller is responsible for regulating the flow of electricity between the solar panels, battery, and motor. It ensures that the system operates efficiently and protects the components from damage.
Now that we understand the key components, let’s move on to selecting the right bicycle frame.
Selecting the Right Bicycle Frame
Selecting the right bicycle frame is essential for ensuring a comfortable and efficient ride. When it comes to bicycle frame stability, there are a few key factors to consider.
Firstly, the material of the frame plays a crucial role in determining its stability. Aluminum frames are lightweight and offer good strength, making them a popular choice for many riders. However, if you’re looking for maximum stability, steel frames are the way to go. They provide excellent durability and absorb vibrations well, resulting in a smoother ride. Additionally, carbon fiber frames are known for their stiffness and lightness, enhancing stability.
It’s important to consider your riding style and terrain when choosing the frame material. With the right frame, you can ensure a stable and enjoyable ride.
Now, let’s move on to choosing the solar panels for our solar electric bike.
Choosing the Solar Panels
When choosing the solar panels for our electric bike, it’s important to consider their efficiency and size.
Solar panel efficiency refers to how well the panels convert sunlight into electricity. The higher the efficiency, the more power the panels can generate. This is crucial for our electric bike, as we want to maximize the energy we can gather from the sun.
There are different types of solar panels available, such as monocrystalline, polycrystalline, and thin-film. Monocrystalline panels are known for their high efficiency and sleek appearance, while polycrystalline panels are more affordable but slightly less efficient. Thin-film panels are the least efficient but are flexible and lightweight.
Considering the size of the solar panels is also important as we need to ensure they fit on the bike without compromising its design and functionality.
Now that we have chosen the most efficient and appropriate solar panels for our electric bike, let’s move on to installing them without any further delay.
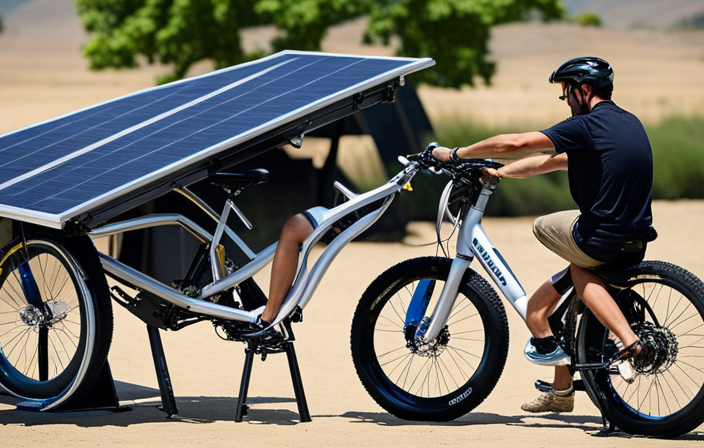
Installing the Solar Panels on the Bike
Once you have decided on the most efficient and appropriate panels, it’s time to start installing them on your bike. Here is a step-by-step guide on how to mount and wire the solar panels for your solar electric bike:
-
Determine the ideal location: Find a suitable area on your bike where you can securely mount the solar panels. Consider factors like accessibility, stability, and exposure to sunlight.
-
Prepare the mounting brackets: Attach the mounting brackets to the back of each solar panel using screws or adhesive. Ensure that they are securely fastened and aligned.
-
Mount the panels: Position the solar panels on the chosen location and use the mounting brackets to secure them in place. Double-check that they are firmly attached and won’t obstruct any moving parts of your bike.
-
Wire the panels: Connect the positive and negative terminals of each panel using appropriate solar panel cables. Ensure proper insulation and secure connections to prevent any loose wiring.
Adding a Battery Storage System
Now that you have successfully mounted and wired the solar panels, it’s time to consider adding a battery storage system.
This is an essential component for your solar electric bike, as it will store the energy generated by the solar panels for later use.
A battery management system is crucial to ensure the optimal performance and longevity of your batteries. It monitors the battery’s state of charge, voltage, and temperature, and ensures that the charging and discharging processes are carried out efficiently.
Additionally, you will need to set up a charging infrastructure to replenish the battery’s energy when needed. This can include a solar charger, which converts the sun’s energy into electricity to charge the battery, or a regular AC charger that can be plugged into a power outlet.
With the battery storage system in place, you will be ready to install the electric motor and controller, which will provide the necessary power for your solar electric bike’s propulsion.
Installing the Electric Motor and Controller
To install the electric motor and controller, you’ll need to carefully follow the manufacturer’s instructions and secure them to the designated area of your vehicle. Here are the steps to successfully install the electric motor and set up the controller:
- Position the electric motor in the desired location on your bike frame, making sure it is securely fastened.
- Connect the motor cables to the controller, ensuring the correct polarity.
- Mount the controller in a safe and accessible location, preferably near the battery.
- Connect the controller to the battery, following the manufacturer’s instructions for proper wiring.
By following these steps, you will be able to successfully install the electric motor and set up the controller for your solar electric bike.
Now, let’s move on to connecting the solar panels to the battery system, which plays a crucial role in harnessing renewable energy to power your bike.
Connecting the Solar Panels to the Battery System
The next step is to securely connect the solar panels to the battery system, ensuring efficient energy transfer for your vehicle.
To begin, gather the necessary materials: solar panels, battery system, and wiring tools.
Position the solar panels on the surface of your electric bike, ensuring they receive maximum sunlight exposure.
Next, connect the positive terminal of the solar panel to the positive terminal of the battery, and the negative terminal of the solar panel to the negative terminal of the battery. Use appropriate gauge wire to prevent energy loss.
Ensure all connections are tight and secure to prevent any accidental disconnection.
Once the solar panels are connected to the battery system, you can proceed to the next section, which focuses on installing the pedal-assist system, enhancing the overall functionality of your solar electric bike.
Installing the Pedal-Assist System
Once you’ve connected the solar panels to the battery system, it’s time to install the pedal-assist system for enhanced functionality. This system allows you to use the power generated by the solar charger to assist you while pedaling.
To install the pedal-assist system, follow these steps:
-
Begin by attaching the pedal-assist sensor to the bottom bracket of the bike frame. This sensor measures your pedaling speed and sends a signal to the controller.
-
Connect the controller to the battery system and the motor. The controller regulates the flow of power from the battery to the motor based on your pedaling speed.
-
Mount the motor onto the rear wheel of the bike. Make sure it is securely fastened and aligned with the wheel.
By adjusting the pedal assist settings on the controller, you can customize the level of assistance you receive while pedaling.
Once the pedal-assist system is installed, you can move on to adding safety features such as lights and reflectors.
Adding Safety Features such as Lights and Reflectors
After installing the pedal-assist system, it’s important to ensure your safety by adding lights and reflectors. Safety regulations and legal requirements dictate that bicycles must have proper lighting and reflectors to enhance visibility, especially during low light conditions.
Here are two important considerations when adding lights and reflectors to your electric bike:
-
Front and rear lights: Install a bright white light on the front of your bike to illuminate the road ahead. A red light on the rear will make you visible to other road users. Ensure that the lights are securely attached and angled correctly for maximum visibility.
-
Reflectors: Attach reflective strips or reflectors to the front and rear of your bike, as well as the pedals and wheels. These reflective surfaces will help increase your visibility to others on the road.
By adhering to safety regulations and adding the necessary lights and reflectors, you can ensure that you are visible to others, reducing the risk of accidents.
Now, let’s move on to the section about testing and troubleshooting the pedal-assist system.
Testing and Troubleshooting
Now that you’ve installed the pedal-assist system, it’s time to test and troubleshoot to ensure everything is working properly.
One of the troubleshooting techniques is to check the battery connection. Make sure it is securely connected and that the terminals are clean and free from corrosion.
Another common issue encountered is with the motor not engaging. Check the wiring connections to ensure they are properly connected. Additionally, check the throttle and make sure it is properly calibrated.
Test the brakes to ensure they are responsive and the stopping power is adequate.
Finally, take the bike for a test ride to ensure the pedal-assist system is functioning correctly.
Once you have confirmed that everything is working as it should, you can move on to maintaining and charging the solar electric bike.
Maintaining and Charging the Solar Electric Bike
To properly maintain and charge your solar electric bike, it’s important to regularly clean the panels and ensure they are free from dirt and debris. Here are some key steps to help you with solar electric bike maintenance and charging methods:
- Clean the solar panels using a soft cloth and mild detergent to remove any dirt or grime.
- Inspect the panels for any signs of damage, such as cracks or scratches, and repair or replace them if necessary.
- Check the connections between the solar panels and the bike’s battery to ensure they are secure and functioning properly.
By following these maintenance steps, you can ensure that your solar electric bike operates at its optimal level and maximizes its charging efficiency.
Now let’s move on to some tips for riding and maximizing efficiency without compromising safety.
Tips for Riding and Maximizing Efficiency
To ride your solar electric bike efficiently, it’s important to adjust the seat and handlebars to a comfortable position. This ensures proper posture, stability, and control while riding. When it comes to riding techniques, start by pedaling smoothly and gradually increasing your speed. This helps optimize the solar power generated by the bike’s panels.
To further maximize efficiency, try to maintain a steady pace and avoid sudden acceleration or braking. Utilize the bike’s gears appropriately to find the right balance between pedaling and using the electric motor. Additionally, be mindful of your surroundings and choose routes that are well-suited for solar charging, such as areas with ample sunlight exposure.
By following these tips, you can enhance your riding experience and make the most of your solar electric bike’s capabilities.
Transition: Now that you know how to ride your solar electric bike efficiently, let’s explore the numerous benefits of using this eco-friendly mode of transportation.
Benefits of Using a Solar Electric Bike
When you ride a solar electric bike, you’ll experience a range of benefits that include reducing your carbon footprint and saving on transportation costs. But the advantages of using a solar electric bike go beyond just these two factors. Let’s explore some of the advancements that make solar electric bikes a great choice for eco-conscious commuters and enthusiasts alike.
| Advantages | Advancements |
|---|---|
| Convenience | Lightweight construction and compact design make solar electric bikes easy to maneuver and store. |
| Efficiency | Improved battery technology and regenerative braking systems ensure longer rides with minimal energy consumption. |
| Cost savings | With no need for gasoline and reduced maintenance requirements, solar electric bikes offer significant savings in the long run. |
| Sustainability | By harnessing the power of the sun, solar electric bikes contribute to a cleaner and greener environment. |
These advancements make solar electric bikes a practical and sustainable alternative to traditional transportation methods. Now let’s delve into considerations for building your own solar electric bike without compromising on quality or performance.
Considerations for Building Your Own Solar Electric Bike
If you’re considering building your own solar electric bike, there are some important factors you should take into account. The building process can be exciting, but it’s crucial to plan and research before diving in. Here are some key considerations:
-
Solar panel placement: Determine the best location on your bike to mount the solar panels for maximum exposure to sunlight.
-
Battery capacity: Calculate the energy requirements of your bike and choose a battery with sufficient capacity to store the solar energy.
-
Motor power: Select a motor that aligns with your bike’s weight and intended use, ensuring it can handle the load and terrain.
-
Cost considerations: Evaluate the total cost of the project, including solar panels, battery, motor, and any additional components, to determine if it fits within your budget.
Frequently Asked Questions
How much does it cost to build a solar electric bike?
The cost analysis and cost comparison of building a solar electric bike can vary depending on the components and quality chosen. Factors to consider include the solar panel, battery, motor, and bike frame, with prices ranging from a few hundred to several thousand dollars.
Is it possible to retrofit a regular bicycle with a solar electric system?
Retrofitting a regular bicycle with a solar electric system is like giving a car wings. Feasible, but challenging. Advantages include eco-friendliness and cost savings, but drawbacks include weight, limited range, and complexity.
How long does it take to fully charge the battery using solar panels?
The charging time of a solar electric bike battery depends on its capacity and the efficiency of the solar panels. Higher capacity batteries may take longer to charge, but on average, it can take around 4-8 hours to fully charge using solar panels.
Can the solar electric bike be used in all weather conditions?
In all weather conditions, the solar electric bike truly shines! Rain or shine, the effectiveness of solar panels remains impressive. However, extreme temperatures can slightly impact performance, so it’s important to consider the climate when using the bike.
Are there any limitations to the distance that can be traveled on a fully charged battery?
There are limitations to the distance that can be traveled on a fully charged battery. Battery life depends on factors like the size and capacity of the battery, as well as the terrain and speed.
Conclusion
In conclusion, building your own solar electric bike is like embarking on a thrilling journey towards a greener future. With meticulous planning and careful selection of components, you can create a marvel that harnesses the power of the sun to fuel your rides.
Just like a symphony conductor, you’ll orchestrate the installation of solar panels on your chosen bicycle frame, ensuring every detail is in perfect harmony. As you ride, the sun’s rays will dance upon your panels, propelling you forward with an eco-friendly elegance.
So, take the leap and embrace the brilliance of a solar electric bike, where innovation and sustainability intertwine.