
Adding a new coat of paint to your bicycle rims can be an enjoyable and satisfying task, infusing your bike with vibrant colors and a touch of personal flair. However, it’s crucial to select the appropriate paint and materials, adequately prepare your rims, and adhere to several straightforward guidelines to achieve a durable and smooth finish.
Firstly, choosing the right paint is crucial. Look for a high-quality, durable paint that is specifically designed for metal surfaces.
You’ll also need supplies such as sandpaper, masking tape, and a primer to ensure that your rims are properly prepared for painting.
With the right tools and techniques, painting your bicycle rims can be a simple and enjoyable DIY project. So let’s get started and transform your ride!
Key Takeaways
- Choosing the right paint and supplies is essential for painting bicycle rims
- Proper preparation, including sanding and applying primer, is crucial for better paint adhesion
- Various painting techniques and color options are available, so decide on finish and color beforehand
- Drying and curing time depends on paint type and weather conditions, so allow enough time before handling the rims
Choose Your Paint and Supplies
Now it’s time for you to choose your paint and supplies, so make sure you have everything you need before starting!
When it comes to painting your bicycle rims, there are a variety of painting techniques and color options to choose from. You can choose between spray paint or brush-on paint, and there are many colors to pick from, including metallic, matte, and glossy finishes.
Before you choose your paint, you need to decide what type of finish you want. Do you want a high-gloss finish that’ll catch everyone’s eye, or do you prefer a more subtle matte finish? Once you’ve decided on the finish, you can choose the color.
Many people opt for a color that matches their bike’s frame, but you can also go for a complementary color or something completely different. After you’ve chosen your paint and finish, it’s time to prepare your rims for painting.
Prepare Your Rims for Painting
Before you get started, make sure your wheels are ready to shine with a little TLC. First, you need to clean your rims thoroughly to remove any grime or dirt that can interfere with the paint’s adhesion. Use a degreaser and a stiff brush to scrub your rims.
Rinse them with water and let them dry completely before proceeding to the next step. Secondly, sanding is essential to create a rough surface that helps the paint adhere better. Start with a coarse-grit sandpaper and work your way to a finer grit until the surface is smooth.
Make sure to sand the entire rim and don’t forget the inside edges. Once you’re done sanding, clean the rims again with a cloth to remove any sanding dust.
With the cleaning process and sanding techniques done, you’re now ready to apply the paint.
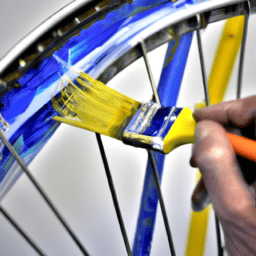
Apply the Paint
After ensuring that your rims are properly prepared, it’s time to start applying the first coat of primer. Before you start painting, consider choosing a color that will complement your bicycle’s overall look. You can go for a classic black or white, or you can opt for a bold and vibrant color that’ll make your bicycle stand out from the rest.
When applying the primer, make sure to use painting techniques that’ll give you a smooth and even finish. Start by applying a light coat of primer, and allow it to dry completely before applying the next coat. Repeat this process until you’ve applied enough coats to cover the entire rim.
Once the primer has dried, you can start applying the paint. Again, use painting techniques that’ll give you a smooth and even finish. Apply light coats of paint, and allow each coat to dry completely before applying the next coat. Choose a color that’ll complement your bicycle’s overall look, and have fun with it.
Let your rims dry and cure before moving on to the next step. This’ll ensure that your paint job is as durable as possible.
Let Your Rims Dry and Cure
Take a deep breath and resist the urge to rush – your patience in letting the rims dry and cure will pay off in the long run with a beautiful and long-lasting finish.
After applying the final coat of paint, it’s important to give your rims ample time to dry and cure properly. This is where time management plays a crucial role in achieving the best results.
Depending on the type of paint you used and the weather conditions, it may take anywhere from a few hours to a few days for the paint to fully dry and cure. It’s important to follow the manufacturer’s instructions and allow enough time for the paint to set before handling your rims.
Additionally, using a primer before painting can provide added benefits such as improved adhesion and durability. By taking the time to properly let your rims dry and cure, you’ll be rewarded with a finish that not only looks great but also stands up to the wear and tear of everyday use.
Now that your rims are dry and cured, it’s time to reassemble your bike and hit the road.
Reassemble Your Bike
Now that the curing process is complete, you can begin reassembling your bike and hitting the road with a newly refreshed look.
Before you start, make sure to double-check that all components are clean and in good condition. This is the perfect time to inspect your bike for any damages or wear and tear that might need fixing.
When reassembling your bike, start with the wheels. Make sure to properly tighten the axles and check that the brakes and tires are aligned.
Next, attach the handlebars and seat, ensuring they’re at the correct height and orientation. Finally, check the chain, pedals, and gears for proper function.
Following these steps will ensure your bike is safe and ready for the road. Remember that proper bike maintenance is essential for both performance and longevity.
Additionally, the importance of proper bike storage cannot be overstated. Make sure to store your bike in a dry, cool place to prevent rust and other damages.
Frequently Asked Questions
How often should you repaint your bicycle rims?
I recommend repainting bicycle rims every 1-2 years, depending on usage and weather exposure. Regular maintenance, such as cleaning and protecting from harsh elements, can prolong the lifespan of the paint job.
Can you paint over rust on the rims?
Painting over rust on bicycle rims is possible, but not recommended. It’s crucial to remove the rust before applying any paint. Using sandpaper and rust converter can help with rust prevention. Various painting techniques can be used to achieve a lasting finish.
Can you use regular spray paint for bicycle rims?
Regular spray paint can be used for bicycle rims, but it’s not as durable as powder coating. Spray paint is affordable and easy to apply. To achieve a smooth finish, sand the rims, use a primer, and apply multiple thin coats.
What type of finish should you choose for your painted rims?
When choosing a finish for painted rims, consider the pros and cons of matte vs glossy. Matte hides imperfections but is harder to clean. Glossy is easier to clean but shows imperfections. Choose a color that complements your bike’s style.
Is it necessary to remove the tires from the rims before painting?
Yes, it’s necessary to remove the tires before painting. This process prevents paint from getting on the tires and ensures a smooth finish on the rims. It’s also important to clean and sand the rims before painting for optimal results.
Conclusion
In conclusion, painting bicycle rims is a task that requires patience, attention to detail, and the right tools and materials. After choosing your paint and supplies, preparing your rims for painting, and applying the paint, it’s important to let your rims dry and cure properly before reassembling your bike.
As an experienced cyclist and avid DIY enthusiast, I can attest to the satisfaction that comes from giving your bike a fresh new look with a custom paint job. Coincidentally, I recently had the opportunity to put these skills to the test when a friend asked me to paint their vintage road bike rims.
With careful sanding, masking, and painting, I was able to transform their worn and rusty rims into shiny, eye-catching accents that perfectly complemented the bike’s classic design.
So, with a little bit of know-how and a lot of elbow grease, anyone can learn how to paint bicycle rims and take their bike from drab to fab in no time. Just be sure to take your time, follow the proper steps, and enjoy the creative process along the way.
Happy painting!