Have you ever wished for an easier way to ride your beach cruiser bike uphill or against strong headwinds? Well, look no further! In this article, I will guide you through the process of installing an electric motor on your beach cruiser bike.
With a few simple steps and the right tools, you’ll be cruising effortlessly and enjoying the freedom of an electrified ride.
So, let’s get started and transform your ordinary bike into an extraordinary electric beach cruiser!
Key Takeaways
- Assess the beach cruiser bike frame for cracks or damage and ensure it can handle the added weight and stress of the electric motor.
- Choose an electric motor that suits your needs and preferences, considering factors such as efficiency, power, weight, and price.
- Gather the necessary tools and parts for installation, and assess bike compatibility for motor and battery integration.
- Connect the battery and wiring following the manufacturer’s instructions, and test and fine-tune the motor and bike’s performance before riding.

ThinkRider X2Max Smart Bike Trainer Cycle Trainer Bicycle Trainer, Quiet Portable Design for Indoor Driving, Simulates 18% Slope, ANT + & BLE
Strong compatibility: Supports BLE and ANT + dual mode protocols and is compatible with mainstream cycling software such...
As an affiliate, we earn on qualifying purchases.
Assess Your Beach Cruiser Bike
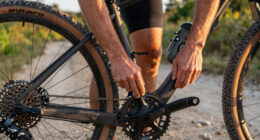
You’ll want to start by assessing your beach cruiser bike to determine if it’s suitable for installing an electric motor. Begin by examining the frame of the bike, checking for any cracks or damage that could affect the motor attachment. Make sure the frame is sturdy enough to handle the added weight and stress of the motor.
Next, evaluate the wheels and tires to ensure they are in good condition and can support the increased speed and power that comes with an electric motor. Additionally, check the brakes to ensure they are strong enough to handle the increased stopping power that may be required.
In terms of battery options, consider the range and capacity that you require. Assessing your desired distance and usage will help determine the appropriate battery size and type for your needs. Lithium-ion batteries are a popular choice due to their lightweight design and long lifespan. It’s also important to consider the battery’s voltage and how it will connect to the motor. Some batteries can be mounted on the frame, while others may require a separate bag or rack.
Once you have thoroughly assessed your beach cruiser bike and evaluated the battery options, you can move on to researching electric motor options.

Wahoo KICKR V6 Smart Indoor Trainer
WiFi Connectivity - Offering a robust 2.4 GHz Wi-Fi connection, the new KICKR transfers ride data to your...
As an affiliate, we earn on qualifying purchases.
Research Electric Motor Options
I’ll need to research different options for an electric motor. When considering an electric motor for my beach cruiser bike, it’s important to choose one that offers high efficiency and provides the benefits I’m looking for. To make an informed decision, I’ve compiled a table comparing some popular electric motor options based on their specifications and features.
| Electric Motor | Efficiency (%) | Power (Watts) | Weight (lbs) | Price ($) |
|---|---|---|---|---|
| Motor A | 90 | 500 | 5 | $200 |
| Motor B | 95 | 750 | 6 | $250 |
| Motor C | 92 | 600 | 4 | $300 |
| Motor D | 88 | 400 | 3 | $150 |
| Motor E | 94 | 700 | 5 | $350 |
Electric motor efficiency is a critical factor to consider as it directly impacts the overall performance and battery life of the bike. Higher efficiency motors tend to consume less power, resulting in longer battery life and less strain on the motor. Additionally, they offer a smoother and more responsive riding experience.
With this information, I can now make an informed decision on the electric motor that best suits my needs. Once I have selected the motor, I can move on to gathering the necessary tools and parts for the installation process.

Garmin Tacx Neo 2T Smart Trainer
Material: metal, plastic
As an affiliate, we earn on qualifying purchases.
Gather the Necessary Tools and Parts
To gather the necessary tools and parts, make sure you have a comprehensive list of everything you’ll need for the installation process.
Assessing bike compatibility is crucial before proceeding with the electric motor installation on your beach cruiser bike. First, you need to determine if your bike frame has enough space to accommodate the motor and battery. Measure the available area and compare it to the dimensions of the motor and battery you plan to use. Additionally, consider the weight capacity of your bike and ensure that it can handle the extra weight of the motor and battery without compromising safety or performance.
Choosing the right motor power is another critical aspect of this process. The power of the motor will determine the speed and performance of your electric beach cruiser. Consider factors such as your weight, the terrain you’ll be riding on, and your desired speed. Higher power motors are suitable for riders who want to tackle hilly terrains or reach higher speeds, while lower power motors are better for riders who prioritize energy efficiency and have flatter routes.
Now that you have assessed bike compatibility and chosen the appropriate motor power, you can move on to the next step: preparing your beach cruiser bike for the installation process.

Wahoo Fitness KICKR CORE 2 ZWIFT COG and Click - Orange Cog 3rd Generation
KICKR CORE Zwift is the smarter way to start riding indoors. The new KICKR CORE builds on the...
As an affiliate, we earn on qualifying purchases.
Prepare Your Beach Cruiser Bike
Once you’ve ensured that your bike frame is compatible with the motor and battery, start by gathering all the necessary tools and parts for the installation process.
Before diving into the installation, it’s crucial to assess any modifications that need to be made to your beach cruiser bike. This will ensure a seamless integration of the electric motor. Take a close look at the frame and determine if any adjustments or additions are required to accommodate the motor and battery.
Now, let’s move on to choosing the motor options for your beach cruiser bike. Consider factors such as power, torque, and battery capacity to make an informed decision. Think about your riding style and the terrain you’ll be tackling. If you plan on using your beach cruiser for leisurely rides on flat surfaces, a lower power motor might suffice. However, if you anticipate taking on more challenging terrains or need to navigate steep hills, a higher power motor with greater torque would be a better choice.
With the assessment of modifications and the selection of motor options complete, it’s time to move on to the next section where we will install the electric motor.
Install the Electric Motor
To successfully install the electric motor on my beach cruiser bike, I need to tackle two key points: attaching the motor to the wheel and securing it in place.
Attaching the motor to the wheel involves ensuring a proper fit and alignment, using the appropriate mounting hardware, and following the manufacturer’s instructions.
Once the motor is attached, I must securely fasten it in place to prevent any movement or dislodging during operation. This can be done by using sturdy brackets or clamps and double-checking all connections.
Attach the Motor to the Wheel
First, you’ll need to secure the motor to the wheel of your beach cruiser bike. Proper wheel alignment is crucial for optimal performance of the electric motor.
Begin by selecting the appropriate motor power option that suits your needs. Once you have the motor, position it near the rear wheel hub. Ensure that the motor aligns with the wheel’s axle and that there is enough clearance between the motor and the frame.
Use the provided mounting brackets and bolts to attach the motor securely to the wheel. Tighten the bolts firmly, but be careful not to overtighten and damage the motor or the wheel.
With the motor securely in place, we can now move on to the next step of securing the motor in place without obstructing other bike components.
Secure the Motor in Place
Now that you’ve attached the motor to the wheel, it’s important to secure it in place without obstructing any other bike components. Securing the motor is crucial to ensure its stability and prevent any unnecessary movement while riding.
There are several motor installation techniques that can be used to achieve this. One common method is to use sturdy metal brackets or clamps to attach the motor to the bike frame or fork. These brackets should be positioned in a way that allows the motor to be securely fastened while still leaving enough clearance for other bike components.
It is also important to use high-quality bolts and screws to ensure a strong and reliable connection. By carefully securing the motor in place, you can ensure a safe and efficient electric bike conversion.
Now, let’s move on to the next step, which is installing the battery.
Install the Battery
When installing the battery on my electric beach cruiser bike, there are three key points to consider: determining the battery placement, mounting the battery, and connecting the wiring.
Firstly, I need to carefully determine the best location for the battery on my bike frame, ensuring it is secure and well-balanced.
Once the placement is decided, I can proceed to mount the battery using the appropriate brackets or clamps, ensuring a tight and stable fit.
Determine the Battery Placement
You’ll want to consider where to place the battery on your beach cruiser bike. The placement will depend on factors such as battery capacity and charging options.
The first thing to consider is the weight distribution. Placing the battery near the rear wheel can help balance the weight of the motor at the front. It is also important to ensure that the battery is securely attached and protected from the elements. You can choose to mount it on the frame, using straps or brackets, or even inside a saddle bag or basket.
Additionally, you should consider accessibility for charging. Placing the battery in a location that allows for easy access to the charging port will make the charging process more convenient.
Once you have determined the ideal placement, you can proceed to mount the battery and connect the wiring seamlessly.
Mount the Battery and Connect the Wiring
To start, make sure you’ve securely attached the battery and then proceed to connect the wiring.
When it comes to battery placement, it’s essential to find a spot that is secure and balanced on your beach cruiser bike. Consider using a battery rack or frame bag specifically designed for electric bike batteries.
Once the battery is securely attached, it’s time to connect the wiring. Begin by locating the controller, which is responsible for regulating the power flow from the battery to the motor. Connect the wires from the battery to the corresponding terminals on the controller, ensuring a snug fit.
It’s crucial to follow the manufacturer’s instructions and double-check the connections for accuracy.
With the battery securely mounted and the wiring properly connected, you’re now ready to move on to the next step: connecting the controller and throttle, which will give you control over your electric motor.
Connect the Controller and Throttle
Once you’ve connected the controller and throttle, you can test the electric motor on your beach cruiser bike. The controller placement is crucial for easy access and protection against the elements. Make sure to mount it securely on the frame, ensuring that all the wires are properly connected.
The throttle sensitivity is another important factor to consider. Adjusting the throttle sensitivity allows for better control and a smoother riding experience. Here are three key steps to follow:
- Connect the controller to the battery and motor using the provided wiring harness. Ensure that all connections are secure and properly insulated.
- Attach the throttle to the handlebars using the provided clamp. Make sure it is positioned comfortably within reach of your hand.
- Adjust the throttle sensitivity by following the instructions provided with your specific controller. This will allow you to customize the level of responsiveness and power output.
Once everything is properly connected, you can move on to testing the electric motor system. This will ensure that all components are functioning correctly and that the motor is providing the desired level of assistance.
Test the Electric Motor System
Before proceeding with the installation of the electric motor on my beach cruiser bike, I need to ensure the battery voltage is at an optimal level. This can be done by using a multimeter to measure the voltage output of the battery pack.
Additionally, it’s essential to thoroughly test the motor functionality to ensure it’s working properly before attaching it to the bike. This can be achieved by connecting the motor to a power source and observing its performance, including its speed, torque, and responsiveness.
Check the Battery Voltage
First, make sure you’re checking the battery voltage on your beach cruiser bike. This is an essential step in checking the battery capacity and testing battery performance.
To do this, you will need a multimeter to measure the voltage of the battery. Connect the positive (red) lead of the multimeter to the positive terminal of the battery and the negative (black) lead to the negative terminal. The multimeter will display the voltage reading, which should ideally be within the specified range for your battery.
If the voltage is significantly below the expected value, it indicates a low battery capacity or potential battery failure. By regularly checking the battery voltage, you can ensure optimal performance of your electric motor system.
Moving on to test the motor functionality…
Test the Motor Functionality
To test the functionality of your motor, you’ll need to connect the wires properly and give it a test run. Here’s how to do it:
-
Connect the motor wires to the appropriate terminals on the controller. Make sure the connections are secure and tight to ensure proper conductivity.
-
Once the wires are connected, turn on the power switch of the electric motor system. You should hear a soft hum or buzzing sound indicating that the motor is receiving power.
-
Gradually increase the throttle or pedal assist level to test the motor performance. Observe if the motor starts smoothly and accelerates without any issues. Pay attention to any unusual noises, vibrations, or hesitations, as these could indicate motor issues that need troubleshooting.
By following these steps, you can effectively test the motor functionality and identify any potential problems that may require further attention.
Now, let’s move on to the next section where we will discuss how to adjust and fine-tune the electric motor system.
Adjust and Fine-Tune the Electric Motor System
Now that you’ve installed the electric motor on your beach cruiser bike, it’s time to adjust and fine-tune the system.
Fine-tuning the performance of your electric motor system is crucial to ensure optimal efficiency and smooth operation. One common problem you may encounter is a misalignment between the motor and the drivetrain. To troubleshoot this, carefully inspect the alignment of the motor and make any necessary adjustments to ensure they are properly aligned.
Another common issue is excessive noise or vibration. This can be caused by loose components or improper installation. Check all the bolts and connections to make sure they are tightened securely. Additionally, check the tension of the drive belt or chain and adjust it if necessary.
It’s also important to check the battery and ensure it is fully charged and functioning correctly. If you are still experiencing issues, consult the manufacturer’s troubleshooting guide for further assistance.
Now that you have fine-tuned your electric motor system, it’s crucial to ensure safety and legal compliance.
Ensure Safety and Legal Compliance
When it comes to electric bikes, it’s crucial to be aware of and comply with local laws and regulations. Before hitting the road, take the time to research and understand the specific requirements in your area.
In addition, installing safety features such as lights and reflectors will not only ensure your visibility to others but also help you stay in compliance with regulations.
Check Local Electric Bike Laws and Regulations
Make sure you’re aware of the local electric bike laws and regulations before adding an electric motor to your beach cruiser bike. It’s important to understand the restrictions and requirements in your area to ensure that you are in compliance with the law.
Here are four key aspects to consider:
-
Maximum speed: Electric bikes are often limited to a certain speed, typically around 20 mph. Understanding this restriction will help you choose an appropriate motor for your beach cruiser bike.
-
Power limit: Some areas have restrictions on the maximum power output of electric bike motors. Make sure to check the regulations to ensure that your motor falls within the allowed range.
-
Age restrictions: In certain places, there may be age restrictions for operating electric bikes. It’s crucial to be aware of these limitations to avoid any legal issues.
-
Safety requirements: Along with legal restrictions, electric bikes offer several benefits. They provide a more eco-friendly mode of transportation and can assist riders with pedaling uphill or against strong winds. However, it’s important to install safety features such as lights and reflectors to enhance visibility and ensure a safe riding experience.
Install Safety Features such as Lights and Reflectors
To ensure your safety on the road, don’t forget to install lights and reflectors on your electric bike. Proper lighting and reflectors are essential for nighttime riding safety and increasing visibility to other road users. By installing these safety features on your beach cruiser bike, you can enjoy a range of benefits. Firstly, lights and reflectors make you more visible to drivers, reducing the risk of accidents. Secondly, they allow you to see the road ahead clearly, improving your overall riding experience. Additionally, complying with local laws and regulations regarding lighting and reflectors is crucial to avoid fines or penalties. Take a look at the table below to understand the various benefits of installing safety features on your electric beach cruiser bike.
| Discussion Ideas |
|---|
| Benefits of installing safety features on a beach cruiser bike |
| Importance of proper lighting and reflectors for nighttime riding safety |
Learn How to Ride an Electric Beach Cruiser Bike
When it comes to riding an electric beach cruiser bike, it’s important to understand the two modes of operation: pedal assist and throttle.
In pedal assist mode, the motor provides assistance as you pedal, making it easier to tackle hills or maintain a consistent speed.
On the other hand, throttle mode allows you to control the bike’s speed solely with the twist of a handle.
To ensure a smooth and controlled ride, it’s crucial to practice smooth acceleration and braking techniques, gradually increasing or decreasing your speed to maintain balance and stability.
Understand the Pedal Assist and Throttle Modes
Understanding the difference between the pedal assist and throttle modes is crucial for successfully installing an electric motor on a beach cruiser bike. To ensure a smooth and efficient ride, it is important to consider the following:
-
Understanding battery capacity: Before choosing a motor, it is essential to assess the battery capacity. This will determine the range and duration of your rides.
-
Exploring different motor power options: Depending on your needs and preferences, there are various motor power options available. From low power motors for leisurely rides to high power motors for faster speeds, consider your intended use for the electric bike.
-
Choosing the right mode: Pedal assist mode provides assistance when you pedal, making it feel like you have superhuman strength. On the other hand, throttle mode allows you to control the speed using a throttle without the need for pedaling.
By understanding these modes and considerations, you can make an informed decision when installing an electric motor on your beach cruiser bike.
Once you have installed the motor, it is important to practice smooth acceleration and braking to ensure a safe and enjoyable riding experience.
Practice Smooth Acceleration and Braking
Practicing smooth acceleration and braking is essential for a safe and enjoyable ride. When it comes to smooth acceleration techniques, it’s important to gradually increase the throttle or pedal assist level instead of abruptly starting at a high power setting. This allows for a smoother transition and prevents sudden jolts. Additionally, maintaining a consistent pedaling cadence and gradually increasing your effort can help achieve a seamless acceleration.
On the other hand, braking tips are equally important. When applying the brakes, it’s crucial to avoid squeezing them abruptly. Instead, gently squeeze the brake levers to gradually slow down. This prevents any sudden jerks or skidding. Remember to distribute the braking force evenly between the front and rear brakes, as this provides better control and stability. Also, keep in mind that applying the brakes too hard while turning can cause the bike to lose traction and potentially lead to a skid.
Practicing these smooth acceleration techniques and employing proper braking tips will enhance your riding experience and ensure a safer journey.
Now, let’s move on to how to maintain and care for your electric beach cruiser bike.
Maintain and Care for Your Electric Beach Cruiser Bike
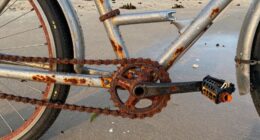
To keep your electric beach cruiser bike in good shape, make sure to regularly clean and lubricate the chain and gears. This is essential for proper electric bike maintenance. Here are some key steps to follow:
- Clean the chain and gears using a degreaser and a brush to remove dirt and grime.
- Rinse with water and dry thoroughly to prevent rusting.
- Apply a lubricant specifically designed for bicycle chains to ensure smooth operation.
- Check the tension of the chain and adjust if necessary to prevent slippage.
Choosing the right battery is also crucial for optimal performance and longevity. Consider the following factors:
- Capacity: Determine your average riding distance and choose a battery with enough capacity to meet your needs.
- Voltage: Higher voltage batteries provide more power and acceleration but may be heavier.
- Type: Lithium-ion batteries are commonly used in electric bikes due to their high energy density and longer lifespan.
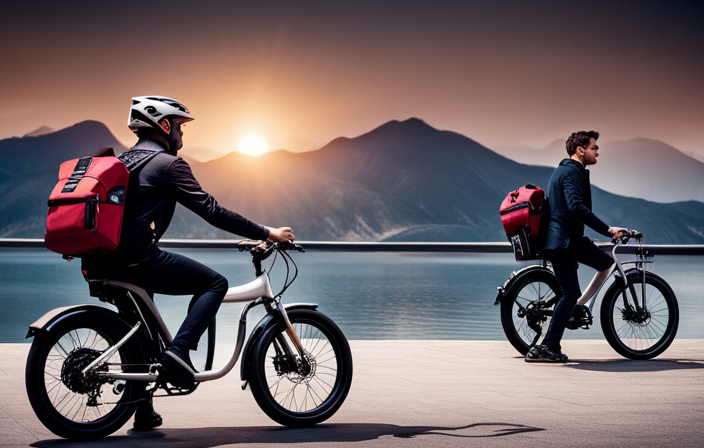
Enjoy Your Electrified Beach Cruiser Bike
Get ready to have a blast with your electrified beach cruiser. Now that you have your electric motor installed and your bike is ready to go, it’s time to explore battery options and compare motor power to enhance your riding experience.
When it comes to battery options, there are a few factors to consider. First, you’ll want to determine the range you desire. If you plan on taking longer rides, a higher capacity battery will be necessary. Additionally, consider the weight and size of the battery, as this will affect the overall handling of your bike.
Next, let’s compare motor power. The power of your electric motor will determine how fast and smoothly your bike accelerates. Higher wattage motors generally provide more power, allowing you to conquer hills and ride at higher speeds effortlessly. However, keep in mind that more powerful motors may drain your battery faster.
By exploring different battery options and comparing motor power, you can customize your electrified beach cruiser to suit your needs and preferences.
Now, let’s transition to troubleshooting common issues that may arise with your electric beach cruiser bike.
Troubleshoot Common Issues
If your electrified cruiser is experiencing any issues, start by checking the battery connections and ensuring they are secure. Troubleshooting electrical connections is essential to maintaining optimal performance.
Begin by inspecting the battery terminals for any signs of corrosion or loose connections. Clean the terminals with a wire brush and tighten them if necessary. Additionally, examine the wiring harness for any frayed or damaged wires. Repair or replace any faulty wiring to ensure a reliable electrical connection.
Another common issue to troubleshoot is battery performance. If you notice a decrease in power or a shortened range, it may indicate a problem with the battery. Start by checking the battery charge level using a voltmeter or battery indicator. If the charge is low, recharge the battery fully and monitor its performance. If the battery continues to underperform, it may need to be replaced.
By troubleshooting these electrical connections and battery performance issues, you can ensure that your electrified cruiser operates smoothly and efficiently.
Join the electric bike community and enjoy the benefits of riding an electrified beach cruiser bike alongside fellow enthusiasts.
Join the Electric Bike Community
After troubleshooting common issues with my electric bike conversion, I have finally joined the electric bike community. The benefits of riding an electric bike are numerous, from reduced carbon emissions to improved health and convenience. But to fully enjoy these benefits, it is crucial to choose the right electric motor for your beach cruiser bike.
When selecting an electric motor, there are several factors to consider. First, determine your desired level of assistance. Do you want a motor that provides minimal pedal assist or one that offers a powerful boost? Next, assess the terrain and distance you’ll be riding. If you plan to tackle steep hills or cover long distances, a motor with higher torque and a larger battery capacity is recommended.
Additionally, consider the type of motor that best suits your needs. There are three main types: hub motors, mid-drive motors, and friction drive motors. Each has its own advantages and disadvantages, so it’s important to research and choose the one that aligns with your riding style and preferences.
Frequently Asked Questions
What are the legal requirements for riding an electric beach cruiser bike?
To ride an electric beach cruiser bike, there are legal requirements and restrictions that must be followed. These regulations vary depending on the jurisdiction, but generally, there are rules regarding the maximum speed of the bike, the power output of the electric motor, and the age restrictions for riders.
It is important to check with local authorities and familiarize yourself with the specific electric beach cruiser bike regulations in your area to ensure compliance and a safe riding experience.
How do I troubleshoot common issues with my electric motor system?
When troubleshooting common issues with an electric motor system, there are a few key troubleshooting tips to keep in mind.
Firstly, check all connections and wiring to ensure they are secure and properly connected.
Next, inspect the battery to ensure it is fully charged and in good condition.
If the motor is not running, check the throttle and controller for any malfunctions.
Can I join the electric bike community and participate in group rides?
Joining the electric bike community is like stepping into a world of endless possibilities. With electric bike modifications, you can transform your ordinary ride into a powerful and efficient machine.
But it doesn’t stop there. By becoming part of a vibrant electric bike community, you gain access to a network of like-minded individuals who share your passion for sustainable transportation.
Get ready for exhilarating group rides, valuable advice, and a supportive community that will take your electric biking experience to new heights.
How do I ensure the safety of myself and others while riding an electric beach cruiser bike?
To ensure the safety of myself and others while riding an electric beach cruiser bike, I follow strict safety precautions and use proper riding techniques.
First and foremost, I always wear a helmet and protective gear.
I make sure to check the bike’s brakes, tires, and lights before each ride.
When riding, I maintain a safe speed and stay alert for any obstacles or pedestrians.
Additionally, I use hand signals to indicate my intentions and always yield to other vehicles and pedestrians.
What are some maintenance and care tips specific to an electric beach cruiser bike?
To ensure the optimal performance and longevity of an electric beach cruiser bike, proper maintenance and care are crucial. Here are some maintenance tips specific to these bikes.
- Regularly clean the bike to prevent dirt buildup.
- Check the tire pressure, brakes, and chain tension regularly.
- Keep the battery charged within the recommended voltage range and avoid extreme temperatures.
- Store the bike in a dry and secure location when not in use.
Following these tips will help maximize the lifespan of your electric beach cruiser bike.
Conclusion
In conclusion, transforming my beach cruiser bike into an electrified wonder has been a game-changer.
The power of the electric motor has taken my cycling experience to new heights, propelling me forward with an exhilarating force that feels like I’m flying.
The precision and attention to detail required during the installation process ensured a seamless integration of the motor onto my bike.
Now, as a proud member of the electric bike community, I can’t wait to hit the beach and show off my electrifying ride.