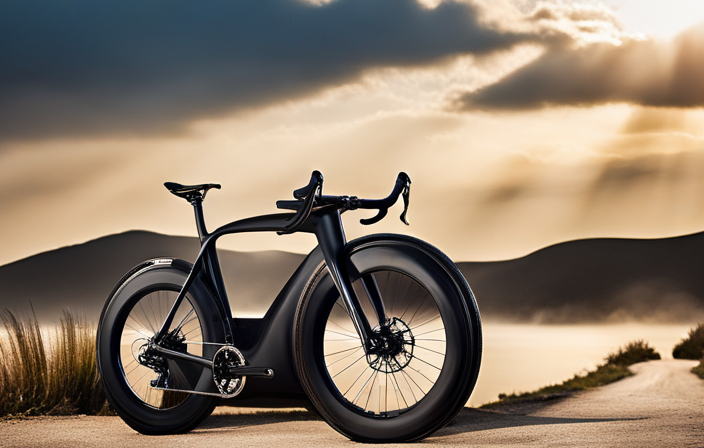

Prepare yourself to tackle the job of removing the front wheel on your specialized sequoia gravel bike! In this detailed guide, I will guide you through each step with easy-to-follow instructions.
Prepare your workspace and gather your tools before shifting gears and engaging the brakes for safety.
Loosen the quick-release lever or axle nuts, remove any obstructing accessories or fenders, then test and readjust as needed.
Finally, double-check everything is secure before hitting the road again.
Let’s dive in!
Key Takeaways
- Preparing the workspace and gathering the necessary tools is essential before removing the front wheel of a specialized sequoia gravel bike.
- Removing any accessories or fenders that may obstruct wheel removal is necessary to proceed with the process.
- Inspecting the removed front wheel for any damage or wear is important to ensure its proper functioning.
- After reinstalling the wheel, it is crucial to test the wheel alignment, tighten the quick-release lever or axle nuts, and readjust the brakes for optimal performance.
Prepare your workspace and gather the necessary tools
Before you start, make sure to gather all the necessary tools and prepare your workspace. Workspace organization is crucial when it comes to bike maintenance. Clear a designated area where you can work comfortably and have easy access to all your tools. This will help prevent any accidents or misplacing of important components.
Now, let’s talk about the essential bike maintenance tools you’ll need for this task. Firstly, grab a set of Allen wrenches in various sizes, as they will be necessary to remove the wheel from the fork dropouts. Additionally, having a torque wrench is recommended to ensure proper tightening of bolts later on.
Once you have everything ready, position your bike securely in a repair stand or on an elevated surface so that it remains stable throughout the process. Double-check that the quick-release lever is fully open before proceeding.
To shift the gears to the smallest chainring, gently pedal backward while simultaneously pressing down on the shifter located near your right hand on the handlebars. This will help create slack in the chain and make it easier to remove the front wheel without any issues.
With these preparations complete, we are now ready to move onto removing the front wheel of your specialized Sequoia gravel bike smoothly and efficiently.
Shift the gears to the smallest chainring
Shift the gears down to the smallest chainring. This is an important step in removing the front wheel of a Specialized Sequoia gravel bike. By shifting to the smallest chainring, you ensure that there is less tension on the chain, making it easier to remove the wheel.
Now, let’s take a look at some workout benefits and nutrition tips that can enhance your cycling experience:
- Improved cardiovascular fitness: Cycling regularly can strengthen your heart and lungs, improving your overall cardiovascular health.
- Increased muscle tone: As you pedal, various muscles in your legs, hips, and core are engaged, leading to toned and stronger muscles.
- Weight management: Cycling is a great way to burn calories and maintain a healthy weight.
To maximize these benefits, it’s essential to fuel your body with proper nutrition. Make sure to consume a balanced diet consisting of carbohydrates for energy, protein for muscle repair and growth, and healthy fats for endurance.
Now that we’ve discussed the workout benefits and nutrition tips let’s move on to engaging the brakes and securing the bike before proceeding with wheel removal.
Engage the brakes and secure the bike
Make sure to engage your brakes and securely stabilize the bike before moving on. This is a crucial step in ensuring your safety while removing the front wheel of your Specialized Sequoia gravel bike.
Begin by checking the tire pressure to ensure that it is at the recommended level for optimal performance. It is important to inspect the brake calipers as well, making sure they are properly aligned and functioning correctly.
To engage the brakes, simply squeeze both brake levers firmly. This will secure the bike and prevent it from rolling or shifting during the wheel removal process. Once you have engaged the brakes, proceed with caution.
Now that you have checked the tire pressure and inspected the brake calipers, you can move on to loosening the quick-release lever or axle nuts. This will allow you to detach the front wheel from its fork safely and efficiently.
By engaging your brakes and securing your bike, you minimize any potential accidents or mishaps that may occur during this process. With these precautions in place, you can confidently move forward with removing your front wheel.
Transitioning into loosening the quick-release lever or axle nuts, it is essential to follow these steps carefully to avoid any damage or injury.
Loosen the quick-release lever or axle nuts
To start the process, you’ll want to loosen either the quick-release lever or axle nuts. Before beginning, ensure that you have set up a suitable workspace for this task. It should be clean and well-lit, allowing you to easily access all necessary tools and components. Additionally, make sure your bike is clean and properly maintained before proceeding with any wheel removal.
If your bike has a quick-release lever, locate it on the front wheel hub. Lift the lever to release tension and rotate it counterclockwise until it is loose enough to remove. If your bike uses axle nuts instead, use an adjustable wrench or box-end wrench to loosen them by turning counterclockwise. Ensure that both sides are equally loosened to prevent damage.
Once the quick-release lever or axle nuts are sufficiently loosened, you can proceed with removing any accessories or fenders that may obstruct the wheel removal process. This will allow for easier access when removing the front wheel from your Specialized Sequoia gravel bike.
Now that we have loosened the quick-release lever or axle nuts and cleared any obstructions from our workspace, we can move on to the next step: removing any accessories or fenders that may obstruct the wheel removal process.
Remove any accessories or fenders that may obstruct the wheel removal
First, check for any accessories or fenders that could get in the way of removing the wheel. It’s important to remove these items before proceeding with the wheel removal process.
Here are three common obstacles you may encounter and how to deal with them:
-
Bike Accessories: Take note of any bike accessories such as lights, reflectors, or computer mounts that might obstruct the wheel removal. Remove them carefully using appropriate tools and cleaning techniques if necessary.
-
Fenders: If your specialized Sequoia gravel bike is equipped with fenders, they need to be removed before taking off the front wheel. Locate the bolts or quick-release mechanisms holding the fenders in place and loosen them accordingly.
-
Mudguards: Similar to fenders, mudguards can impede wheel removal. Look for any screws or attachments securing the mudguards and release them appropriately.
Now that you have cleared any potential obstacles out of your way, you can proceed to hold the fork securely and gently pull the wheel out of the dropouts without damaging any components.
Hold the fork securely and gently pull the wheel out of the dropouts
Once you have cleared any potential obstacles, securely hold the fork and gently pull the wheel out of the dropouts. This step is crucial in properly removing the front wheel of a Specialized Sequoia gravel bike. To begin, ensure that all accessories or fenders that may obstruct the wheel removal have been eliminated. Once this is done, position yourself in front of the bike with one hand on each side of the fork. Firmly grasp the fork legs near the dropouts to firmly hold it in place.
Using a smooth and steady motion, gently pull the wheel outwards from both sides simultaneously. Be cautious not to twist or force it as this could cause damage to either the fork or wheel itself. The goal is to smoothly slide it out without any resistance. If you encounter any difficulty during this process, double-check for any remaining obstacles or obstructions.
After successfully removing the front wheel, carefully set it aside and proceed to inspect it for any signs of damage or wear. This thorough examination will help identify any issues that need immediate attention before reinstalling or replacing the wheel.
Transitioning into checking for possible damage or wear on your removed front wheel is essential for maintaining its optimal condition and ensuring a safe ride ahead without compromising performance.
Check for any damage or wear on the wheel or tire
After successfully removing the front wheel, I carefully inspect it for any signs of damage or wear on both the wheel and tire. It is crucial to ensure that the wheel is in good condition before continuing with any maintenance or repairs. Here are three important things to check during this inspection:
-
Inspecting Tire Pressure: Using a pressure gauge, I measure the air pressure in the tire to make sure it meets the recommended range specified by the manufacturer. Low tire pressure can affect bike performance and cause premature wear on both the tire and wheel.
-
Checking Wheel Alignment: By visually examining the wheel, I look for any visible misalignment or wobbling. A properly aligned wheel ensures smooth handling and prevents unnecessary stress on other components of the bike.
-
Looking for Damage or Wear: I thoroughly examine the surface of both the wheel rim and tire tread for any cracks, dents, or excessive wear. These issues can compromise safety and may require immediate attention or replacement.
Once I have completed this inspection process, if necessary, I move on to cleaning the fork dropouts and wheel axle. This step ensures proper functionality and removes any dirt or debris that could hinder future use of my specialized Sequoia gravel bike.
Clean the fork dropouts and wheel axle if necessary
To ensure proper functionality, you should clean the fork dropouts and wheel axle if needed. Cleaning these areas is crucial for maintaining your specialized Sequoia gravel bike.
First, let’s focus on the fork dropouts. Start by removing any dirt or debris using a soft brush or cloth. Be thorough in cleaning all sides of the dropouts to prevent any buildup that could affect wheel alignment. If there are stubborn stains, you can use a mild detergent mixed with water to gently scrub away the grime.
Moving on to the wheel axle, begin by removing it from the fork dropout carefully. Inspect both ends of the axle for any accumulated dirt or grease. You can use a degreaser and a clean rag to remove any contaminants effectively. Pay close attention to the threads on each end of the axle, as they can accumulate dirt over time.
By employing effective cleaning techniques and following these maintenance tips, you will ensure that your specialized Sequoia gravel bike stays in top-notch condition.
Now we can transition into inspecting brake pads and making any necessary adjustments if needed without compromising performance and safety.
Inspect the brake pads and make any adjustments if needed
Inspecting the brake pads and making any necessary adjustments is crucial for ensuring optimal performance and safety. When it comes to the specialized sequoia gravel bike, properly adjusted brake pads are essential for reliable stopping power on various terrains.
To begin, check the alignment of the brake pads with the rim surface. They should make even contact with the rim when engaged, without touching the tire. If there is any uneven wear or signs of damage, it may be necessary to replace the brake pads.
Next, examine the position of the brake pad relative to the rim. The pads should align parallel to the rim’s braking surface, ensuring equal contact across their entire width. Adjustments can be made using a 5mm Allen wrench to loosen and reposition them as needed.
Troubleshooting brake issues involves inspecting for proper cable tension as well. Ensure that there is enough tension in the cable so that when you engage your brakes, they respond quickly and effectively.
By adjusting brake pads and troubleshooting any issues, you can guarantee optimal braking performance on your specialized sequoia gravel bike. This will provide confidence and safety during your rides.
Now we can move on to reinstalling the wheel by sliding it into the dropouts and aligning it properly without compromising its stability or functionality.
Reinstall the wheel by sliding it into the dropouts and aligning it properly
Align the wheel properly by sliding it into the dropouts, ensuring stability and functionality. The reinstalling process of the front wheel on a specialized Sequoia gravel bike is crucial for optimal performance.
Here are four key steps to follow:
-
Check for proper alignment: Before inserting the wheel, ensure that the brake rotor lines up with the caliper and that the axle fits snugly into the dropouts.
-
Securely fasten the quick-release lever or axle nuts: Once aligned, tighten either the quick-release lever or axle nuts to hold the wheel securely in place. This ensures stability during rides and prevents any wobbling.
-
Test spinning motion: Give the wheel a spin to confirm smooth rotation without any rubbing against either brake pads or frame components.
-
Troubleshoot common issues: If you encounter any problems during this process, such as misalignment or difficulty fitting into dropouts, double-check your steps and consult your bike’s manual for further guidance.
By following these steps carefully, you can successfully reinstall your front wheel on a specialized Sequoia gravel bike.
Now, let’s move on to tightening the quick-release lever or axle nuts securely for added safety and stability while riding.
Tighten the quick-release lever or axle nuts securely
After sliding the wheel into the dropouts and aligning it properly, it is crucial to tighten the quick-release lever or axle nuts securely. Failing to do so can result in an improperly secured wheel, which can lead to accidents or damage to your bike. Therefore, it is important to be aware of common mistakes that should be avoided during this step.
One common mistake is not tightening the quick-release lever or axle nuts enough. This can cause the wheel to become loose while riding, jeopardizing your safety. On the other hand, overtightening can damage the components and make it difficult to remove the wheel when necessary.
It’s worth noting that there are different types of quick release levers available, each with its own pros and cons. Some provide more leverage for easier tightening, while others offer enhanced security against theft.
In summary, ensuring a secure fit by properly tightening the quick-release lever or axle nuts is essential for a safe ride. Next, we will discuss how to test the wheel to ensure it spins freely and is properly aligned without any issues arising during your ride.
Test the wheel to ensure it spins freely and is properly aligned
To ensure a smooth ride, make sure the wheel spins freely and is aligned properly. Testing the wheel alignment and checking for proper spinning is an essential step in removing the front wheel of your Specialized Sequoia gravel bike. To do this, follow these steps:
| Step | Action | Purpose |
|---|---|---|
| Step 1 | Spin the wheel | Check if it spins without any resistance |
| Step 2 | Observe the gap between the brake pads | Ensure it is even on both sides |
| Step 3 | Inspect the rim for wobbling | Verify that there are no irregularities |
| Step 4 | Apply light pressure to each side of the rim | Confirm there are no loose spokes |
| Step 5 | Rotate the wheel while observing from different angles | Ensure it remains centered and straight |
By performing these tests, you can assess whether your front wheel is properly aligned and spins freely. If any issues arise during this process, such as uneven gaps or wobbling rims, adjustments may be necessary to ensure optimal performance.
Transitioning into readjusting the brakes if necessary, we will now move on to fine-tuning this crucial component of your specialized Sequoia gravel bike.
Readjust the brakes if necessary
After testing the wheel to ensure it spins freely and is properly aligned, the next step in removing the front wheel of a Specialized Sequoia gravel bike is to readjust the brakes if necessary. This is an important step as it ensures that the brakes are functioning correctly and will provide optimal stopping power when needed.
To readjust the brakes, start by checking the brake cables for any signs of wear or damage. If there are any issues with the brake cables, they should be replaced before continuing.
Next, use an Allen wrench to loosen the brake caliper mounting bolts. This will allow you to adjust the position of the caliper so that it aligns properly with the rim.
Once you have adjusted the position of the caliper, tighten the mounting bolts securely. Then, squeeze and release each brake lever several times to check for proper operation. If there are any issues or inconsistencies with braking performance, further troubleshooting may be required.
With proper brake adjustment complete, you can now transition into reattaching any accessories or fenders that were removed.
Reattach any accessories or fenders that were removed
Now it’s time to reattach any accessories or fenders that were taken off. When reinstalling fenders, make sure they are aligned properly and securely attached to the bike frame using the appropriate mounting hardware. Check for any damage or wear on the fenders and replace them if necessary. Additionally, ensure that all bolts and screws are tightened to the manufacturer’s specifications to prevent them from coming loose during rides.
Securing bike accessories is essential for a safe and comfortable ride. Begin by attaching any front lights or reflectors onto the handlebars using their respective mounts. Make sure they are positioned correctly and facing forward for maximum visibility. Next, securely fasten any bags or baskets onto the front rack with sturdy straps or brackets. Double-check that they are tightly secured and won’t shift while riding.
To help you visualize this process, here is a table showcasing common bike accessories and their recommended attachment methods:
| Accessory | Attachment Method |
|---|---|
| Front Light | Handlebar Mount |
| Fenders | Frame Mounting Hardware |
| Bags/Baskets | Front Rack Straps/Brackets |
Once all accessories and fenders have been reattached, proceed to double-check all connections and ensure everything is secure before riding. This will help prevent any accidents or damage caused by loose attachments. With everything in place, you can now confidently hit the road on your specialized Sequoia gravel bike!
Double-check all connections and ensure everything is secure before riding
Before riding, make sure to double-check all connections and ensure that everything is securely attached. This step is crucial for a safe and secure riding experience on your specialized sequoia gravel bike.
Start by inspecting the front wheel connection. Ensure that the quick-release lever or thru-axle is tightened properly, providing a snug fit between the wheel and the fork dropouts. Give it a gentle tug to confirm that it doesn’t move or wobble.
Next, examine the brake system. Verify that both brake pads are aligned symmetrically with the rim, making even contact when engaged. Squeeze the brake levers to confirm they engage smoothly without any excessive play or resistance.
Moving on to the handlebars, check that they are securely fastened to the stem using bolts or clamps. Wiggle them side-to-side and up-and-down to verify there is no movement or looseness.
Finally, inspect any accessories or fenders you reattached earlier. Make sure they are tightly secured in their respective mounting points without interfering with any moving parts.
By thoroughly double-checking all connections before each ride, you can enjoy a worry-free and secure cycling experience on your specialized sequoia gravel bike.
Remember, safety should always be your top priority!
Frequently Asked Questions
How do I know if there is any damage or wear on the wheel or tire?
To check for tire wear, start by examining the tread depth. Look for any uneven wear patterns or bald spots on the tire surface.
Inspect the sidewalls for cracks or bulges, which can indicate damage.
To inspect the wheel for damage, closely examine the rim for any dents, cracks, or loose spokes.
Spin the wheel and check for wobbling or misalignment.
Additionally, ensure that the axle is securely fastened and there are no signs of rust or corrosion.
What should I do if the wheel does not slide easily into the dropouts?
If the wheel does not slide easily into the dropouts, troubleshooting wheel alignment is necessary.
First, ensure that the quick release lever is fully open before attempting to insert the wheel.
If it still doesn’t fit, check if there are any obstructions or debris in the dropouts. Clean them if needed.
If all else fails, alternative methods of removing the front wheel include loosening the brake caliper or removing the axle nuts if applicable.
How do I clean the fork dropouts and wheel axle?
To clean the fork dropouts on my bike, I start by exaggerating the level of dirt and grime that has accumulated. It’s like a layer of ancient mud encrusted on them!
But fear not, with a little bit of elbow grease and a rag soaked in degreaser, I meticulously scrub away the filth until they gleam like new.
As for lubricating the wheel axle, I carefully apply a thin layer of high-quality bike grease to ensure smooth rotation and minimize friction.
What adjustments should I make to the brake pads if needed?
To adjust the brake pads on my bike, I first need to check for any issues. If the brake pads are not properly aligned with the rim or if they are worn out, adjustments may be necessary.
To troubleshoot brake issues, I will inspect the alignment of the pads and adjust them as needed using an Allen wrench. It is important to ensure that the pads make even contact with the rim for optimal braking performance.
How do I test the wheel to ensure it spins freely and is properly aligned?
To ensure that your wheel spins freely and is properly aligned, you need to perform a thorough test.
First, exaggerate the force applied to the wheel by spinning it vigorously with your hand and observe any irregularities in its movement. If there are issues, troubleshooting alignment may involve adjusting the axle nuts or quick release skewer.
Additionally, inspect the brake caliper for any interference with the wheel’s rotation and make necessary adjustments to achieve optimal alignment.
Conclusion
I’ve carefully prepared my workspace, gathered all the necessary tools, and followed each step with precision.
With a flick of the gears to the smallest chainring and a firm engagement of the brakes, I secured my specialized Sequoia gravel bike.
Loosening the quick-release lever or axle nuts was a breeze, allowing me to effortlessly remove any obstructing accessories or fenders.
After ensuring proper alignment and smooth spinning, I readjusted the brakes if needed.
With everything securely reattached, I double-checked all connections before taking off on my next adventure.