Connect with us

Care

How to Remove Rust From Bike Chains

Published

on

Hello! I specialize in removing rust from bike chains, and I’m here to assist you in eliminating all that corroded debris from your chain. Fear not – it’s easier than it appears! Equipped with the appropriate tools and a little effort, your chain will be gleaming anew before you know it.

I know from experience that rust can seem daunting at first, but don’t let it discourage you. It’s actually pretty easy to remove – all you need is a few simple items and some patience.

In this article, I’ll walk you through the steps for removing rust from your bike chain so that you can keep pedaling without any problems.

Ready to get started? Let’s go!

Causes Of Rust On Bicycle Chains

Rust can be a major problem for bicycle chains. It’s important to know that rust can form on the surface of a bike chain, and if left unchecked, it can cause serious damage. In order to prevent rust from forming and to keep your bike chain in great condition, it’s important to take preventive measures.

When it comes to removing rust from bicycle chains, there are several methods that can be used to do so safely and effectively. From using steel wool or wire brushes to chemical solutions like vinegar or WD-40, there are several ways to get rid of rust without damaging your bike chain any further. It’s important to choose the method that works best for you and your bike chain.

No matter which method you decide to use, it’s essential to make sure that any remaining dirt or debris is removed before moving onto preventing future rusting issues. If this step is skipped then the effectiveness of any preventive measures taken will be greatly diminished.

To start off on the right foot with prevention strategies, all dirt and debris must first be removed from the surface of the bike chain.

Prevention Strategies

Rust is an unavoidable part of the bike-riding experience, but there are steps you can take to minimize its effects and keep your bike chain looking healthy. As a rust removal expert, I’m here to tell you that with proper care of your bike, you can avoid the potential of rust forming in the first place.

To prevent rust from forming on your bike chain, I recommend taking three simple steps:

  • Keep your bike clean. This won’t just make it look better – dirt and mud left on the chain are a prime environment for rust to form.
  • Store it properly when not in use. If you’re storing your bike outside or in a humid environment, make sure to wipe down all exposed metal parts before covering them with a protective cloth or keeping them indoors.
  • Lubricate the chain periodically. This will help minimize wear and tear while also providing a barrier against moisture.

Taking these few simple steps will help ensure your bike stays rust-free and ready for adventure!

Simple Rust Removal Techniques

Removing rust from bike chains can be tricky, but with the right tools and some elbow grease, you can easily get rid of the pesky corrosion.

First, you’ll need a rust remover. Many formulas are available on the market, so choose one that works for your type of chain.

Next, make sure to remove the chain from your bike before applying the remover – this will help you get into all those hard-to-reach spots.

After liberally coating the chain in rust remover, let it sit for 30 minutes or more depending on how much rust is present.

Then rinse off the rust remover and scrub away any remaining residue with a brush or cloth.

Once you’ve removed as much rust as possible, it’s time to start lubricating your bike chain again.

Begin by using a degreaser to clean off any gunk or dirt that may have built up during removal.

When cleaning your chain, it’s important to do so carefully and not overwork it too much – otherwise you risk breaking it completely!

Finally, apply a fresh layer of lubricant to ensure that your bike chain has proper protection against future corrosion and wear.

This will help keep your bike running smoothly for many rides to come!

Using Wd-40 Effectively

Now that you know the basics of rust removal from bike chains, let’s take it a step further and discuss how to use WD-40 effectively.

WD-40 is an effective rust remover, as well as a lubricant, so it’s great for removing rust from bike chains.

To begin, make sure you have the right materials: a can of WD-40 and some cloths.

Start by spraying your rusty bike chain with the WD-40 until it’s completely covered.

Once it’s been sprayed down with WD-40, let it sit for a few minutes to allow the product to break down any rust particles and dissolve them away.

After a few minutes have passed, use a cloth to wipe down the chain and remove any debris or excess WD-40.

You may need to repeat this process several times before all of the rust is removed from your bike chain.

Once you’ve successfully removed all of the rust from your bike chain using WD-40, make sure you give it a good coat of chain lube to protect against future corrosion and oxidation.

This will help keep your bike chain in top condition for longer periods of time!

Now that we have discussed how to use WD-40 as an effective way to remove rust from bike chains, let’s move on to sourcing chemical rust removers that are specifically designed for this purpose.

Sourcing Chemical Rust Removers

If you need to remove rust from the bike chain, you may be looking for an effective chemical rust remover. As a bike chain rust removal expert, I know that not just any product will do – you need the right combination of solvents and abrasives to get the job done.

The first step is to make sure that your bike chain is clean and dry before applying the chemical rust remover. This will help it to penetrate deeper into the metal and get rid of all the rust.

Once it’s applied, let it sit for a few minutes before scrubbing off the rust with a wire brush or an old toothbrush. Then rinse off with water and dry thoroughly to keep your bike rust-free.

It’s important to remember that chemical rust removers should only be used if other methods of removal are not successful. They can be very effective at removing stubborn rust, but they also have their drawbacks as they can cause damage if not used properly.

The next step after using a chemical rust remover is to soak the bike chain with a degreaser to ensure all traces of the chemicals have been removed.

Soaking The Chain With A Degreaser

When it comes to removing rust from bike chains, soaking the chain with a degreaser is a key step. It’s important to make sure you use the right type of degreaser, as some chemicals can damage the metal of the chain links. I always recommend using a non-corrosive, biodegradable degreaser.

Once you have your degreaser ready, place your bike chain in a container and completely submerge it in the degreaser. Let it soak for at least 15 minutes – this gives time for the degreaser to break down and dissolve any rust on the chain.

After that, remove your chain from the container and give it a good rinse with water. This will help get rid of any remaining dirt or grease on your chain and prepare it for scrubbing.

Your bike chain should now be clean and free from dirt and grease – but not necessarily free from rust! If there are still signs of rust on your chain links, then you’ll need to move onto the next step: scrubbing your chain to remove any remaining rust.

Scrubbing The Chain To Remove Rust

Now that the bike chain is soaked and degreased, it’s time to start scrubbing away the rust. You can use a stiff brush or an old rag to get at the rust on the surface of the chain. This is the best way to remove rust from bike chains, as it allows you to get into every nook and cranny of the chain.

Here are five tips for getting all that rust off:

  • Use a stiff brush with firm bristles
  • Scrub in circles around each link
  • Make sure to get both sides of each link
  • Don’t forget about any crevices in between links
  • Wipe off any excess dirt and grime with a rag after scrubbing

Once you feel like you’ve gotten all the rust off, give your chain one final wipe down with a rag. This will help ensure that no dirt or grime is left on your bike chain before you put it back together.

Now that your bike chain is free of rust, it’s time to focus on storing and maintaining your bike so that it stays in great condition for years to come!

Storing And Maintaining Your Bike

When it comes to bike maintenance, rust is one of the most relentless enemies of your bike chain. It’s a classic battle between man and machine – but with the right knowledge and supplies, you can get rid of rust before it takes over.

The first step in defeating rust is to properly store your bike. To make sure it runs smoothly, hang your bike up using a bike stand to make sure no water or dirt build up over time.

Then inspect your bike chain for any signs of rust or dirt buildup. If you spot any, take some classic chain lube and apply it directly to the affected area, then use a cloth to rub away the remaining residue.

This will help prevent further damage from occurring and keep your chain running smoothly. It won’t take long – just a few minutes here and there – but will go a long way in keeping your beloved bike running like new for many years to come.

With that being said, let’s move on to discuss the effects of rust on the bike chain.

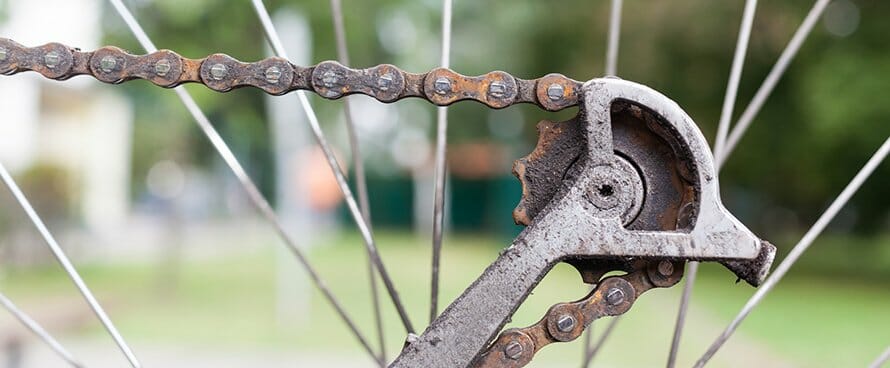
Effects Of Rust On The Bike Chain

Rust is a common problem for bike chains and can be difficult to remove without the right tools or knowledge. It’s important to keep a rusty chain clean, as it can cause wear and tear on all of the other components in your bike.

If you’ve noticed rust on your bike, there are a few different ways to remove rust from your bike chain. The quickest and easiest way to remove rust from your bike chain is by using an old toothbrush and some WD-40.

Start by spraying the chain with WD-40, then use the toothbrush to scrub away at any visible rust. Once you’ve cleaned off all of the rust, rinse off the chain with water and dry it off with a cloth.

If this method doesn’t work, you may need to look into professional rust removal services for help cleaning a rusty bike chain. A professional can provide you with more powerful tools like wire brushes or chemical solutions that will get rid of any remaining rust on your chain quickly and effectively.

Moving forward, it’s important to take steps towards preventing further rust damage so that you can maintain the longevity of your bike’s parts. When it comes time for professional rust removal services, make sure you do your research and find a reputable service provider who knows what they’re doing. That way, you can ensure that your bike is running smoothly now and in the future!

Professional Rust Removal Services

When it comes to removing rust from bike chains, there are a few options available. The most common is to take your bike chain to a local bike shop for professional rust removal services. This can be a great option if you have an excessive amount of rust on your chain, as it can remove the rust quickly and easily.

If you decide to do this yourself at home, then you will need some specialized tools and equipment. You will need items such as wire brushes and lubricants designed specifically for bike chains in order to get rid of the rust. It may also be necessary to purchase a new chain if the current one is too far gone.

Overall, it’s important that you take good care of your bike chain in order to keep it looking its best and running smoothly. Taking it into a professional for rust removal services or purchasing the right tools and supplies can help ensure that your bike remains in top condition for many years to come.

Frequently Asked Questions

What Is The Best Way To Protect A Bike Chain From Rust?

As the old adage goes, ‘an ounce of prevention is worth a pound of cure’, and this couldn’t be more true when it comes to protecting your bike chain from rust.

As an expert in rust removal, I can tell you that the best way to protect your bike chain from rust is to regularly clean and lubricate it. This will help keep dirt and moisture away from the chain, both of which are the main causes of rust.

Additionally, storing your bike somewhere dry will also help prevent rusting, as well as using a protective coating on the chain itself.

How Long Should A Bike Chain Be Soaked In A Degreaser?

Soaking a bike chain in a degreaser is an effective way to remove rust and other debris.

Generally, I recommend soaking the chain for at least 15 minutes.

You may need to extend the time depending on the severity of the rust, but it shouldn’t exceed 30 minutes.

Make sure you use gloves and protective eyewear when dealing with harsh chemicals, as degreasers can be harmful if not handled properly.

What Are The Long-Term Effects Of Rust On A Bike Chain?

Rust is a serious issue when it comes to bike chains, as it can significantly reduce the life of your chain. In fact, the long-term effects of rust on a bike chain are so severe that it can cause irreparable damage and weaken the links, ultimately leading to breakage.

As a bike chain rust removal expert, I would advise everyone to regularly inspect their bikes for signs of rust and take immediate action if any is found. This is the best way to ensure that your bike’s drivetrain remains in good condition for years to come.

Is Wd-40 An Effective Rust Remover?

Yes, WD-40 is an effective rust remover.

In fact, it’s one of the most popular products for removing rust from bike chains.

It penetrates the rust and loosens it up so you can easily scrape it away.

WD-40 also leaves a protective coating behind that prevents further corrosion, so your chain will be protected from future rusting.

Can A Bike Chain Be Professionally Rust-Proofed?

The answer to whether a bike chain can be professionally rust-proofed is yes. It’s a great way to ensure your bike chain stays rust-free for as long as possible.

Rust can easily accumulate on bicycle chains due to exposure to moisture and other elements, but with professional rust-proofing, you can protect your bike chain from corrosion and other damage.

Professional rust-proofing services use special products and processes that are designed specifically to protect bike chains from the elements. The process usually involves applying a protective coating or sealant onto the bike chain, which helps prevent it from corroding or becoming brittle over time.

Conclusion

As a bike chain rust removal expert, I can confidently say that there is no one-size-fits-all answer when it comes to removing rust from bike chains.

Depending on the severity of the rust, the best approach could be anything from a simple degreasing and lubricating to a full professional rust-proofing job. It all depends on how much time and effort you are willing to put into it.

If you are looking for long-term protection against rust, then I recommend investing in a professional rust-proofing service. This will ensure that your bike chain is properly taken care of and protected against any future corrosion.

Remember, taking preventive measures now can save you a lot of headaches down the line!

WD-40

If you want to clean rust on your bike chain, WD-40 can be an excellent tool to use. It can be applied to the chain with a cloth or even in a washing machine. This product can help you clean the rust from your bike chain and extend its lifespan. It can also reduce wear and tear on the chain.

The first step to cleaning rust on your bike chain is to inspect your bike chain. Generally, rust doesn’t affect the whole chain, but only a portion of it. If you don’t see any rust, try hanging the chain upside down or hanging it against a wall to check for rust. When you start cleaning rust, make sure you use a stable surface to avoid damaging the chain.

WD-40 - 490224 Multi-Use Product with SMART STRAW SPRAYS 2 WAYS, 14.4 OZ [2-Pack]
WD-40

When cleaning rust from your bike chain, you need to remove the master link, which is different from the other chains. You can then take apart the rest of the chain. After removing the chain, make sure to wiggle it a few times to remove dirt buildup. Now, you can use a scouring pad and a degreaser. Once the scouring pad is wet, you should wipe the area with force.

WD-40 can be a great solution for cleaning rust from your bike chain, but it is important to remember that WD-40 is a solvent and can cause damage to your bike if applied improperly. Make sure that you apply WD-40 to all rusted parts and leave it on for at least 10 minutes. If you have a severe case of rust, you may need to replace the entire chain.

Another way to clean your bike chain is to use olive oil. This oil can help prevent corrosion and rust, and it can also protect it from dirt and filth. However, olive oil only has a short-term effect and should only be used as a last resort.

WD-40 is the most popular way to clean a bike chain. The product is available in a spray form and has numerous uses. It is a great degreaser and cleaner, as well as a light lubricant. However, WD-40 should not be applied to bike brake pedals if you do not have any lubricant for your pedals.

After cleaning the bike chain, you should lubricate it. This will help the WD-40 remove stubborn rust and allow the chain to be reattached to your bike. The lubricant will also keep the chain from rusting. If you have a severe case of rust on your bike chain, you may want to consider replacing it altogether.

If you are looking for a simple way to clean your bike chain and derailleur, you can use WD-40 to remove rust. The lubricant works by loosening grime and oil grease that can clog the bike chain. Then, use a cleaning sponge and soap and water to scrub the chain.

Cleaning with Nylon Brush

Cleaning rust from bike chains is an important aspect of bike maintenance. Since bike chains are made of iron, they react with moisture and air to form rust. It’s important to clean your bike chain after every ride, especially if you live in a humid area. This will prevent further rusting.

Before cleaning your bike chain, you should remove the bike and inspect the chain thoroughly. If you notice a large amount of rust, it’s best to replace the chain. However, if the rust has spread throughout the chain, you can try cleaning it with lime juice or WD-40. After cleaning the chain, lubricate it and reattach it to the bike.

If you can’t get rid of all the rust with a nylon brush, try soaking the chain in degreaser. However, be careful because this process can be a bit rough on your hands. Another alternative is to soak a steel wool piece in lime juice and scrub it on the rusty parts. The degreaser will break down the particles that make up the rust. Once you’ve soaked the chain, you can wipe it off with a paper towel or dry cloth.

Another option is to use steel wool that has been dampened with lime juice or citric acid. While doing this, be sure to wear gloves. Then, you can use a steel brush to clean the parts that can’t be reached with a nylon brush. You can also use an old toothbrush to scrub the parts of the bike chain that are especially rusty.

After cleaning the chain, you can apply rust converter to protect the metal and prevent it from forming rust again. After cleaning, you can lubricate the chain and put it back on the bike. You can also apply wax or clear varnish to the bike to keep it from rusting.

The rust on bike chains is caused by moisture and a humid climate. However, it does not mean that the bike is broken. The rust is only damaging the metal. Therefore, cleaning rust from bike chains is not a difficult task. If you follow the tips outlined below, you should have no problem keeping your bike chain free of rust.

If you cannot find the master link, you can remove the chain manually. You can also jump the link of a gear spike. Plastic gloves can be very helpful in this process. Lastly, you’ll need a spray bottle. This bottle contains a solution of Coca-cola or vinegar. The amount of vinegar that you need depends on the size of the bike. This solution can be applied to the entire chain and is safe for people of all ages.

WD-40 or baking soda can be used as a lubricant on the surface of a bike chain. However, it’s not a permanent solution. WD-40 evaporates too quickly, which leaves little protection for the chain. In addition, rust can spread to other parts of your bike, so you should check your cycle regularly.

Muc-Off

If your bike chain has rusted, Muc-Off can help. The product comes in a trigger sprayer that can remove rust and oxidation. It works by reintroducing oxygen to metals that have been exposed to water and oxygen. It can be applied by brushing or spraying on the rusted area. Once you are done, rinse and dry the chain.

Muc-Off comes in neon yellow and is a biodegradable degreaser. The product is easy to use, just spray on the dirty part and rinse off. It comes with a spray bottle head that is designed to reach parts on all sides. This helps you clean even the toughest rust and grime. You can also use a brush to work the product into any small crevices. Muc-Off works well on metal, plastic, rubber, and seals, and is completely safe to use.

If you’re still having trouble with the rust, you can try applying lime juice to the chain. It contains citric acid, which helps break apart rust particles. You can also rub steel wool on the chain to remove light rust. It’s important to wear protective gloves and protect your eyes.

Another method to remove rust from a bike chain is to dampen steel wool with lime juice or citric acid. This will remove any remaining sticky residue and will also clean the chain. You should wash the chain thoroughly with soap and water afterwards. If the rust is stubborn, you can also use WD-40 spray. WD-40 is a powerful degreaser, but it’s not a lubricant.

If you’re unsure of how your bike chain works, the best way to clean a chain is to remove the masterlink first. It’s important to remove the masterlink first if the chain is heavy with surface rust. If the chain is only lightly rusted, however, it’s possible to clean the chain with the master link intact.

Ralf is a devoted husband and father who loves spending time with his family. He enjoys riding his bicycle as much as possible, and takes every opportunity he can to get out on the open road. Ralf is a kind and gentle person who wants only the best for those around him.

Continue Reading

Care

How to Clean Bike Chain

Published

on

By

Hello, cycling aficionados! You’re in the perfect spot if you’re seeking advice on cleaning your bike chain.

Keeping your bike chain clean is essential for keeping your ride in tip-top shape and making sure that it runs smoothly.

I’m a bicycle maintenance technician and I know all the best practices for cleaning a bike chain.

In this article, I’m going to give you step-by-step instructions on how to get the job done right.

So let’s get started!

Overview Of Bike Chain Maintenance

Maintaining your bike chain is an essential part of keeping your bicycle in tip-top shape. A clean and lubricated chain helps to ensure that you can enjoy smooth, efficient pedaling. It also prevents the unnecessary wear and tear that results from a dirty or dry drivetrain.

To get started, you’ll need some basic supplies: a chain lube, a chain cleaner, and a lubricant.

When it comes to cleaning and lubricating your bike chain, it’s important to do so after every ride. This will help keep all of your components running smoothly as well as prevent dirt and grime from building up over time.

Start by removing any excess dirt or debris that may be present on the chain, then use the chain cleaner to remove all traces of gunk from both the inside and outside of the links. Once everything is clean, apply a thin coat of lube to each link of the chain, making sure not to miss any spots.

After applying the lube, give it some time to penetrate into the links before wiping off any excess with a rag. Taking proper care of your bike’s drivetrain will ensure that you can enjoy smooth riding for years to come – no matter what terrain you choose to explore!

With these steps in mind, you’re now ready to start preparing for cleaning your drivetrain.

Preparing To Clean The Drivetrain

Getting your bike’s drivetrain ready for cleaning is the first step. To do this, you’ll need to remove the chain and use a chain keeper or other device to keep it from moving around on its own.

You’ll also want to get some degreaser or other cleaning product that is specifically designed for bicycle chains.

Next, you’ll want to take some time to inspect the chain and make sure that it doesn’t have any dirt or grime trapped in between the links that could get stuck in there during the cleaning process. If necessary, use a brush or cloth to try and remove as much of this debris as possible before beginning.

Once everything is prepped and ready, it’s time to start cleaning your bike chain. Do this by applying the degreaser or cleaner directly onto the chain itself, making sure that all of the components are thoroughly coated.

Allow it to sit for several minutes before rinsing off with warm water and drying with a soft cloth.

With your drivetrain prepared, you’re now ready to move on to actually cleaning your bicycle chain.

How To Clean A Bicycle Chain

Now that you’ve got the bike ready for its cleaning session, it’s time to focus on the drivetrain. The chain is the most important part of your bike and needs to be properly taken care of. Cleaning your chain will help keep your bike in good shape and running smoothly.

I’ll show you how to clean a bicycle chain.

First, take out a degreaser or cleaner and apply it to the chain using a rag or an old toothbrush. Take some time to scrub all around the chainring, cogs, and cassette area. This will help remove any built-up dirt or debris from those hard-to-reach areas.

Next, use a brush and lube to lubricate your chain. You want to make sure that you get every link of the chain because this is what helps reduce friction between parts and makes for smooth gear shifting. Don’t forget to get inside both sides of each link as well!

After you finish lubricating the chain, it’s time to move onto rinsing and drying it off.

Rinse And Dry The Chain

The bicycle chain is like a river coursing through the mountains and valleys of your bike, carrying the wheels along on their journey. It’s vital to keep that river clean and flowing by regularly rinsing and drying the chain.

To begin, rinse the chain in clean water to remove as much dirt and debris as possible.

Once it’s been rinsed, use a clean rag to dry off any excess moisture. Allow the chain to dry completely before proceeding further.

To make sure you get all the water out from between each link, use a cloth or brush to wipe off any excess moisture.

Now that your bike’s chain is sparkling clean and dry, you’re ready for the next step – applying lubricant to protect it against corrosion and wear.

Applying Lubricant To The Chain

Now that you’ve rinsed and dried your chain, it’s time to apply lubricant. Knowing what kind of lube to use can be tricky, so let’s break it down.

A wet lube is recommended for wet or rainy climates, as they are oil-based and provide better protection from rust and corrosion. Dry lubes are better for dry weather conditions; they’re wax-based and won’t attract dirt like wet lubes do.

Now that you know the differences between the two types of lube, let’s get started.

Before you start lubing your chain, make sure it’s clean by wiping off any excess residue with a rag or brush. This will ensure the chain is free from dirt and grime before you apply any lubricant.

Once the chain is clean and dry, spread some drops of lube along each link of the chain. Spin the pedals a few times to work the lubricant into all parts of the chain, then wipe off any excess using a cloth or rag.

Now that you know how to clean and lube your bike chain, you’ll be able to keep your bike running smoothly and efficiently! With just a few simple steps (and some elbow grease), your chain will stay in tip-top shape for years to come!

How To Lube A Bicycle Chain

Similar to a car needing oil, your drivetrain also needs regular lube to keep it running smoothly. Think of it as a lubricant that keeps the chainsaw of your bike functioning properly.

Imagine if you were to neglect your chain – it would become like an old rusty saw blade, losing its sharpness and eventually becoming completely useless.

When selecting the lube you use, choose one specifically designed for bicycle chains. This type of lube is usually made up of a combination of oils and waxes and will help protect against dirt and moisture buildup. Also make sure that the lubricant you use does not leave a sticky residue on the chain or other parts of the drivetrain, as this can attract even more dirt and grime over time.

It is important to remember that no matter how much lube you put in, if your chain is dirty then it won’t be able to do its job properly – so cleanliness is key! To keep your drivetrain functioning efficiently, make sure to periodically:

  • Clean off any dirt or debris with a cloth or brush
  • Apply lubricate evenly along the entire length of the chain
  • Wipe off any excess lubricant that’s left behind on the outside of the chain
  • Inspect the chain for any signs of wear or damage and replace if necessary.

Keeping The Chain Clean

Now that your bike chain is well lubricated and running smoothly, it’s important to keep it clean. Grease and dirt can accumulate on the chain over time, which can cause a lot of wear to the parts of your drivetrain. Cleaning your bike chain only takes a few minutes, but it pays off in the long run by helping you get smoother rides and longer-lasting parts.

The first step to cleaning your bike chain is to un-attach it from your bike. This will make it easier to access the link pins so you can remove them for a deep clean.

Once removed, put a rag around the chain so you don’t get lube or dirt on yourself or anything else. Dip the chain into some warm water with dish soap added in and use an old toothbrush to scrub away any grimy build-up that has accumulated over time.

Rinse off the suds with fresh water and then let it air dry while you finish up other tasks.

Once dry, take some drip lube and lightly apply it to each link as needed – just enough for a light slick coating of protection between each pin link. Make sure every piece of your bike chain is well-lubricated for smooth running performance and always be sure store any unused lube in a cool place after use – this helps keep it fresh for future use!

Doing these steps regularly will ensure you have a fresh chain that runs smoothly during every ride!

What Is A Drivetrain?

As a bicycle maintenance technician, I often get asked what a drivetrain is. In simplest terms, the drivetrain includes all of the components that help power your bike. This includes the chain, crankset, pedals, cassette and derailleur. All of these parts work together to help you pedal and move forward on your bike.

When it comes to maintaining your drivetrain and keeping it in good working order, one of the most important things to do is keep your bike chain clean and lubricated. A dirty bike chain can not only be inefficient but also cause premature wear on other components such as the rear cassette and derailleur.

Cleaning and lubricating your bike chain regularly will help ensure optimal performance and extend its life span. It’s relatively simple to clean a bike chain – all you need is some degreaser, an old rag or brush and some lube. Start by shifting into the smallest gear in the rear so the chain is tight and then spray degreaser onto any surface grime on the chain links. Use a brush or rag to scrub away any dirt particles before rinsing off with water. Once dry, apply lube generously to each link of the chain as this helps reduce friction between them when pedaling.

Now that we understand what a drivetrain is and how to clean a bike chain using it’s time to look at some of the benefits of cleaning and lubricating your bike chain regularly…

Benefits Of Cleaning And Lubricating Your Bike Chain

Cleaning and lubricating your bike chain is an important part of maintaining your bike. Whether you’re a recreational cyclist, daily commuter or serious biker, your chain needs regular attention to keep it running smoothly.

Here I’ll explain the benefits of keeping your chain clean and lubed:

  • Keeping your chain clean prevents dirt from grinding away at the metal components, preventing wear and tear.
  • Lubrication reduces friction between the moving parts, reducing energy loss and making shifting gears easier.
  • A freshly lubed chain makes for smooth pedaling and increased efficiency, allowing you to go further with less effort!

When it comes to bike maintenance, a clean and lubricated chain is essential for optimal performance. Regular cleaning and lubrication not only keeps dirt at bay but also helps to keep your chain in top condition, ensuring an enjoyable ride every time!

Different Types Of Chain Lube

When it comes to maintaining your bike chain, you’ll need a few key items. First up is a bike lube; this will help keep the chain running smoothly and reduce wear and tear.

You’ll also want to grab a chain scrubber and degreaser; this will help get rid of any dirt or grime that’s built up on your chain. Finally, you might want to consider using drip lube or waxed chains for extra protection.

Using the right lube is essential when it comes to maintaining your bike chain. A good quality lube will help keep your chain functioning efficiently, while also providing protection against dirt, dust and other elements. You should apply the lube by lightly dripping it onto the inside of each link; this ensures that each link is properly lubricated. Make sure to wipe off any excess lube with a clean cloth afterwards!

Cleaning your bike chain doesn’t have to be difficult. With the right products and a bit of elbow grease, you can easily keep your chain in top condition. Just remember to use the correct type of lube for your specific bike type and use it regularly for optimal performance!

Now that we’ve gone over different types of chain lubes, let’s move on to discussing some safety tips for cleaning your bike chain.

Safety Tips For Cleaning Your Bike Chain

Do you think that cleaning a bike chain is as easy as taking a nap on Sunday afternoon? Well, I’m here to tell you it’s not! Cleaning a bike chain requires some patience and know-how. Whether you’re talking about a mountain bike or an old-school 10-speed, it’s important that you keep your bike well maintained.

Here are some tips for doing just that:

  • Invest in a good chain tool: A decent chain tool should be the first item in your bike maintenance kit. This will help you break the chain prior to cleaning and make sure that it’s properly connected when reassembled.
  • Lube up: Once your chain is clean, be sure to apply lube to its entire length. This will keep rust and corrosion away and also help make sure your gears shift smoothly when riding.
  • Use a chain keeper: If you’re going to be storing your bike for a while, investing in a chain keeper is an excellent idea. It will keep the links of your chain aligned and protected from dirt and debris while it’s not in use.

Now that you’ve gotten all the basics down, let’s look at how to actually clean your mountain bike chain!

How To Clean A Mountain Bike Chain

Now that you know the basics of safety when cleaning a mountain bike chain, let’s talk about the actual steps involved in cleaning your chain.

First and foremost, you’ll want to scrub the entire length of your chain with a brush or rag. This will help remove any debris and dirt that may have built up over time. Make sure to use a chain keeper to keep the chain from coming apart while you clean it.

Once all the dirt and grime has been removed, it’s time to apply some lube. A good quality lubricant is essential for keeping your chain running smoothly. Start by applying lubricant to each link, then leave your chain on for a few minutes so the lubricant can get into every nook and cranny. Once this is done, wipe off any excess lube with a dry cloth.

When you’re finished, don’t forget to clean and lube your drivetrain components as well. This includes your rear derailleur, cassette, and crank arms.

Be sure to relubricate the chain once every month or two depending on how much riding you do – this will help ensure that your drivetrain stays in top condition for years to come!

With proper care and maintenance, you can enjoy smooth shifting performance for miles on end!

Common chain maintenance mistakes are easy to make if you don’t have the proper knowledge or skill set – don’t worry though! In our next section we’ll go over some common mistakes so you can be sure you’re taking care of your bike correctly.

Common Chain Maintenance Mistakes

Maintaining your bike chain is an essential part of keeping your ride smooth and efficient. As the old saying goes, “A chain is only as strong as its weakest link” – and making sure that link isn’t you is key to avoiding cycling headaches down the road.

To keep your bike chain rolling smoothly, it’s important to avoid some common maintenance mistakes. One of the most common mistakes is not cleaning your chain often enough. Over time, dirt and grime can accumulate on the links of your chain and cause damage.

To clean properly, use a stiff-bristled brush to remove any build-up and then rinse with water before drying with a cloth or air compressor. You should also consider re-lubing once in awhile – this can help keep your chain running smoothly. However, be careful not to overdo it – using too much lube can actually attract more dirt, so if you feel like you’re applying too much then it’s best to start over with a dry chain.

Finally, another mistake many people make is ignoring signs that their chains need replacing. If you notice any rust spots or fraying on the links of your chain then it needs to be replaced right away – this will help prevent bigger problems in the future. Taking care of these issues now will save you time and money in the long run.

By following these simple steps and avoiding these common mistakes, you can ensure that your bike chain stays in top shape for many rides ahead!

How To Keep Your Bike Chain Rolling Smoothly

Maintaining your bike chain is an important part of keeping your ride running smoothly. To keep it in top condition, you’ll want to clean and lubricate it regularly. It’s a good idea to replace your chain every few thousand miles, or when you start to notice any rust or wear on the cassette.

Before cleaning your bike chain, you’ll want to make sure all dirt and debris are removed. A quick wipe with a rag will do the trick. Once that’s done, it’s time for some degreaser and scrubbing. Make sure you pay special attention to the cassette for any built up grime and gunk.

Once everything looks nice and clean, rinse off the degreaser with water, then dry off the chain completely with a towel or air compressor.

Finally, if you’re using a new chain, apply some lubricant while spinning the crankset around so that it gets evenly distributed throughout the links of the bicycle chain. This will help prevent rusting and ensure proper operation while riding.

With some basic maintenance techniques like these, you can keep your bike chain rolling smoothly for many miles!

Common Bike Chain Cleaning Questions

Taking care of your bike chain is important for keeping it running smoothly. Here are the basics you should keep in mind:

  • Check the chain frequently for any wear or damage.
  • Keep the chain from getting too dirty by wiping it down with a cloth after each ride.
  • When necessary, apply lube to the chain to reduce friction and prevent rusting.

These simple steps will help keep your bike’s chain well-maintained and free of problems.

Remember, regular maintenance is essential if you want your bike to run optimally – so don’t forget to check and lube your chain frequently!

Use a chain breaker if needed to replace any worn out links or adjust the tension of the chain.

Frequently Asked Questions

How Often Should A Bike Chain Be Replaced?

It’s often said that ‘a chain is only as strong as its weakest link’.

When it comes to bike chains, this couldn’t be truer.

If you’re a serious cyclist, you should know when to replace your bike chain.

On average, depending on the type of riding you do and the conditions you ride in, you should replace your bike chain every three to five thousand miles.

But if you’re doing more extreme off-road riding, or riding in wet and muddy conditions, then you may need to replace it even more often.

So don’t wait until your chain snaps–replace it before it starts to wear out!

Can I Use A Degreaser To Clean My Bike Chain?

Yes, you can use a degreaser to clean your bike chain.

It’s important to make sure the degreaser you use is specifically designed for bike chains and isn’t too harsh.

I recommend using a high-quality degreaser that is made specifically for bicycle chains.

Make sure to apply it evenly onto the links of your chain and give it time to penetrate into the dirt and grime before wiping off with a cloth or brush.

What Is The Best Type Of Bike Chain Lubricant?

You want a bike chain that runs as smoothly as possible, and the best way to do that is with the right lubricant.

As a bicycle maintenance technician, I recommend using a dry lube for bike chains. It’s light enough not to attract dirt while still providing superior protection against rust and corrosion.

Dry lube penetrates deep into the inner workings of your chain and creates an ultra-thin layer that effectively repels water and dirt. Plus, it won’t leave an oily residue on your drivetrain, so you can ride worry free!

Is It Necessary To Clean And Lubricate My Bike Chain?

Yes, it is absolutely necessary to clean and lubricate your bike chain.

Without regular maintenance, dirt can build up in the chain, causing premature wear and tear. This can lead to costly repairs or replacements down the line.

As a bicycle maintenance technician, I highly recommend taking time to clean and lubricate your bike chain regularly for optimal performance and longevity.

How Do I Know When My Bike Chain Needs Lubricating?

Lubricating your bike chain is like giving your bicycle a tune-up. Just like your car, a bicycle needs to be serviced every so often and it’s important to know when that time comes.

A good rule of thumb is to check your bike chain for dryness and stiffness. If you can feel grit grinding between the links when you twist the chain, or if the links are stiff and won’t move easily, then it’s time to lubricate!

Conclusion

The importance of keeping your bike chain clean and lubricated cannot be overstated. It is essential for a smooth, efficient ride, as well as helping to reduce wear and tear on the chain.

A well-maintained bike chain should last around 2,000 miles before needing to be replaced.

By spending just a few minutes every month cleaning and lubricating the bike chain, you can help ensure that your bike is always running at its best.

Taking care of your bike chain will also help improve your overall cycling experience – something that’s backed up by research showing that regular maintenance can extend the life of a bicycle by up to three times!

Continue Reading

Beginners Guides

How to Remove Rust on Chrome Bicycle Components: The Ultimate Guide

Published

on

By

Rust often plagues chrome components on bicycles. It not only tarnishes the appearance of your bike, making it look aged and unsightly, but it can also harm the part itself.

How to Remove Rust on Chrome Bicycle Components

Rust, neglecting your bike can lead to many problems, one of the most common being rust. When you leave your bike out in the rain or don’t wipe down and dry it after a ride, water can seep into the metal frame and cause rust.

Not only is this unsightly, but it can also weaken the frame, making it more susceptible to breakage. If you live in an area with high humidity, salt water, or severe winters, it’s even more important to take preventive measures against rust. You can purchase a can of clear coating at your local hardware store and apply it to your bike frame once or twice a year. This will create a barrier between the metal and the elements, helping keep your bike looking new for years to come.

Bikes Tender Loving Care

Bikes Tender Loving Care, a common question we come across in relation to this is how can you remove rust from chrome bicycle components? Rust removal on chrome bicycle components is a relatively straightforward process.

WD-40

Many people enjoy riding bicycles as a form of transportation or exercise. However, over time, bikes can begin to show signs of wear and tear. One common issue is rust. Rust can cause your bike to lose its luster and can even make it difficult to ride.

Fortunately, there are a few simple steps you can take to remove rust from your bike and keep it looking like new. First, use water and a mild soap to remove any dirt or debris from the bike. Next, apply an oil-based product like WD-40. This will help to loosen the rust. Finally, use a cloth and some polish to buff out the rust and restore the shine to your bike. With a little effort, you can keep your bike in great condition for years to come.

[affiliatable id=’95990′]

All you need is an abrasive material (like aluminum foil or steel wool see below for more on this), something to lubricate it (water, an oil-like WD-40 or polish), and then a cloth and polish to finish.

How to Remove Rust on Chrome Bicycle Components

I have found that the WD-40 on sale in my local supermarket or on Amazon is the best deal. I like to use it because it works great on all kinds of surfaces. It also has a very strong smell that lasts for a long time. I would recommend this to anyone who is looking for a good deal on a product that works well.

Simply lubricate the steel wool or choice of material and lightly scrub away the rust. Once you’ve removed the majority of the rust, finish by wiping down the area with a cloth soaked in either water or your chosen oil. Finally, buff the area with a clean cloth and some polish until it shines. With just a little bit of elbow grease, you can easily remove rust from any chrome bicycle component.

In this guide, we will teach you how to remove rust from chrome bike parts using a variety of methods. We will also discuss how to prevent rust from forming in the future. Let’s get started!

How to Remove Rust on Chrome Bicycle Components: The Ultimate Guide

Rust is one of the most irritating things to have to deal with, not only because it’s unsightly, but also because it can cause serious problems in terms of functionality.

A rusty chain, for example, can cause your bike to break down completely. Rust is caused by a reaction between iron and oxygen and is accelerated by moisture and salt.

he best way to prevent rust is to keep your bike clean and dry and to apply a rust-inhibiting primer or paint if you live in an area that is particularly prone to rust. If your bike is already rusting, you can try to remove the rust with a wire brush or sandpaper.

However, Once rust has set in, it can be very difficult to remove completely. The best solution is often simply to replace the affected parts.

How to Clear Rust on Chrome Bicycle

Rust is a common problem for bike owners, particularly those who live in humid or coastal areas. While rust can form on any metal surface, it is most commonly found on chrome parts such as handlebars and wheel rims. Rust formation is caused by the oxidation of metal in the presence of moisture and air. While rust will not permanently damage your bike, it is unsightly and should be removed as soon as possible.

There are a number of effective methods for removing rust from chrome bike components. One popular method is to use a vinegar and water solution. Simply mix equal parts vinegar and water in a spray bottle and apply the solution to the rusty area. Let it sit for several minutes before wiping it away with a clean cloth.

Another option is to use a commercially available rust removal product. These products typically come in aerosol form and can be applied directly to the affected area. Before using any rust removal product, be sure to read the manufacturer’s instructions carefully. Rust removal products can be harsh on delicate surfaces so it is important to follow directions carefully to avoid damage.

If you have chrome bicycle components that have rust on them, there are a few ways to remove the rust. You can use a metal polish, vinegar, and baking soda. Make sure to clean off all of the polish or residue from the components after you’re done, so they look their best.

Procedure for Removing Rust From Chrome

There are a number of ways to remove rust from chrome, but some methods are more effective than others. In this section, we’ll outline a few of the most popular methods so you can decide which one is right for you.

  1. Method 1: Use a Vinegar and Water Solution
  2. Method 2: Use a Commercially Available Rust Removal Product
  3. Method 3: Remove Rust with Aluminum Foil
  4. Method 4: Remove Rust with Steel Wool

One popular method for removing rust is to use a vinegar and water solution. Simply mix equal parts vinegar and water in a spray bottle and apply the solution to the rusty area. Let it sit for several minutes before wiping it away with a clean cloth.

Another option is to use a commercially available rust removal product. These products typically come in aerosol form and can be applied directly to the affected area. Before using any rust removal product, be sure to read the manufacturer’s instructions carefully. Rust removal products can be harsh on delicate surfaces so it is important to follow directions carefully to avoid damage.

If you have chrome bicycle components that have rust on them, there are a few ways to remove the rust. You can use a metal polish, vinegar, and baking soda. Make sure to clean off all of the polish or residue from the components after you’re done, so they look their best.

Remove Rust with Vinegar and Water Solution

One popular method is to use a vinegar and water solution. Vinegar is a weak acid that can break down Rust molecules.

To use this method, mix equal parts vinegar and water in a bowl. Then, use a cloth to apply the solution to the rusted area.

Let the solution sit for a few minutes before wiping it away with a clean cloth. You may need to repeat this process a few times to remove all of the rust. But, with a little patience, you can get your metal looking like new again.

Remove Rust with Commercially Available Rust Removal Product

Commercially available rust removal products can be a great way to remove rust and restore the original appearance of metal surfaces. When choosing a rust removal product, it is important to select one that is specifically designed for the type of metal surface you are working with.

For example, there are products that are safe for use on stainless steel, while others are designed for use on aluminum or cast iron. Once you have selected the right product, simply follow the instructions on the packaging and you will soon have your metal surface looking like new again.

Remove Rust with Aluminum Foil

As anyone who has dealt with rust knows, it can be a stubborn and difficult problem to solve. Traditional rust removal methods often involve harsh chemicals or abrasive scrubbing, neither of which is ideal for delicate surfaces like chrome.

As any cyclist knows, rust can quickly ruin the appearance of a bike. Not only is it unsightly, but it can also make parts less functional and more prone to breakage. Fortunately, aluminum foil offers an easy and inexpensive way to remove rust from chrome bicycle parts.

When placed on rust, the foil chemically dissolves the iron oxides by attracting oxygen molecules to themselves. This process quickly breaks down the rust, leaving the underlying metal shining through. Best of all, the foil can be easily rinsed away with water, making it a stress-free solution for keeping your bike looking its best.

Remove Rust with Aluminum Foil

However, as the video below demonstrates, aluminum foil can be an effective way to remove rust without causing any damage. The key is to crumple the foil into a ball and then use it to rub away the rust in a gentle, circular motion. It may take a bit of elbow grease, but the result will be a shiny, rust-free surface. Best of all, this method is safe to use on any type of chrome, making it a great option for those who want to avoid damaging their belongings.

Remove Rust with Steel Wool

Steel wool is one of those humble household items that can be used for a variety of tasks, from scouring pots and pans to polishing wood furniture. It’s also an effective way to remove surface rust from chrome bicycle parts. Just grab a wad of steel wool and start buffing your tools.

They’ll look like new in no time. In addition to being easy to use, steel wool is also relatively inexpensive. So next time you’re dealing with rusty bike parts, reach for the steel wool instead of calling the professionals. You might be surprised at how well it works.

Remove Rust with Steel Wool

If you find yourself with some particularly bad rust buildup, don’t despair. There’s a method you can use to break through the rust and restore your item to its former glory. This method is similar to using aluminum foil (below), but you’ll need a few additional items on hand including steel wool or a wire brush, hot soapy water, and metal polish.

It’s also important to test this method in a small section first to make sure it won’t remove the chrome finish (if that’s something you’re concerned about). If all goes well, you should be able to break through the rust and bring your item back to its shiny self.

Conclusion

Rust can be a difficult problem to solve, but with these methods, you can remove it from chrome bicycle components quickly and easily. One popular method is to use a vinegar and water solution.

Vinegar is a weak acid that can break down Rust molecules. To use this method, mix equal parts vinegar and water in a bowl. Then, use a cloth to apply the solution to the rusted area. Let the solution sit for a few minutes before wiping it away with a clean cloth. You may need to repeat this process a few times to remove all of the rust. But, with a little patience, you can get your metal looking like new again.

Commercially available rust removal products can be a great way to remove rust and restore the original appearance of metal surfaces. When choosing a rust removal product, it is important to select one that is specifically designed for the type of metal surface you are working with. For example, there are products that are safe for use on stainless steel, while others are designed for use on aluminum or cast iron. Once you have selected the right product, simply follow the instructions on the packaging and you will soon have your metal surface looking like new again.

Rust can be a difficult problem to solve

Aluminum foil offers an easy and inexpensive way to remove rust from chrome bicycle parts. When placed on rust, the foil chemically dissolves the iron oxides by attracting oxygen molecules to themselves. This process quickly breaks down the rust, leaving the underlying metal shining through.

Best of all, the foil can be easily rinsed away with water, making it a stress-free solution for keeping your bike looking its best. However, as the video below demonstrates, aluminum foil can be an effective way to remove rust without causing any damage. The key is to crumple the foil into a ball and then use it to rub away the rust in a gentle, circular motion. It may take a bit of elbow grease, but the result will be a shiny, rust-free surface. Best of all, this method is safe to use on any type of chrome, making it a great option for those who want to avoid damaging their belongings.

If you are looking for an easy and effective way to remove rust from your chrome bicycle parts, aluminum foil may be the answer. This inexpensive household item can be used to quickly and easily dissolve rust, leaving behind a shiny surface.

Continue Reading

Affiliate disclaimer

As an affiliate, we may earn a commission from qualifying purchases. We get commissions for purchases made through links on this website from Amazon and other third parties.

About us

We are a passionate team driven by the belief that cycling is a fantastic and accessible way to stay active while enjoying the beauty of the outdoors. Our mission is to share our love for cycling with as many people as possible. We provide a welcoming environment for individuals of all ages, abilities, and backgrounds to come together and ride bikes. With Ralf’s visionary leadership, Zane’s expertise in cycling adventures, and Olivia’s dedication to community building, we strive to create a vibrant space where everyone can experience the joy of cycling. Through group rides, workshops, and inclusive events, we inspire and empower individuals to embrace an active lifestyle. Join us in our quest to pedal together, embrace the joy of cycling, and foster connections that last a lifetime.

Trending