
At first glance, changing out a bicycle seat might appear challenging, however, it’s genuinely a straightforward process that can be accomplished with a few easy steps. Upgrading to a seat that offers more comfort or needing to swap out a worn or damaged one, mastering the skill of replacing a bicycle seat is vital for any bike rider.
Before starting, it’s important to determine your bike’s seat post type, as this will affect the tools and techniques you’ll need to use. Once you have this information, you can gather the necessary tools and get started on removing the old seat.
With a bit of patience and attention to detail, you’ll be able to install the new seat and make any necessary adjustments to ensure a comfortable and safe ride.
So, let’s dive into the details of how to replace a bicycle seat and get you back on the road in no time!
Key Takeaways
- Identify the seat post type before purchasing a replacement seat, as different types require different types of seat posts.
- Proper seat measurement is crucial, as different types of bike saddles can affect comfort and performance of the ride.
- Adjusting seat height is important to prevent injury and reduce the risk of knee injuries and other strains.
- Aligning the seat properly is a key component to achieving optimal comfort and performance, including saddle shape, height, angle, and distance from handlebars.
Determine Your Bike’s Seat Post Type
If you’re not sure what type of seat post your bike has, you’ll need to take a closer look. Identifying seat post type is important before purchasing a replacement seat because different types of seats require different types of seat posts.
The simplest way to tell what type of seat post you have is to look for the diameter measurement. Most seat posts have the diameter measurement stamped or etched on the bottom of the post. If it’s not there, you’ll need to measure the post’s diameter with a caliper or ruler.
Once you have the diameter measurement, you can start looking for a replacement seat that matches your seat post. Choosing replacement seat material is also an important consideration when replacing your bike’s seat.
Bike seats can be made from a variety of materials, including plastic, leather, and synthetic materials. Each material has its own advantages and disadvantages in terms of comfort, durability, and cost. It’s important to choose a material that suits your needs and preferences.
Now that you have identified your bike’s seat post type and chosen the replacement seat material, it’s time to gather the necessary tools.
Gather the Necessary Tools
First, you’ll want to grab the tools you need to get the job done quickly and efficiently. You’ll need a wrench, pliers, and a screwdriver. These tools will help you remove the old seat and adjust the new one properly. Make sure you have the right size wrench and screwdriver for your bike’s seat post bolts.
Proper seat measurement is crucial when replacing a bicycle seat. You’ll want to take note of the width of your old seat and choose a new one that is similar in size. Additionally, different types of bike saddles can affect the comfort and performance of your ride. Consider your riding style and preferences when selecting a new saddle.
With the right tools and proper measurements, you’ll be ready to remove the old seat and install the new one for a more comfortable and enjoyable ride.
Remove the Old Seat
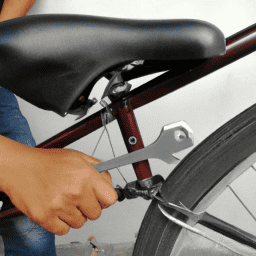
Now it’s time to get rid of the old seat and make space for the new one. You’ll need your trusty wrench, pliers, and screwdriver to carefully loosen the bolts and remove the seat from the bike frame.
First, locate the bolt that attaches the seat to the post. Use your wrench to loosen it, then lift the seat off the post. If the seat is stuck, use your pliers to gently twist it until it comes loose.
Once you’ve removed the old seat, it’s important to dispose of it properly. Don’t just toss it in the trash! Many bike shops offer recycling options for old seats, or you can look for recycling facilities in your area.
Now that the old seat is gone, let’s move on to installing the new one.
Install the New Seat
Now that I’ve removed the old seat, it’s time to install the new one.
The first thing I need to do is adjust the seat height according to my preference, making sure it’s neither too high nor too low.
Then, I must tighten the seat clamp securely to ensure that the seat stays in place while riding.
Finally, I need to align the seat to make sure it’s straight and comfortable to sit on.
Adjust the Seat Height
To get the perfect height for your bicycle seat, imagine yourself pedaling smoothly down a road and adjust the seat until your legs extend almost fully at the bottom of the pedal stroke.
Proper posture is important when adjusting the seat height to prevent injury. Common mistakes include setting the seat too low, which can cause knee pain, or setting it too high, which can cause hip pain.
It’s crucial to find the right balance to ensure comfortable and safe riding.
The importance of correct seat height cannot be overstated when it comes to injury prevention. By setting the seat at the proper height, you reduce the risk of knee injuries and other strains.
To achieve the proper height, make sure to measure the distance between the top of the pedal and the top of the seat. Once you’ve found the right height, tighten the seat clamp to secure the seat in place.
Tighten the Seat Clamp
Once you’ve found the perfect height for your bicycle seat, the next step is to tighten the seat clamp to keep it securely in place. Proper tightening technique is crucial to ensure that your seat stays put during your ride.
First, make sure that the clamp bolt is in the correct position and that the threads are clean and free of debris. Then, use a torque wrench to tighten the clamp bolt to the manufacturer’s recommended torque specification. If you don’t have a torque wrench, use a regular wrench and tighten the bolt until it feels snug, but be careful not to over-tighten it.
Common seat clamp issues include the seat slipping or tilting during a ride. This can be caused by an improperly tightened clamp or a worn or damaged clamp bolt. To prevent these issues, check the clamp bolt regularly and replace it if necessary.
Additionally, make sure that the seat post is clean and free of debris before tightening the clamp. Once you’ve tightened the clamp, double-check to ensure that the seat is level and straight. This will ensure that you have a comfortable and safe ride.
In the next section, we’ll discuss how to align the seat for optimal comfort and performance.
Align the Seat
Achieving optimal comfort and performance on your ride is essential, and aligning your seat properly is a key component to achieving that goal. Proper seat posture is important to avoid discomfort or injury during your ride. The ideal position of the seat is when it is parallel to the ground, and the nose of the saddle is slightly tilted downwards. This position allows for proper weight distribution and reduces pressure on your perineum.
Comfortable saddle shape is also important when aligning your seat. A saddle with a shape that complements your body type and riding style can significantly improve comfort. It is recommended to try different saddle shapes and widths until you find the right one for you. Remember to also adjust the height of the seat to ensure that your legs are at a comfortable angle when pedaling. With the proper seat posture and a comfortable saddle shape, you will be able to enjoy your ride to the fullest. Now, it’s time to test the seat and make adjustments as necessary.
Test the Seat and Make Adjustments
Before hopping on your bike, give the seat a test spin and make any necessary tweaks to ensure it fits like a glove, just as a tailor would adjust a suit to fit perfectly.
To test the seat, mount your bike and pedal around for a few minutes, paying close attention to any discomfort or awkwardness in your posture.
If the seat feels too high or low, adjust its height using techniques such as loosening the clamp and sliding the seatpost up or down. Make sure to tighten the clamp securely once you have found the right height.
Comfort considerations should also be taken into account during the testing phase. If the seat feels too hard or too narrow, consider investing in a new seat that is better suited to your body type.
Another option is to adjust the angle of the seat, tilting it slightly forward or backward to alleviate pressure points.
Finally, check the distance between the seat and the handlebars, making sure that you are not overreaching or hunching over, which can cause discomfort and strain.
By taking these steps, you can ensure that your bike seat is adjusted to your body for maximum comfort and efficiency on your rides.
Frequently Asked Questions
How do I know if my old bicycle seat is worn out and needs to be replaced?
I assess the wear of my bicycle seat by checking for cracks, tears, and flattening. If it looks worn out, I choose a durable and comfortable material like leather or gel.
Can I replace my bicycle seat with any type of seat or do I have to buy a specific type for my bike?
Like puzzle pieces, not all seats fit every bike. Seat compatibility is crucial when replacing a bicycle seat. Choose the right seat by considering the bike’s make, model, and seat post diameter to ensure a proper fit.
Is it necessary to use a torque wrench when installing the new seat?
Using a torque wrench when replacing a bicycle seat is not necessary, but it can ensure proper tightening without over or under tightening. Hand tightening may be faster, but it can lead to uneven or loose bolts.
How do I adjust the angle and height of my new bicycle seat for optimal comfort?
To achieve proper seat adjustment, I first determine the height by placing my heel on the pedal and extending my leg. Then, I adjust the angle for comfort and make sure the saddle shape supports my sit bones.
Can I reuse the same seat post or do I need to buy a new one when replacing my bicycle seat?
When replacing a bicycle seat, it is possible to reuse the same seat post as long as it is compatible with the new seat. However, different brands may have different dimensions, so it’s important to check compatibility before reuse.
Conclusion
So there you have it, folks. Replacing your bicycle seat isn’t as complicated as it may seem, as long as you have the right tools and a basic understanding of your bike’s seat post type.
By following the steps outlined above, you can easily remove your old seat and install a new one that will better fit your needs and provide a more comfortable ride.
Remember to take your time and make any necessary adjustments before taking your bike for a spin. A well-fitted seat can make all the difference in your cycling experience, and with a little bit of know-how, you can ensure that your ride is as comfortable and enjoyable as possible.
So go ahead and give it a try – your bum will thank you! As the saying goes, "a comfortable seat is like a good pair of shoes, you don’t even notice it’s there."
Related Posts:


Zane rides her bike because she loves it, but also because she is mindful of the need to leave a better world for her children.