As someone who rides bicycles, I’ve come to understand that taking care of your bicycle is key to preserving its peak performance. Among the routine maintenance activities, changing the brake pads stands out as particularly important. This not only enhances the braking efficiency of your bicycle but also plays a significant role in ensuring your safety while cycling.
In this article, I’ll guide you through the process of replacing your bicycle brake pads, step-by-step.
Before we begin, it’s important to gather the necessary tools and supplies. You’ll need a set of new brake pads, a small hex wrench, a clean rag, and some rubbing alcohol. Make sure you have the correct brake pads for your bike’s make and model. It’s also a good idea to have a bike stand or some way to elevate your bike off the ground for easier access to the brakes.
With these tools and supplies on hand, let’s get started on replacing your bicycle brake pads.
Key Takeaways
- Regular maintenance is important for bike’s condition and safety.
- Identifying the type of brake pad is crucial for choosing the right replacement.
- Proper alignment is crucial for maximum braking power and to prevent premature wear.
- Testing brakes before riding is important.
Gather the Necessary Tools and Supplies
You’re gonna need some pliers and a hex wrench to get started, so grab those from your toolbox and let’s get to work. When choosing the right brake pads, make sure they are compatible with your bike’s braking system. There are different types of brake pads such as rim brake pads and disc brake pads, so be sure to choose the appropriate type for your bike. Check the manufacturer’s recommendations to ensure you get the right size and type of brake pads.
Common mistakes when replacing brake pads include not aligning the pads properly, not tightening the bolts enough, or over-tightening them. To avoid these mistakes, take your time and follow the manufacturer’s instructions closely. It’s important to have the right tools to ensure a successful replacement.
Once you have the tools and supplies ready, it’s time to remove your old brake pads.
Remove Your Old Brake Pads
Before I can install new brake pads on my bicycle, I need to remove the old ones. This process involves identifying the type of brake pad I have and removing the retaining pin or bolt that holds it in place.
First, I’ll need to determine if my brake pads are threaded or non-threaded. Then, I can use the appropriate tool to remove the retaining pin or bolt.
Identifying the Brake Pad Type
Just like a detective, identifying the type of brake pads on your bicycle is the first step to replacing them. There are different types of brake pads, and each type has its unique feature that makes it suitable for a particular bike. Here are some clues to look out for when identifying the type of brake pad on your bike:
-
Look at the shape: The shape of the brake pad can give you a clue about its type. Some are rectangular, while others are curved or angled.
-
Check the color: The color of the brake pad can also be a clue. Some are black, while others are brown or gray.
-
Inspect the material: The material of the brake pad can also give you an idea of its type. Some are made of rubber, while others are made of ceramic or metallic material.
-
Read the label: Some brake pads have labels that indicate their type and the bikes they are compatible with.
-
Consult the manual: If you have the bike manual, it can provide information about the type of brake pads that came with the bike and the recommended replacement.
Identifying the type of brake pads on your bike is crucial because it will help you choose the right brake pad for your bike. Once you’ve identified the type of brake pad, you can proceed to remove the brake pad retaining pin or bolt.
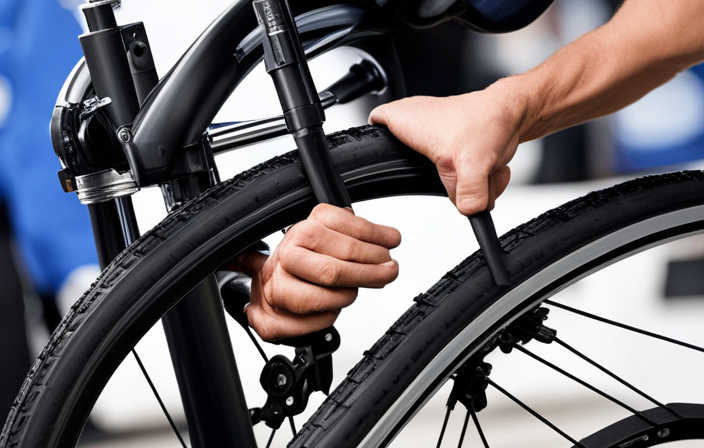
Removing the Brake Pad Retaining Pin or Bolt
To proceed with removing the retaining pin or bolt, it’s important to first locate the brake pad holder on your bike. This is typically found on the caliper arms, which are located on either side of the wheel.
Once you have located the brake pad holder, you should be able to see the retaining pin or bolt that holds the brake pad in place. To remove the pin or bolt, you will need to use a small wrench or Allen key. Simply turn the wrench counterclockwise to loosen the pin or bolt.
Once it is loose enough, you can pull it out and remove the brake pad. If you are having difficulty removing the pin or bolt, try applying some lubricant to loosen it up. Alternative methods include using pliers or a screwdriver to gently pry the pin or bolt out.
Troubleshooting tips include checking to make sure the brake pad holder is clean and free of debris, and checking to make sure the retaining pin or bolt is not stripped. With the pin or bolt removed, you can now move on to installing your new brake pads.
Installing new brake pads is an important step in maintaining the safety and functionality of your bike. To complete this task, you will need to follow a few simple steps.
Install Your New Brake Pads
Now that you have removed the old brake pads, it’s time to install the new ones. Proper alignment is crucial to ensure maximum braking power and to prevent premature wear. Before installing the new pads, make sure that the brake caliper is clean and free from debris.
When choosing a pad material, consider the type of riding you’ll be doing and the weather conditions you’ll be encountering. For example, if you’ll be riding in wet conditions, organic brake pads may be a better option as they tend to have better wet-weather performance. On the other hand, if you’ll be doing a lot of high-speed descents, metallic brake pads may be a better choice for their heat dissipation properties. Use the table below as a guide to help you choose the right pad material for your needs.
| Pad Material | Pros | Cons |
|---|---|---|
| Organic | Better in wet weather, Quieter, Softer on rotors | Wear faster, Less heat resistant |
| Metallic | More durable, Better heat dissipation, Better for high-speed descents | Noisier, Wear rotors faster, Poorer wet weather performance |
| Ceramic | Quiet, Low dust, Long-lasting | Expensive, Not as good in extreme conditions |
Now that your new brake pads are installed, it’s important to adjust your brakes to ensure they are working properly.
Adjust Your Brakes
Once the new brake pads are in place, it’s crucial to fine-tune the brakes for optimal performance. Here are some steps to adjust your brakes:
-
First, locate the barrel adjuster on the brake lever. Turn it counterclockwise to loosen the tension and bring the pads closer to the rim. If the pads are too close, turn the barrel adjuster clockwise to increase the tension.
-
Next, check the brake cable tightness by squeezing the brake lever. If the lever feels too loose, tighten the cable by turning the barrel adjuster at the brake arm. If the lever is too tight, loosen the cable by turning the same barrel adjuster counterclockwise.
-
Finally, make sure both brake pads contact the rim evenly. If one side of the brake pad contacts the rim before the other, adjust the brake arm tension by using a 5mm Allen key to loosen the nut and align the brake pads.
Common mistakes include over-tightening the brake cable or adjusting the pads at an angle. Troubleshooting tips include checking for loose or damaged brake cables and making sure the brake pads are properly aligned with the rim.
Once you have adjusted your brakes, it’s time to test them before going for a ride.
Before testing your brakes, make sure your bike is stable and secure. Squeeze the brake lever gently to check for any unusual sounds or resistance. If the brakes feel too loose or too tight, go back and adjust them accordingly. Once you’re satisfied with their performance, it’s time to take your bike for a spin and enjoy a safe ride.
Test Your Brakes and Go for a Ride
Before heading out on a ride, it’s important to test your brakes to ensure they’re working properly. One common issue that can arise is squeaking brakes, which can be caused by a number of factors such as dirty rims or worn brake pads.
Additionally, it’s important to use proper braking technique to ensure maximum stopping power and prevent accidents.
Squeaking Brakes
If you hear a high-pitched, irritating sound when you apply your brakes, it’s time to replace your brake pads. Squeaking brakes can be caused by a number of factors, including worn out brake pads, dirty brake pads or rotors, glazed brake pads, or loose components.
To prevent brake squeal, it’s important to keep your bike’s braking system clean and well-maintained. Regularly inspect your brake pads and replace them when they become worn down to prevent them from becoming too thin and causing excessive noise. Additionally, avoid using harsh cleaning agents on your brake pads or rotors, as this can cause damage and lead to squeaking.
If you’re experiencing squeaking brakes, there are a few tips you can try to reduce the noise. First, try cleaning your brake pads and rotors with rubbing alcohol or a mild soap and water solution. This can help remove any dirt or debris that may be causing the squeak. You can also try lightly sanding your brake pads to remove any glazing that may be occurring. If these tips don’t work, it may be time to replace your brake pads altogether.
Proper braking technique is crucial for the safety and efficiency of your bike, so it’s important to master this skill. To learn more about proper braking technique, continue reading the next section.
Proper Breaking Technique
Mastering proper braking technique on your bike can make all the difference in your safety and efficiency on the road, so let’s delve into some helpful tips.
One common mistake that many bikers make is relying solely on their front brakes to stop. While the front brakes do provide more stopping power than the rear brakes, using only the front brakes can cause you to lose control and potentially go over the handlebars. Therefore, it’s important to use both brakes in conjunction with each other to achieve maximum stopping power.
Another helpful tip is to shift your weight backwards while braking. This helps to prevent the bike from tipping forward and keeps the wheels in contact with the road.
Additionally, it’s important to apply the brakes gradually rather than slamming them on. This allows for a smoother stop and prevents skidding.
By improving your braking technique, you’ll have better control of your bike and be able to stop more efficiently, ultimately making your ride safer and more enjoyable.
Frequently Asked Questions
How often should I replace my bicycle brake pads?
Replacing bicycle brake pads depends on factors like riding frequency and terrain. To extend their lifespan, I properly maintain my bike’s brakes with regular cleaning and inspections.
Is it necessary to replace both brake pads at the same time?
Yes, it is recommended to replace both brake pads simultaneously for optimal performance. Brake pad compatibility is crucial, as mismatched pads can cause uneven wear and decreased braking power. It’s not advised to replace only one pad.
Can I use any type of brake pad for my bike?
Choosing compatible brake pads for my bike requires careful consideration of the pros and cons of different types. While any pad may fit, using the wrong one can result in poor performance or damage to my bike.
How do I know if my brake pads are worn out and need replacing?
I can tell if my brake pads are worn out by checking for signs like reduced braking power, screeching or squealing sounds, and visible wear. Regular maintenance tips for brake pads include keeping them clean and properly aligned.
What should I do if my brakes are still not working properly after replacing the brake pads?
After replacing brake pads, if brakes still aren’t working properly, I adjust brake cable tension. If that doesn’t work, I check for rotor warping. If the rotor is warped, I replace it.
Conclusion
So that’s it, folks! You now know how to replace your bicycle brake pads. It may seem daunting at first, but with the right tools and a bit of patience, it’s a task that can easily be accomplished at home.
I know some of you may be thinking, "But what if I mess up and can’t get my brakes working properly?"Don’t worry, this is a common concern. If you’re having trouble adjusting your brakes or they don’t seem to be functioning properly, it may be time to take your bike to a professional mechanic for further assistance.
It’s always better to be safe than sorry when it comes to your bike’s safety and performance. Remember to always ride with caution and keep your brakes in good working order.
With this new skill under your belt, you’ll be able to confidently tackle any brake pad replacement in the future. Happy riding!