For passionate cyclists, it’s well known that having a warped or misaligned bike wheel creates a ride that’s both uneven and shaky. This not only results in a ride that’s less than comfortable but can also pave the way for further problems in the future.
Fortunately, with a few tools and some patience, you can easily straighten your bicycle rim and get back to riding smoothly.
Before you begin, it’s important to thoroughly assess the damage. Look for any visible dents, cracks, or breaks in the rim or spokes. If the damage is severe, it may be best to take your bike to a professional for repair or replacement.
However, if the issue is simply an out-of-true rim, you can tackle the repair yourself with a few simple steps. In this article, we’ll guide you through the process of straightening your bicycle rim, from removing the wheel to checking for trueness and reinstalling it properly.
Key Takeaways
- Causes of bent bike rims include hitting a curb or pothole, loose spokes, and worn-out bearings.
- Assess the damage by looking for visible dents, cracks, or breaks in the rim or spokes.
- Straighten the rim by removing the wheel, using a spoke wrench to straighten out any bends, identifying which spokes need to be tightened or loosened, and making adjustments to one spoke at a time.
- Regular maintenance and checking for trueness can prevent unnecessary wear and tear on the bike, ensure a safe and smooth ride, and allow for confident riding on the road.
Top picks for "straighten bicycle"
Open Amazon search results for this keyword.
As an affiliate, we earn on qualifying purchases.
Assess the Damage
Before you start straightening your bike rim, it’s important to assess the damage and make sure you’re not overlooking any potential problems.
To do this, you need to check the wheel for any cracks, dents, or bends. You can use a spoke wrench to check if any of the spokes are loose or broken. Additionally, you can spin the wheel and observe if it wobbles or rubs against the brake pads.
Assessing techniques are crucial in identifying the root cause of the problem. Common causes of a bent bike rim include hitting a curb or pothole, loose spokes, and worn-out bearings.
By assessing the damage, you can determine whether you need to replace the rim or if it’s repairable. Once you’re confident that the rim is repairable, you can proceed to remove the wheel to begin the straightening process.
Remove the Wheel
First, you’ll need to loosen the brake caliper by squeezing the brake arms together and unhooking the cable from the caliper arm. This will allow you to remove the wheel from the frame.
Make sure to remember how the wheel is attached to the frame so you can easily put it back on later.
Once the wheel is off, you can begin to inspect it for any damage. Check the rim for any cracks or dents, and make sure the spokes are all intact and tight.
This is also a good time to check the tire for any wear or damage, and consider replacing it if necessary.
After completing wheel maintenance and tire replacement, you can move on to using a spoke wrench to straighten out any bends in the rim.
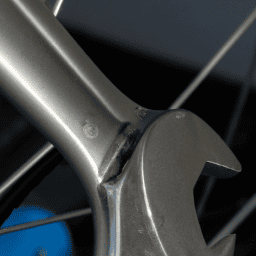
Use a Spoke Wrench
Now, you’re ready to tackle the next step in restoring your wheel: using a spoke wrench to bring your wheel back into proper alignment. This tool will allow you to adjust the tension of each spoke and correct any bends or kinks in the rim. It’s important to use spoke wrenches effectively to avoid further damage to your wheel.
When using a spoke wrench, start by identifying which spokes need to be tightened or loosened. Remember to work in small increments, making adjustments to one spoke at a time. Avoid making sudden, drastic changes as this can put too much stress on the rim and cause it to warp even further.
Common mistakes to avoid when straightening a rim include over-tightening spokes, failing to maintain even tension across the wheel, and skipping over any damaged spokes. Once you’ve made your adjustments, move on to the next step: checking for trueness.
Check for Trueness
To ensure a smooth and safe ride, it’s crucial to check if your wheel is true, meaning it spins evenly without wobbling or rubbing against the brake pads. Assessing trueness is important and can be done using various techniques such as using a truing stand, zip-tie method, or simply flipping the bike upside down and spinning the wheel.
It’s recommended to check trueness whenever you notice any wobbling or rubbing, after a crash, or at least once a year to prevent any potential issues. Common causes of rim misalignment include hitting potholes, curbs, or other rough terrain, improper spoke tension, and worn bearings.
To prevent misalignment, avoid hitting rough terrain at high speeds, regularly check spoke tension and replace any damaged or worn components. Troubleshooting techniques include loosening and tightening specific spokes, or using a spoke wrench to adjust tension.
Once you have assessed trueness and made any necessary adjustments, it’s time to reinstall the wheel and ensure that it is securely fastened before taking it for a spin.
Reinstall the Wheel
Now that you’ve successfully straightened your bicycle rim, it’s time to reinstall the wheel.
The first step is to reattach the brake pads, making sure that they’re properly aligned with the rim.
Next, carefully put the wheel back on the bike, making sure that it’s securely fastened in place.
Finally, test the wheel and make any final adjustments necessary to ensure that it spins smoothly and evenly.
With these steps complete, your bike should be ready to ride again.
Reattach the Brake Pads
First, you’ll need to loosen the brake pad retaining bolt and slide the pad out of the way. This will allow you to access the rim and work on straightening it.
Make sure to adjust the alignment of the brake pads before reattaching them. This will ensure that the pads are properly aligned with the rim, providing optimal braking performance.
When selecting appropriate brake pads, consider the type of riding you’ll be doing. For example, if you frequently ride in wet conditions, you may want to choose brake pads that are designed for wet weather.
Once you’ve chosen your brake pads, slide them back into place and tighten the retaining bolt. With the brake pads reattached, you can move on to putting the wheel back on the bike.
As you put the wheel back on the bike, make sure that it’s properly aligned and tightened. This will ensure that your bike is safe to ride and that your newly straightened rim will function properly.
Put the Wheel Back on the Bike
Before you ride, make sure to properly align and tighten the wheel to ensure a safe and smooth ride. To put the wheel back on the bike, begin by inserting the axle into the dropouts of the frame. Make sure the axle is fully seated in the dropouts and the quick release lever is open.
Then, slide the brake pads back into place. To ensure proper alignment, center the wheel between the brake pads. Tighten the quick release lever so that it creates enough tension to hold the wheel in place, but not so much that it’s difficult to close.
Finally, check the wheel to make sure it spins freely and does not rub against the brake pads or frame. Proper alignment and wheel maintenance will prevent unnecessary wear and tear on your bike and reduce the risk of accidents.
Now that the wheel is securely attached to the bike, it’s time to test it and make any final adjustments. Check to make sure the wheel is spinning smoothly and there are no wobbles or rubbing. If there are any issues, adjust the quick release lever as necessary.
With a properly aligned and maintained wheel, you can confidently hit the road for your next ride.
Test the Wheel and Make Final Adjustments
After securing the wheel and aligning it between the brake pads, it’s important to test and make any necessary final adjustments to ensure a smooth ride. Start by spinning the wheel and observing its movement. The wheel should spin freely and without any wobbling. If it wobbles, adjust the spoke tension until the rim runs smoothly.
Next, check the wheel alignment and rim balance. Use a truing stand or flip the bike upside down and spin the wheel. Observe the gap between the rim and brake pads to ensure they are even on both sides. If one side is closer, adjust the spoke tension on that side until the gap is even. Then, check the rim balance by spinning the wheel and observing if it dips or rises at any point. If it does, adjust the spoke tension on the opposite side until the rim runs straight. Once you’ve made any necessary adjustments, test the wheel for a final time to ensure it runs smoothly and without any wobbling.
| Wheel Adjustment | How to Adjust |
|---|---|
| Spoke tension | Use a spoke wrench to tighten or loosen the spokes until the rim runs smoothly |
| Wheel alignment | Observe the gap between the rim and brake pads. Adjust spoke tension on one side to even out the gap. |
| Rim balance | Spin the wheel and observe if it dips or rises at any point. Adjust spoke tension on the opposite side until the rim runs straight. |
| Final test | Spin the wheel and observe for any wobbling or uneven movement. Make any necessary adjustments until the wheel runs smoothly. |
Frequently Asked Questions
How do I know if my bike rim needs to be straightened?
If your bike wobbles or rubs the brakes, it may indicate a bent rim. Look for signs of damage, such as dents or cracks. If it’s beyond repair, replace it.
Can I straighten a bent rim myself or do I need to take it to a bike shop?
If you have experience with DIY bike rim repair and have the necessary tools, you can try straightening a bent rim yourself. If not, it’s best to seek professional bike repair services to avoid causing further damage.
What tools do I need to straighten a bike rim?
To straighten a bike rim, you’ll need a spoke wrench, truing stand, and nipple driver. Remember to loosen the opposing spokes before tightening the bent ones. Use your fingers to feel for any high spots and turn the spoke nipple until the rim is true.
Will straightening a bike rim affect its performance or lifespan?
Straightening a bike rim can affect its performance and lifespan if not done properly. Techniques such as using a spoke wrench and truing stand can help ensure alignment and tension, preventing future issues.
How can I prevent my bike rim from becoming bent or warped in the future?
To prevent your bike rim from becoming bent or warped, perform routine maintenance and ensure proper tire pressure. Check your wheels for damage or wear regularly and avoid riding over obstacles that may cause damage.
Conclusion
Congratulations! You’ve successfully straightened your bicycle rim. You’re now a master mechanic, capable of fixing any bike-related issue that comes your way.
But let’s be honest, who wants to spend their free time straightening a rim when they could be out riding their bike? It’s ironic, isn’t it? We spend so much time and energy fixing our bikes, but all we really want to do is ride them.
So next time you find yourself with a wobbly rim, take a deep breath and remember why you started biking in the first place. Don’t let a little maintenance take away from the joy of the ride.
And if all else fails, just take it to your local bike shop and let the professionals handle it.
Happy riding!