Removing a bicycle chain might appear to be a challenging endeavor at first, but with the appropriate tools and instructions, it can actually be quite straightforward. As someone who is passionate about cycling, I’ve had to take off and put back chains on my bicycle on numerous occasions, whether it was for regular maintenance or switching to a new chain.
In this article, I will provide a step-by-step guide on how to safely and efficiently remove a chain from your bicycle.
Before we begin, it is important to note that removing a chain from your bike requires a few specialized tools. If you do not own these tools, it may be worth considering taking your bike to a professional mechanic. However, if you are willing to invest in the tools and learn the process, taking a chain off your bike can save you time and money in the long run.
So, let’s gather our necessary tools and get started on removing that chain.
Key Takeaways
- Identifying the type of chain and inspecting the bike for damage or wear is crucial before removing the chain.
- Regular chain maintenance, including cleaning and lubricating the chain, significantly reduces wear and tear and prolongs the lifespan of bike components.
- Specialized tools are necessary for chain removal, and different types of chains require different types of chain tools.
- Properly maintaining the chain can save time and money in the long run and result in a smoother and more efficient ride.
Gather Necessary Tools
You’ll need a couple of tools to get that chain off your bike, so grab a pair of pliers and a chain tool to get started.
Before you begin, it’s important to identify the type of chain on your bike. There are various types of chains, and each requires a different type of chain tool. Common chain issues include rust, wear, and tight links. If you notice any of these issues, it’s best to replace the chain altogether.
Once you have the necessary tools, it’s time to prepare your bike for chain removal.
Prepare Your Bike
Before getting started, make sure your trusty ride is ready for the process ahead. The first step is to inspect your bike thoroughly, checking for any damage or wear and tear that may affect the chain removal process.
Look for any loose bolts or screws, damaged gears or pedals, and worn-out parts. If you notice any issues, it’s best to fix them before proceeding with removing the chain.
Once you’ve inspected your bike and made sure everything is in good condition, it’s time to clean the bike surface. Use a clean rag or towel to wipe down the bike, removing any dirt or debris that may be present.
This will help prevent any dirt or debris from getting into the chain, which can cause damage or prevent it from functioning properly. With a clean and well-inspected bike, you’re now ready to move onto the next step – removing the chain.
Remove the Chain
Once your bike is prepped and sparkling clean, it’s time to say goodbye to that old chain and welcome a smoother ride. Removing the chain is a simple process, but it’s important to take your time and pay attention to detail to avoid damaging any parts of your bike. Here’s how to remove the chain in three easy steps:
-
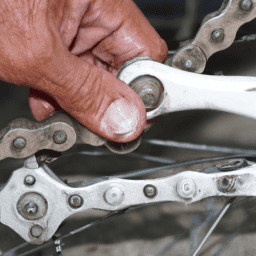
Use a chain tool: A chain tool is a small, handheld device that allows you to push the chain pin out of its link. Place the tool over the pin and turn the handle clockwise until the pin is pushed out enough to remove the link.
-
Remove the chain from the bike: Once the link is removed, you can easily slide the chain off the bike’s sprockets and derailleur. Be sure to keep the chain in a safe place to avoid losing any links.
-
Inspect the chain: Now that the chain is off the bike, it’s a good time to inspect it for any damage or wear. If the chain is excessively dirty or worn, it may be time for chain maintenance or replacement.
With the chain removed, it’s time to clean and lubricate it to keep it in top shape.
Clean and Lubricate the Chain
To properly maintain my bike’s chain, I need to clean and lubricate it regularly. First, I use a degreaser to remove any dirt and grime from the chain.
Next, I apply lubricant to the chain to ensure smooth operation and prevent rust. Finally, I wipe off any excess lubricant to avoid attracting more dirt and debris.
By following these steps, I can ensure that my bike’s chain stays in good condition, providing a smooth and reliable ride.
Use Degreaser to Clean Chain
Ready to get that chain sparkling clean? Use some degreaser to make it shine like new! Using a good quality degreaser is an important step in the process of cleaning and maintaining your bike chain. Not only does it help to remove dirt and grime from your chain, but it also helps to prolong the life of your chain and ensure that it continues to work smoothly.
There are many benefits of using degreaser to clean your bike chain. Firstly, it helps to remove any dirt and grime that has built up on your chain, which can cause your chain to wear down more quickly. Secondly, using degreaser helps to prevent rust and corrosion from forming on your chain, which can also cause your chain to wear out more quickly. There are many different types of degreasers available on the market, but some of the best degreasers for bike chains include Simple Green Bike Cleaner, Finish Line Citrus Degreaser, and Muc-Off Nano Tech Bike Cleaner. So, grab your degreaser and let’s get started on cleaning that chain!
Now that we’ve cleaned the chain with degreaser, it’s time to apply lubricant to the chain to keep it working smoothly.
Apply Lubricant to Chain
Now it’s time to give your bike’s moving parts some love by applying lubricant to keep them running smoothly. The chain is the most important part to lubricate, as it’s responsible for transferring power from your pedals to the wheels. By lubricating your chain, you’ll reduce friction, prevent rust, and prolong the lifespan of your bike’s components.
There are many benefits to using chain lubricant, including reducing friction, preventing rust, and prolonging the life of your bike’s components. When choosing a lubricant, consider the type of riding you’ll be doing and the weather conditions you’ll be riding in. Wet lubricants are best for riding in wet conditions, while dry lubricants are best for riding in dry conditions.
Once you’ve applied the lubricant, wipe off any excess to prevent dirt and debris from sticking to your chain.
Wipe Off Excess Lubricant
Don’t forget to wipe off any excess lubricant from your bike’s chain to ensure a smooth ride and prevent dirt and debris buildup. After applying lubricant to your chain, use a clean rag to wipe off any excess.
This will prevent the lubricant from attracting dirt and debris, which can cause the chain to wear out faster and make shifting more difficult. Choosing the right lubricant is also important for maintaining your bike chain.
There are many types of lubricants available, but you should choose one that is specifically designed for bicycle chains. A good lubricant will reduce friction and wear on your chain, making it last longer and shift more smoothly.
With a properly lubricated and maintained chain, you’ll have a more enjoyable and efficient ride. Now, let’s move on to the next step of reinstalling the chain.
Reinstall the Chain
Once you’ve wrestled the chain back onto the gears, give it a few spins to make sure it’s running smoothly. If everything seems to be working well, it’s time to reinstall the chain. Here are the steps to follow:
- Take the master link and insert it into the ends of the chain.
- Align the two ends of the chain so that the pins are facing each other.
- Press the link together until you hear a click.
- Give the chain a few spins to make sure it’s properly connected.
It’s important to remember that regular chain maintenance is crucial to the longevity of your bicycle. Cleaning and lubricating your chain regularly can significantly reduce wear and tear, which means you’ll be able to enjoy your bike for much longer. Taking care of your chain also results in a smoother and more efficient ride. So, take the time to care for your chain and reap the benefits of regular chain maintenance.
Frequently Asked Questions
How can I tell if my bike chain needs to be removed and cleaned?
To determine if my bike chain needs removing and cleaning, I look for signs of wear such as rust, gunk buildup, or stretched links. Regular maintenance is crucial to prevent these issues and prolong chain lifespan.
Can I reuse the chain once it’s been removed, or do I need to buy a new one?
Yes, you can reuse the chain once it’s been removed, but it’s essential to perform proper chain maintenance and cleaning process to ensure its longevity. Neglecting these steps can lead to premature wear and tear, affecting the overall performance of the bike.
Is it necessary to use a specific type of lubricant on my bike chain?
Did you know that a well-lubricated chain can last up to five times longer than a dry one? It’s crucial to use a suitable lubricant for bike chains to prevent rust and reduce friction. Consider factors like weather, riding conditions, and chain type when choosing a lubricant.
What should I do if the chain keeps falling off my bike after I’ve reinstalled it?
To prevent chain falls, first check derailleur alignment. If it’s aligned, adjust tension on the chain. Loosen rear wheel nuts, pull wheel back, and retighten. Repeat until chain tension is correct.
How often should I take my bike chain off and clean it?
I recommend cleaning my bike chain every 100-200 miles or after heavy use in wet/dirty conditions. To clean, I apply degreaser and scrub with a chain cleaning tool or brush. Rinse thoroughly and lubricate with a quality chain lube.
Conclusion
Phew! That was quite a process, but I finally managed to take the chain off of my bike. As I carefully followed the steps, I couldn’t help but feel like a surgeon performing a delicate operation. The tools were my instruments, and my bike was my patient. Every move had to be calculated and precise.
As I inspected the chain, I noticed the dirt and grime that had accumulated over time. It reminded me of the plaque that builds up in our arteries if we don’t take care of ourselves. Just like how we need to clean and lubricate our bodies, we also need to do the same for our bikes. It’s all about maintenance and keeping things running smoothly.
Overall, I learned that taking a chain off a bike requires patience, attention to detail, and a willingness to get a little dirty. But the end result is worth it – a clean and well-functioning bike that’s ready to hit the road.