Are you fed up with the irritating rattling noise coming from your bike chain? No need to worry! In this article, I will walk you through the steps to tighten your bike chain, leading to a more smooth and silent ride.
Just like a well-oiled machine, your bike deserves proper maintenance to perform at its best. So grab your tools and get ready to dive into the world of bike maintenance, where precision and attention to detail are key.
Let’s get started!
Key Takeaways
- Proper chain tension is important to prevent skipping or binding.
- Regularly inspect the chain for excessive wear and replace if necessary.
- Clean and lubricate the chain regularly to minimize noise and reduce friction.
- Seek professional help if needed for proper chain tension and adjustment.
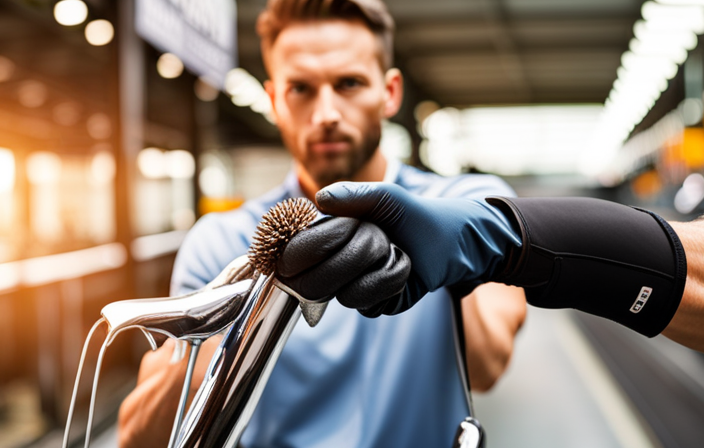
Gather Your Tools
Gather your tools before starting to tighten the bicycle chain. Identifying the issue is crucial in determining the proper tool selection.
You will need a chain checker, a chain tool, and a wrench. The chain checker will help you determine if your chain needs tightening or replacing. It measures the wear of the chain and provides an accurate assessment.
The chain tool is essential for removing and installing chain links. It allows you to adjust the chain length and tension.
A wrench is needed to loosen and tighten the bolts that secure the chain.
Once you have gathered these tools, you can proceed to identify the problem with your bicycle chain, ensuring a smooth and safe ride.
Identify the Problem
Check if there is any slack in your bike’s chain. Identifying chain problems is crucial in troubleshooting chain issues.
Start by examining the tension of the chain. A loose chain can cause poor shifting, chain skipping, or even falling off the gears. To check the tension, apply pressure with your hand on the chain midway between the front and rear gears. If the chain moves more than half an inch up or down, it needs tightening.
Additionally, inspect the chain for any signs of wear, such as rust, stretched links, or excessive dirt buildup. These issues can also affect the performance of your bike’s chain.
Once you’ve identified the problem, you can proceed to loosen the rear wheel for further adjustments.
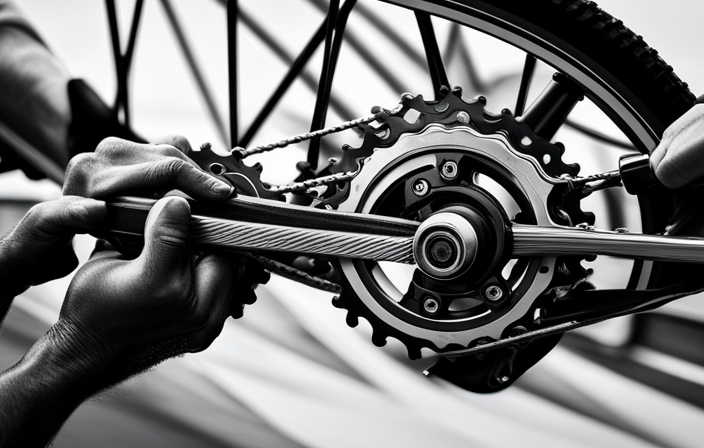
Loosen the Rear Wheel
To make adjustments, you’ll need to slightly loosen the rear wheel of your bike.
Begin by locating the nuts or quick-release lever that secure the rear wheel in place. Use a wrench or your hands to loosen them, allowing the wheel to move back and forth in the dropouts.
Next, realign the rear derailleur by gently pushing it towards the wheel, ensuring that the jockey wheels align with the sprockets on the cassette.
Once the derailleur is properly aligned, you can adjust the chain tension. Pull the wheel back in the dropouts until the chain is tight, but not too tight. A good rule of thumb is to have about half an inch of vertical play in the chain.
With the rear wheel slightly loosened, you can now move on to adjusting the chain tension for optimal performance.
Adjust the Chain Tension
Once you’ve loosened the rear wheel, you can now adjust the tension in the chain for optimal performance. Adjusting the chain tension is crucial to avoid common chain tension issues and ensure smooth operation of your bicycle.
Here’s how to troubleshoot chain tension problems:
-
Check the tension: Start by visually inspecting the chain tension. It should have a slight slack and not be too tight or loose.
-
Use the tensioner: If the chain is too loose, use the tensioner to tighten it. Turn the tensioner clockwise to increase tension.
-
Test the tension: After making adjustments, spin the pedals to check if the chain moves smoothly without skipping or binding.
-
Fine-tune the tension: If necessary, make small adjustments until you achieve the desired tension.
Now that you’ve adjusted the chain tension, let’s move on to realigning the rear wheel.
Realign the Rear Wheel
To properly align the rear wheel, you’ll need to make sure it is centered and straight within the frame of your bike. Start by loosening the bolts that secure the rear wheel to the frame using a wrench.
Once the bolts are loose, gently push or pull the wheel until it is aligned straight in the frame. Check for any misalignment by visually inspecting the wheel’s position relative to the frame and making any necessary adjustments. Pay close attention to the wheel’s position in relation to the chain and the alignment of the wheel with the bike’s centerline.
Common alignment issues include the wheel being off-center or angled, causing the chain to rub against the derailleur or frame. Once the wheel is properly aligned, tighten the bolts securely. This will ensure that the wheel stays in place and the chain runs smoothly.
With the rear wheel properly aligned, we can now move on to the next step of checking for proper alignment.
Check for Proper Alignment
Now, you need to make sure the rear wheel is properly aligned in order to ensure optimal performance. Here are the steps to check for proper alignment:
- Measure the distance between the chain and the chainstay on both sides of the rear wheel.
- Adjust the position of the rear wheel by loosening the axle nuts or quick-release lever.
- Align the wheel by keeping the chain an equal distance from the chainstay on both sides.
- Use a ruler or a specialized tool to check the alignment accurately.
Proper chain tension and alignment are crucial for smooth and efficient cycling. If the rear wheel is misaligned, it can cause the chain to skip or derail, leading to poor performance and potential damage.
Once you have ensured the wheel is properly aligned, you can move on to the next step of lubricating the chain.
Lubricate the Chain
To properly maintain your bike, it’s important to regularly lubricate the chain. Proper lubrication ensures smooth and efficient movement of the chain, reducing wear and tear on the components. Start by selecting a chain lubricant specifically designed for bicycles. Avoid using thick oils or grease as they can attract dirt and grime, causing more harm than good.
Apply the lubricant evenly along the length of the chain while rotating the pedals backward. Be careful not to over-lubricate, as excess lubricant can attract dirt and cause chain slippage. After applying the lubricant, wipe off any excess with a clean cloth.
It’s important to note that lack of lubrication or improper lubrication are common mistakes that can lead to premature wear and poor performance.
With the chain properly lubricated, let’s move on to the next step of testing the chain tension.
Test the Chain Tension
Check if the chain is properly tensioned by gently pulling on it. The chain should have a slight amount of slack, allowing it to move up and down without being too loose or too tight. If the chain feels loose and easily comes off the sprockets, it needs to be tightened. On the other hand, if the chain feels tight and doesn’t move smoothly, it needs to be loosened.
Testing the chain tension is crucial to ensure optimal performance and prevent common chain issues such as skipping gears or excessive wear. To troubleshoot chain tension problems, pay attention to the following:
- Check for proper alignment of the rear wheel.
- Verify that the chain is properly seated on the sprockets.
- Ensure that the chain is not twisted or kinked.
- Examine the chain for signs of excessive wear or damage.
- Make sure the chain tension is consistent along its entire length.
Once the chain tension is tested and any issues are identified, it’s time to make final adjustments to ensure smooth and efficient cycling.
Make Final Adjustments
After testing the chain tension, it’s important to make final adjustments to ensure a smooth and efficient ride. To make these adjustments, follow the steps outlined in the table below:
| Adjustment | Procedure |
|---|---|
| 1 | Loosen the rear axle nuts or quick release lever to allow for chain adjustment. |
| 2 | Move the rear wheel forward or backward to achieve the desired tension. |
| 3 | Ensure the chain is properly aligned with the front chainring and rear cassette. |
| 4 | Tighten the rear axle nuts or quick release lever while holding the wheel in place. |
| 5 | Check the chain tension again to ensure it is within the recommended range. |
By carefully following these final chain tension adjustments, you’ll ensure that your bicycle chain is properly tightened for optimal performance. Now, let’s move on to the next step and check for smooth operation.
Check for Smooth Operation
Once the final adjustments have been made, it’s important to ensure that the bike chain is operating smoothly. To achieve smooth operation, here are some tips:
-
Proper Lubrication:
-
Apply a high-quality chain lubricant to reduce friction and enhance smooth movement.
-
Avoid excessive lubrication that can attract dirt and debris, leading to chain wear.
-
Tension Check:
-
Verify that the chain tension is appropriate, neither too loose nor too tight, to prevent skipping or binding.
Troubleshooting common issues:
-
Chain Skipping:
-
Adjust the derailleur limit screws to fine-tune gear shifting and avoid the chain jumping between gears.
-
Inspect the cassette and chainrings for excessive wear, replacing them if necessary.
-
Chain Noise:
-
Clean and lubricate the chain regularly to minimize noise caused by friction.
-
Check for bent or damaged chain links that may cause a clicking or grinding sound.
By following these smooth operation tips and troubleshooting common issues, you will ensure the optimal performance of your bicycle chain.
Now, let’s proceed to the next section and test ride the bicycle.
Test Ride the Bicycle
To ensure a smooth ride, take the bike for a test spin. During the test ride evaluation, pay close attention to the performance of the bicycle chain.
Start by pedaling the bike and shifting through different gears to evaluate how the chain engages with the cassette and chainrings. Listen for any unusual noises or grinding sensations, as these may indicate an issue with the chain tension or alignment.
Additionally, observe if the chain jumps or slips when applying force to the pedals, as it could be a sign of a loose or worn-out chain. Troubleshooting tips for chain-related problems include adjusting the chain tension or replacing the chain if necessary.
Maintaining regular chain maintenance is essential for optimal performance and durability. This includes cleaning, lubricating, and inspecting the chain regularly to ensure it remains in good condition.
Maintain Regular Chain Maintenance
Make sure you regularly clean, lubricate, and inspect your chain to keep it in good condition. Regular chain maintenance is essential for the smooth operation and longevity of your bicycle chain. By following a simple maintenance routine, you can prevent premature wear, reduce friction, and ensure optimal performance.
To emphasize the importance of regular chain maintenance, let’s take a look at the benefits it offers:
| Benefits of Chain Maintenance |
|---|
| 1. Improved shifting precision |
| 2. Extended chain life |
| 3. Reduced drivetrain wear |
| 4. Enhanced power transfer |
| 5. Quieter and smoother operation |
By regularly cleaning and lubricating your chain, you remove dirt, grime, and old lubricant that can cause friction and wear. Inspecting the chain allows you to identify any signs of damage or wear, such as stretched links or worn teeth, which can be addressed promptly.
Maintaining your chain is crucial for optimal performance and longevity. Now, let’s explore how to avoid over-tightening the chain in the next section.
Avoid Over-Tightening the Chain
Avoiding over-tightening the chain is important for maintaining optimal performance and longevity.
To prevent chain wear, it is crucial to properly tension the chain. When the chain is too tight, excessive stress is placed on the chain, sprockets, and derailleur. This can lead to premature wear and damage.
To ensure proper chain tensioning, start by shifting the chain onto the smallest front chainring and smallest rear sprocket. Then, adjust the tension by either moving the rear wheel or adjusting the rear derailleur.
The ideal tension can be determined by lightly pulling the chain away from the chainring. There should be a slight amount of play, around 1/2 inch up and down.
Remember that over-tightening the chain can cause unnecessary strain and decrease overall performance. Seek professional help if needed to avoid any potential damage.
Seek Professional Help if Needed
After realizing that over-tightening the bicycle chain can cause damage, it is crucial to seek professional help if needed.
While it may be tempting to attempt fixing the chain on your own, it is important to remember that professional advice can prevent potential risks.
A trained bike mechanic has the knowledge and experience to accurately assess the condition of your chain and make the necessary adjustments. They will ensure that the chain is tightened to the appropriate tension, avoiding any unnecessary strain or wear on the drivetrain.
Seeking professional help not only guarantees a proper and safe adjustment but also saves you from the frustration of a chain that continues to slip or skip gears.
With the chain properly tightened, you can enjoy a smooth and quiet ride, free from any worries.
Enjoy a Smooth and Quiet Ride
To fully appreciate your ride, you can ensure a smooth and quiet experience. One important aspect of bike maintenance is chain lubrication. By regularly lubricating your bicycle chain, you can reduce friction and prevent unnecessary wear and tear. This will not only make your ride smoother and quieter, but it will also prolong the lifespan of your chain.
To properly lubricate your chain, follow these steps:
-
Clean the chain: Before applying any lubricant, make sure to clean your chain thoroughly. Use a degreaser and a brush to remove any dirt or grime.
-
Apply the lubricant: Choose a high-quality bicycle chain lubricant and apply it evenly to the chain. Be careful not to use too much, as excess lubricant can attract more dirt and debris.
-
Let it soak: Allow the lubricant to soak into the chain for a few minutes. This will ensure that it penetrates all the moving parts and provides optimal lubrication.
-
Wipe off the excess: After the lubricant has had time to penetrate, use a clean rag to wipe off any excess. This will prevent the chain from attracting dirt and keep your ride smooth and quiet.
Following these steps and regularly maintaining your bike chain will ensure a smooth and quiet ride every time you hit the road.
Frequently Asked Questions
How do I know if my bicycle chain is too loose or too tight?
To determine if my bicycle chain is too loose or too tight, I check for proper chain tension maintenance. Common signs of a loose chain include excessive movement and noise, while a tight chain can cause resistance and difficulty in pedaling.
Can I use any type of lubricant for my bicycle chain?
Yes, you can use different types of lubricants for your bicycle chain. For example, using a dry lubricant like Teflon-based spray reduces dirt buildup, but it requires more frequent application compared to wet lubricants. Common mistakes to avoid include over-lubrication and using the wrong type of lubricant.
How often should I tighten my bicycle chain?
I should tighten my bicycle chain regularly as part of routine bicycle chain maintenance. Signs of a worn bicycle chain include skipping gears, excessive noise, and difficulty pedaling.
What should I do if my bicycle chain keeps slipping off?
If my bicycle chain keeps slipping off, it’s likely due to common causes like a loose chain, worn-out gears, or misalignment. To troubleshoot, I’d start by checking the chain tension, inspecting the gears, and aligning the derailleur properly.
Is it possible to over-tighten the bicycle chain?
Yes, it is possible to over-tighten a bicycle chain. Over-tightening can lead to consequences such as increased wear on the chain and sprockets, decreased efficiency, and poor bike performance.
Conclusion
In conclusion, by following these steps and maintaining regular chain maintenance, you can ensure a smooth and quiet ride on your bicycle.
Just like a well-oiled machine, a properly tightened chain allows for efficient power transfer, giving you the freedom to conquer any road or trail.
So grab your tools, get your hands dirty, and take control of your ride. With a tight chain, you’ll feel the exhilaration of the wind in your hair and the satisfaction of a job well done.
Happy riding!