It is commonly believed that safety is of utmost importance, especially when it comes to biking, as having brakes that work properly is essential.
In this step-by-step guide, I will show you how to tighten the brakes on your bicycle to ensure maximum stopping power and control.
With just a few simple tools and a little bit of know-how, you’ll be able to adjust the brake tension, align the brake pads, and perform a thorough inspection to make sure your brakes are in top-notch condition.
So let’s dive in and get those brakes tightened up!
Key Takeaways
- Adjust brake pad tension by turning the barrel adjuster clockwise to increase tension or counterclockwise to decrease tension.
- Regularly check and remove rust from the brake cable housing using a wire brush or rust remover.
- Replace frayed cables immediately for optimal brake performance.
- Properly align brake pads with the rim and braking surface to ensure maximum stopping power.
Gather the necessary tools
To tighten the brakes on your bicycle, you’ll need to gather the necessary tools. Start by locating a 5mm Allen wrench, a pair of pliers, and a 10mm box-end wrench.
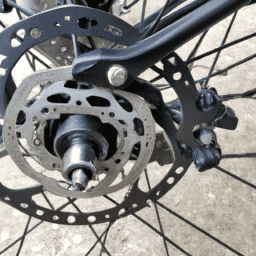
Assessing brake pad condition is crucial to determine whether they need tightening. To ensure proper brake pad alignment, position the bike upside down or use a bike stand for easy access.
Begin by loosening the brake cable pinch bolt with the 5mm Allen wrench, allowing the brake arms to move freely. Next, squeeze the brake lever to bring the pads closer to the rim.
Use the pliers to center the pads and adjust their height. Finally, retighten the brake cable pinch bolt and test the brakes for proper function. Assessing the brake pads will help you determine whether further adjustments are necessary.
Assess the brake pads
To assess the brake pads, I first check for any signs of wear and tear. This can include cracks, grooves, or uneven surfaces.
Next, I measure the thickness of the brake pads using a caliper or a ruler. It’s important to ensure that the brake pads meet the minimum thickness requirement specified by the manufacturer.
Check for wear and tear
Before checking for wear and tear, make sure to squeeze the bike brake lever to see if it feels loose or too tight. Once you’ve assessed the brake pads, it’s important to inspect the brake cables and replace the brake pads if necessary. To do this, follow these steps:
| Step | Action |
|---|---|
| 1 | Examine the brake cables for any signs of fraying or damage. Replace them if needed. |
| 2 | Remove the brake pads from the caliper. Inspect them for wear and tear, looking for any cracks or unevenness. |
| 3 | Measure the thickness of the brake pads using a caliper or ruler. If they are less than 3mm thick, it’s time to replace them. |
By following these steps, you can ensure the safety and effectiveness of your bicycle brakes. In the next section, we will discuss how to measure the thickness of the brake pads.
Measure the thickness
To measure the thickness of your brake pads, simply use a caliper or ruler. This step is crucial to ensure the accuracy of your measurements.
Start by removing the wheel from the bicycle and locating the brake pads. Use the caliper or ruler to measure the thickness of each pad. Take note of the measurements and compare them to the manufacturer’s recommended minimum thickness. If the pads are worn down beyond this point, they need to be replaced.
It’s important to compare the measurements using different methods, such as using a caliper and a ruler, to ensure accuracy. Once you have determined the thickness of the brake pads, you can move on to the next step of adjusting the brake cable tension to tighten your brakes.
Adjust the brake cable tension
To adjust the brake cable tension on my bicycle, I first locate the barrel adjuster. This small cylinder-shaped component is usually located near the brake lever.
Once I find it, I turn the adjuster clockwise to tighten the cable or counterclockwise to loosen it.
This step-by-step process allows me to fine-tune the brake performance and ensure optimal stopping power.
Locate the barrel adjuster
First, find the barrel adjuster on your bicycle. The barrel adjuster is a small cylindrical device usually located where the brake cable enters the brake caliper or brake lever.
Inspect the adjuster mechanism to ensure it is in good condition and free from any dirt or debris. If there are any issues with the adjuster, such as it being stuck or not turning smoothly, troubleshoot by cleaning it or applying lubricant.
Once the adjuster is in proper working condition, you can proceed to the next step. Turn the adjuster to tighten or loosen the cable, depending on your specific needs. This adjustment allows you to fine-tune the tension of your brakes, ensuring optimal performance and stopping power.
With the barrel adjuster, you can easily make small adjustments to achieve the desired brake feel and responsiveness.
Turn the adjuster to tighten or loosen the cable
Next, use the adjuster to either tighten or loosen the cable for the desired adjustment.
To adjust the brake pads, start by locating the barrel adjuster near the brake lever. Turn the adjuster clockwise to tighten the cable, which will result in the brake pads moving closer to the rim. This will increase the braking power.
Conversely, turn the adjuster counterclockwise to loosen the cable, which will move the brake pads away from the rim. This will decrease the braking power.
It’s important to find the right balance between the pads being too close or too far from the rim.
Once you’ve adjusted the cable tension, you can move on to aligning the brake pads for optimal performance.
Align the brake pads
Make sure your brake pads are aligned with the rim of your bicycle wheel. Proper brake pad alignment is essential for effective braking. To align the brake pads, follow these steps:
- Loosen the bolts that hold the brake pads in place using an Allen wrench.
- Squeeze the brake lever to bring the brake pads closer to the rim.
- Position the brake pads so that they are parallel to the rim and centered on it.
- Tighten the bolts to secure the brake pads in their aligned position.
It’s important to note that misaligned brake pads can result in reduced braking power and increased wear on the brake pads. By aligning the brake pads correctly, you ensure optimal braking performance. Now, let’s move on to the next step and check the brake lever.
Check the brake lever
To check the brake lever, start by squeezing it to ensure it moves smoothly and without any resistance. If there is any stiffness or sticking, it may indicate a need for lubrication or adjustment.
Next, check the brake lever reach, which is the distance from the handlebar grip to the lever. This can be adjusted to accommodate different hand sizes and preferences. To adjust the brake lever reach, locate the reach adjustment screw on the lever. Turn it clockwise to bring the lever closer to the handlebar or counterclockwise to move it away.
Once the reach is adjusted to your liking, test the brakes to ensure they engage properly and stop the bicycle effectively.
Moving on to the next section about testing the brakes, it is important to verify their performance before riding to ensure safety.
Test the brakes
After checking the brake lever, it’s time to move on to the next step: testing the brakes. This is an essential part of the process as it allows us to assess the brake performance and troubleshoot any issues that may arise.
To begin, find a safe and open area where you can ride your bicycle at a moderate speed. Start by squeezing the brake lever gradually, paying close attention to how the brakes respond. Are they engaging smoothly or do they feel sluggish? Do they stop the bike efficiently or is there a delay? Take note of any abnormalities or concerns.
Additionally, test the brakes at different speeds and in different conditions, such as going uphill or downhill, to get a comprehensive evaluation of their performance.
Once you have assessed the brake performance thoroughly, you can move on to the next step and fine-tune the brake pads.
Fine-tune the brake pads
To fine-tune your brake pads, you’ll want to make small adjustments to ensure optimal performance.
Start by checking the brake pad alignment. Look at the position of the brake pads in relation to the rim. They should be centered and evenly spaced on both sides. If they are not aligned properly, loosen the brake pad mounting bolt and adjust the position until they are aligned correctly.
Next, adjust the brake lever tension. Squeeze the brake lever and observe how far it travels before engaging the brake pads. If it travels too far, tighten the tension by turning the barrel adjuster clockwise. If it doesn’t travel far enough, loosen the tension by turning the barrel adjuster counterclockwise.
Once you have fine-tuned the brake pads and adjusted the brake lever tension, you can move on to checking the brake cable housing. This will ensure that your brakes are functioning properly and provide a smooth braking experience.
Check the brake cable housing
Examine the brake cable housing to ensure proper functionality and a smooth braking experience.
First, check for rust on the housing as this can cause friction and affect the brake performance. Rust can be removed by gently scrubbing with a wire brush or applying a rust remover.
Next, inspect the cable for any signs of fraying or damage. Frayed cables should be replaced immediately to prevent brake failure. To do this, loosen the cable anchor bolt and slide the cable out of the housing. If it is frayed, purchase a new cable and thread it through the housing, then tighten the cable anchor bolt.
Finally, ensure the cable moves freely within the housing by pulling and releasing it a few times. This will ensure smooth brake operation.
Now, let’s move on to lubricating the brake parts for optimal performance.
Lubricate the brake parts
Now, let’s move onto lubricating the brake parts for optimal performance by applying a small amount of lubricant to ensure smooth operation.
Lubrication is an essential step in maintaining the efficiency and longevity of your bicycle’s brakes. The benefits of lubrication include reducing friction between the moving parts, preventing rust and corrosion, and enhancing overall brake performance.
When it comes to lubricating the brake parts, you have several options for common lubricants. One popular choice is a silicone-based lubricant, which offers excellent heat resistance and water repellency. Another option is a light oil, such as bicycle-specific lubricating oil, which provides good lubrication and protects against rust.
Whichever lubricant you choose, make sure to apply it sparingly to avoid attracting dirt and debris.
After lubricating the brake parts, it’s time to double-check the brake pad alignment to ensure proper contact with the rim.
Double-check the brake pad alignment
First, make sure you align the brake pads properly for optimal performance. Proper brake pad alignment is crucial for effective braking on a bicycle. When the brake pads are aligned correctly, they make full contact with the rim, resulting in maximum stopping power. Improper alignment can lead to reduced braking efficiency and uneven wear on the brake pads.
To align the brake pads, start by loosening the brake pad fixing bolt. Next, position the brake pads so that they are centered on the rim and aligned with the braking surface. Avoid common mistakes such as misaligning the brake pads or tightening the fixing bolt too much. Once the brake pads are properly aligned, tighten the fixing bolt securely. This will ensure that the brake pads stay in place during use.
With the brake pads aligned, you can now move on to testing the brakes again to ensure they are functioning properly.
Test the brakes again
Take a moment to give the brakes another test to ensure they are working properly. Retest results are crucial in determining whether the adjustments made to the brake pads were successful. Here are a few troubleshooting tips to consider during the testing process. First, check for any unusual noises or squeaks when applying the brakes. If you hear any, it may indicate that the brake pads are not aligned properly or that they need further adjustment. Second, pay attention to the braking power. The brakes should engage smoothly and bring the bike to a complete stop without any difficulty. Finally, test the brakes at different speeds and on various terrains to ensure consistent performance. If any issues persist, revisit the previous steps to ensure proper alignment. Now, let’s move on to adjusting the brake lever reach.
Adjust the brake lever reach
To adjust the brake lever reach, you can simply move it closer or further away from the handlebars.
Start by locating the reach adjustment screw on the brake lever. This screw is typically found on the inside of the lever, near the pivot point.
Use a 2.5mm Allen wrench to turn the screw clockwise to move the lever closer to the handlebars or counterclockwise to move it further away.
After making the adjustment, test the lever to ensure it feels comfortable and allows for easy braking.
If you are still experiencing issues with the lever, such as it being too loose or too tight, you may need to troubleshoot further by checking the cable tension or inspecting the brake calipers.
Once the lever is properly adjusted, proceed to the next section about securing all bolts and screws.
Secure all bolts and screws
Make sure you secure all bolts and screws on your bike to ensure everything is properly fastened. Start by assessing the tightness of all bolts on the brake assembly, including the mounting bolts, caliper bolts, and pad holder bolts. Use a torque wrench to ensure they are tightened to the manufacturer’s specifications.
Inspect the integrity of all screws on the brake system, such as those on the brake levers, cable clamp, and brake pads. Make sure they are not stripped or damaged. If any screws are loose or damaged, replace them with new ones.
Additionally, check the bolt and screw tightness on other parts of the bike, such as the handlebars, stem, and seatpost. This will help prevent any unwanted shifting or rattling while riding.
Now that all bolts and screws are secure, we can move on to the next step: cleaning the brake surfaces.
Clean the brake surfaces
Ensure the brake surfaces are clean by using a cloth and a mild detergent to remove any debris or residue. Start by wetting the cloth with water and adding a small amount of the mild detergent. Gently scrub the brake surfaces, paying close attention to any areas with visible dirt or grime. Be sure to clean both the brake pads and the brake rims thoroughly.
Avoid using harsh chemicals or abrasive materials, as they can damage the brake surfaces. Once the brake surfaces are clean, rinse them with water and dry them with a clean cloth. For optimal results, it’s recommended to use a specific bike cleaning product that’s designed to remove grease and grime from brake surfaces.
After cleaning the brake surfaces, you can proceed to the next step of the process, which is to ride and retest the brakes.
Ride and retest the brakes
After cleaning the brake surfaces, it is important to ride the bicycle and retest the brakes to ensure they are functioning properly. This step is crucial as it allows you to fine tune and adjust the brake tension accordingly.
To begin, find a safe and open area where you can ride the bicycle freely. Start by gently applying the brakes and observing their response. If the brakes feel too loose or ineffective, you will need to tighten them further.
Locate the barrel adjuster on the brake lever and turn it clockwise to increase the tension. After each adjustment, ride the bicycle again and test the brakes. Continue this process until you achieve the desired level of brake responsiveness.
Remember, it is important to ride and retest the brakes to ensure optimal performance and safety while riding.
Frequently Asked Questions
How often should I tighten the brakes on my bicycle?
I should tighten my brakes on my bicycle when I notice the brake lever reach needs adjustment or when I see that the brake pads are worn. It’s important to regularly check these factors for optimal braking performance.
Can I use any type of lubricant on the brake parts?
Sure, you can totally use any type of lubricant on your brake parts! Just be prepared for a disastrous outcome. Brake lubricant alternatives can lead to poor brake performance and dangerous situations. Avoid common mistakes and stick to proper brake lubricants for optimal safety.
Is it necessary to clean the brake surfaces before tightening the brakes?
Cleaning brake surfaces is essential for optimal braking performance. Dirty brake surfaces can significantly reduce the effectiveness of the brakes, leading to longer stopping distances and potential safety hazards. Regularly cleaning and maintaining the brake surfaces is crucial for safe and efficient bicycle braking.
What should I do if the brake cable tension is too tight?
If the brake cable tension is too tight, I would start by loosening the brake lever tension. This can be done by adjusting the barrel adjuster located on the brake lever. Turn it counterclockwise to increase tension and clockwise to decrease tension.
How can I tell if the brake pads need to be replaced?
If the brake pads are worn, you may notice signs like decreased braking power, squealing, or a grinding noise. To replace them, first loosen the brake pad retention bolt, remove the old pads, and insert the new ones.
Conclusion
In conclusion, tightening the brakes on a bicycle is a crucial skill that every cyclist should possess. By following the step-by-step process outlined in this article, you can ensure that your brakes are in optimal condition, providing you with the necessary stopping power for a safe and enjoyable ride.
Remember, practice makes perfect, so don’t be discouraged if it takes a few tries to get it right. Soon enough, you’ll be able to stop on a dime and leave your friends in awe.
So grab your tools, get to work, and happy riding!