As a passionate cyclist, I understand from personal experience how vital it is to have a bike that’s properly adjusted. The gears, in particular, are essential elements of the bicycle, enabling you to smoothly navigate through all kinds of landscapes.
However, even the best gears can fall out of alignment over time, causing your ride to become less smooth and efficient. That’s why I’m here to share my knowledge on how to tune bicycle gears.
In this article, I’ll guide you through the process of:
- Identifying problem areas
- Adjusting both the front and rear derailleurs
- Troubleshooting common issues
- Testing and fine-tuning your gears
With a little patience and some basic tools, you can get your bike running like new again. So let’s get started!
Key Takeaways
- Regular maintenance, including cleaning, lubrication, and checking cable tension, can prevent gear shifting problems.
- Fine-tuning gear ratios and adjusting limit screws and cable tension can improve gear shifting and prevent chain rubbing.
- Understanding how gears work and practicing drills to simulate different riding conditions can help identify and troubleshoot gear problems.
- Proper gear selection for different terrains is important for efficient and smooth riding.

Schwinn Sporterra RX Gravel Bike, 700c Mens and Womens Bike, 14-Speed Drop Bar Gravel Bicycle, Mechanical Disc Brakes, Rigid Fork, Aerodynamic Riding Position, Quick Release Seat Post, Adult Bicycle
GRAVEL BICYCLE: Enjoy next level riding with the Sporterra RX by Schwinn. With 700c wheels, this mens and...
As an affiliate, we earn on qualifying purchases.
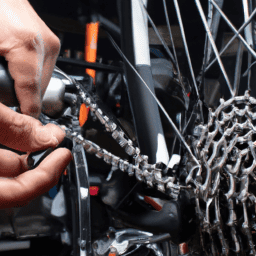
Identify Problem Areas
Now let’s identify where your bicycle gears may be causing some trouble so we can get them running smoothly. Common mistakes that can cause gear shifting problems include loose cables, worn out or dirty chain, bent derailleur hangers, and improper derailleur adjustment.
Preventative maintenance can go a long way in preventing these issues. Regularly cleaning and lubricating the chain, checking cable tension, and keeping the derailleur hanger straight can help keep your gears running smoothly.
If you’re experiencing trouble shifting gears, it’s likely that your front derailleur needs some adjustment. This can be caused by a misaligned derailleur or a cable that has stretched.
Don’t worry, adjusting the front derailleur is a relatively simple process that can be done in just a few minutes with the right tools and a bit of experience.
SAVADECK Carbon Gravel Bike - T800 Carbon Frame & Fork, Shimano GRX400 10-Speed Groupset, Hydraulic Disc Brakes, 700C x 40mm Tires - Lightweight Design for Road & Off-Road Adventures (Black, 58cm)
【Ultra-Lightweight T800 Carbon Frame】Built with a T800 R21 carbon fiber frame and fork, this bike weighs just 10.4kg...
As an affiliate, we earn on qualifying purchases.
Adjust Front Derailleur
First, make sure your front derailleur is properly adjusted and shifting smoothly. To do this, start by checking the derailleur cable tension. If it’s too loose, the derailleur won’t shift properly. To adjust it, shift the gears to the smallest chainring and the largest cog on the cassette. Then, use the barrel adjuster on the derailleur or shifter to tighten the cable until the chain moves smoothly from the smallest to the largest cog. If it’s too tight, the chain may skip or shift poorly. In this case, shift to the largest chainring and smallest cog and loosen the cable until the chain moves smoothly.
Next, check the limit screw adjustments. These screws control how far the derailleur can move inwards and outwards. If they’re too loose, the chain may fall off the chainring or shift past the largest or smallest cog. If they’re too tight, the chain may not shift onto the largest or smallest cog.
To adjust the limit screws, shift the chain to the smallest chainring and use the low limit screw to adjust the derailleur so that the chain is as close as possible to the frame without rubbing. Then, shift the chain to the largest chainring and use the high limit screw to adjust the derailleur so that the chain is as close as possible to the outside without rubbing.
With these adjustments made, you’ll be ready to move onto adjusting the rear derailleur.
Now, let’s move onto adjusting the rear derailleur.

SAVADECK T800 Carbon Gravel Bike, with Shimano GRX610 12-Speed, Hydraulic Disc Brakes, 700x40c Tires for Road & Off-Road Adventure, Men's/Women's Bicycle(Elegant White, 51cm)
【With SHIMANO GRX Drivetrain Setup】Equipped with SHIMANO GRX610 shifters and RX822 rear derailleur, matched with a 12-speed M6100...
As an affiliate, we earn on qualifying purchases.
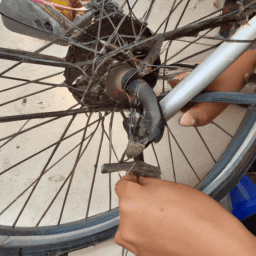
Adjust Rear Derailleur
To get your bike shifting smoothly, take a look at the rear derailleur and make sure it’s properly adjusted. Start by checking the chain tension, which should be tight enough to prevent the chain from slipping off the gears, but not so tight that it causes excessive wear on the drivetrain. To adjust the chain tension, use the barrel adjuster on the derailleur to tighten or loosen the cable tension. Turn the barrel adjuster clockwise to tighten the cable, which will increase the tension and move the derailleur towards the smaller gears. Turn it counterclockwise to loosen the cable, which will decrease the tension and move the derailleur towards the larger gears.
Next, check the cable tension, which should be just tight enough to move the derailleur smoothly between gears, but not so tight that it causes excessive resistance or makes shifting difficult. Use the cable tension adjuster on the shifter to adjust the tension. Turn the adjuster clockwise to increase the tension and make shifting to smaller gears easier, or counterclockwise to decrease the tension and make shifting to larger gears easier. Make small adjustments and test the shifting after each one until you find the sweet spot where the derailleur moves smoothly and the gears shift easily. Once you’ve adjusted the chain and cable tension, check the shifting again and make any additional adjustments as needed.
To troubleshoot common issues with the derailleur, check for bent or damaged hangers, worn or damaged derailleur pulleys, and loose or damaged cables. If you’re still having trouble with shifting, you may need to replace these parts or take your bike to a professional mechanic for further diagnosis and repair.

KABON Carbon Gravel Road Bike, T800 Carbon Fiber Frame 700C Road Bike with 18 Speeds Drivetrain, Integrated Carbon Handlebar, Disc Brakes Racing Bicycle for Adult Unisex (Black, 53cm)
【DURABLE & LIGHTWEIGHT】- Lightweight T800 Carbon Fiber Frame combined with carbon fork,handlebar and seatpost for added vibration dampening...
As an affiliate, we earn on qualifying purchases.
Troubleshooting Common Issues
When troubleshooting common issues with my bicycle gears, I often encounter chain skipping, gear slipping, and chain rubbing.
Chain skipping occurs when the chain momentarily jumps over the teeth of the cogs, causing a sudden loss of power.
Gear slipping, on the other hand, happens when the chain fails to fully engage with the cogs, resulting in a poor transfer of power.
Lastly, chain rubbing refers to the unpleasant noise that occurs when the chain makes contact with the front derailleur or other parts of the bike frame.
Chain Skipping
Like a skipping record, a chain skipping on your bike can be frustrating, but there are a few things you can do to fix it.
First, you should check if your gears are clean and well lubricated. Dirty or dry gears can cause the chain to skip, so make sure to clean and oil them regularly. Additionally, make sure that your chain is not too loose or too tight. A loose chain can easily come off the gears, while a tight chain can cause unnecessary wear and tear.
Another common cause of chain skipping is worn out gears or a worn chain. If you’ve been using the same chain and gears for a long time, it may be time to replace them. Also, make sure that your gears are properly aligned and adjusted. Misaligned gears can cause the chain to skip, so take the time to make sure they are properly adjusted.
By taking these steps, you can prevent chain skipping and ensure a smooth ride.
Now, let’s move on to the next subtopic: gear slipping.
Gear Slipping
Experiencing gear slipping while riding your bike can be frustrating, but there are ways to fix it and get back to enjoying your ride. Gear slipping occurs when the chain slips off the teeth of the cassette or chainring, causing the rider to lose power and momentum. This can be caused by a variety of factors, including worn out gears, loose cables, or improper gear shifting technique.
To prevent slipping, it is important to regularly maintain your bike’s gears. This includes cleaning and lubricating the chain, checking and adjusting cable tension, and inspecting the cassette and chainring for wear and tear. It is also important to shift gears properly, avoiding cross-chaining and shifting under heavy load. By taking these steps, you can ensure that your bike’s gears are operating smoothly and efficiently, allowing for a more enjoyable ride.
Moving on to the next subtopic of chain rubbing, it is important to address this issue as it can also cause frustration and hinder the performance of your bike.
Chain Rubbing
To prevent chain rubbing on your bike, it’s important to regularly check for proper chain alignment and adjust the derailleur as needed. Here are some tips to help you prevent rubbing and ensure smooth gear shifting:
-
Check the chain alignment: A misaligned chain can cause rubbing. To check for alignment, shift the chain to the small chainring and the smallest cog on the cassette. Look at the chain from behind and check if it lines up with the center of the cassette. If it doesn’t, adjust the limit screws on the derailleur until the chain aligns properly.
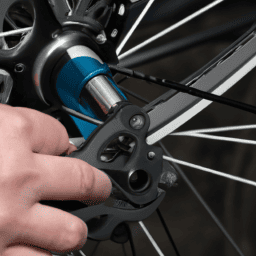
-
Check the derailleur hanger: A bent derailleur hanger can cause rubbing. Use a derailleur alignment tool to check for any misalignment and straighten it if necessary.
-
Check the cable tension: A loose or tight cable can cause rubbing. Shift the chain to the smallest cog on the cassette and the largest chainring. If the chain rubs against the derailleur, adjust the cable tension using the barrel adjuster.
-
Check the chain length: A chain that’s too long can cause rubbing. Shift the chain to the smallest chainring and the smallest cog on the cassette. If the derailleur pulley wheels are too far forward, the chain is too long. Adjust the chain length by removing links until the pulley wheels are in the correct position.
Now that you’ve checked and adjusted your bike’s components, it’s time to test and fine-tune the gear shifting.
Test and Fine-Tune
Congratulations! You’ve made it to the test and fine-tune stage, where you get to play detective with your bicycle’s gears and make them sing like a choir.
The first step in fine-tuning your gears is to practice drills that simulate different riding conditions. This will help you identify any gear shifting issues and give you a better understanding of how your gears work.
Once you’ve practiced these drills, it’s time to fine-tune your gear ratios. Start by adjusting your derailleur’s limit screws to ensure that your chain doesn’t rub against the derailleur cage or the chainrings.
Next, shift through all of your gears and listen for any rubbing or grinding noises. If you hear any, adjust your cable tension until the noise disappears.
Finally, take your bike for a test ride and make sure that your gears shift smoothly and quickly. With a little patience and attention to detail, you’ll be able to fine-tune your gears and enjoy a smoother, more efficient ride.
Frequently Asked Questions
How often should I tune my bicycle gears?
I tune my bicycle gears every few weeks as part of my regular bicycle gear maintenance routine. The frequency of gear tuning depends on how often you ride and how much wear and tear your gears experience.
Can I adjust my gears without any special tools?
Sure, I can DIY gear adjustments without any special tools. However, it’s important to identify common gear problems first. Once identified, I can make adjustments with precision using only a few basic tools.
How do I know if my derailleur needs to be replaced?
If my gears are skipping or not shifting smoothly despite Derailleur maintenance and troubleshooting derailleur issues, it may be time to replace the derailleur. Look for signs of damage, worn jockey wheels, or bent cage.
Can I ride a bike with poorly tuned gears?
Yes, you can ride a bike with poorly tuned gears, but it can be frustrating and cause common problems like chain slipping or difficulty shifting. Troubleshooting tips include adjusting cable tension and limit screws.
What should I do if my gears keep slipping even after tuning?
I’ve found that troubleshooting slipping gears often involves checking the gear cable maintenance. Did you know that a significant number of gear issues are caused by worn or frayed cables? It’s important to regularly inspect and replace them to keep your gears running smoothly.
Conclusion
Well, that’s all there is to it! Tuning your bicycle gears can seem daunting at first, but with a little practice and patience, you’ll be able to do it with ease.
Just remember to identify any problem areas, adjust the front and rear derailleurs accordingly, troubleshoot any common issues, and test and fine-tune until you achieve the perfect ride.
Tuning your gears can be compared to playing an instrument. Just like how a musician needs to fine-tune their instrument to produce the best sound, a cyclist needs to fine-tune their gears to achieve the smoothest ride.
It takes time and effort, but once you get the hang of it, your bike will perform at its best and you’ll be able to enjoy your rides to the fullest.
So go out there, grab your tools, and start tuning your gears. Your bike will thank you, and you’ll be amazed at how much better your rides will be.
Happy cycling!