Are you looking to ensure your safety while cycling in the dark or during poor lighting conditions? Turning on your bike lights is crucial for your safety. Bike lights not only illuminate your path but also increase your visibility to other people on the road.
In this article, we’ll show you how to turn on your bicycle lights and give you some tips on selecting the right type of light for your needs.
Before we get started, it’s important to understand the different types of bicycle lights available on the market. There are two main types: front lights and rear lights. Front lights are designed to illuminate the road ahead of you, while rear lights are meant to make you visible to other road users from behind. Some lights come with multiple settings, such as flashing modes or different brightness levels.
Knowing the features and capabilities of your lights can help you use them more effectively and stay safe on the road.
Key Takeaways
- Locate the power button on the bike light and press and hold it down to turn on the light.
- Understand the different light modes available, such as high beam, low beam, flashing, and strobe, and use the appropriate setting for the right conditions.
- Test bike lights before riding at night to ensure they’re working properly and bright enough to be visible from a distance of at least 500 feet.
- Adjust the angle of the light so that it’s angled slightly downwards to prevent blinding other road users and troubleshoot any difficulties with light settings by checking the battery level or consulting the user manual.
Understand the Types of Bicycle Lights
Do you know the different types of bicycle lights and which ones are best suited for your needs? Understanding the types of bike lights is essential before you set out on a ride.
Bicycle light brightness is measured in lumens, and the higher the number of lumens, the brighter the light. There are different types of bike lights, such as headlights, taillights, and spoke lights.
Headlights are the most common type of bike light and are essential for illuminating the path ahead of you. Taillights are important for increasing your visibility to motorists behind you, while spoke lights add an extra layer of visibility to your bike.
Choosing the right light for your needs is crucial. If you ride in areas with low light conditions or during the night, you’ll need a powerful headlight with at least 500 lumens of brightness. For daytime riding, a lower lumens headlight can suffice, and a taillight with at least 100 lumens will make you visible to other road users.
Always ensure that your bike lights are charged and ready to go before every ride. Check the batteries and replace them if they’re low, and make sure that the lights are securely attached to your bike.
Now that you understand the different types of bike lights and their features, let’s move on to the next step.
Check the Batteries
Now that you know about the different types of bicycle lights and how to turn them on, it’s important to check the batteries regularly.
If necessary, replace the batteries to ensure your lights are working properly.
If you have rechargeable batteries, make sure to charge them before your ride.
It’s crucial to have functioning bicycle lights to ensure your safety on the road, so be knowledgeable about the features of your lights and keep them in good working condition.
Replace Batteries if Necessary
If your bike lights are dead, you’ll need to replace the batteries. Before you do, consider rechargeable versus disposable batteries. Rechargeable batteries can save you money, but may not hold a charge as long and require a charging station. When choosing replacement batteries, make sure they’re compatible with your bike light.
To install replacement batteries, unscrew the cap or slide open the cover to access the compartment. Insert the batteries correctly according to the diagram. Close the cover or replace the cap and turn on the bike light to test the new batteries.
Remember, bike lights are crucial for safety on the road, so ensure they’re always working properly. In the next section, we’ll discuss charging rechargeable batteries.
Charge Rechargeable Batteries
To keep your bike light shining bright, it’s important to know how to charge rechargeable batteries. Maximizing battery life is crucial to ensure that your bike light lasts for a long time.
Rechargeable batteries have a limited lifespan, and it’s essential to use the right charger to prevent damage to the battery. When charging your rechargeable bike light batteries, choose the right charger that’s compatible with your battery. Using the wrong charger can cause damage to the battery or reduce its lifespan.
Always follow the manufacturer’s instructions to ensure that you’re charging your batteries correctly. Once fully charged, your bike light will be ready to use. With the batteries charged, the next step is to mount the lights.
Mount the Lights
First, let’s attach the lights to your bike using the provided brackets – have you found the right spot for them yet? Proper positioning of your lights is crucial for your safety and visibility on the road.
Here are some tips to help you mount your lights correctly:
-
Choose the right mount for your lights. Different lights come with different brackets that are designed to fit specific parts of your bike. Make sure you have the right bracket for your light and the location where you want to mount it.
-
Position your lights at the correct angle. Your front light should be pointed slightly downward to illuminate the road directly in front of you. Your rear light should be angled slightly upward to make it visible to drivers behind you.
-
Secure your lights tightly. Make sure your lights are securely fastened to your bike to prevent them from falling off while you ride.
Now that you’ve mounted your lights, it’s time to turn them on and make sure they’re working properly.
Turn on the Lights
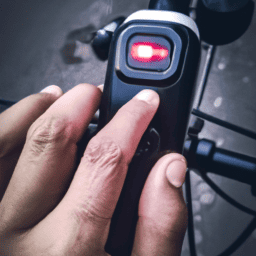
To turn on your bicycle lights, start by locating the power button on your light. This is usually located on the top or side of the light. Once you’ve found it, press and hold it down until the light turns on.
It’s important to understand the different light modes your light offers, such as steady or flashing, so you can choose the appropriate mode for your ride.
Remember, using bicycle lights is essential for your safety and visibility on the road.
Locate the Power Button
You’ll find the power button right on the top of your bicycle light. It’s a small circular button that you’ll need to press and hold down for a few seconds to turn on the lights. If you’re having trouble locating the power button, check the common power button locations for your specific type of bike light.
Additionally, if you experience any issues with the power button, refer to the troubleshooting power button issues section in your bike light’s manual.
To fully understand how to use your bike lights, it’s important to familiarize yourself with the different light modes available. Understanding the light modes will allow you to customize the brightness and pattern of your lights to best suit your riding conditions.
Understand the Light Modes
Now that you’ve located the power button, let’s delve into the different light modes available for your bike light and how they can enhance your riding experience.
Most bike lights come with common light settings such as high beam, low beam, flashing, and strobe. High beam is great for illuminating the road ahead in dark conditions while low beam is suitable for urban areas with street lights. Flashing mode is ideal for daytime use as it increases visibility to other road users, while the strobe mode can be used as a distress signal in emergency situations.
It’s important to understand the different light modes to ensure you use the appropriate setting for the right conditions. For instance, using the high beam mode in urban areas is not only unnecessary but also a hazard to other road users.
If you encounter any difficulties with your light settings, try troubleshooting by checking the battery level, adjusting the angle of the light, or consulting the user manual.
Now that you’re familiar with the different light modes and their functions, let’s move onto the next step and test the lights.
Test the Lights
Once it gets dark, it’s important to make sure your bicycle lights are working properly before hitting the road. Testing your lights will ensure that you’re visible to others on the road and prevent accidents. Here are four steps to help you test your bike lights:
-
Make sure your lights are charged or have fresh batteries. A dim or non-functional light can be dangerous and defeat the purpose of having lights in the first place.
-
Turn on your lights and check if they’re working properly. Test every mode on your light to ensure that they work as intended.
-
Check the brightness of your lights. Make sure that your lights are bright enough to be visible from a distance of at least 500 feet.
-
Make sure that your lights are pointing in the right direction. Adjust your lights so that they’re angled slightly downwards to prevent blinding other road users.
Remember, having proper visibility is crucial when riding at night. By testing your bike lights before you hit the road, you can ensure that you’re well-equipped to stay safe on the road.
Frequently Asked Questions
How do I choose the right brightness level for my bicycle lights?
Choosing the right brightness level for your bicycle lights is crucial for safety. Adjusting the angle of your lights and using battery saving techniques can help. Consider different types of bike lights and their features to make an informed decision.
How long do bicycle light batteries typically last?
Maximizing battery life depends on choosing the right battery type. Different bike lights have different battery life depending on usage. It’s important to use lights to increase visibility and safety.
Can I use rechargeable batteries for my bicycle lights?
Sure, you can use rechargeable batteries for your bike lights. The pros are that they’re eco-friendly and cost-effective in the long run, but the cons are that they can be heavier and less powerful. Alternatives include disposable batteries or dynamo-powered lights.
Do I need both front and rear lights for my bicycle?
You need both front and rear lights for your bicycle. Using them together increases visibility and safety on the road. Choose from different types of lights such as LED or rechargeable, and consider features like brightness and battery life. Always use lights when riding at night.
Are there any laws or regulations regarding bicycle lights that I should be aware of?
Oh, there are definitely no laws or regulations when it comes to bicycle lights. It’s not like you’ll get hit by a car or anything. But seriously, using reflective gear and maintaining your lights is crucial for your safety. Make sure you choose the right type of light for your needs and keep them charged or replace batteries regularly.
Conclusion
Congratulations! You now know how to turn on your bicycle lights. Remember, using bicycle lights is not only important for your safety, but also the safety of others around you.
In fact, according to the National Highway Traffic Safety Administration, 22% of all bicycle accidents occur between 6pm and 9pm, when visibility is low. By using the right type of bicycle lights, checking the batteries, mounting the lights correctly, and turning them on before you ride, you can greatly reduce your risk of being involved in an accident.
Always be sure to test your lights before you hit the road to ensure they’re working properly. Stay safe and enjoy your ride!