As an avid bicyclist, I understand the aggravation of dealing with a snapped bike chain all too well. No matter if you’re enjoying a relaxed ride or navigating a difficult path, a busted chain can put an immediate stop to your cycling adventure.
Fortunately, with the right tools and a bit of knowledge, fixing a broken chain is a relatively easy task that can be done in a matter of minutes.
In this article, I will guide you through the process of using a bicycle chain tool to repair a damaged chain link. We will cover the necessary tools and materials, as well as the steps involved in removing and replacing the damaged link.
By the end of this article, you will have the knowledge and confidence to fix a broken bicycle chain on your own, ensuring that you can get back on the road or trail in no time.
Key Takeaways
- A bicycle chain tool is a necessary tool for fixing a broken chain and performing regular maintenance.
- Different types of chains require specific chain tools, so it’s important to use the correct one.
- Precise cutting and positioning of the chain tool are crucial for proper maintenance and avoiding damage or injury.
- Regular chain maintenance, including cleaning and lubrication, is important for longevity and smooth operation of the chain.
Gather the Necessary Tools and Materials
Before starting, make sure you’ve got all the tools and materials you’ll need. These include a bicycle chain tool, chain lubricant, and a rag for cleaning. It’s also important to understand the types of bicycle chains and the importance of regular chain maintenance.
There are different types of bicycle chains, including single-speed, multi-speed, and derailleur. Each type requires a specific chain tool, so make sure you have the right one before starting the repair process.
Regular chain maintenance is crucial for the longevity and smooth operation of your bike. Neglecting to clean and lubricate your chain can cause it to wear out faster and even break while riding. It’s recommended that you clean and lubricate your chain every 100-200 miles of riding.
With the necessary tools and materials and an understanding of the importance of regular chain maintenance, let’s move on to removing the damaged chain link.
Remove the Damaged Chain Link
To remove a damaged chain link, the first step is to identify which link is causing the issue.
Once this is done, position the chain tool on the damaged link and ensure that the tool is correctly aligned with the pin.
Finally, turn the chain tool handle to push the pin out of the link, allowing the damaged link to be removed.
It’s important to take care when using the chain tool to avoid damaging the chain or injuring yourself.
Identify the Damaged Link
First things first, you’ll want to locate the damaged link in your bicycle chain using a chain tool. There are a few inspection tips that can help you identify the damaged link.
First, look for any obvious signs of damage such as a bent or twisted link. Next, check for any tight or stiff links that may be causing the chain to skip or jump. You can also run your fingers along the chain to feel for any rough spots or inconsistencies.
Finally, inspect the chain for any signs of wear or stretching, which can also cause damage over time.
Common causes of chain damage include improper maintenance, lack of lubrication, and riding in harsh conditions. If you notice any of these signs, it’s important to address the issue right away to prevent further damage to your bike.
Once you’ve identified the damaged link, you’ll be ready to position the chain tool and start the repair process.
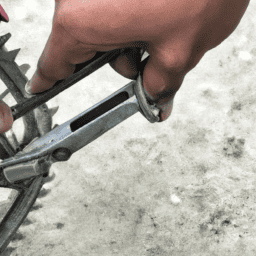
Position the Chain Tool
Once you’ve located the damaged link, it’s time to get down to business and position the chain tool like a surgeon preparing for surgery.
First, adjust the pressure of the chain tool by turning the adjusting knob until the driving pin is aligned with the center of the damaged link. It’s important to ensure that the driving pin is in the correct position, as this will prevent any further damage to the chain.
Common mistakes to watch out for when positioning the chain tool include not centering the driving pin on the damaged link or applying too much pressure. Applying too much pressure can cause the chain to break, so make sure to adjust the pressure gradually and carefully.
Once the chain tool is in place and the pressure is set, it’s time to move on to the next step: turning the chain tool handle to push the pin through the damaged link.
Transitioning to the next step, remember that turning the chain tool handle should be done slowly and with steady pressure to avoid damaging the chain.
Turn the Chain Tool Handle
Gently rotating the handle of the chain tool like a skilled craftsman, you can feel the resistance of the pin as it begins to push through the damaged link. It’s essential to maintain a proper handle grip while turning the tool, ensuring that the chain tool remains stable and doesn’t slip out of place.
Avoiding common mistakes such as applying too much force at once or not aligning the tool correctly with the pin will prevent any further damage to the chain or tool. Once the pin has pushed through the link, continue to rotate the handle until the chain tool has separated the damaged link from the rest of the chain.
At this point, it’s time to measure and cut the replacement link, which will be covered in the subsequent section.
Measure and Cut the Replacement Link
So now that I’ve removed the damaged chain link, it’s time to measure and cut the replacement link.
First, I’ll need to measure the length of the chain to determine the right size for the replacement link. Then, using my chain tool, I’ll carefully cut the new link to the correct length.
It’s important to be precise in measuring and cutting to ensure a smooth and efficient ride.
Measure the Replacement Link
To accurately measure the replacement link for your bicycle chain, you’ll need a ruler or caliper and a keen eye for detail. Measuring accuracy is crucial to ensure the new link fits perfectly and your bike won’t experience any issues. It’s important to note that if you’re not comfortable using a ruler or caliper, there are alternative solutions available. For example, some bike shops offer a chain measuring service, or you can purchase pre-cut links that are ready to install.
To measure the replacement link, start by aligning the ruler or caliper with the pin of the existing link. Make sure the measuring device is flat against the chain and measure the distance between the centers of the pins. This measurement will give you the correct length for the replacement link. It’s important to measure the pin-to-pin distance rather than the overall length of the link, as this will ensure the new link fits perfectly. Once you have your measurement, you can proceed to cut the replacement link.
Without compromising the measuring accuracy, it’s important to ensure that the replacement link is cut precisely to avoid any issues with the chain’s performance.
Cut the Replacement Link
Now that you’ve measured the replacement link, it’s time to cut it precisely. This step is crucial for chain maintenance, as a poorly cut link can cause common causes of chain damage, such as skipping gears and chain slippage.
To start, position the chain tool over the pin that needs to be removed. Make sure the chain is lined up straight and place the chain tool’s driving pin precisely over the pin you want to remove. Next, turn the handle of the chain tool to push the driving pin into the chain pin. Keep turning until the pin is pushed out completely.
Once the pin is removed, you can now break the chain to the exact length you need by removing the necessary number of links. Remember to be precise in your cutting to ensure your bike’s optimal performance. With the link cut, you can now move on to connect the new chain link seamlessly.
Without any hesitation, let’s proceed to the next step of the process and connect the new chain link.
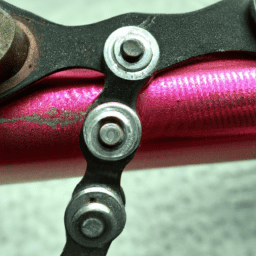
Connect the New Chain Link
First, attach the new chain link to the end of the chain with the chain tool, and feel the satisfaction of successfully repairing your own bicycle. To properly align the new link, make sure the chain is lying flat and straight on the tool. Secure the link by inserting the replacement pin into the tool and turning the handle clockwise until the pin is fully seated.
Choosing the right chain link size is important for a successful repair. Using a chain tool, you can remove any damaged links and replace them with a new link that matches the size of the chain. Refer to the manufacturer’s instructions or a bike shop for guidance on the correct chain size for your bike. Once the new link is securely attached, it’s time to lubricate and test the chain for proper function.
Lubricate and Test the Chain
Now that the new chain link is connected, it’s important to lubricate and test the chain.
To do this, I’ll apply chain lubricant to ensure smooth operation and prevent rust. Next, I’ll run the chain through the gears to make sure everything is properly aligned and functioning correctly.
Finally, I’ll test the chain tension to ensure it’s not too loose or too tight, which can cause damage to the drivetrain.
Apply Chain Lubricant
Don’t neglect your trusty steed – keep it running smoothly by applying chain lubricant regularly.
There are different types of chain lubricants available in the market, but it’s best to choose one that is specifically designed for bicycles. Before applying the lubricant, make sure to clean the chain thoroughly with a degreaser to remove any dirt or debris.
Once the chain is clean, apply the lubricant evenly on each link while turning the pedals backwards. It’s important to use just enough lubricant to cover the chain, as excess lubricant can attract dirt and grime. After applying the lubricant, let it sit for a few minutes before wiping off any excess.
Properly lubricating the chain can extend its lifespan and improve the bike’s performance. Once you have applied the lubricant, it’s time to move on to the next step – running the chain through the gears. This will distribute the lubricant evenly and ensure that the chain is working smoothly.
It’s important to do this before riding the bike to avoid any potential issues that may arise from a poorly lubricated chain. So, let’s move on to the next step and make sure our bike is in top condition for our next ride.
Run the Chain Through the Gears
To ensure your ride is smooth and effortless, proper gear shifting is crucial while running the chain through the gears. Starting in the lowest gear, smoothly shift up one gear at a time, while applying moderate pressure to the pedals. This will prevent any sudden jerks or chain slippage, which can cause damage to the chain or derailleur.
It’s important to avoid shifting multiple gears at once, as this can cause the chain to become misaligned and derail, leading to costly repairs. Common mistakes while running the chain through the gears include shifting too quickly, not applying enough pressure to the pedals, or shifting under too much pressure. These mistakes can cause the chain to skip or slip, which can be dangerous while riding.
By taking the time to properly shift through each gear, you can extend the life of your chain and ensure a smooth ride. Now that the chain is running smoothly through the gears, it’s time to test the chain tension.
Test the Chain Tension
First, check if the tension of your chain is correct by gently pulling the chain away from the teeth on the front chainring. If there’s too much slack, the chain may slip off the chainring or derailleur. If it’s too tight, it may cause excessive wear on both the chain and the drivetrain components.
To adjust the chain tension, use the chain tool to remove the necessary links until the chain is at the correct tension. Common mistakes when adjusting chain tension include removing too many links, not removing enough links, or not checking the tension after making adjustments.
If the chain is still too loose after removing links, check if the derailleur hanger is bent or if the derailleur cage is damaged. If the chain is too tight, check if the chainring or cassette teeth are worn or if the derailleur is misaligned.
Troubleshooting these issues can help ensure that the chain is properly tensioned and prevent premature wear on the drivetrain.
Frequently Asked Questions
How often should I replace my bicycle chain?
When my chain starts jumping gears or I notice excessive wear, I use chain wear indicators to determine if it’s time for a replacement. Regular chain maintenance practices can extend its life.
Can I use any type of chain link as a replacement?
When replacing a bicycle chain link, it’s important to ensure compatibility and proper sizing. Using any type of chain link may cause issues with shifting and ultimately damage the drivetrain.
How do I know if my chain is too loose or too tight?
As a rule of thumb, a bicycle chain should have around half an inch of play. Checking tension is easy: I hold the chain at the midpoint between the front and rear sprockets and push it up and down. Adjusting links is necessary if the chain is too loose or tight.
What type of lubricant should I use for my chain?
For chain maintenance, I prefer using a dry lubricant for my bike chain. It keeps my chain clean and doesn’t attract dirt and debris. There are also wet lubricants that provide better protection in wet conditions. Choose the one that suits your riding conditions.
Can I use a bicycle chain tool on a chain with a master link?
Master link alternatives exist, but chain tool compatibility may vary. Some chain tools come with separate attachments to handle master links, while others may require a different tool altogether.
Conclusion
In conclusion, using a bicycle chain tool requires a bit of patience and attention to detail, but it’s a skill that every cyclist should know. By following the steps outlined in this article and gathering the necessary tools and materials, you can easily remove a damaged chain link, measure and cut a replacement link, and connect the new chain link.
Just remember to lubricate and test the chain before hitting the road. As with any bike maintenance task, safety should always be a top priority. Make sure to wear gloves and eye protection when using a chain tool, and take your time to ensure that the chain is properly connected before riding.
By mastering the use of a chain tool, you can save time and money by performing your own bike repairs and upgrades. So go ahead and give it a try – you might just surprise yourself with how easy it is!