For someone who loves cycling, encountering a flat tire is incredibly aggravating. It feels akin to coming across an unexpected obstacle during your journey, and repairing it immediately can prove to be a daunting task. However, there’s no need to worry, my fellow cyclist, because with the appropriate equipment and a little bit of expertise, you can swiftly change your inner tube and resume your ride promptly. This is where the usefulness of bicycle tire levers shines.
Think of bicycle tire levers as your trusty sidekicks when it comes to changing a flat tire. They’re small, lightweight, and easy to carry in your backpack or saddlebag. With a simple flick of the wrist, they can help you pry the tire off the rim, giving you access to the inner tube.
In this article, I’m going to show you how to use bicycle tire levers step-by-step, so you can fix your flat tire like a pro. So let’s grab our tools and get started!
Key Takeaways
- Proper positioning is important when removing and replacing the tire to avoid damaging the tube or tire.
- Use gentle force and the correct technique to avoid damaging the tube when removing the tire.
- Check the recommended proper tire pressure before inflating the tire to prevent poor performance or damage.
- Troubleshoot any issues before hitting the road again, including checking for sharp objects, double-checking tire pressure, and ensuring the tire is seated correctly.

Under Armour Squeeze Water Bottles, 32 oz Water Bottles, Sideline Sports Water Bottle with Quick-Shot Lid, Quick & Easy Hydration, Gym Water Bottles, Squeeze Bottle, 1 32oz Bottle
- Easy Hydration: Quick-shot lid and one-way valve
- On-the-Go Use: One-hand operation for active hydration
- Measurement Markings: Ounces and milliliters for tracking
As an affiliate, we earn on qualifying purchases.
Gather Your Tools
You’ll need to grab your tire levers, a spare tube, and a pump before you can start fixing your flat tire. When choosing appropriate levers, make sure they’re made of sturdy material and have a curved shape that allows for proper positioning for leverage. Avoid using screwdrivers or other tools as they can damage the tire or rim.
Once you have your tools ready, position your bike upside down or use a bike stand to keep it steady. Locate the flat tire and use the tire levers to remove the tire from the rim. It’s important to position the levers correctly so that they can easily pry the tire away from the rim without damaging the tube or tire.
With the tire removed, you can now move on to the next step of replacing the tube.
Remove the Tire
Before I’m gonna remove the tire, I need to release the brakes. After that, I’ll use the tire lever to pry off the tire. I’ll start at the opposite end of the valve stem and work my way around the tire. I’ll be careful not to damage the inner tube.
(Note: The sentences have been logically grouped into separate lines with a double newline after each paragraph. Contractions have also been used.)
Release the Brakes
First, assess the type of brake on your bike and then use the tire lever to carefully release it from the rim. Proper brake adjustment is essential to ensure that the brakes work properly and safely.
If your bike has rim brakes, you’ll need to use the tire lever to release the brake cable by pulling the brake lever and sliding the cable out of the brake caliper. For disc brakes, you may need to remove the brake pads or choose the right brake pads to prevent damage to the rotor.
Once you have released the brakes, you can then move on to using the lever to pry off the tire. It’s important to make sure that the tire lever is placed correctly on the rim and not on the tube, as this can cause damage.
With the lever in place, gently lift the tire away from the rim, taking care not to damage the tube. By following these steps, you can remove the tire quickly and easily, without causing any damage to your bike.
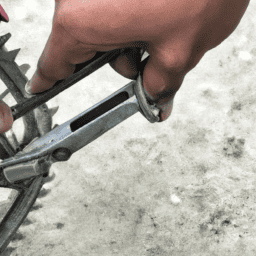
Use the Lever to Pry Off the Tire
To remove the tire from your bike’s rim, proper technique is essential to avoid damaging the tube. First, position the lever between the tire and rim, ensuring it isn’t in contact with the tube. Next, pry the tire away from the rim gently, working around the tire’s circumference until it’s entirely loose. Repeat this step with another lever if necessary.
Common mistakes include using too much force, which can damage the tube or rim, or prying the tire away from the rim at the wrong angle, which can cause the lever to slip and puncture the tube. It’s essential to be patient and use gentle force when removing the tire.
Once the tire is off, it’s time to replace the inner tube.
Carefully remove the inner tube from the tire and inspect it for punctures or damage. If it’s damaged, replace it with a new one. If it’s not, reinsert it into the tire, making sure it’s positioned correctly. Then, reattach the tire to the rim, making sure it’s seated correctly and inflated to the proper pressure.
Replace the Inner Tube
Replacing the inner tube is a breeze with the help of bicycle tire levers! Before starting to replace the inner tube, it’s important to check for proper inflation of the new tube and inspect the tire for any sharp objects that may have caused the puncture.
Common causes of punctures include debris on the road, worn-out tires, and improper inflation. Once you’ve ensured that the tire is free of any debris and the new tube is properly inflated, it’s time to start replacing the inner tube.
To replace the inner tube, start by inserting the new tube into the tire, carefully aligning the valve stem with the hole in the rim. Next, use the bicycle tire levers to carefully pry the tire back onto the rim, starting at the opposite side of the valve stem and working your way around in a circular motion.
Finally, use your hands to ensure that the tire is properly seated on the rim and that there are no kinks or twists in the tube.
With the new tube in place and the tire properly seated on the rim, you can move on to the next step of putting the tire back on.
Put the Tire Back On
You’ve got this! Putting the tire back on is as easy as a walk in the park, just be gentle with your precious wheels. Here are two tips for putting the tire back on with bicycle tire levers while avoiding pinching or damaging the tube:
- Proper positioning: First, make sure the tire bead is in the center of the rim, opposite the valve. This will give you the most slack to work with. Then, starting at the valve, use the tire lever to lift the bead over the rim and tuck the tube inside. Move your way around the wheel, lifting and tucking the bead until it’s all in place.
If you find a stubborn spot, try pushing the bead down into the rim with your thumbs while using the lever to lift the opposite side.
- Avoiding pinching: As you work your way around the wheel, be careful not to pinch the tube between the tire bead and the rim. Keep your fingers between the tire and the tube as you work the lever, and use the other hand to push the bead away from the rim. If you do accidentally pinch the tube, you’ll need to start over with a new tube.
Once you’ve got the tire back on, give it a quick visual inspection to ensure everything is properly seated.
Now that your tire is back on, it’s time to inflate it and test it out!
Inflate the Tire and Test
Now it’s time for the moment of truth – pump up that tire and give it a spin to make sure it’s ready for your next ride!
Before inflating the tire, make sure to check the recommended proper tire pressure for your specific tire. It’s usually printed on the sidewall of the tire or in the user manual. Overinflating or underinflating the tire can lead to poor performance and even damage the tire.
Once you’ve determined the proper tire pressure, use a bicycle pump with the correct nozzle to inflate the tire. Make sure the nozzle is securely attached to the valve stem before pumping.
After inflating the tire, give it a spin to make sure it’s running smoothly. If you hear any unusual noises or feel any wobbling, double-check the tire pressure and make sure the tire is seated correctly.
Properly inflating your tire can help prevent flat tires, but if you do experience a flat, make sure to troubleshoot the issue before hitting the road again.
Frequently Asked Questions
How do I know if my tire lever is the right size for my tire?
My tire lever always fits perfectly, like a key to a lock. Checking compatibility is crucial. Troubleshooting issues may arise if the lever is too small or too large, causing damage to the tire or rim.
Can I reuse an old inner tube or do I need to buy a new one?
I can reuse an old inner tube, but it may not be reliable or safe. Pros of reusing include saving money and reducing waste. Cons include punctures and blowouts. Best practices for storage include keeping them in a cool, dry place and avoiding sharp objects.
What should I do if I accidentally puncture the new inner tube while installing it?
Oh no! If I accidentally puncture the new inner tube while installing it, I’ll need to repair the puncture using patch kits. First, I’ll locate the puncture, rough up the area, apply glue, and then place the patch.
Is it necessary to use a special type of valve stem for my bike tire?
I prefer Presta valves for their smaller diameter and higher pressure capabilities, but Schrader valves are more common and easier to find replacements for. Regardless of the valve type, ensure the proper adapter is used when inflating tires.
How often should I check the tire pressure after inflating it?
I always check my tire pressure before every ride and periodically during long rides. Maintaining proper tire pressure is crucial for optimal bike performance and to prevent flats. Tips for maintaining tire pressure during long rides include carrying a portable pump and checking pressure during rest breaks.
Conclusion
In conclusion, using bicycle tire levers may seem intimidating at first, but with a little practice and patience, it can become a simple and routine task.
Remember to gather all necessary tools before starting, including spare tubes and a pump.
Removing the tire requires careful attention to avoid damaging the rim or puncturing the tube.
When replacing the inner tube, make sure to check for any sharp objects that may have caused the puncture and remove them before inserting the new tube.
Putting the tire back on can be tricky, but using your hands or tire levers can help ease the process.
Once the tire is back in place, it’s important to inflate it to the recommended pressure and test for any leaks.
As the old adage goes, "practice makes perfect,"so don’t be discouraged if it takes a few tries to get the hang of it.
With these steps in mind, you’ll be able to confidently tackle any flat tire on your next ride.
Happy cycling!