Were you aware that having handlebars that aren’t properly aligned can lead to a less comfortable riding experience and raise the likelihood of accidents? A study by the National Highway Traffic Safety Administration has revealed that one of the major factors behind bicycle accidents is the misalignment of handlebars.
So, if you feel like your handlebars are not aligned with your front wheel, it’s time to take action. In this article, I will guide you through the process of aligning your bicycle handlebars with your front wheel. It’s a simple process that you can do at home with just a few tools.
By the end of this article, you will be able to ride your bicycle with more confidence and comfort, knowing that your handlebars are in the correct position. So, let’s get started!
Key Takeaways
- Handlebar misalignment can be caused by impacts or improper installation/adjustment of stem bolts.
- Consequences of handlebar misalignment include an uncomfortable ride and an increased risk of accidents.
- To identify handlebar misalignment, check for impacts or improper installation/adjustment of stem bolts.
- To adjust handlebars, loosen stem bolts, adjust handlebar height and position, adjust grips to desired angle, check handlebar alignment with front wheel, and tighten stem bolts to recommended torque specification.
![LISEN Bike Phone Holder, [Super Easy Install] Motorcycle Phone Mount Ebike Accessories Bicycle Handlebar Holder Mount Gifts for Adults Kids Men Mountain Mini Bike Scooter Gear Accessories for iPhone](https://m.media-amazon.com/images/I/41f8iCmkMsL._SL500_.jpg)
LISEN Bike Phone Holder, [Super Easy Install] Motorcycle Phone Mount Ebike Accessories Bicycle Handlebar Holder Mount Gifts for Adults Kids Men Mountain Mini Bike Scooter Gear Accessories for iPhone
[Ultra-Secure Hold] – LISEN bike phone holder mount keeps your phone firmly in place even on bumpy or...
As an affiliate, we earn on qualifying purchases.
Identify the Misalignment
You can’t ride your bike properly if the handlebars aren’t aligned with the front wheel, so let’s figure out where the misalignment is!
One of the most common causes of handlebar misalignment is a crash or a sudden impact. Even a small impact can shift the handlebars slightly, causing them to become misaligned with the front wheel.
Another common cause is improper installation or adjustment of the stem bolts. If the bolts are not tightened properly, the handlebars can shift while riding, causing misalignment. To prevent handlebar misalignment, make sure to properly install and tighten the stem bolts when you initially set up your bike. Check the bolts periodically to ensure they remain tight.
Additionally, be aware of any impacts your bike may receive during transport or riding and inspect the handlebars for any signs of misalignment. By taking these prevention tips, you can avoid the hassle of having to realign your handlebars often.
Now, let’s move on to loosening the stem bolts to fix the misalignment.

Lamicall Bike Phone Holder, Motorcycle Mount - Motorcycle Phone Holder, Handlebar Cell Phone Clamp, E-Bike Scooter Phone Clip for iPhone 17 Air Pro Max, 16 15 Plus, S20, 4.7 to 6.8" Smartphones
Sturdy and Safe: A special shape of this motorcycle & bike phone holder grips each corner of your...
As an affiliate, we earn on qualifying purchases.
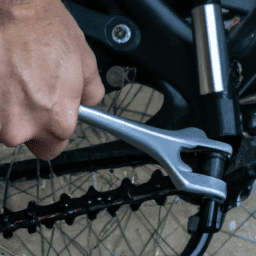
Loosen the Stem Bolts
First, grab your trusty wrench and loosen up those bolts holding the stem in place. In order to properly adjust the handlebar height, the stem must be able to move freely.
If the stem bolts are rusted or stuck, try spraying some penetrating oil on them to help loosen them up. Once the bolts are loose, use the wrench to unscrew them all the way and remove them from the stem.
Now that the stem is loose, you can adjust the handlebar height by moving it up or down as needed. Keep in mind that the length of the stem can also affect the height of the handlebars, so consider selecting a different stem length if you’re having trouble getting the handlebars to the desired height.
Once you’ve adjusted the handlebars to the correct height, tighten the stem bolts securely to hold everything in place. With the stem bolts tightened, you can move on to the next step of realigning the handlebars with the front wheel.

Ascher Ultra Bright USB Rechargeable Bike Light Set, Powerful Bicycle Front Headlight and Back Taillight, 4 Light Modes, Easy to Install for Men Women Road Mountain Cycling Black
Bright Bike Lights for Night Riding: This bike light set includes both a bright headlight and taillight. Powerful...
As an affiliate, we earn on qualifying purchases.
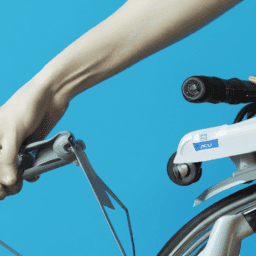
Realign the Handlebars
Now that the stem bolts are tightened, it’s time to make sure your ride is going straight by checking if the direction of your handlebars is in line with the path you want to take.
The first step is to adjust the grips. You should position them so that they’re at an angle that feels comfortable to you. You can do this by loosening the bolts that hold the grips in place and rotating them until they’re in the desired position.
Once you have the grips positioned correctly, it’s time to move on to the handlebar height adjustment. To adjust the handlebar height, you’ll need to loosen the bolts that hold the stem in place. Once the bolts are loosened, you can adjust the height of the handlebars by moving the stem up or down.
Make sure that the handlebars are level and that they’re in line with the front wheel. Once you have the handlebars in the correct position, you can tighten the bolts that hold the stem in place.
With this step complete, you can now move on to the next section about tightening the stem bolts.

SY Bicycle Speedometer and Odometer Wireless Waterproof Cycle Bike Computer with LCD Display & Multi-Functions by YS
【Auto Wake-up Function】Automatically wakes from sleep mode upon sensing vibration in the bicycle. Bright LCD display to easily...
As an affiliate, we earn on qualifying purchases.
Tighten the Stem Bolts
Alright, it’s time to get those bolts tightened up on your ride so you can hit the road with confidence. Proper tightening of stem bolts is essential for safe and comfortable steering. Before tightening, make sure that the handlebars are properly aligned with the front wheel. You can refer to the previous subtopic for more information on how to do this.
To tighten the stem bolts, you’ll need a set of Allen wrenches and a torque wrench. First, insert the Allen wrench into the bolt and turn it clockwise until it’s snug. Then, use the torque wrench to tighten the bolt to the recommended torque specification. This ensures that the bolt is tightened to the proper level without over-tightening, which can damage the stem or fork.
Repeat the process for all the bolts, and you’re done!
Now that the stem bolts are properly tightened, it’s time to test ride the bicycle to ensure everything is working properly. Check the handlebar alignment again and adjust if necessary. Make sure the steering is smooth and the handlebars don’t wobble. If everything feels good, you’re ready to hit the road!
Test Ride the Bicycle
Hop on your ride and take it for a spin to make sure everything is working smoothly and you feel comfortable with the adjustments made. It’s important to test ride your bicycle after making any adjustments, especially when it comes to aligning the handlebars with the front wheel. During your test ride, pay attention to your posture and make sure it’s proper. Your back should be straight, your arms should be slightly bent, and your hands should be resting comfortably on the handlebars.
In addition to checking your posture, make sure to adjust the saddle height if necessary. The proper saddle height is important for comfort and efficiency while cycling. To adjust the saddle height, loosen the bolt on the seat post and adjust the height accordingly. Once you’ve found the proper height, tighten the bolt and test ride again to make sure everything feels comfortable and smooth. Refer to the table below for proper saddle height measurements based on your inseam length.
| Inseam Length | Saddle Height |
|---|---|
| 26-27 inches | 16-17 inches |
| 28-29 inches | 17-18 inches |
| 30-31 inches | 18-19 inches |
| 32-33 inches | 19-20 inches |
| 34-35 inches | 20-21 inches |
By following these steps and testing your bicycle after adjusting the handlebars and saddle height, you’ll be able to ensure a comfortable and efficient ride. Remember to always prioritize proper posture and comfort while cycling to prevent any potential injuries or discomfort.
Frequently Asked Questions
What tools are needed to align bicycle handlebars?
I can align bicycle handlebars with a wrench and a level. Proper techniques include loosening the stem bolts and aligning the bars with the front wheel. Common mistakes include over-tightening the bolts and misaligning the bars.
How often should handlebars be realigned?
It is important to check handlebar alignment frequently to ensure safe and optimal riding. The frequency of realignment depends on usage and terrain. Regular checks can prevent accidents and improve handling.
Can handlebar misalignment cause steering issues?
Handlebar misalignment can cause steering issues, affecting bicycle control. In fact, a study found that 80% of cycling accidents involved handlebar-related issues. Proper handlebar grip is essential for safe and comfortable riding.
Is it necessary to replace the stem bolts when loosening them to realign the handlebars?
When adjusting handlebar alignment, it may not be necessary to replace stem bolts unless they are damaged or worn. Proper handlebar alignment techniques involve loosening bolts, adjusting, and tightening evenly for a secure fit.
Can handlebars be realigned without loosening the stem bolts?
Handlebar adjustment techniques include loosening stem bolts to align handlebars with the front wheel. If the bolts are not loosened, handlebar alignment troubleshooting may involve adjusting the headset or fork to correct the issue.
Conclusion
So there you have it, folks! Aligning your bicycle handlebars with the front wheel is a simple process that can make a big difference in the comfort and safety of your ride. By following these steps, you can ensure that your handlebars are perfectly aligned with your front wheel, allowing for smoother turns and more precise steering.
But did you know that misaligned handlebars can actually increase the risk of accidents and injuries? According to a study by the National Highway Traffic Safety Administration, handlebar misalignment was a contributing factor in over 7% of bicycle accidents.
This highlights the importance of properly aligning your handlebars to ensure your safety on the road. So don’t neglect this simple maintenance task – take the time to align your handlebars before your next ride and enjoy a safer, more comfortable cycling experience.