Have you ever had difficulty changing gears while biking? Perhaps you’re laboring to climb hills in a gear that’s too high, or finding it hard to keep up your speed on a level road.
The good news is that adjusting your gears is a task that any cyclist can learn, with a little bit of practice and patience. But why bother in the first place?
Well, having properly adjusted gears can make a huge difference in your cycling experience. It can help you ride more efficiently, reduce the risk of mechanical issues, and make your ride more enjoyable overall.
So, whether you’re a seasoned cyclist or just starting out, it’s worth taking the time to learn how to adjust your gears. In this article, we’ll walk you through the process step-by-step, from understanding the different types of gears to fine-tuning your shifting.
Key Takeaways
- Understanding the different types of gears and their effects on pedaling difficulty is essential for a smooth cycling experience.
- Choosing the right gear combinations for tackling different terrains can make the ride more efficient and comfortable.
- Common gear problems can be troubleshooted with fine-tuning shifting using cable tension, limit screws, and barrel adjusters.
- Regular maintenance of gears with cleaning and lubrication, and understanding gear ratios and combinations, is crucial for optimal performance.

Schwinn Sporterra RX Gravel Bike, 700c Mens and Womens Bike, 14-Speed Drop Bar Gravel Bicycle, Mechanical Disc Brakes, Rigid Fork, Aerodynamic Riding Position, Quick Release Seat Post, Adult Bicycle
GRAVEL BICYCLE: Enjoy next level riding with the Sporterra RX by Schwinn. With 700c wheels, this mens and...
As an affiliate, we earn on qualifying purchases.
Understanding the Different Types of Gears
You’re going to love cruising through different terrains once you understand the different types of gears on your bike. Gear ratios and gear combinations determine how easy or hard it is to pedal a bike.
The gear ratio is the number of teeth on the front chainring divided by the number of teeth on the rear cog. The higher the ratio, the harder it is to pedal, but the faster you can go. The lower the ratio, the easier it is to pedal, but the slower you can go.
Different gear combinations can help you tackle different terrains. For example, if you’re climbing a steep hill, you’ll want to shift to a lower gear combination to make pedaling easier. On the other hand, if you’re cruising on a flat road, you’ll want to shift to a higher gear combination to go faster with less effort.
Now that you understand the different types of gears, let’s move on to identifying common gear problems.

Mongoose Men's Elroy Adventure Bike 700C Wheel Bicycle, Blue, 54cm frame size
Versatile adventure touring bike features capable adventure bike geometry, a sleek alloy frame and steel fork for the...
As an affiliate, we earn on qualifying purchases.
Identifying Common Gear Problems
When riding, it’s frustrating to experience frequent chain slips, which occur in approximately 30% of gear problems. This problem is often caused by a worn cassette or chainring, or a loose or damaged derailleur.
To troubleshoot this issue, start by inspecting the chain for wear and tension. If the chain is stretched or loose, it may need to be replaced or tightened. Additionally, check the cassette and chainring for wear and replace if necessary. Finally, ensure that the derailleur is properly aligned and tightened.
Another common gear problem is slow or unresponsive shifting. This issue can be caused by cable tension that is too loose or tight, worn shift cables, or a poorly adjusted derailleur.
To fix this problem, start by adjusting the cable tension using the barrel adjuster on the derailleur. If this doesn’t work, check the shift cables for wear and replace if necessary. Finally, ensure that the derailleur is properly adjusted by following gear maintenance techniques.
With these troubleshooting tips, you can identify and fix common gear problems before fine-tuning your shifting.

PEXMOR Foldable Bike Cargo Trailer with Universal Bike Hitch, Bicycle Wagon Trailer with 16" Wheels & Reflectors, Large Loading Bike Trailer Storage Cart
【FOLDABLE & EASY TO INSTALL】- Comes with detailed instructions for easy installation and foldable design makes it easy...
As an affiliate, we earn on qualifying purchases.
Fine-Tuning Your Shifting
Now that you’ve identified common gear problems, it’s time to fine-tune your shifting. Adjust cable tension carefully to ensure smooth shifting. Limit screws must be set properly to prevent the chain from falling off or shifting too far. Barrel adjusters can be used to fine-tune shifting on the fly.
To adjust cable tension, use the barrel adjuster to fine-tune. If the chain is slow to shift to a smaller cog, tighten the cable by turning the barrel adjuster counterclockwise. If the chain is slow to shift to a larger cog, loosen the cable by turning the barrel adjuster clockwise.
To adjust the limit screws, shift the chain to the smallest cog in the rear and the largest chainring in the front. Use the limit screws to adjust the derailleur until it sits directly under the cog. Then, shift the chain to the largest cog in the rear and the smallest chainring in the front. Again, use the limit screws to adjust the derailleur until it sits directly under the cog.
Finally, use the barrel adjuster to fine-tune shifting on the fly. If the chain is slow to shift, turn the barrel adjuster counterclockwise. If the chain is shifting too quickly, turn the barrel adjuster clockwise.
Cable Tension
To get the perfect gear adjustment, simply tighten or loosen the cable tension. However, before doing so, make sure that the cables are in good condition. Proper lubrication and regular maintenance will prevent cable wear, which can lead to inaccurate shifting.
To adjust cable tension, first shift into the highest gear on the rear derailleur and the smallest chainring on the front derailleur. Then, loosen the bolt holding the cable in place and adjust the tension by turning the barrel adjuster. Tighten the bolt once the cable is taut and test the shifting. If the gears don’t shift smoothly, adjust the tension until they do.
Once cable tension is properly set, move on to adjusting the limit screws for perfect gear alignment.
Limit Screws
Proper alignment of the gears is essential for a smooth and efficient ride, and limit screws play a crucial role in achieving this. Adjusting derailleur limit screws can be a bit daunting, but it’s a necessary skill for any cyclist.
These screws control the movement range of the derailleur, which in turn dictates the position of the chain on the gears. If the limit screws aren’t properly adjusted, it could result in shifting issues or the chain slipping off the gears altogether.
To adjust the limit screws, start by shifting the chain to the smallest gear in the front and the largest gear in the back. Then, locate the two limit screws on the derailleur. The one marked ‘H’ controls the high gear (the smallest cog), and the one marked ‘L’ controls the low gear (the largest cog). Use a screwdriver to turn the screws clockwise or counterclockwise until the derailleur is aligned with the corresponding gear.
If you’re still having trouble with shifting issues after adjusting the limit screws, it’s time to move on to the next step: barrel adjusters.
Now that you have a basic understanding of how to adjust the derailleur limit screws, it’s time to move on to the next step in troubleshooting shifting issues: barrel adjusters. These small knobs are located where the derailleur cable enters the derailleur and are used to fine-tune the cable tension.
In the next section, we’ll discuss how to adjust the barrel adjusters to ensure smooth and precise shifting.
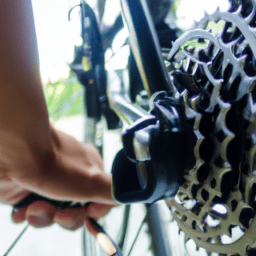
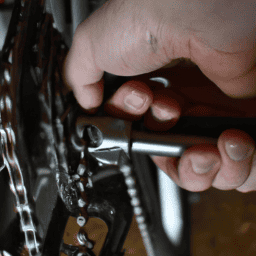
Barrel Adjusters
Located at the point where the derailleur cable enters, the small knobs known as barrel adjusters help to fine-tune the cable tension for a smooth and precise ride. The barrel adjuster function is to increase or decrease the tension on the derailleur cable, which in turn adjusts the position of the derailleur to change gears.
Turning the barrel adjuster clockwise increases the tension on the cable, while turning it counterclockwise decreases the tension. If you’re experiencing issues with shifting, the first step should be to troubleshoot the barrel adjusters. Check to make sure the barrel adjusters are turned clockwise for proper tension.
If shifting is slow or sluggish, turning the barrel adjuster counterclockwise can help. On the other hand, if the chain is jumping between gears, try turning the barrel adjuster clockwise to increase tension. Remember to make small adjustments and test ride after each one.
Maintaining your gears is crucial for a smooth and safe ride. One way to do so is by regularly cleaning and lubricating the chain.

VEVOR Bike Cargo Trailer, 275 lbs Load Capacity, Foldable Compact Storage & Quick Release with Universal Hitch, 20" Wheels, Fits Most Bike Wheels, Carbon Steel Frame, Heavy-Duty Bicycle Wagon Cart
Professional Tire Design: Our bike trailer comes equipped with sporty 20" tires and iron hubs, providing excellent stability...
As an affiliate, we earn on qualifying purchases.
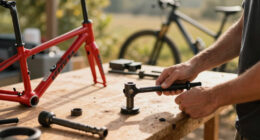
Maintaining Your Gears
When maintaining your gears, it is important to regularly clean and lubricate them to prevent wear and tear. Gear cleaning involves removing any dirt, grime, or debris that may be stuck in the gears. This can be done using a soft brush or cloth, and a mild detergent or bike-specific cleaner. Be sure to avoid using harsh chemicals or high-pressure water, as this can damage the gears.
Once the gears are clean, it is important to lubricate them properly. Lubrication techniques can vary depending on the type of gears and the conditions in which they are used. A good rule of thumb is to apply lubricant to the chain and gears, allowing it to penetrate the small crevices and spaces between the teeth. Too much lubricant can cause dirt and debris to stick to the gears, so be sure to wipe off any excess. The following table provides a brief overview of some common lubricants and their recommended use:
| Lubricant | Recommended Use |
|---|---|
| Wet Lubricant | For wet or muddy conditions |
| Dry Lubricant | For dry or dusty conditions |
| Ceramic Lubricant | For high-performance racing or long-distance riding |
Maintaining your gears requires practice and patience. It may take some time to find the right cleaning and lubrication techniques that work best for your bike and riding style. By staying consistent with your maintenance routine, you can ensure that your gears will continue to function properly and deliver a smooth, efficient ride.
Practice and Patience
Now that you know how to maintain your gears, it’s time to practice and be patient in adjusting them. Adjusting gears can be challenging, but with practice, you can improve your control and muscle memory.
Start by adjusting one gear at a time. Use the barrel adjuster to make small adjustments. Turn it clockwise to move the derailleur towards the larger cog and counterclockwise to move it towards the smaller cog. Shift through all the gears to make sure they are shifting smoothly. If you notice any problems, make small adjustments until the gears are shifting smoothly.
It’s important to be patient when adjusting gears. Don’t make big adjustments or try to rush the process. Take your time and make small adjustments until the gears are shifting smoothly. With practice, you’ll become more comfortable with adjusting your gears and you’ll be able to do it quickly and easily.
Keep practicing and soon you’ll be able to adjust your gears without even thinking about it.
Frequently Asked Questions
How often should I replace my bike’s gears?
To maximize gear longevity, replace worn parts as soon as you notice decreased performance or hear grinding or clicking noises. Regular maintenance, such as cleaning and lubrication, can also help prevent excessive wear and tear.
Can I mix and match different types of gears on my bike?
Oh sure, why not? Just throw on whatever gears you want. Compatibility concerns? Pfft, who needs ’em? But seriously, matching gears can improve performance and prevent mechanical issues.
Is there a way to make my bike’s gears shift more smoothly?
To make your bike’s gears shift more smoothly, try lubricating the gears with a high-quality bike lubricant. You can also adjust the derailleur tension by using a technique called barrel adjustment, which fine-tunes the cable tension. Follow these steps for a more efficient ride.
How do I know if my bike’s chain needs to be replaced?
You can check if your bike’s chain needs to be replaced by using chain wear indicators. If the chain stretches beyond 0.75%, it’s time to replace it. Proper lubrication techniques can also extend its lifespan.
What are some common mistakes to avoid when adjusting gears on a bike?
To achieve better gear adjustment, ensure proper lubrication and cable tension. Avoid common mistakes such as neglecting to check for worn cables and misalignment. Learn how to troubleshoot gear issues while on a bike ride for a smoother ride.
Conclusion
Congratulations! You’ve successfully learned how to adjust the gears on your bicycle. By understanding the different types of gears and how they work, you’ve taken the first step towards becoming a master bike mechanic.
Identifying common gear problems and fine-tuning your shifting skills will help you achieve a smooth and efficient ride every time. Remember to maintain your gears regularly to prevent wear and tear. Keep your chain clean and lubricated, and check for any signs of damage or misalignment.
With practice and patience, you’ll be able to adjust your gears like a pro in no time. So go ahead and take your bike for a spin, revel in the smooth shifting, and enjoy the thrill of the ride. You’ve earned it!
And if you encounter any problems along the way, don’t worry. You now have the knowledge and skills to tackle any gear-related issue that comes your way. Keep on pedaling with confidence and joy, and may your gears always run like a well-oiled machine.