If you’ve ever experienced difficulties changing gears on your bike, you understand the level of frustration it can cause. No matter if you’re smoothly riding on a flat surface or climbing a challenging incline, having gears that are correctly adjusted is crucial for a positive biking experience.
Having properly adjusted gears is not only important for a smooth and enjoyable ride, but it can also prevent damage to your bike’s components. When your gears are misaligned, the chain can rub against the derailleur, causing unnecessary wear and tear.
Additionally, a poorly adjusted chain can slip or skip, which can be dangerous if you’re riding at high speeds or on uneven terrain. By taking the time to learn how to adjust your gears, you’ll not only improve your cycling experience but also extend the life of your bike.
Key Takeaways
- Properly adjusted gears lead to a smoother and safer ride, while preventing wear and tear.
- Common gear issues include noisy drivetrains, difficulty shifting, gear slipping, skipping gears, and chain slippage.
- Troubleshooting techniques involve checking cables and housing for wear or damage, adjusting limit screws, and ensuring derailleur hanger is straight.
- To maintain proper gear adjustment, regularly inspect derailleur hanger alignment and limit screw adjustment, and seek professional help if unsure how to fix gear issues.
RegalRider Hybrid Bike, 700C Men's Bike, 7-Speed Commuter Bicycle, Low Step-Through Frame, Adjustable Seat & Handlebar, Reflectors, 90% Pre-Assembled
Ride in Easiness - Hybrid bike for adults features lightweight 700C aluminum double-wall rims paired with high-grip tires....
As an affiliate, we earn on qualifying purchases.
Why Proper Gear Adjustment is Important
Proper gear adjustment is crucial for a smooth and efficient ride, so don’t skip this step! The importance of adjusting your bike gears cannot be overstated.
When your gears are not properly adjusted, you’ll experience a variety of issues such as difficulty shifting, chain slipping, and unnecessary wear and tear on your bike’s components. By taking the time to adjust your gears correctly, you can avoid these problems and enjoy a more comfortable and efficient ride.
The benefits of adjusting your bike gears go beyond just the ride itself. Proper gear adjustment can also extend the life of your bike’s drivetrain components, saving you money in repairs and replacements. It can also improve your overall cycling experience by allowing you to tackle hills and difficult terrain with ease.
So, take the time to learn how to adjust your bike gears correctly, and you’ll be rewarded with a smoother, more efficient ride. Now, let’s move on to identifying when your gears need adjustment.

WEIZE Beach Cruiser Bike, 26 inch Commuter Bicycle for Adult Men and Women,High-Carbon Steel/Front & Rear Fenders, Comfortable City Bikes with Rear Rack&Basket, Ergonomic Upright Design,White
【Classic & High-Carbon Steel】: The combination of three-spray and four-bake process with excellent welding technology makes it a...
As an affiliate, we earn on qualifying purchases.
Identifying When Your Gears Need Adjustment
If you don’t keep an eye on your gear shifting, you could end up with a less efficient ride, leading to frustration and wasted time.
Common issues that indicate your gears need adjustment are a noisy drivetrain, difficulty shifting gears, or gears that frequently slip.
Troubleshooting techniques include checking the cables and housing for wear or damage, ensuring the limit screws are properly adjusted, and making sure the derailleur hanger is straight. It’s important to address these issues promptly to prevent further damage to your bike.
If you’re unsure how to make the necessary adjustments, it’s best to take your bike to a professional mechanic.
In the next section, we’ll discuss the tools you’ll need to get started on adjusting your gears.

TST Electric Bike for Adults, 1500W Peak Motor 60 Miles Fat Tire E Bike 48V 15Ah Removable Battery 20" Electric Bike with Full Suspension SGS UL 2849 Certification Black
【Excellent Motor Performance】This electric bike is equipped with a high-performance 750W motor(1500W peak power) with 2 to 3...
As an affiliate, we earn on qualifying purchases.
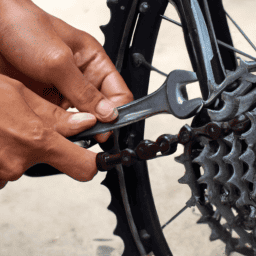
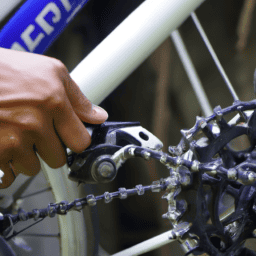
Tools You’ll Need
Get ready to tackle gear adjustments with the tools you’ll need to make your ride smoother and more efficient. Bicycle maintenance is crucial to ensuring that your gears are working properly. Here are the tools you’ll need to get started:
- Allen wrenches: These are essential for adjusting the derailleur and brake cables.
- Screwdrivers: You’ll need both flathead and Phillips head screwdrivers to adjust the limit screws on the derailleur.
- Chain lubricant: A lubricated chain will shift more smoothly.
- Rag: Use a clean rag to wipe down the chain and derailleur before and after making adjustments.
Common gear problems include skipping gears, difficulty shifting, and chain slippage. With the right tools, you can easily adjust your gears to fix these issues.
Now that you have the tools, let’s move on to the step-by-step guide to adjusting your gears.

sixthreezero Around The Block Men's Beach Cruiser Bike, Single Speed Step-Through Touring Hybrid Bicycle with Rear Rack, 26 Inch Wheels, Matte Black
HYBRID BIKE FOR MEN: Versatile men’s hybrid bicycle with a 19-inch steel frame, designed for leisure riding, commuting,...
As an affiliate, we earn on qualifying purchases.
Step-by-Step Guide to Adjusting Your Gears
Now it’s time to gear up and smoothly ride towards a hassle-free cycling experience with this easy step-by-step guide on how to adjust your bicycle gears.
First, shift your bike to the smallest chainring in the front and the largest cassette in the rear. This will ensure that the cable tension is at its lowest, making it easier to work with.
Next, loosen the cable anchor bolt on the derailleur and pull the cable taut with a pair of pliers. Tighten the cable anchor bolt back up and shift through all the gears to ensure that the cable is properly tensioned.
One common mistake when adjusting bicycle gears is not properly adjusting the cable tension. If the cable is too loose, your bike won’t shift into the smaller chainring or larger cassette. If the cable is too tight, your bike won’t shift into the larger chainring or smaller cassette.
Troubleshooting techniques include checking the derailleur hanger alignment and making sure the derailleur limit screws are properly adjusted.
Now that your gears are properly adjusted, let’s move on to tips for maintaining proper gear adjustment.
Tips for Maintaining Proper Gear Adjustment
To maintain optimal gear performance, you should regularly inspect the alignment of your derailleur hanger and ensure that the limit screws are properly adjusted. Your derailleur hanger is the small piece of metal that connects your derailleur to the frame of your bike. Over time, it can become bent or misaligned, which can cause improper shifting. To check the alignment of your derailleur hanger, you can use a derailleur alignment tool. This tool will help you determine if your hanger is straight or if it needs to be adjusted.
In addition to checking your derailleur hanger, it is also important to make sure that your limit screws are properly adjusted. These screws determine the range of motion for your derailleur and can affect shifting performance if they are not set correctly. To ensure that your limit screws are properly adjusted, refer to the manufacturer’s instructions or seek the help of a professional bike mechanic. Common mistakes when adjusting gears include improper alignment of the derailleur hanger, incorrect limit screw adjustment, and a worn or damaged chain. Troubleshooting these issues can be difficult, so it is important to seek the help of a professional if you are unsure about how to fix them.
Frequently Asked Questions
What causes bicycle gears to become misaligned or need adjustment?
If you notice your gears slipping or jumping, it may be due to a bent derailleur or worn cables. These issues can cause misalignment and the need for adjustment. Keep your bike well-maintained to avoid these problems.
How often should I check and adjust my bicycle gears?
To ensure proper functionality, check and adjust your bicycle gears every few weeks. Signs of wear and tear include slipping, grinding, and jumping. Lubrication is crucial for smooth gear changes and increased longevity.
What are some common mistakes people make when adjusting their gears?
When adjusting gears, common mistakes include lack of lubrication and ignoring signs of worn chain links. These can cause poor shifting and premature wear. Regular maintenance is crucial for optimal performance.
Can I adjust my gears without any specialized tools?
Yes, you can adjust your gears without specialized tools by using gear adjustment techniques such as DIY gear tuning. However, it is important to follow proper procedures to avoid damaging your bike or causing injury.
How do I know if my derailleur hanger needs to be replaced?
Hey there, if you’re noticing your shifting is off, it could be a sign of wear on your derailleur hanger. Look for scratches or bending. Replacement options include DIY or professional repairs.
Conclusion
Congratulations! You’ve successfully adjusted your bicycle gears. By following the step-by-step guide and using the necessary tools, you’ve ensured that your bike is running smoothly and efficiently.
But why is proper gear adjustment so important? On the one hand, a well-adjusted gear system allows for a more comfortable and enjoyable ride. You’ll be able to shift gears effortlessly, without any grinding or skipping. This means you’ll be able to tackle hills and rough terrain with ease, and enjoy the wind in your hair as you cruise down the road.
On the other hand, a poorly adjusted gear system can lead to frustration and discomfort. You may find yourself struggling to shift gears, or experiencing unexpected chain slips and drops. This not only makes for an unpleasant ride, but can also put you at risk of injury.
So, by taking the time to adjust your bike gears properly, you’re not just ensuring a smoother ride – you’re also investing in your own safety and well-being. Remember to keep an eye out for signs that your gears need adjusting, and to perform regular maintenance to keep your bike running at its best.
With these tips in mind, you’ll be able to enjoy your rides to the fullest, whether you’re cruising through the city or exploring off-road trails. Happy cycling!