
Should you be curious about how to remove a bike chain without the aid of a tool, then you’ve landed in the perfect spot. This piece will provide you with several techniques for detaching a chain sans tool. Applying lubricant to the chain can facilitate the removal process, allowing you to twist off the chain without needing any tools. Indeed, lubricant can serve as a substitute for tweezers in this scenario.
Park Tool removes bike chain without tool
If you are looking for a tool that will remove bike chains, you may want to check out the Park Tool. This chain removal tool comes in adjustable and fixed configurations. First, you need to locate the old chain. Since the new chain links will look similar to the old ones, it’s important to know what to look for. You can do this by looking for the outer edge of the link. Once you have the outer edge of the chain link, you can start to remove the chain.
Depending on how badly the chain has been damaged, you can either bend it, or remove it entirely. The Park Tool Master Chain Tool is ideal for this task. If you don’t have the Park Tool or have the time to get one, you can also use a multi-tool. These tools usually come with a chain breaker attachment.
Purchasing a chain tool is essential if you ride a bike frequently or have the need to repair it frequently. A high-quality chain tool will allow you to reconnect your chain in a few seconds and won’t damage it. This is a must-have tool for any bike mechanic, or even for occasional bike owners. However, be sure to test the chain before putting it back on the bike.
To change a bike chain, you must first loosen the pins on the chain. You may be able to find these pins with a chain tool. If you don’t have the Park Tool, you can use a chain wrench or any other tool for the job. Make sure to use the correct tool for the right chain model. Be careful not to bend any links or pins. If you have an old chain, you should replace it immediately. In addition, you should avoid riding in gears that put more stress on the chain. Remember, a chain that has been twisted and broken is a chain that needs to be replaced.
The Park Tool CT-3.2 Chain Tool is a lightweight chain tool with a fixed cradle. It fits all speed chains. The cradle helps keep the chain in place while aligning the pins. This tool weighs only 273g and feels well-built. However, it does not have a comfortable handle or stiff-link cradle.
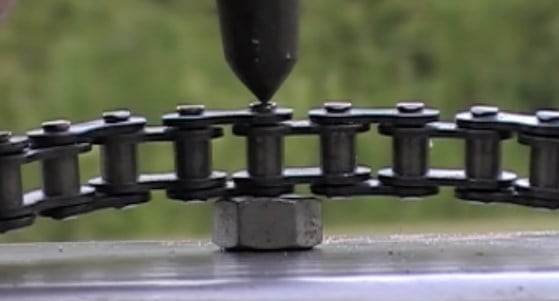
Putting rivet back by hammering
There are a few things that you need to know before you can put a rivet back on a bike chain. First, make sure the chain is not bent, otherwise you will have trouble putting the rivet back on. Second, make sure that the rivet is seated in a solid steel surface, not concrete. This way, the rivet will retain its restitution properties. Third, be sure to use the right tools to insert the rivet. For example, if the chain is made of steel, you can use a steel hammer.
A chain tool is necessary when putting a rivet back on a bike chain. It can also help you if you’re trying to fix a faulty link. With a tool, you can remove the broken links from the chain. Afterward, you need to push the rivet out until it fits snugly into the inner link and is flush with the other rivets on the chain.
If you don’t have a tool, you can use a nail or two small blocks of wood as a work stand. Next, you’ll need to thread the chain through the front and rear derailleurs. The master link will then need to click into place. To do this, use pedal pressure or a hammer.
Once you’ve found the right rivet, it’s time to attach the rest of the chain. You can buy a chain tool at a bike shop. However, you should also consider the length of the chain that you have. This way, you’ll be able to match the outer and inner plates. After that, you can add the last two rivets that are missing. So, the chain should be a reasonable length.
If you don’t have a chain tool, you can use a nail punch instead. This will remove the rivet without damaging the link, but it will decrease the strength of the rivet. Also, the chain won’t be able to shift to the biggest cogs on the cassette, which can damage the chain. Fortunately, there are many brands of master links, and you can find a replacement one easily. You should always carry a spare master link in your riding gear so that you can fix a broken chain.
In some cases, you can hammer a chain rivet back into place. However, this is not always possible, and you may need to install a new chain. If you do this, you should take the time to measure the length of the chain before hammering the rivet back into place. You should remember that you do not want to cut off the chain, as it will cause the chain to deform and possibly be prone to wickeding. Secondly, you should know that connecting chain links can be difficult, and you should have a bike tool on hand.
Using a chain tool
If you’ve ever struggled to remove a bike chain, using a chain tool can make the process much easier. Simply insert the tool into the link and apply enough pressure to pull the chain off. The chain tool will help you remove the chain without losing any of the screws that are inside the link.
The tool has a handle that fits over the broken link. When using it, make sure that the handle is flush with the plate on the link. When you’re finished, you should be able to push the pin out, but it is critical that the pin isn’t fully out.
A chain tool is an essential part of bike repair. It is a simple device with two prongs that fit snugly around a chain link. A standard chain without a master link should fit into the tool easily. When removing a chain that has a master link, be sure to move the bike’s axle forward so that the master link can be pushed out.
Another important part of a chain tool is the ability to adjust to a variety of chain widths. Some tools are self-adjusting, while others have a sliding chain shelf that accommodates several chains. Some tools even have a threaded backing plate so that you can manually set the stop.
Once you’ve unlocked the drive pin with a wrench or a chain tool, you’ll be able to remove the chain. Next, remove the retainer that is attached to the chain. Once the retainer is off, the chain should be free. While the process might seem complicated, it’s essential for safe bike repair.