TL;DR
Moving your rig into a closet can drastically cut noise and reflections, but proper placement and ventilation are key. Acoustic treatment improves sound quality, while sealing gaps prevents leaks, making small spaces workable for voice-over or recording.
Ever wonder why some closet recordings sound surprisingly clear, while others are a muffled mess? The secret isn’t just in the foam panels—it’s about where you put your microphone, what surfaces you treat, and how you handle noise leaks. The biggest win for your sound might be simply moving your rig into a closet, away from your workspace.
This article shows you how to turn a cramped closet into a practical, quiet studio space. You’ll learn why dampening isn’t just about foam, how placement makes or breaks your sound, and why ventilation is the real challenge in a sealed space. Get ready to make your closet work smarter, not harder.
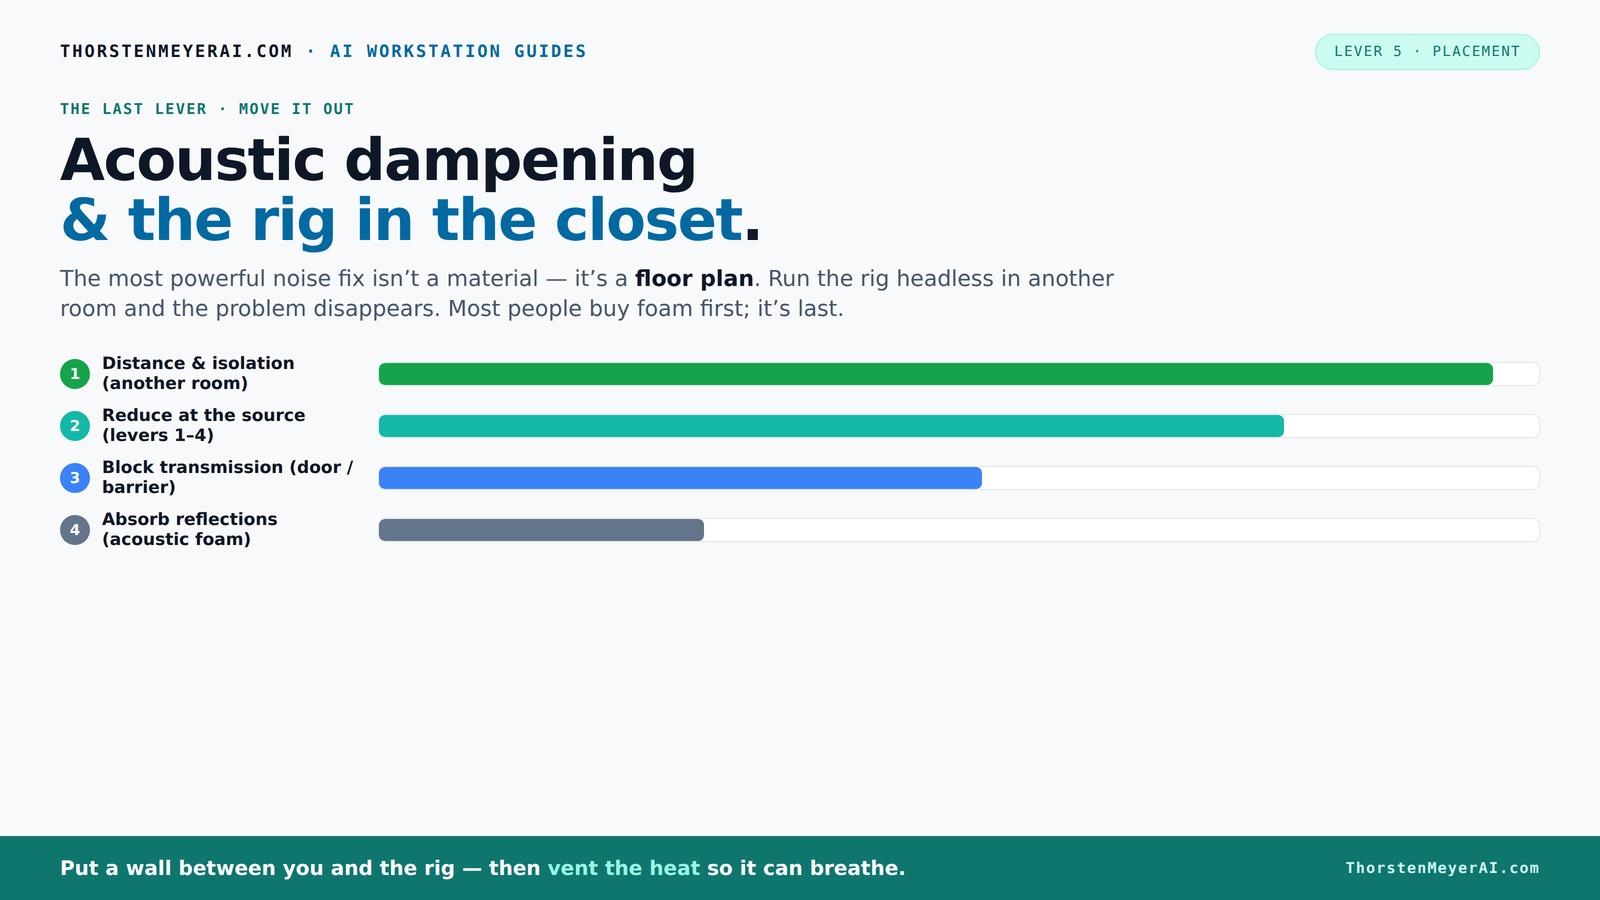
Acoustic dampening
& the rig in the closet.
The most powerful noise fix isn’t a material — it’s a floor plan. A rig you can’t hear because it’s in another room beats any amount of foam. Tap the approaches in Part 1 to see what actually works.
(another room)
(levers 1–4)
(door / barrier)
(acoustic foam)
Contain the noise, not the heat
Key Takeaways
- Focus on reflection control—place treatment at reflection points and behind the mic for clearer sound.
- Moving your rig into a different room is the most effective way to silence noise, often more so than foam.
- Ventilation is essential—sealed closets trap heat, risking overheating and fan noise.
- Seal gaps around doors and vents to prevent sound leaks, using weatherstripping and acoustic sealant.
- DIY materials like blankets, curtains, and rugs can dramatically improve sound quality on a budget.

Focusound 52 Pack Acoustic Foam Panels 1" x 12" x 12" Sound Proof Foam Panles Soundproofing Noise Cancelling Wedge Panels for Home Office Recoding Studio with 300PCS Double-Side Adhesive
- Soundproofing Design: Triangular grooves for noise absorption
- Includes Adhesive Tape: 300pcs double-sided adhesive for easy installation
- Easy Shape Recovery: Reforms shape after soaking in water
As an affiliate, we earn on qualifying purchases.
As an affiliate, we earn on qualifying purchases.
Why Acoustic Treatment Is About Reflection, Not Just Noise
Acoustic dampening in a closet is less about blocking outside noise and more about controlling how sound bounces inside. When sound waves hit hard surfaces, they reflect and create echoes that muddle your recordings. Thick, soft materials like blankets or foam absorb these reflections, preventing them from bouncing back into the microphone. This not only clarifies your voice but also reduces the 'echo chamber' effect that small, reflective spaces tend to produce.
Understanding this distinction is crucial because many assume foam alone makes a space soundproof. In reality, foam absorbs reverberations but doesn’t stop external noise from entering or leaving. If you want to prevent sound leaks, you need to combine absorption with sealing techniques. The key is strategic placement: treating reflection points—like the wall behind your mic or the ceiling—can dramatically improve clarity without heavy construction.
This approach emphasizes that proper acoustic treatment is about managing internal sound behavior, which in small spaces can be more impactful than trying to block all external noise. It’s a tradeoff: focus on reflection control first, then consider additional measures if external noise intrusion is significant.
Placement Tricks That Make Your Closet Sound Better Instantly
Where you position your microphone and sound sources directly influences how much unwanted reflection and echo you pick up. Proper placement reduces the chance of capturing reflected sound waves that cause a boxy or hollow tone. Facing the mic away from reflective surfaces prevents sound from bouncing directly into the capsule, which can cause comb-filtering effects or muddiness.
Placing the mic at an angle—rather than directly facing a wall—breaks up the path of reflections. Additionally, positioning the mic slightly off-center from walls or corners minimizes standing waves—resonances that can cause certain frequencies to be exaggerated or canceled out. Using a reflection filter behind the mic acts like a shield, absorbing sound waves before they bounce back, further clarifying your recording.
In practical terms, start by placing the mic about 6-12 inches away from a treated wall or corner, and experiment with angling it slightly. Use a reflection filter or portable shield behind the mic to trap unwanted sound. Moving your position even a few inches can significantly reduce echo and improve clarity. Remember, controlling sound travel paths is about understanding how reflections bounce within the small space, and adjusting your setup accordingly.
How to Treat Your Closet Walls and Corners for Deep Sound Control
Small closets often suffer from low-frequency buildup and standing waves, which make recordings sound boomy or hollow. To combat this, focus on adding bass traps in the corners where low-end energy tends to concentrate. Installing bass traps—thick panels of 4-6 inches foam or mineral wool—absorbs these problematic frequencies, preventing them from bouncing back and causing muddiness.
Corners are natural accumulation points for bass energy because sound waves reflect and converge there. By strategically placing traps in all corners—especially behind your microphone setup—you can flatten out these resonances, resulting in a warmer, more natural sound. DIY options include using thick blankets, mattresses, or even dense upholstery cut into manageable pieces, which can absorb low frequencies effectively when placed in corners.
In addition to bass traps, treat large flat surfaces like walls and ceilings with absorption panels. Properly combining these elements reduces the overall reverberation and low-frequency muddiness, giving your voice a cleaner, more professional quality. Remember, the goal is to balance absorption across frequencies—over-treating high frequencies without addressing low-end can create a dull sound, so use a mix of materials for full-spectrum control.
Sealing Gaps and Managing Noise Leaks in a Closet Setup
Sound leaks through gaps, cracks, and the door—no matter how much foam you hang. To really quiet your rig, sealing these leaks is essential because it prevents external noise from entering and your sound from escaping. Gaps around the door frame, vents, or any openings act like open windows for sound waves, rendering your acoustic treatment less effective.
Applying weatherstripping around the door frame creates a tight seal that significantly reduces noise leaks—tests show it can cut sound transmission by over 60%. Using acoustic sealant or putty around vents, cable holes, and edges further prevents sound from sneaking through small openings. Covering vents with acoustic fabric or foam inserts ensures airflow while blocking noise leaks. Additionally, placing rugs or mats on the floor can help absorb sound that might otherwise reflect or escape through gaps.
Sealing is about creating a barrier, which is the foundation of effective soundproofing in small spaces. It’s a tradeoff: airtight seals are excellent at blocking sound but can make the space less ventilated, so balance is key. Proper sealing enhances the effectiveness of your acoustic treatment and makes the space more isolated, ensuring your recordings are clean and your neighbors aren’t disturbed.
Ventilation and Heat Management—Keeping Your Closet Rig Cool
A sealed closet traps heat just as it traps sound. High-power rigs, especially when running for extended periods, can cause internal temperatures to soar to 80-90°F (27-32°C). Overheating not only risks damaging your equipment but can cause fans to ramp up, introducing additional noise and reducing your recording quality. The solution is to incorporate active ventilation—quiet fans and ducting—to maintain a stable, cool environment without compromising sound isolation.
Installing a low-noise exhaust fan with ducting helps expel hot air while operating quietly. For passive cooling, small vents with filters can promote airflow, preventing heat buildup without adding noise. Consider using a thermostat-controlled fan that activates only when necessary, balancing cooling needs with noise reduction. In some cases, liquid cooling solutions or external fans can be routed outside the closet, removing heat directly from the space and maintaining a consistent temperature.
Proper ventilation not only prevents overheating but also reduces the risk of humidity buildup, which can damage equipment or cause mold. Maintaining a cool, dry environment ensures your rig runs smoothly and quietly during long sessions, preserving sound quality and hardware longevity.
DIY Materials and Budget Hacks for a Closet Vocal Booth
You don’t need expensive studio panels to significantly improve your closet’s acoustics. Household items like thick blankets, moving pads, curtains, and rugs are surprisingly effective at reducing reflections and echoes. These materials are inexpensive, readily available, and easy to install or remove, making them ideal for DIY acoustic treatment.
For example, hanging thick blankets or quilts on the walls absorbs high-frequency reflections, while draping a curtain around your setup creates a barrier against sound bouncing off hard surfaces. Placing a rug underneath your chair and soft covers on the door further dampen sound, especially in the lower frequencies. These simple tricks can turn a basic closet into a functional recording space without breaking the bank.
Practical DIY tips include covering walls with moving blankets, hanging a thick curtain in front of the door, and placing soft furnishings like pillows or foam pads at reflection points. Rearranging or adding layers of household textiles effectively reduces reverberation and echo, creating a more controlled environment suitable for voice-over, streaming, or podcasting. The key is layering materials to cover as many reflective surfaces as possible, balancing cost and effectiveness.
Final Tips: When a Closet Is Enough and When You Need a Real Studio
A closet can be a surprisingly effective space for voice-over work, podcasts, and singing if you prioritize proper treatment, sealing, and ventilation. However, for high-end music production or recordings involving live instruments, a dedicated room designed for sound control is preferable. Small closets, even when treated, have limitations—such as limited space, potential for low-frequency buildup, and challenges in achieving complete sound isolation.
For instance, a closet may be perfect for a voice actor recording daily or creating content for streaming, but a musician recording drums or loud instruments will need a larger, acoustically optimized room with proper soundproofing. The key is to assess your needs carefully: if your primary goal is clear voice recordings or streaming, a well-treated closet can suffice. But for professional music production, investing in a dedicated studio space with proper room design and soundproofing is wise.
Remember, the goal is to match your environment to your project requirements. Properly treating and sealing your closet can make it a highly effective space for certain applications, but understanding its limitations ensures you don’t overestimate what it can achieve without a full studio setup.
Frequently Asked Questions
Is acoustic foam enough to soundproof a closet?
Not quite. Acoustic foam reduces echoes and reflections but doesn’t block outside noise. For true soundproofing, sealing gaps and adding barriers are necessary, especially if external noise leaks in.
What’s the difference between acoustic treatment and soundproofing?
Acoustic treatment improves sound quality inside a space by controlling echoes and reflections. Soundproofing prevents sound from entering or leaving the room, often needing sealing, barriers, and structural modifications.
Where should I place foam, panels, or blankets in a closet booth?
Place treatment at the reflection points—behind the mic, on the ceiling, and on walls directly opposite or beside the source. Corners benefit from bass traps, and doors should be sealed for leaks.
Do I need bass traps in a small closet?
Yes. Bass traps in corners help manage low-frequency buildup, reducing the 'boxy' or 'boomy' sound often found in tiny spaces like closets.
How do I stop sound from leaking through the door and gaps?
Seal all gaps with weatherstripping, acoustic sealant, and door sweeps. Cover vents with acoustic fabric or foam, and use rugs or mats to block floor gaps.
Conclusion
The real secret to a quiet, professional-sounding closet rig isn’t just foam panels—it's smart placement, effective sealing, and proper ventilation. Focus on what truly matters: controlling reflections, managing noise leaks, and keeping your hardware cool. When you do that, your tiny closet can become a surprisingly capable voice booth or streaming studio.
So, the next time you see that cramped space, remember: with a little strategy, it can turn into your best recording secret. Your perfect sound is just a few thoughtful tweaks away.