To showcase your personal style with a custom bike paint job, start by thoroughly preparing your bike surface and choosing the right paints like enamel or urethane for durability. Use designs, decals, or hand-painted details to reflect your personality, then apply your paint with precision, whether DIY or professionally. Regular maintenance keeps your finish vibrant and long-lasting. Keep exploring options to make your bike uniquely yours and enjoy the creative process!
Key Takeaways
- Incorporate unique graphics, decals, or hand-painted details to reflect personal personality and style.
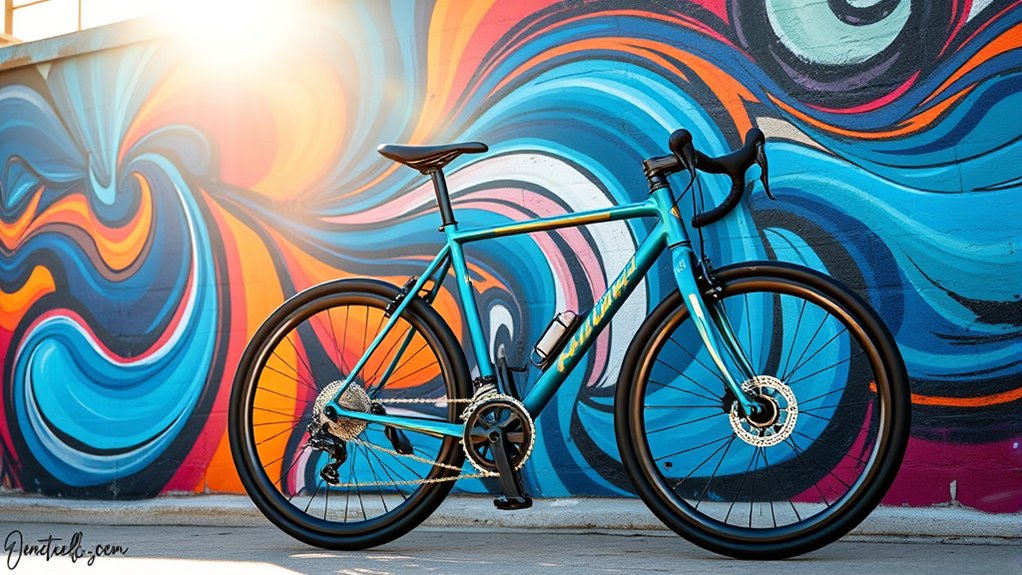
- Use bold, custom color palettes and finishes like metallics or pearls for visual impact.
- Collaborate with professional painters or pursue DIY techniques for a personalized, one-of-a-kind design.
- Layer patterns, textures, and sharp designs with masking and stencils for intricate customization.
- Maintain your custom paint with regular cleaning, protective coatings, and touch-ups to preserve vibrancy and originality.
Preparing Your Bike Surface for a Flawless Finish
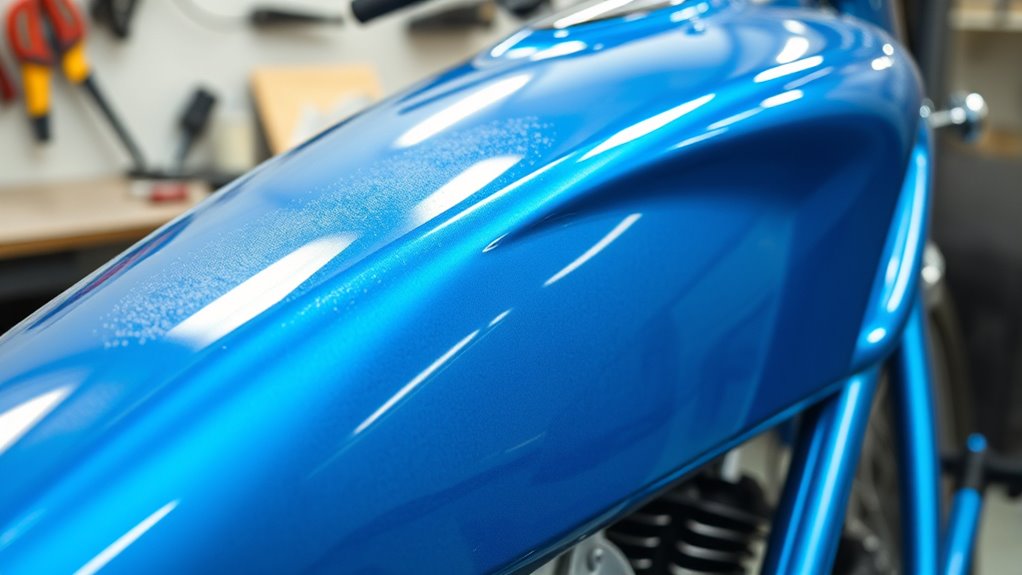
Before applying paint, you need to make sure your bike’s surface is perfectly prepped. Start by thoroughly cleaning the frame with a degreaser and isopropyl alcohol to remove grease, dirt, and residues, ensuring good paint adhesion. Using a quality paint sprayer can help achieve a smooth, even coat, enhancing the final finish. Mask off critical components like the bottom bracket, head tube, seat tube, and dropouts with painter’s tape to prevent overspray. Inspect the frame for cracks, chips, or uneven surfaces, repairing any damage before sanding. Lightly sand the surface with 600-800 grit sandpaper, using gentle, linear strokes parallel to the tubing, especially around welds and joints. After sanding, wipe everything down with a lint-free cloth to remove dust. Run your fingertips across the surface and use a flashlight to spot any imperfections, ensuring a smooth, clean surface ready for painting. Additionally, understanding surface preparation techniques can significantly improve the durability and appearance of your custom paint job, especially as proper prep is essential for paint adhesion and long-lasting results. Proper paint curing conditions also play a vital role in achieving a professional finish. Incorporating appropriate drying times ensures the paint fully cures, preventing issues like peeling or cracking over time.
Selecting the Perfect Paint and Materials for Your Design
Choosing the right paint and materials is essential for achieving a durable, eye-catching bike design. Enamel paint offers resistance to chipping and fading, making it budget-friendly for frequent use. Urethane paint provides a high-gloss finish and chemical resistance, favored by professionals. Powder coating delivers superior durability and a wide color range, perfect for bikes in harsh conditions. Utilizing the best free keto diet app can help you track your diet and maintain proper nutrition while working on your bike project. Water-based acrylic is eco-friendly and gaining popularity for its low VOC emissions. When priming, an epoxy primer ensures strong adhesion, while clear coats like 2K automotive-grade protect your finish with excellent durability. Additionally, selecting the appropriate application tools—such as mini spray guns, HVLP systems, or airbrush kits—ensures smooth, even coverage. Select vibrant or metallic colors to match your style, considering current trends like NEO-matte or retro schemes. Incorporating space and organization into your workshop can also streamline your painting process and keep your supplies accessible. For example, understanding support hours at local parks or facilities can help plan your DIY projects around available resources and ensure a smooth workflow. Moreover, exploring sound healing science techniques, like playing calming music during your work sessions, can enhance focus and relaxation throughout your project.
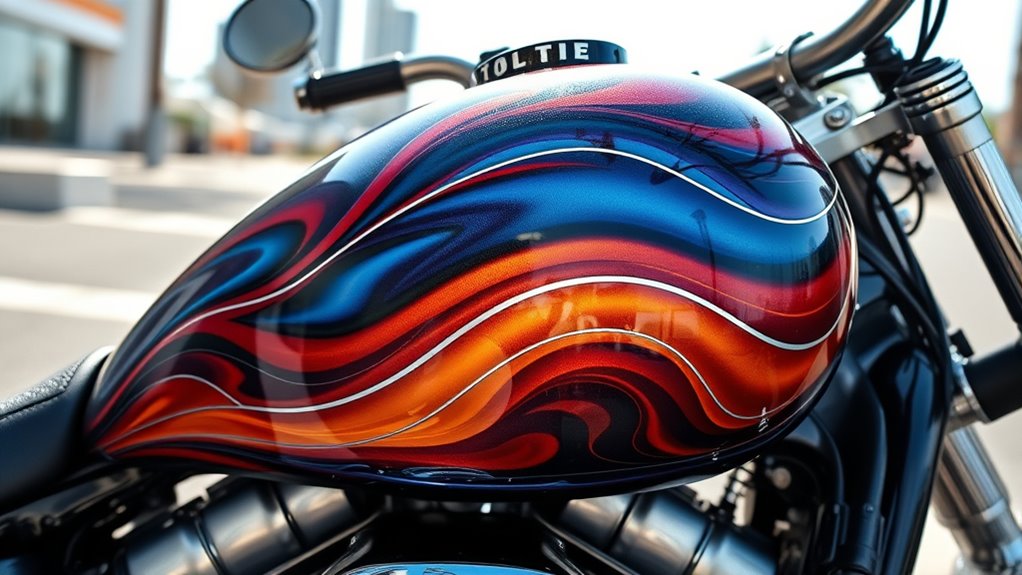
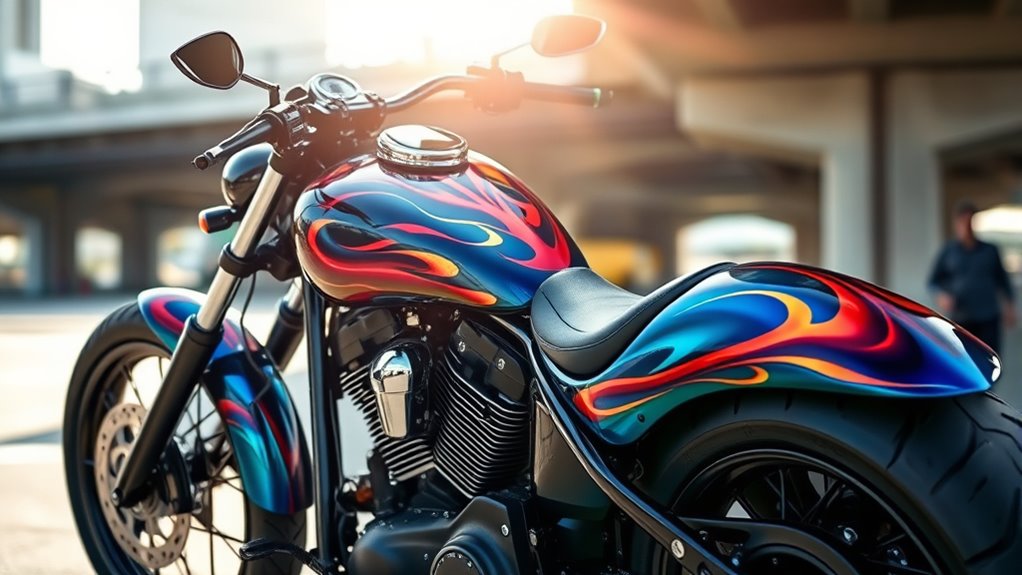
Techniques to Achieve Unique and Stunning Custom Paint Effects

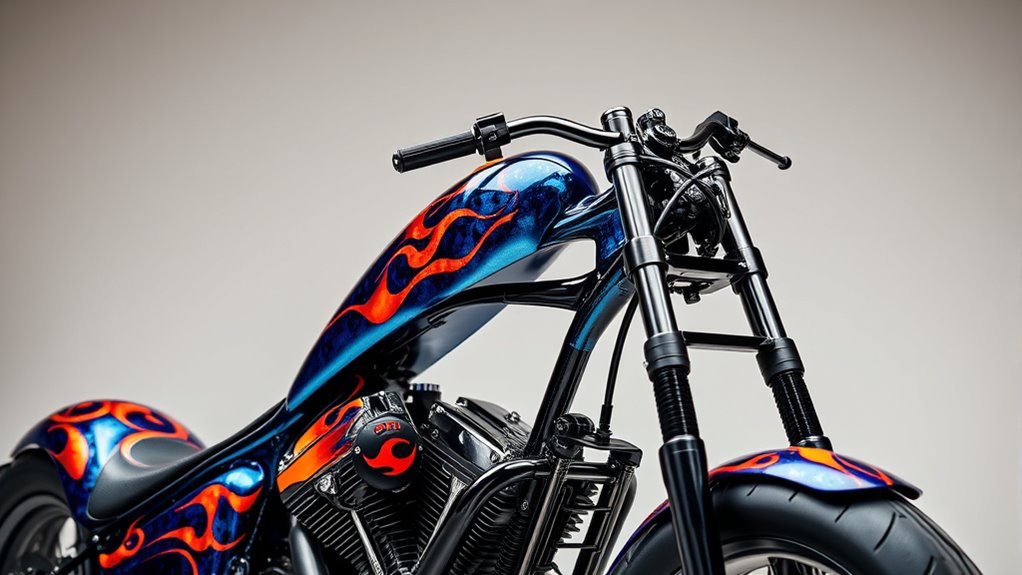
To create truly unique and eye-catching bike paint effects, you need to master a variety of specialized techniques. Start with proper prep: apply primer for adhesion, lightly sand to smooth the surface, and use a damp scouring pad for better paint grip. Wipe down the frame with microfiber cloths to remove dust and oils, then inspect for imperfections. Incorporating natural materials like linen or wood-inspired textures can enhance the tactile quality of your design. When applying color, layer thin coats for even coverage, and blend shades gradually for seamless progressions. Use masking techniques with tape or stencils to create sharp patterns, and consider metallic finishes for added depth. To add dimension, incorporate textured paints, raised patterns, or metal flake effects. Pay attention to environmental considerations, ensuring your workspace minimizes waste and pollution. Additionally, understanding paint compatibility is crucial to achieve durable and vibrant results. Using electric bike paints that are designed for durability and weather resistance will ensure your artwork withstands outdoor conditions. For added durability, applying a protective clear coat after finishing will help safeguard your artwork from scratches and weathering. Finish with clear coating, layering multiple coats, wet sanding, and buffing for a glossy, durable, professional look.
Infusing Your Personal Style With Design Choices and Details
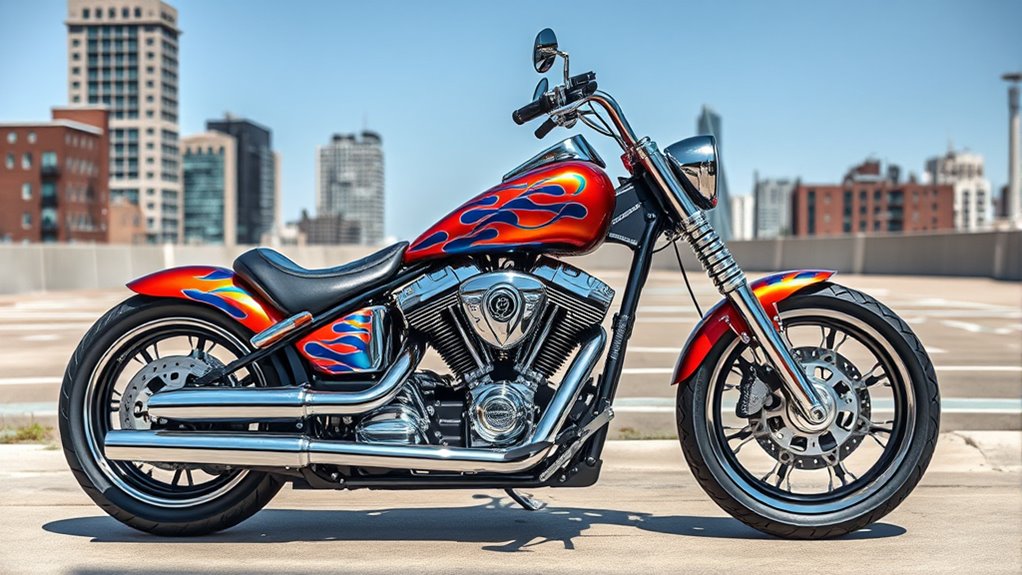
Infusing your personal style into a custom bike begins with thoughtful design choices that reflect your unique tastes. Start by drawing inspiration from nature, art, or cultural themes that resonate with you. Your input is key—collaborate closely with designers, provide feedback, and use digital mock-ups to visualize your ideas. Choose color palettes that match your personality, whether from annual collections or custom samples. Incorporate graphics like decals or hand-painted details to add intricacy and personal meaning. Consider finishes like metallics, pearls, or Cerakote for durability and visual impact. Layering graphics and refining details through feedback ensure your design evolves perfectly. Understanding design customization enables you to create a truly personalized bike that stands out. Additionally, paying attention to texture and finish can significantly elevate the visual appeal and tactile experience of your bike. Being aware of state-specific tax laws and their implications can help you plan your project more effectively and avoid unexpected costs. Staying informed about cybersecurity threats related to online design tools or digital mock-ups can help protect your personal data throughout the customization process. For example, in regions like the Midwest, knowing local tax laws can be especially important when purchasing high-end materials or paying for professional services, ensuring your project remains cost-effective. The goal is a bike that genuinely showcases your style, crafted with precision and care from concept to final touches.
Professional vs. DIY: Which Route Suits Your Creative Vision?
Deciding between professional and DIY bike painting hinges on your creative vision, budget, and skill level. If you want a high-end finish with metallics or intricate graphics, professionals have the tools and workspace to deliver durable, flawless results, but it comes at a higher cost (€500–€3,000+). DIY is more budget-friendly (€30–€200 for materials) and allows unlimited customization, like hand-painted details or experimental textures. However, it requires time, prep work, and artistic skill to avoid uneven coverage or drips. If you’re comfortable with spray techniques and surface prep, DIY can satisfy your creative instincts. For complex designs or professional-grade durability, hiring a pro guarantees a polished, long-lasting result. Additionally, understanding paint preparation and application techniques can significantly improve your results, whether you choose DIY or professional services. Your choice depends on your artistic goals, budget, and willingness to invest time or money.
Maintaining Your Custom Paint Job for Long-Lasting Impact
Maintaining your custom bike paint job requires regular care and attention to preserve its vibrant appearance and durability. Start by washing your bike frequently with mild soap and water, avoiding harsh chemicals that can damage the finish. For tougher dirt or grime, use soft brushes or microfiber cloths to prevent scratching. After cleaning, dry your bike thoroughly to prevent water spots. Applying a protective wax or sealant designed for painted surfaces helps shield against UV rays, dirt, and minor scratches. Consulting bike forums like BikeForums.net can provide finishing techniques and tips for touch-ups if your paint gets chipped or faded. Using a dedicated portable camping light can also help you inspect your paint job in low-light conditions. Regular maintenance keeps your custom paint job looking fresh and ensures it lasts longer, showcasing your personal style with pride for years to come.
Frequently Asked Questions
How Do I Choose the Right Colors for My Custom Bike Design?
When choosing colors for your bike, think about your riding style and personality.
Bright, high-visibility hues work well for sporty or racing bikes, while earth tones suit touring or commuting bikes.
Consider the overall palette trends and brand-specific themes, like Speedvagen’s yearly colors.
Match components like bottle cages and wheels for harmony, and pick finishes—matte or gloss—that suit your maintenance preferences.
Ultimately, select colors that reflect your style and guarantee durability.
What Safety Gear Should I Use During DIY Painting Projects?
During your DIY painting projects, picture yourself protected like a knight in armor. You should wear a mask to breathe easy, goggles to shield your eyes from splatters, gloves to keep chemicals off your skin, and a paint suit or old clothes to prevent stains.
Make certain good ventilation to clear fumes, and keep your workspace safe with proper tool storage and spill clean-up. Stay protected, stay safe, and paint confidently.
Can I Add Glow-In-The-Dark or Metallic Effects to My Bike?
You can definitely add glow-in-the-dark or metallic effects to your bike for a unique look. Use phosphorescent paint to create glowing accents, applying 2-3 coats and sealing with a clear varnish for durability.
Metallic paints can add shine and contrast. Just prep the surface properly, use stencils for designs, and guarantee you charge the glow layers with sunlight or UV light.
These effects boost visibility and style simultaneously.
How Long Does a Professional Custom Paint Job Typically Last?
Imagine your bike as a knight’s armor, shining bright for years. A professional custom paint job typically lasts 5 to 7 years, depending on factors like paint type, maintenance, and weather.
Urethane and powder coating offer the longest durability. Regular cleaning and avoiding harsh chemicals help extend its life.
Keep an eye out for chips or fading, and consider refinishing when needed to keep your bike looking fresh.
What Are the Best Ways to Protect My Painted Bike From Weather Damage?
You want to keep your painted bike safe from weather damage, so start by applying a hydrophobic ceramic coating to repel water and mud.
Use water-based protective sprays regularly to prevent UV yellowing.
Consider adding a bike cover for outdoor storage, and always dry your bike after rides to avoid rust.
Store indoors when possible, and protect high-impact zones with targeted paint protection films for extra durability.
Conclusion
Now that your bike’s covered in dazzling colors and personal flair, you’re basically riding a floating work of art—probably turning heads at every corner. Just imagine the envy and admiration swirling around you like a paint-splattered tornado. But remember, all that beauty needs love and care, or it’ll fade faster than a bad joke. So, keep that masterpiece shining and stay ahead of scratches—after all, your bike’s now a walking, talking billboard for your fabulous style.