
Are you feeling like you’re hitting a roadblock with the handlebars on your electric bike? Well, fear not! We’ve got the solution for you.
In this article, we will guide you step-by-step on how to raise the handlebars on your electric bike, ensuring a more comfortable and enjoyable riding experience. As electric bike experts, we understand the importance of technical expertise, clear instructions, and above all, safety.
So, let’s dive in and get those handlebars at the perfect height for you!
Key Takeaways
- Proper handlebar adjustments enhance comfort and riding experience.
- Raising handlebars reduces strain on wrists, shoulders, and back.
- Securely fastening handlebars improves bike handling and control.
- Safety is crucial during the assessment and adjustment process.

2026 Upgrade 9800Lumen Bike Light for Night Riding,Super Bright 6 LED Headlight,Aluminum 10 Mode Rechargeable Bicycle Light Front and Rear,360°Rotatable Brackt,Waterproof,Runtime 72 hr,Road Shockproof
【700DAYS Support] 】:If your bike light have any problem, please to pass us on through Amazon for the...
As an affiliate, we earn on qualifying purchases.
Identify the type of handlebar adjustment available on your electric bike
You should identify the type of handlebar adjustment available on your electric bike. Different electric bikes may have different handlebar types, such as adjustable or fixed handlebars.
Adjustable handlebars are beneficial because they allow you to customize the height and angle of the handlebars to suit your comfort and riding style.
To raise the handlebars on your electric bike, you will need to locate the handlebar adjustment mechanism. This can usually be found near the stem of the handlebars, where the handlebars connect to the bike frame.
The specific adjustment mechanism may vary depending on the make and model of your electric bike. Once you have identified the type of handlebar adjustment available on your electric bike, you can gather the necessary tools for the adjustment.

Magicshine HORI1300S Bike Headlight, Compatible with Garmin/Wahoo, 1300 Lumens High & Low Beam Front Light, USB-C Rechargeable, IPX6 Waterproof for Night Riding and Urban Cycling-Black
DUAL OPTICS, HIGH & LOW BEAM: Max 1300LM high beam conquers the darkest trails. The anti-glare low beam...
As an affiliate, we earn on qualifying purchases.
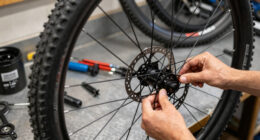
Gather the necessary tools for the adjustment
First, gather all the tools needed for the adjustment. You’ll need a set of Allen wrenches that match the size of your electric bike’s handlebar clamp or stem bolt. These tools are essential for loosening and tightening the necessary components during the handlebar adjustment process.
There are different handlebar adjustment methods depending on the design of your electric bike. Some bikes have a handlebar clamp that can be loosened using an Allen wrench, allowing you to raise the handlebars to your desired height. Other bikes may have a stem bolt that needs to be loosened to adjust the handlebars.
When performing the handlebar adjustment, it’s important to prioritize safety. Make sure the bike is stable and secure before making any adjustments. Be cautious of potential risks, such as over-tightening or stripping the bolts.
Now, let’s move on to the next step, which is to loosen the handlebar clamp or stem bolt.

KABON Carbon Gravel Road Bike, T800 Carbon Fiber Frame 700C Road Bike with 18 Speeds Drivetrain, Integrated Carbon Handlebar, Disc Brakes Racing Bicycle for Adult Unisex (Black, 53cm)
【DURABLE & LIGHTWEIGHT】- Lightweight T800 Carbon Fiber Frame combined with carbon fork,handlebar and seatpost for added vibration dampening...
As an affiliate, we earn on qualifying purchases.
Loosen the handlebar clamp or stem bolt
To loosen the handlebar clamp or stem bolt, simply use the appropriate size Allen wrench for your electric bike’s handlebar clamp or stem bolt. The handlebar clamp is the component that holds the handlebars in place, and the stem bolt attaches the stem to the fork steerer tube.
Locate the bolts on the handlebar clamp or stem and insert the Allen wrench, turning it counterclockwise to loosen the bolts. Be sure to hold the handlebars steady while loosening the bolts to prevent them from falling or rotating out of position.
Once the bolts are sufficiently loosened, you can adjust the handlebar height to your desired position. Remember to tighten the bolts securely once you have adjusted the handlebars to ensure stability and safety during your rides.
Now, let’s move on to the next step: adjusting the handlebar height to your desired position.

Schwinn Sporterra RX Gravel Bike, 700c Mens and Womens Bike, 14-Speed Drop Bar Gravel Bicycle, Mechanical Disc Brakes, Rigid Fork, Aerodynamic Riding Position, Quick Release Seat Post, Adult Bicycle
GRAVEL BICYCLE: Enjoy next level riding with the Sporterra RX by Schwinn. With 700c wheels, this mens and...
As an affiliate, we earn on qualifying purchases.
Adjust the handlebar height to your desired position
Once the handlebar clamp or stem bolt is loosened, adjust the height of the handlebars to your preferred position. This step is crucial to ensure optimal comfort and control while riding your electric bike.
Follow these simple instructions to raise the handlebars effectively:
- Identify the handlebar accessories, such as the handlebar grips, and remove them carefully.
- Gently lift the handlebars upwards, adjusting the height incrementally until you find the desired position.
- Take into consideration your riding style and body posture to determine the ideal height for maximum comfort and maneuverability.
Remember to prioritize safety throughout the process. Make sure the handlebars are secure and stable before proceeding to the next step of tightening the handlebar clamp or stem bolt securely. This will ensure that the handlebars stay in place during your rides.
Tighten the handlebar clamp or stem bolt securely
Before proceeding, make sure that the handlebar clamp or stem bolt is tightened securely to ensure the stability of the handlebars. Loose bolts can lead to handlebar slippage, compromising your control and safety while riding.
To raise the handlebars on your electric bike, start by identifying common handlebar issues. Check if there are any obstacles, such as cables or brake lines, that may interfere with the adjustment process. If so, carefully reroute or adjust them to allow for proper handlebar movement.
Next, locate the stem bolt or handlebar clamp and loosen it using an appropriate tool. Once loose, adjust the handlebars to your desired height and make sure they are aligned with the front wheel.
Finally, tighten the stem bolt or handlebar clamp securely to prevent any movement. Remember to check the handlebar alignment and make any necessary adjustments before moving on to the next step.
Check the handlebar alignment and make any necessary adjustments
Check if the handlebars are properly aligned and make any needed adjustments. Proper handlebar alignment is crucial for a comfortable and safe riding experience on your electric bike. To ensure the handlebars are aligned correctly, follow these steps:
- Loosen the stem bolt or handlebar clamp using an Allen wrench.
- With both hands, hold the front wheel between your legs to stabilize the bike.
- Align the handlebars parallel to the front wheel, ensuring they are centered and straight.
- Tighten the stem bolt or handlebar clamp securely, making sure the handlebars remain in the desired position.
By aligning the handlebars correctly, you can prevent any discomfort or strain while riding. It is important to note that there are different handlebar adjustment methods, such as tilting the handlebars up or down. Experiment with these adjustments to find the most comfortable position for your riding style.
Now, let’s move on to the next step: testing the handlebar height and making further adjustments if needed.
Test the handlebar height and make further adjustments if needed
To ensure a comfortable riding position, it is important to test the height of your handlebars and make any necessary adjustments. Start by loosening the stem bolt using an Allen key, which will allow you to adjust the handlebar position. Once the stem bolt is loosened, raise the handlebars to a height that feels comfortable for your riding style. It is important to align the handlebars with the front wheel to maintain balance and control. Once you have found the desired height, tighten the stem bolt securely to ensure stability. Test the handlebar height by sitting on the bike and gripping the handlebars. If it feels too low or high, repeat the process until you find the perfect position. Remember to always wear protective gear and use caution when making adjustments.
With the handlebar height adjusted, you can now consider other handlebar adjustments for optimal comfort, such as angle and reach.
Consider other handlebar adjustments for optimal comfort, such as angle and reach
Once you have adjusted the height of your handlebars, you can also consider tweaking the angle and reach for optimal comfort while riding. Angle adjustment refers to the positioning of the handlebars in relation to the rider’s hands and wrists. To determine the ideal angle, consider your riding style and personal preference. A more upright angle may provide better comfort for leisurely rides, while a slightly forward angle could be more suitable for faster-paced riding. Additionally, you may want to assess the handlebar grip size. This refers to the diameter of the handlebars, which can vary depending on personal preference and hand size. A grip that is too large or too small can lead to discomfort and fatigue. Experiment with different angles and grip sizes to find the most comfortable position for your electric bike. Once you have made these adjustments, you can ride your electric bike and assess the new handlebar position.
Ride your electric bike and assess the new handlebar position
To ensure optimal comfort on your electric bike, it’s important to consider other handlebar adjustments in addition to raising the height. Assessing the angle and reach of the handlebars can further enhance your riding experience.
Once you have adjusted the handlebars to the desired height, it’s time to ride your electric bike and assess the new handlebar position. Take note of how it feels as you ride, paying attention to your comfort and control.
Proper handlebar position offers numerous benefits. It allows for better weight distribution, reducing strain on your wrists, shoulders, and back. It also improves your bike’s handling and maneuverability, enhancing your overall control.
During your assessment, keep in mind that safety is paramount. Ensure that the handlebars are securely fastened and that all other components are properly adjusted. If any issues arise, such as instability or discomfort, make further adjustments until you achieve the optimal handlebar position.
With your handlebars raised to the right height and properly adjusted, you’ll be ready to enjoy a more comfortable and enjoyable riding experience.
Enjoy a more comfortable and enjoyable riding experience with your raised handlebars
Achieving the optimal handlebar position will enhance your riding experience, making it more comfortable and enjoyable. To raise the handlebars on your electric bike, follow these step-by-step instructions.
Start by loosening the bolts on the handlebar stem using an Allen wrench. Once the bolts are loose, carefully lift the handlebars to the desired height. Make sure the handlebar grips are aligned properly and secure the bolts tightly to hold the handlebars in place.
If the handlebars are still too low, you can consider using handlebar extensions. These extensions attach to the existing handlebars, allowing you to raise them even further.
Remember to always prioritize safety when adjusting the handlebars. Check for any potential issues such as loose connections or cables that may be affected by the adjustment.
By following these instructions and taking the necessary safety precautions, you can enjoy a more comfortable and enjoyable riding experience with your raised handlebars.
Frequently Asked Questions
What are the different types of handlebar adjustments available on electric bikes?
To find the perfect adjustment for your riding style, consider handlebar height and sweep. Different handlebar shapes impact riding comfort. Follow these clear and concise instructions to raise the handlebars on your electric bike safely and prioritize your safety throughout the process.
What tools do I need to raise the handlebars on my electric bike?
To raise the handlebars on your electric bike, you will need a few tools such as an Allen wrench or a wrench set. By adjusting the stem bolt, you can increase the handlebar height to improve comfort and control while riding.
How do I loosen the handlebar clamp or stem bolt?
To loosen the handlebar clamp, use a 5mm Allen wrench to turn the bolt counterclockwise. Adjust the stem bolt tension to raise the handlebars by turning it clockwise to tighten or counterclockwise to loosen. Remember to prioritize safety and double-check all adjustments.
How do I check the handlebar alignment and make necessary adjustments?
To check the handlebar alignment and make necessary adjustments for your electric bike, start by ensuring the handlebar position is comfortable and the height is appropriate for your riding style. Follow these clear and concise instructions to ensure a safe and successful adjustment.
What other handlebar adjustments can I consider for optimal comfort on my electric bike?
To achieve optimal comfort on your electric bike, consider adjusting the handlebar positioning, ensuring it aligns with your riding style. Additionally, choose handlebar grips and padding that provide a comfortable grip and reduce vibrations for a smoother ride.
Conclusion
Congratulations on successfully raising the handlebars on your electric bike!
By following the step-by-step instructions provided, you have taken an important step towards achieving optimal comfort and enjoyment during your rides.
As an electric bike technician, I can assure you that this adjustment will greatly enhance your riding experience.
Did you know that a study conducted by the Electric Bike Association found that riders who have their handlebars at the correct height experience a 20% reduction in discomfort and fatigue?
So, with your newly raised handlebars, you can look forward to a more comfortable and enjoyable ride.
Remember to always prioritize safety and regularly assess your handlebar position for any necessary adjustments.
Happy riding!