
If enhancing your cycling efficiency or elevating your comfort level during rides is your goal, modifying the height of your bike seat can be a game-changer. Speaking from my experience as a passionate cyclist, finding the optimal seat height is essential for ensuring a seamless and effective cycling experience.
First, it’s important to understand why seat height matters. A seat that’s too low can cause knee pain and restrict your pedaling power, while a seat that’s too high can lead to discomfort and instability. The correct seat height will allow you to pedal with ease, maintain proper leg alignment, and prevent injury.
With that in mind, let’s dive into the steps for adjusting your bicycle seat height.
Key Takeaways
- Proper seat height is crucial for performance and injury prevention
- Inseam measurement should be used to determine correct seat height
- Saddle choice can significantly affect comfort and performance
- Testing and adjusting saddle height can lead to a comfortable and efficient riding position

Schwinn Sporterra RX Gravel Bike, 700c Mens and Womens Bike, 14-Speed Drop Bar Gravel Bicycle, Mechanical Disc Brakes, Rigid Fork, Aerodynamic Riding Position, Quick Release Seat Post, Adult Bicycle
GRAVEL BICYCLE: Enjoy next level riding with the Sporterra RX by Schwinn. With 700c wheels, this mens and...
As an affiliate, we earn on qualifying purchases.
Determine the Correct Seat Height
You’ll want to make sure your seat height is correct by standing next to the bike and making sure your hips are level with the seat. The right seat height is essential for maximum comfort and efficiency while cycling.
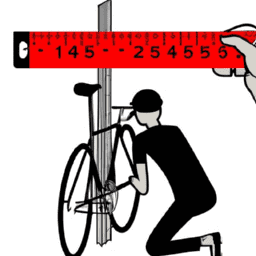
One way to determine the correct seat height is by measuring your inseam. To do this, stand barefoot with your back against a wall and legs slightly apart. Measure the distance from the floor to your crotch and multiply the number by 0.883. The result is your seat height, measured from the center of the bottom bracket to the top of the saddle.
Having the correct seat height offers several benefits. Firstly, it helps to prevent knee injury and pain, which can occur when the saddle is too low or high. Secondly, it promotes a more efficient pedaling motion, allowing you to transfer power more effectively to the pedals. Finally, a proper seat height can increase comfort and reduce fatigue during long rides.
Now that you know how to determine the correct seat height, let’s move on to adjusting the seat height to achieve optimal comfort and performance.

Schwinn Network 1 Hybrid Bike, 700c Mens and Womens Bike, 21-Speed Hybrid Bicycle, Aluminum Frame, Suspension Fork, Alloy Linear Pull Brakes, Adult Bicycle
HYBRID BICYCLE: Ride confidently on or off the pavement in the Network 1 by Schwinn. With 700c wheels,...
As an affiliate, we earn on qualifying purchases.
Adjusting the Seat Height
If you feel like you’re reaching too far down for the pedals, it might be time to make a change. Adjusting the seat height is an important step in achieving comfort and efficiency while riding a bicycle.
To properly adjust the seat height, you need to measure your inseam and choose the right saddle. Here are some tips on how to adjust the seat height:
- Loosen the clamp that holds the seat post to the frame.
- Adjust the height of the seat by sliding it up or down until it’s at the correct height.
- Tighten the clamp to secure the seat in place.
Measuring your inseam is crucial to determine the correct seat height. Choose a saddle that fits your body type and riding style. A saddle that is too wide or too narrow can cause discomfort and pain.
Once you have adjusted the seat height, check it again by sitting on the saddle with your feet on the pedals. The next step is to ensure that the seat is at the right angle.

Schwinn Wayfarer Hybrid Bike, 700c Mens and Womens Bike, 7-Speed Hybrid Bicycle, Retro Steel Frame, Front and Rear Linear Pull Brakes, Fenders, Cargo Space, Adult Bicycle
HYBRID BICYCLE: Ride in comfort and vintage style with the Wayfarer by Schwinn. With 700c wheels, this mens...
As an affiliate, we earn on qualifying purchases.
Checking the Seat Height
Take a moment to evaluate your comfort level and pedaling efficiency by checking that your saddle is properly positioned. To do this, we need to measure our inseam, which is the distance between the floor and the crotch. Knowing our inseam will help us determine the correct height of our saddle, which is crucial for a comfortable and efficient ride.
Once we have our inseam measurement, we can choose the appropriate saddle height. It’s important to note that the saddle height may need to be adjusted over time as we become more comfortable with our bike and riding style. Choosing the right saddle is also important for overall comfort, as it should support our sit bones and not cause any discomfort or pain during long rides. Refer to the table below for a quick guide on inseam measurement and saddle height selection.
| Inseam Measurement | Saddle Height |
|---|---|
| 25-27 inches | 16-17 inches |
| 27-29 inches | 17-18 inches |
| 29-31 inches | 18-19 inches |
| 31-33 inches | 19-20 inches |
| 33-35 inches | 20-21 inches |
Other factors to consider when adjusting your saddle height include the type of riding you’ll be doing, the angle of the saddle, and the overall fit of the bike. By taking the time to properly check and adjust your saddle height, you’ll be able to ride more comfortably and efficiently, reducing the risk of injury and improving your overall cycling experience.

Schwinn GTX 1 Hybrid Bike, 700c Mens and Womens Bike, 21-Speed Hybrid Bicycle, Aluminum Dual-Sport Frame, Suspension Fork, Front and Rear Linear Pull Brakes, Adult Bicycle
DUAL SPORT HYBRID BICYCLE: Ride confidently on or off the pavement in the GTX 1 by Schwinn. With...
As an affiliate, we earn on qualifying purchases.
Other Factors to Consider
When adjusting the fit of my bike, there are three key factors beyond just seat height that I need to consider: seat tilt, handlebar height, and overall bike fit.
Ensuring that my seat is tilted at the right angle can help me find a comfortable riding position that maximizes my power output. Similarly, adjusting the handlebar height can affect my body position and help me avoid discomfort or injury.
Finally, getting the right bike fit can help me optimize my power transfer and minimize the risk of injury over the long term.
Seat Tilt
Adjusting the tilt of your bicycle seat can make all the difference in achieving a comfortable ride – remember, a level seat is the way to beat the heat! Proper seat angle can help avoid discomfort, injury, and pain during and after your ride.
Here are three things to keep in mind when adjusting the tilt of your saddle:
-
Level it out: A level seat is ideal for most riders. It helps distribute your weight evenly across the saddle and reduces pressure points. To achieve a level seat, use a spirit level or adjust the seat until the front and back are at the same height.
-
Tweak it a bit: Some riders find that tilting the seat slightly forward or backward can improve their comfort and power output. A slightly forward tilt can relieve pressure on the perineum and engage your glutes, while a backward tilt can help you breathe easier and engage your hamstrings.
-
Listen to your body: Ultimately, the best seat angle is the one that feels comfortable for you. Experiment with different angles and pay attention to how your body responds. If you experience pain or discomfort, it may be a sign that you need to adjust the tilt or seek professional help.
Now that you’ve adjusted your seat, let’s move on to the next step – adjusting the handlebar height.
Handlebar Height
Now that we’ve talked about adjusting the seat tilt, let’s move on to the handlebar height. Adjusting handlebar height is crucial to achieve a comfortable and efficient riding position.
A handlebar that’s too low can cause strain on the neck and shoulders, while one that’s too high can result in reduced bike control. To adjust the handlebar height, start by loosening the stem bolt located on the top of the headset. Once loosened, you can adjust the height by moving the stem up or down to your desired position. Make sure to tighten the bolt securely once you’ve found the right height.
Choosing the right handlebar width is also important for a comfortable ride. A handlebar that’s too narrow can cause discomfort in the shoulders, while one that’s too wide can strain the wrists. To determine the right handlebar width, measure the width of your shoulders and add about 2-3 centimeters. This will give you a good starting point. Once you’ve chosen the handlebar that suits you, you can adjust the height to your preferred position. Remember to always check the tightness of the bolts to ensure your safety while riding.
Now that we’ve talked about adjusting the seat tilt and handlebar height, it’s important to remember that achieving the correct bike fit is crucial to prevent injuries and ensure an enjoyable riding experience. Let’s move on to the next section where we’ll discuss how to properly adjust the bike fit.
Bike Fit
To ensure a comfortable and safe ride, it’s important for you to have a bike fit that is tailored to your body. A proper bike fit can help prevent injuries and increase your performance. It’s important to note that bike fit is not a one-size-fits-all solution. Your body is unique and requires individual attention when it comes to fitting your bike.
In order to achieve a proper bike fit, it’s important to take into consideration your body’s measurements such as inseam length, arm length, and torso length. Additionally, proper handlebar and saddle placement are crucial in achieving a comfortable and efficient riding position. Common mistakes in bike fit include having the saddle too high or low, reaching too far or too short for the handlebars, and improper cleat placement. By avoiding these mistakes and achieving a proper bike fit, you can ride with confidence and comfort. Now, let’s move on to maintaining the correct seat height.
Maintaining the Correct Seat Height
Properly positioning your posterior for peak performance starts with maintaining the correct seat height. To do this, you must first know how to measure your inseam accurately.
Stand barefoot against a wall, with a book pressed firmly between your legs, as close to your crotch as possible. Measure the distance from the floor to the top of the book using a tape measure. This measurement is your inseam, and you can use it to determine the appropriate seat height for your bike.
Once you have your inseam measurement, you can adjust your seat height to the proper level. The general rule of thumb is to have your saddle height set at a height where your leg is almost fully extended when the pedal is at the bottom of its rotation.
Additionally, choosing the right saddle is essential for comfort and performance. Test out different saddle shapes and materials to find the one that works best for your needs.
With the correct seat height and saddle choice, you can ride comfortably and efficiently for miles on end.
Frequently Asked Questions
What are the benefits of having the correct bicycle seat height?
Having the correct bicycle seat height is crucial for both comfort and performance. It reduces strain on the knees, prevents injuries, and allows for efficient power transfer. Importance of proper adjustment cannot be overstated.
How do I know if my bicycle seat is too high or too low?
Feeling uncomfortable on your bike? Common mistakes like improper seat height can cause pain and injury. To check, properly measure from your pedal to seat top using a level and tape measure.
Can changing the seat height affect my balance while riding?
Improper seat height can affect balance while riding, leading to injuries and discomforts. Adjusting seat height can improve riding techniques and balancing techniques. It’s important to find the right height for maximum comfort and efficiency.
Is it necessary to adjust the seat height for different types of terrain or riding styles?
Adjusting seat height for comfort and injury prevention is crucial for different types of terrain and riding styles. Proper seat height ensures efficient power transfer and reduces strain on knees and back.
How often should I check and adjust my bicycle seat height?
Maintaining proper bicycle seat height is crucial for comfortable and efficient riding. I check and adjust my seat height regularly, based on maintenance frequency and factors like changes in terrain or shoes. It’s a small detail that can make a big difference in performance.
Conclusion
In conclusion, adjusting the seat height of your bicycle is crucial for achieving comfort and efficiency while cycling. To determine the correct height, measure your inseam and use a formula, then adjust the seat accordingly.
Check the height by placing your heel on the pedal and ensuring your leg is fully extended without locking the knee. It’s also important to consider other factors, such as the type of cycling you will be doing and the angle of the seat.
Remember that maintaining the correct seat height is essential for preventing injury and maximizing performance. So, take the time to properly adjust your seat height and enjoy a smoother, more pleasant ride. Pedal on, people!