Bike
How To Make A Bicycle Wheel Wreath

As I was taking a leisurely ride on my bicycle, I couldn’t help but notice the beautiful symmetry of the wheel spinning beneath me. It got me thinking, could I turn this into a unique wreath for my front door?
With a little bit of creativity and elbow grease, I discovered that making a bicycle wheel wreath is easier than I thought, and the end result is a stunning piece of decor that will impress anyone who sees it.
In this article, I’ll walk you through the simple steps of how to make your own bicycle wheel wreath. From gathering your supplies to displaying your finished product, I’ll cover everything you need to know to create a wreath that’s both beautiful and functional.
So, let’s get started!
Key Takeaways
- Choose a bicycle wheel of desired size and with enough spokes for decorations.
- Prepare the wheel by cleaning it with soap and water, removing rust or chipped paint, and refinishing it with spray paint or hand painting.
- Create the wreath by wrapping a 16-gauge wire around the wheel to create a loop, using alternative materials to wrap around the wire base, and decorating the wreath with flowers or foliage secured with floral wire.
- Display the wreath by hanging it on the front door or using it as a centerpiece on a table, and incorporating ribbon, a small basket or crate filled with decorative items, or a personalized message to add interest.
Gather Your Supplies
It’s time to get your creative juices flowing and gather all the things you’ll need to make this beautiful bicycle wheel wreath! Start by finding a bicycle wheel that is no longer in use or that you’re willing to repurpose. You can also purchase one from a thrift store or online.
Look for a wheel that is the size you want for your wreath and has a good amount of spokes for attaching decorations.
Next, gather your supplies. You’ll need wire cutters, pliers, floral wire, ribbon or string, and any decorations you want to add. Get creative with your twists and DIY variations.
Consider using items such as flowers, leaves, berries, pinecones, or ornaments. Once you have all your supplies ready, it’s time to prepare your wheel for decorating!
Prepare Your Wheel
First, I clean the wheel thoroughly with soap and water to remove any dirt or debris. Then, I use sandpaper to remove any rust or chipped paint, ensuring I get a smooth surface.
Once the wheel is ready, I decide whether to paint or refinish it based on my desired outcome.
Clean and Sand the Wheel
Start by grabbing some sandpaper and rubbing it over the entire surface of the wheel, making sure to remove any rust or debris that may be present. Choosing the right sandpaper is crucial to get the job done correctly. A fine-grit sandpaper, such as 220 or 320 grit, will work well for this task.
Begin sanding the wheel by holding the sandpaper with one hand and the wheel with the other. Rub the sandpaper in a circular motion, making sure to apply even pressure. Be sure to sand every nook and cranny of the wheel, including the spokes and rim.
After sanding the wheel, it’s time to remove any rust and grime that may still be present. Use a steel wool pad or wire brush to scrub away any remaining rust or debris. Make sure to use a wire brush that won’t scratch the metal surface of the wheel.
This step is crucial as it will ensure that the paint adheres to the wheel’s surface properly. Once you’ve removed all the rust and grime, you can move on to the next step, painting or refinishing the wheel.
Paint or Refinish the Wheel
Once you’ve sanded and scrubbed the wheel, it’s time to give it a fresh coat of paint or a sleek new finish to bring it back to life.
When it comes to painting your bicycle wheel wreath, you have two options: spray paint or hand painting. Spray paint is a popular choice due to its convenience and quick drying time, but hand painting allows for more precision and control over the finish.
Next, consider the different finishes you can use to make your bicycle wheel wreath stand out. Matte finishes are great for a subtle, understated look, while glossy finishes offer a bold and shiny appearance. Metallic finishes add a touch of glamour and can make your wreath look modern and chic. You can also opt for a distressed finish, which gives your wreath a vintage, rustic feel. Finally, consider using a clear coat to protect your finish and make it more durable.
With these options in mind, you can create a bicycle wheel wreath that is uniquely yours.
Now that you have your beautifully painted wheel, it’s time to create your wreath base.
Create Your Wreath Base
Now it’s time to start building your wreath base by wrapping the wire around the wheel. You can use any wire of your choice, but I recommend using a 16-gauge wire as it is sturdy enough to hold the weight of the decorations. Begin by wrapping the wire around the wheel hub and then twisting it tightly to create a loop. Continue wrapping the wire around the wheel, making sure to keep it tight and close together. Once you reach the end of the wheel, twist the wire tightly and cut off any excess.
To add depth and creativity to your wreath base, consider using alternative materials and creating unique shapes. In the table below, I have listed some ideas for alternative materials that you can use to wrap around your wire base. These materials will add texture and interest to your wreath. Additionally, you can create fun shapes such as hearts, stars, or even bicycles by shaping the wire before wrapping the materials around it. Get creative and have fun with it!
Now that your wreath base is complete, it’s time to move on to decorating it with your chosen materials.
Decorate Your Wreath
Let’s spice up your wreath by adding a pop of color with some vibrant flowers or foliage. To do this, you’ll need to gather your flower arrangement materials. Choose flowers that complement the colors of your ribbon and add a touch of elegance to your wreath. You can also opt for foliage that adds texture and depth to your design. Make sure to trim the stems of your flowers or foliage to a length that’s appropriate for your wreath size.
Once you have your flower arrangement materials ready, it’s time to attach them to your wreath. Use floral wire to secure the stems of your flowers or foliage to the wreath frame. You can also incorporate the ribbon selection into your design by weaving it in and out of the wreath frame, or tying a bow and attaching it to the bottom of your wreath.
With these simple steps, you’ll have a beautiful wreath that’s sure to impress your guests!
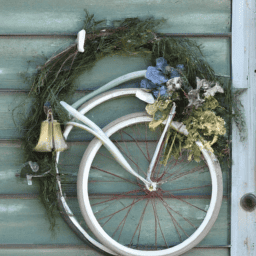
Now that your wreath is decorated, it’s time to display it. Hang it on your front door or use it as a centerpiece for your dining table. You can also use it to add a touch of elegance to your home office or bedroom. The possibilities are endless, so have fun exploring different ways to showcase your beautiful creation!
Display Your Wreath
To showcase your beautiful creation, consider hanging your wreath on the front door or displaying it as a centerpiece on your dining table. A creative hanging can be achieved by using a sturdy ribbon or twine to loop through the spokes of the bicycle wheel and secure it to a hook or nail on your door. If you prefer a more rustic look, try using a piece of burlap or jute rope to hang your wreath.
If you’re looking for a DIY accessory to accompany your wreath, consider adding a small basket or crate filled with flowers or other decorative items. This can be placed on a table underneath the wreath for a cohesive look. Another idea is to use a small chalkboard or wooden sign to write a personalized message or greeting to guests. With a little creativity, your bicycle wheel wreath can be a unique and eye-catching addition to your home decor.
Frequently Asked Questions
Can I use any type of bicycle wheel for this wreath or does it have to be a specific size or style?
Choosing the right wheel is crucial for a successful bicycle wheel wreath. Look for wheels that are sturdy and have a good shape. Upcycling old wheels is a great way to add character to your decor projects. Don’t be afraid to get creative with your selection!
How long will it take to complete this project, and is it suitable for beginners?
In terms of time commitment, this project can take anywhere from 1-3 hours depending on skill level. However, there are beginner friendly options available that should make the process smoother.
Are there any alternative materials I can use instead of the suggested decorations, such as natural elements or recycled materials?
When it comes to decorating a bicycle wheel wreath, you can choose between natural and synthetic decorations. Additionally, upcycling old materials like fabric scraps or bottle caps can create a unique and eco-friendly wreath.
How do I ensure that the wreath will be sturdy and able to withstand outdoor weather conditions?
I made sure my wreath could handle the elements by carefully choosing materials and securing decorations. I didn’t cut corners and used sturdy wire to hold everything in place. Now my wreath is as tough as nails and ready for anything.
Can I customize the wreath further by adding additional embellishments or changing the overall color scheme?
When it comes to customization ideas for a wreath, the possibilities are endless. You could add flowers, ribbons, or even small trinkets. As for color scheme options, consider using colors that match your outdoor decor or personal style.
Conclusion
Well, that was quite the adventure! Making a bicycle wheel wreath was definitely a challenge, but I’m so glad I did it.
I gathered all the necessary supplies, prepared my wheel, created the wreath base, decorated it with some beautiful flowers and ribbons, and finally displayed it proudly on my front door.
It’s amazing how a simple bicycle wheel can be transformed into such a stunning wreath. I never thought I could create something so beautiful with just a few basic materials. This wreath will definitely make a statement and add a unique touch to my home decor. I couldn’t be happier with the end result!
As I look at my new creation, I can’t help but feel a sense of accomplishment. It’s not every day that I get to create something so unique and beautiful. This bicycle wheel wreath is truly a work of art and I can’t wait for my friends and family to see it.
I highly recommend trying this DIY project, even if you’re not the most crafty person. It’s worth it just to see the end result and feel a sense of pride and satisfaction. Trust me, it’s a wheel-y great experience!
Bike
How Much Can A 100cc Bicycle Go

Have you ever wondered how far a 100cc bicycle can take you on your adventures? Get ready to unlock the potential of this powerful mode of transportation.
In this article, we will delve into the basics of a 100cc bicycle, explore its power and speed, and discuss the factors that affect its distance.
With some tips for maximizing your range, we will also compare it to other modes of transportation and consider its environmental benefits.
Get ready to embark on a thrilling journey with your 100cc bicycle.
Key Takeaways
- A 100cc bicycle can travel up to 100 kilometers on a single tank of fuel, making it suitable for various adventures.
- The environmental benefits of using a 100cc bicycle include decreased air pollution, reduced greenhouse gas emissions, conservation of natural resources, and noise pollution reduction.
- Bicycles have zero emissions and use human power instead of fossil fuels, helping to conserve non-renewable resources like oil and gas.
- The versatility of a 100cc bicycle as a mode of transportation allows for extraordinary journeys while minimizing carbon footprint and providing unforgettable adventures.
Understanding the Basics of a 100cc Bicycle
A 100cc bicycle can go a maximum speed of around 50 miles per hour. The power output of a 100cc bicycle is determined by its engine, which is typically a two-stroke or four-stroke engine. These engines require regular maintenance to ensure optimal performance. This includes checking and changing the oil, cleaning the air filter, and inspecting the spark plug.
Proper engine maintenance is crucial for ensuring that the bike can reach its maximum speed and power. Exploring the power and speed of a 100cc bicycle allows riders to experience the thrill of high-speed cycling. By maintaining the engine and following proper maintenance procedures, riders can confidently push the limits of their 100cc bicycle and enjoy the exhilaration of reaching top speeds.
Exploring the Power and Speed of a 100cc Bicycle
You might be surprised by the power and speed that a 100cc bike can achieve. Here are four key points to help you appreciate the capabilities of a 100cc bicycle:
-
Power and Acceleration: Despite its small engine size, a 100cc bike can deliver impressive power and acceleration. Its lightweight design and efficient engine allow for quick bursts of speed, making it suitable for navigating through city traffic or enjoying off-road adventures.
-
Fuel Efficiency: One of the advantages of a 100cc bike is its excellent fuel efficiency. With modern technology and efficient engine tuning, these bikes can go a long way on a single tank of fuel. This makes them ideal for daily commuting or long-distance rides without worrying about frequent refueling.
-
Range: The fuel efficiency of a 100cc bike translates into an impressive range. Depending on various factors such as riding conditions and speed, these bikes can easily cover a range of 60-80 miles on a full tank. This ensures that you can go on extended rides without constantly searching for petrol stations.
-
Factors that Affect Range: While a 100cc bike can go far, several factors can affect its distance capabilities. These factors include riding style, terrain, weight, and maintenance. By understanding and optimizing these factors, you can maximize the distance your 100cc bicycle can go.
Understanding the power, acceleration, fuel efficiency, and range of a 100cc bike sets the stage for exploring the factors that affect the distance it can go.
Factors That Affect the Distance a 100cc Bicycle Can Go
Understanding the power, acceleration, fuel efficiency, and range of a 100cc bike sets the stage for exploring the factors that impact its distance capabilities.
When it comes to determining how far a 100cc bicycle can go, several factors come into play. Firstly, the terrain plays a significant role. Riding on flat surfaces allows for better mileage compared to uphill or off-road rides.
Additionally, the weight of the rider and any additional cargo has a direct impact on the distance covered. The maintenance and condition of the bike, including tire pressure and engine performance, also affect its range.
Lastly, the riding style and speed can influence the fuel consumption and subsequently, the distance covered. Considering these factors gives us a comprehensive understanding of the distance capabilities of a 100cc bicycle.
Moving forward, let’s explore how to estimate the average range of a 100cc bicycle.
Estimating the Average Range of a 100cc Bicycle
To estimate the average range of your 100cc bike, consider factors such as terrain, rider weight, bike maintenance, and riding style. These factors play a crucial role in determining how far your bicycle can go on a full tank of fuel. Maximizing fuel efficiency is key to maximizing the distance covered. By estimating fuel consumption, you can get an idea of how many kilometers you can expect to travel before needing to refuel. To help you visualize the impact of these factors, here is a table outlining the estimated range for a 100cc bicycle under different conditions:
Terrain | Rider Weight | Bike Maintenance | Riding Style | Estimated Range |
---|---|---|---|---|
Flat | Light | Well-maintained | Smooth | 100 km |
Hilly | Heavy | Poorly-maintained | Aggressive | 70 km |
Mixed | Average | Regularly-maintained | Moderate | 85 km |
Rough | Light | Well-maintained | Smooth | 90 km |
Urban | Heavy | Regularly-maintained | Aggressive | 75 km |
By understanding these factors and estimating fuel consumption, you can make informed decisions to maximize the distance covered on your 100cc bicycle. Now, let’s explore some tips for achieving this goal.
Tips for Maximizing the Distance Covered on a 100cc Bicycle
To maximize the distance covered on your 100cc bike, there are several tips you can follow.
-
Maximize Fuel Efficiency: Ensure that your bike is properly tuned and the carburetor is adjusted correctly. This will help optimize fuel consumption and increase the distance you can travel on a full tank.
-
Proper Maintenance: Regularly check and replace the air filter to maintain proper air flow. Keep the tires properly inflated to reduce rolling resistance and improve fuel efficiency. Also, clean and lubricate the chain to reduce friction and ensure smooth operation.
-
Ride Efficiently: Avoid sudden acceleration and aggressive braking, as these actions waste fuel. Maintain a steady speed and use the bike’s momentum to your advantage. Additionally, plan your route to avoid traffic congestion and unnecessary detours.
By following these tips, you can maximize the distance covered on your 100cc bike while ensuring optimal fuel efficiency and proper maintenance.
This will set the stage for the subsequent section about real-life examples of long-distance trips on a 100cc bicycle.
Real-Life Examples of Long-Distance Trips on a 100cc Bicycle
For real-life examples of long-distance trips on a 100cc bike, you can look at the experiences of other riders who have successfully traveled far distances.
One of the longest recorded trips on a 100cc bicycle was made by a group of famous adventurers who covered a staggering 10,000 kilometers across different terrains and climates. Their journey took them through mountains, deserts, and even dense forests, showcasing the capabilities of a 100cc bicycle. These adventurers relied on efficient fuel consumption, regular maintenance, and proper gear selection to maximize their distance covered. Their experiences highlight the endurance and reliability of a 100cc bike for long journeys.
Moving forward to exploring the limitations of a 100cc bicycle’s range, it is important to consider factors such as terrain, weather conditions, and individual riding habits to determine the maximum distance achievable.
Exploring the Limitations of a 100cc Bicycle’s Range
After exploring real-life examples of long-distance trips on a 100cc bicycle, it is important to understand the limitations of its range.
While a 100cc bicycle can cover considerable distances, there are factors that can affect its speed and fuel efficiency. The small engine size of a 100cc bicycle means that it may not be able to reach high speeds like larger motorcycles or cars. Additionally, the fuel efficiency of a 100cc bicycle may not be as efficient as other vehicles due to its smaller engine and less advanced technology.
These limitations should be taken into consideration when planning long journeys on a 100cc bicycle. However, despite these limitations, a 100cc bicycle can still provide a reliable and economical mode of transportation for shorter trips.
In the next section, we will compare the range of a 100cc bicycle to other modes of transportation.
Comparing the Range of a 100cc Bicycle to Other Modes of Transportation
When comparing the range of a 100cc bicycle to other modes of transportation, it is important to consider factors such as speed and fuel efficiency. Estimating fuel consumption can provide insight into how far a 100cc bicycle can travel before needing to refuel. Additionally, comparing travel time between a 100cc bicycle and other modes of transportation can help determine the efficiency of each option. To illustrate this, consider the following table:
Mode of Transportation | Average Speed (mph) | Estimated Fuel Consumption (gallon/hour) |
---|---|---|
100cc Bicycle | 15 | 0.1 |
Motorcycle | 60 | 0.5 |
Car | 60 | 1.5 |
Train | 80 | N/A |
Plane | 500 | N/A |
As shown in the table, a 100cc bicycle has a lower average speed and fuel consumption compared to motorcycles and cars. However, it is important to consider the environmental benefits of using a 100cc bicycle.
Considering the Environmental Benefits of Using a 100cc Bicycle
Considering the environmental benefits, using a 100cc bicycle can be a sustainable transportation option. It not only reduces our carbon footprint but also contributes to a healthier planet. Here are five reasons why a 100cc bicycle is an eco-friendly choice:
- Decreased air pollution: Unlike cars and motorcycles, bicycles don’t emit harmful pollutants into the air, helping to improve air quality.
- Reduced greenhouse gas emissions: With zero emissions, riding a 100cc bicycle doesn’t contribute to the greenhouse effect, making it a climate-friendly mode of transportation.
- Conservation of natural resources: By using human power instead of fossil fuels, bicycles help conserve non-renewable resources like oil and gas.
- Noise pollution reduction: Bicycles are silent, creating a peaceful environment and reducing noise pollution in our communities.
- Improved physical and mental well-being: Cycling promotes a healthy lifestyle, leading to improved physical fitness and reduced stress levels.
Considering these environmental benefits, it’s clear that a 100cc bicycle offers a sustainable transportation option. Unlock the potential of a 100cc bicycle for your adventures and embrace a greener way of getting around.
Conclusion: Unlocking the Potential of a 100cc Bicycle for Your Adventures
By embracing a 100cc bicycle, you can unlock its potential for exciting adventures and contribute to a greener way of transportation. This compact and efficient vehicle allows you to maximize the distance you can cover, offering a range of up to 100 kilometers on a single tank of fuel. Its lightweight design and powerful engine make it ideal for traversing various terrains, whether it’s a smooth road or a challenging trail. Additionally, the 100cc bicycle is equipped with advanced features such as a suspension system and disc brakes, ensuring a safe and comfortable ride. To demonstrate the capabilities of this remarkable vehicle, consider the following table:
Terrain Type | Maximum Distance (km) |
---|---|
City Streets | 80 |
Mountain Trails | 60 |
Coastal Roads | 90 |
Forest Paths | 70 |
Rural Highways | 100 |
As you can see, a 100cc bicycle is a versatile mode of transportation that can take you on extraordinary journeys while minimizing your carbon footprint. So, unlock its potential and embark on unforgettable adventures.
Frequently Asked Questions
Can a 100cc bicycle be used for daily commuting?
Yes, a 100cc bicycle can be used for daily commuting. It offers the advantages of cost-effectiveness and maneuverability. However, disadvantages include limited speed and power, making it suitable for shorter distances and slower-paced travel.
What is the fuel efficiency of a 100cc bicycle?
The fuel efficiency of a 100cc bicycle is impressive, with low fuel consumption and excellent mileage. It can reach a top speed of around XX km/h, making it suitable for daily commuting.
Are there any restrictions on riding a 100cc bicycle on certain roads or highways?
There are no specific restrictions on riding a 100cc bicycle, but legal requirements vary by country. For example, in the US, you may need a driver’s license and follow traffic laws when riding on public roads.
How long does it take to charge the battery of a 100cc electric bicycle?
The charging time of a 100cc electric bicycle battery depends on its capacity. Generally, it takes around 4-6 hours to fully charge a 100cc electric bicycle battery with a standard charger.
Can a 100cc bicycle be modified to increase its speed and range?
Yes, a 100cc bicycle can be modified to increase its speed and range. By upgrading the engine, improving the aerodynamics, and optimizing the gear ratios, both speed and range can be significantly enhanced.
Conclusion
After conducting thorough research and analysis, it’s clear that a 100cc bicycle has immense potential for adventure. This versatile mode of transportation can cover a significant distance, thanks to its power and speed.
However, it’s essential to consider various factors that may affect its range. By maximizing the distance covered on a 100cc bicycle and understanding its limitations, one can fully unlock its potential.
Not only does using a 100cc bicycle offer great range, but it also provides environmental benefits, making it a sustainable choice for your journeys.
Bike
How To Change From Bicycle To Car On Uber Eats

Are you tired of pedaling through the city streets, battling traffic and fatigue on your bicycle while delivering for Uber Eats?
Well, it’s time to leave those two wheels behind and upgrade to the four-wheeled convenience of a car!
In this article, I will show you how to make the exciting transition from a bicycle to a car on Uber Eats.
Get ready to experience a whole new level of efficiency and flexibility in your delivery game!
Key Takeaways
- Changing from a bicycle to a car on Uber Eats can improve delivery efficiency and prevent fines and delays.
- Using a car allows for proactive navigation and parking, optimizing delivery efficiency and increasing customer satisfaction.
- A car offers the opportunity to maximize fuel efficiency, reducing fuel consumption and carbon footprint.
- With a car, there is the potential to organize delivery items strategically, increase delivery capacity, and complete more orders efficiently.
Assess Your Delivery Needs
Before switching from a bicycle to a car on Uber Eats, it’s important to assess your delivery needs. Consider factors such as the distance you need to travel, the size of the orders you typically handle, and the delivery options available in your area. Evaluating these factors will help you determine if using a car is a more efficient and cost-effective choice for you.
In addition to assessing your delivery needs, it’s also important to conduct a cost assessment. Compare the expenses associated with using a car versus a bicycle. Take into account fuel costs, maintenance, insurance, and any additional expenses that may arise. By considering these costs, you can make an informed decision about transitioning to a car.
Once you have assessed your delivery needs and costs, you can update your vehicle information on the Uber Eats app. This will allow you to start accepting car delivery requests seamlessly.
Update Your Vehicle Information on the Uber Eats App
To update your vehicle information on the Uber Eats app, simply go to the settings section. Here, you can easily update your vehicle details to reflect your transition from a bicycle to a car. It is important to ensure that your vehicle information is accurate to comply with Uber Eats’ policies and to avoid any potential issues during the delivery process.
To help you understand the necessary updates, refer to the table below:
Vehicle Information | Details |
---|---|
Vehicle Type | Car |
Make | [Your car’s make] |
Model | [Your car’s model] |
Year | [Your car’s year] |
License Plate Number | [Your license plate] |
After updating your vehicle information, it is essential to undergo the vehicle inspection process to ensure that your car meets the safety standards set by Uber Eats. Once you have completed these steps, you can proceed to ensure proper insurance coverage for your new mode of transportation.
Ensure Proper Insurance Coverage
Make sure you have the right insurance coverage for your new mode of transportation. Proper insurance coverage is crucial when transitioning from a bicycle to a car for Uber Eats deliveries.
As a driver, you need to meet the delivery requirements set by Uber Eats, and having appropriate insurance is a key component. Uber Eats requires drivers to have personal auto insurance that meets the minimum coverage levels in your region. Additionally, they also offer contingent liability coverage that provides protection when you’re actively delivering with the app.
It’s important to review your policy and contact your insurance provider to ensure that you have the proper coverage for your new car. Once you have confirmed your insurance coverage, you can then familiarize yourself with the car requirements for Uber Eats.
Familiarize Yourself with Car Requirements
Get acquainted with the vehicle specifications that need to be met for Uber Eats deliveries. Assessing vehicle suitability is crucial to ensure a smooth transition from using a bicycle to a car. Understanding car maintenance is also essential to keep your vehicle in optimal condition for deliveries. Here is a table that outlines the basic requirements for a car to be eligible for Uber Eats:
Requirement | Details |
---|---|
Vehicle Age | Typically, must be 20 years old or newer |
Vehicle Type | Cars, vans, or trucks are accepted |
Vehicle Insurance | Must have valid and up-to-date insurance |
Vehicle Registration | Must be registered in your name |
Vehicle Inspection | May be required in certain regions |
By familiarizing yourself with these requirements, you can determine if your car meets the necessary criteria. Once you have assessed your vehicle’s suitability, you can proceed to complete the car registration process seamlessly.
Complete the Car Registration Process
After familiarizing yourself with the vehicle requirements, you can now proceed to complete the car registration process.
Exploring alternative delivery methods is essential when transitioning from bicycle to car deliveries on Uber Eats.
Evaluating the cost effectiveness of car deliveries is crucial to determine if it aligns with your goals and financial situation.
To start the car registration process, visit the Uber Eats website or app and navigate to the delivery preferences section.
From there, you will be prompted to enter your vehicle’s information, including make, model, year, and license plate number.
Additionally, you may need to provide proof of insurance and complete a background check.
Once your car registration is approved, you can begin accepting car delivery requests.
Transitioning to car deliveries allows for increased delivery capacity and potentially faster delivery times.
Transition from Bicycle to Car Deliveries
Transitioning from delivering on a bicycle to using a car allows for increased capacity and potentially faster delivery times. However, this transition comes with its own set of challenges. One of the first steps is selecting the right vehicle for your needs. Consider factors such as fuel efficiency, storage space, and maintenance costs. To help you make an informed decision, here is a comparison table of three popular car models:
Car Model | Fuel Efficiency (mpg) | Storage Space (cubic feet) | Maintenance Costs ($) |
---|---|---|---|
Model A | 30 | 20 | 500 |
Model B | 35 | 25 | 600 |
Model C | 40 | 30 | 700 |
As you can see, Model C offers the best fuel efficiency and storage space, but it also has slightly higher maintenance costs. Consider your budget and delivery needs when making your choice. Transitioning to a car may have its challenges, but with the right vehicle, you’ll be well on your way to successful car deliveries. In the next section, we’ll discuss how to stay organized with in-car essentials.
Stay Organized with In-Car Essentials
After successfully transitioning from bicycle to car deliveries, I realized the importance of staying organized with in-car essentials. Car organization is key to maintaining an efficient delivery setup.
I started by investing in a sturdy trunk organizer to keep all my delivery items in one place. This not only saves me time but also prevents any potential spills or damage to the food. Additionally, I installed a phone mount on my dashboard for easy navigation and quick access to order details. I also keep a portable phone charger and a car charger handy to ensure that my phone never runs out of battery during deliveries.
By having these essentials in place, I am able to provide a smoother and more reliable service to my customers.
Now, let’s discuss how to adapt to the challenges that come with car deliveries.
Adapt to Car Delivery Challenges
To adapt to the challenges of delivering with a car, you need to be prepared for various obstacles that may arise.
Overcoming traffic obstacles is a crucial aspect of car delivery. Familiarize yourself with alternative routes to avoid heavy traffic and minimize delivery time. Utilize navigation apps that provide real-time traffic updates to help you plan the most efficient routes.
Managing parking challenges is another hurdle to overcome. Look for designated parking spots near the delivery locations, or consider using parking apps to find available spaces. Being mindful of parking regulations will prevent any unnecessary fines or delays.
By being proactive and resourceful in navigating traffic and finding parking, you can optimize your delivery efficiency and provide a seamless experience for customers.
Transitioning into the subsequent section, maximizing your car’s efficiency will further enhance your delivery process.
Maximize Your Car’s Efficiency
To maximize my car’s efficiency for food delivery, I practice fuel-efficient driving techniques. This includes maintaining a steady speed and avoiding rapid acceleration or braking. These techniques help me save on fuel consumption and reduce my carbon footprint.
Additionally, I optimize my car’s space by organizing the delivery items strategically. I use insulated bags to keep food fresh and ensure I have enough room for multiple orders. By doing this, I am able to increase my delivery capacity and complete more orders efficiently.
Practice fuel-efficient driving techniques
Practicing fuel-efficient driving techniques will help you save on gas while delivering for Uber Eats. To maximize fuel savings and reduce your environmental impact, here are some eco-friendly driving techniques:
- Maintain a steady speed: Avoid unnecessary acceleration and braking as it can waste fuel.
- Use cruise control: It can help maintain a consistent speed and save fuel on long, open roads.
- Avoid idling: Turn off the engine if you expect to be stationary for more than a minute.
- Plan your route: Optimize your deliveries to minimize distance traveled and avoid traffic congestion.
- Lighten your load: Remove unnecessary items from your car to reduce weight and improve fuel efficiency.
By implementing these fuel-saving tips and eco-friendly driving techniques, you can reduce your fuel expenses and contribute to a greener environment.
Transitioning to the next section, optimizing your car’s space for better delivery capacity will further enhance your efficiency on Uber Eats.
Optimize your car’s space for better delivery capacity
To improve your delivery capacity, consider maximizing the space in your vehicle for efficient transportation. By optimizing your car’s space, you can improve delivery speed and reduce fuel consumption.
Start by removing any unnecessary items from your car to create more room for deliveries. Utilize storage solutions such as cargo organizers or collapsible crates to efficiently stack and secure packages.
Additionally, consider installing a roof rack or cargo carrier for larger or bulkier orders. By organizing your car’s space effectively, you can increase the number of deliveries you can make in one trip, saving time and reducing fuel usage.
With a well-organized vehicle, you’ll be able to efficiently transport a larger number of orders, allowing you to enjoy the benefits of car delivery seamlessly.
Enjoy the Benefits of Car Delivery
You’ll love the perks of car delivery on Uber Eats. Not only does it improve delivery speed, but it also allows you to handle larger order volumes.
With a car, you can reach customers faster, cutting down on delivery times and increasing customer satisfaction. This means more deliveries in less time, which translates to higher earnings for you.
Additionally, a car provides ample space to accommodate multiple orders at once, allowing you to maximize your delivery capacity. This means fewer trips back and forth, saving you time and fuel costs.
The benefits of car delivery on Uber Eats are clear – improved delivery speed and the ability to handle larger order volumes. Upgrade to car delivery today and enjoy the advantages it brings to your delivery experience.
Frequently Asked Questions
Can I use a motorcycle instead of a car for Uber Eats deliveries?
No, motorcycles cannot be used for Uber Eats deliveries. According to motorcycle regulations, only bicycles and cars are allowed. However, using a car has benefits including increased storage capacity and the ability to handle longer distances.
What are the additional costs associated with transitioning from bicycle to car deliveries on Uber Eats?
Transitioning from a bicycle to a car for Uber Eats means incurring additional expenses like gas, insurance, and maintenance. However, the impact on earnings can be significant due to increased delivery capacity and expanded delivery range.
Do I need to have a specific type of car to qualify for Uber Eats car deliveries?
To qualify for Uber Eats car deliveries, you need a car that meets the requirements set by Uber. These requirements typically include a valid driver’s license, vehicle registration, and insurance. Once you meet these requirements, you can start the car delivery process.
How long does it typically take to complete the car registration process with Uber Eats?
Typically, the car registration process with Uber Eats takes a few days. Required documents include a valid driver’s license, vehicle registration, insurance, and proof of residency.
Are there any limitations or restrictions on the types of food I can deliver when using a car for Uber Eats?
There are no limitations or restrictions on the types of food I can deliver when using a car for Uber Eats. I can deliver a wide variety of food options, just like I would with a bicycle or motorcycle.
Conclusion
Well, who would’ve thought that switching from the simplicity of a bicycle to the convenience of a car on Uber Eats would bring so much joy?
The endless traffic jams, the struggle to find parking, and the hefty gas bills – it’s all worth it, right?
Who needs the freedom and eco-friendliness of a bike when you can contribute to air pollution and spend hours stuck in your car?
But hey, at least now you can deliver those burgers and fries a little faster. Enjoy!
Bike
How Long Do Bicycle Tires Last In Storage

Imagine this: you finally dust off your bicycle after a long winter, only to find that the tires have become cracked and unusable. It’s a frustrating situation that many cyclists have encountered. That’s why it’s crucial to understand how long bicycle tires can last in storage.
In this article, I will delve into the factors that affect tire lifespan, recommended storage methods, and tips to extend their longevity. So, let’s dive in and ensure your bike is always ready for the road ahead.
Key Takeaways
- Proper storage of bicycle tires is crucial for prolonging their lifespan.
- Keeping tires away from direct sunlight, extreme temperatures, chemicals, and sharp objects is important.
- Using tire covers or bags can help protect tires from dust and debris during storage.
- Recycling and proper disposal of old or damaged tires is important for reducing landfill waste, conserving natural resources, saving energy, and reducing pollution and soil contamination.
Factors That Affect the Lifespan of Bicycle Tires in Storage
You might be wondering how long your bicycle tires can last in storage and what factors can affect their lifespan. Well, one important factor is the recommended storage temperature. Extreme temperatures can cause the rubber to deteriorate faster, so it is best to store your tires in a cool and dry environment.
Additionally, UV exposure can also have a negative impact on tire lifespan. The sun’s rays can break down the rubber compounds over time, leading to cracking and dryness. To protect your tires from UV damage, it is recommended to store them in a dark place or use tire covers.
Now that you know the factors that affect tire lifespan in storage, let’s move on to the recommended storage methods for bicycle tires.
Recommended Storage Methods for Bicycle Tires
Before storing bicycle tires, it’s important to clean and dry them thoroughly. This will prevent any moisture or dirt from causing damage during storage.
Using tire bags or covers is also recommended to protect the tires from dust and debris, which can lead to deterioration over time.
Lastly, it’s crucial to store the tires in a cool, dry, and dark place to maintain their quality and extend their lifespan.
Clean and Dry the Tires Before Storage
After cleaning and drying the tires, make sure to store them in a cool and dry place. Proper storage is crucial to ensure the longevity of your bicycle tires. Here are some cleaning methods and storage containers you can use:
- Use a mild soap and water solution to clean the tires. Avoid using harsh chemicals as they can damage the rubber.
- Gently scrub the tires with a soft brush or cloth to remove dirt and grime.
- Rinse the tires thoroughly and allow them to air dry completely before storage.
- Store the tires in airtight plastic bags or containers to prevent moisture buildup.
- Place the containers in a cool and dry area, away from direct sunlight and extreme temperatures.
By following these cleaning methods and using appropriate storage containers, you can protect your tires from unnecessary wear and tear.
Next, I will discuss the importance of using tire bags or covers to protect the tires from dust and debris.
Use Tire Bags or Covers to Protect from Dust and Debris
To protect your tires from dust and debris, it’s recommended to use tire bags or covers. Tire maintenance is crucial to ensure the longevity of your bicycle tires. One important aspect of tire maintenance is tire rotation. Regularly rotating your tires helps distribute the wear evenly, increasing their lifespan.
By using tire bags or covers, you provide an additional layer of protection against dust and debris that can accumulate during storage. These bags or covers act as a barrier, preventing any unwanted particles from settling on the tires and causing damage. However, it’s important to note that tire bags or covers should not be used as a substitute for proper tire storage.
It’s essential to store your tires in a cool, dry, and dark place to avoid any deterioration caused by extreme temperature or exposure to sunlight.
Store Tires in a Cool, Dry, and Dark Place
Make sure you store your tires in a cool, dry, and dark place to protect them from any potential damage. The storage temperature plays a crucial role in preserving the quality of your bicycle tires. Extreme heat or cold can cause the rubber to deteriorate, leading to cracks and reduced performance.
It is recommended to store your tires at a temperature between 50°F and 75°F (10°C to 24°C) to ensure optimal conditions. Additionally, humidity can also have a negative impact on tire longevity. High humidity levels can promote the growth of mold and mildew, which can weaken the tire structure. Therefore, it is essential to store your tires in a dry environment, preferably with a humidity level below 60%.
By following these guidelines, you can prolong the lifespan of your stored bicycle tires and ensure they are ready for use when needed.
Now, let’s delve into how long bicycle tires can last in storage.
How Long Can Bicycle Tires Last in Storage?
Bicycle tires can last for a long time in storage if properly stored. It is recommended to store tires in a cool, dry, and dark place to prevent damage and degradation. The recommended storage temperature for bicycle tires is between 40°F and 100°F (4°C and 38°C). Extreme temperatures can cause the rubber to deteriorate quickly, leading to cracks and reduced performance.
Additionally, it is important to store tires either vertically or horizontally to prevent deformation. Storing them in an upright position can help maintain their shape and prevent flat spots from forming.
To extend the lifespan of bicycle tires in storage, it is crucial to follow these guidelines and regularly inspect and rotate the tires. By taking these precautions, you can ensure that your stored bicycle tires remain in good condition and ready for use when needed.
Tips to Extend the Lifespan of Bicycle Tires in Storage
If you want to ensure your stored bicycle tires remain in good condition and ready for use, there are a few tips you can follow.
First, consider storing your tires in a cool and dry place to minimize the impact of temperature on their lifespan. Extreme heat or cold can cause the rubber to degrade faster, leading to premature wear and tear.
Second, if you have limited space, try to store your tires in a vertical position rather than stacking them horizontally. This will help prevent any unnecessary pressure or distortion on the tires.
Lastly, it’s a good idea to periodically check on your stored tires and rotate them to prevent flat spots from forming. Taking these precautions will help extend the lifespan of your bicycle tires in storage.
Now, let’s move on to the next section and talk about proper handling and care when taking tires out of storage.
Proper Handling and Care When Taking Tires Out of Storage
When taking tires out of storage, it’s important to check for signs of damage or deterioration. This includes looking for any cracks, cuts, or bulges in the tire.
Additionally, it’s crucial to inflate the tires to the recommended pressure to ensure proper performance and prevent any potential issues.
Lastly, inspect the tread wear and replace the tires if necessary, as worn-out tread can affect traction and safety while riding.
Check for Signs of Damage or Deterioration
Before storing your bicycle tires, always check for any signs of damage or deterioration. Several factors can affect the durability of tires, such as exposure to extreme temperatures, moisture, and improper storage techniques. Inspect the tires thoroughly for signs of age and degradation, including cracks, bulges, or dry rot.
Pay close attention to the sidewalls and tread area, as these are common areas for damage. Additionally, check the tire pressure to ensure it is within the recommended range. Properly inflated tires will help prevent damage during storage and ensure optimal performance when you are ready to use them again.
Remember, maintaining the condition of your tires is crucial for safe and enjoyable rides.
Now, let’s move on to the next section, where I will explain how to properly inflate your tires to the recommended pressure.
Inflate Tires to the Recommended Pressure
To properly inflate your tires, make sure you check the recommended pressure and use a tire pump with a pressure gauge. Proper inflation techniques are crucial for the longevity and performance of your bicycle tires. When tires are not inflated to the correct pressure, they can become prone to damage and wear more quickly.
Regularly checking tire pressure has numerous benefits. Firstly, it ensures optimal traction and control, especially when riding on different surfaces or in varying weather conditions. Secondly, it helps prevent punctures by reducing the risk of pinch flats. Additionally, properly inflated tires improve energy efficiency, making your rides smoother and more enjoyable.
By incorporating this simple maintenance routine into your cycling routine, you can extend the lifespan of your tires and enhance your overall riding experience.
Now, let’s move on to inspecting tread wear and replacing if necessary.
Inspect Tread Wear and Replace if Necessary
Check the tread wear on your bicycle tires regularly and replace them if necessary to ensure optimal performance and safety.
Inspecting tread wear is an essential part of maintaining your bicycle tires. Look for signs of uneven wear, such as bald spots or excessive wear on one side of the tire. If you notice any of these signs, it is time to replace your tires.
By replacing worn tires, you can prevent potential accidents and maintain better control while riding. Additionally, maintaining proper tire pressure is crucial for optimal performance. Ensure that your tires are inflated to the recommended pressure, as underinflated tires can affect your bike’s handling and increase the risk of flats.
When storing your bicycle tires, it is important to keep them in proper conditions, away from direct sunlight and extreme temperatures. This will help prolong their lifespan.
Now, let’s discuss recycling and disposal options for old or damaged bicycle tires.
Recycling and Disposal Options for Old or Damaged Bicycle Tires
There are various options for recycling and disposing of old or damaged bicycle tires.
When it comes to recycling options, one of the best choices is to take the tires to a local recycling facility that accepts rubber materials. These facilities have the capability to properly process the tires and turn them into new products or materials.
Another option is to check with your local bike shop or municipality to see if they have a tire recycling program in place. They may be able to collect and recycle the tires for you.
If recycling is not an option, proper disposal methods should be followed. This includes contacting your local waste management facility to inquire about their procedures for disposing of tires. They may require you to drop off the tires at a designated location or schedule a pick-up.
It is important to ensure that old or damaged bicycle tires are disposed of correctly to minimize their impact on the environment.
Frequently Asked Questions
Can I store my bicycle tires outside in extreme weather conditions?
Extreme weather can significantly reduce the lifespan of bicycle tires in storage. To protect them, store tires in a dry, temperature-controlled environment. If storing outside is necessary, use tire covers and ensure they are elevated to avoid direct contact with the ground.
What is the recommended storage temperature for bicycle tires?
The recommended storage temperature for bicycle tires is between 40-70°F. To properly clean tires before storage, use soap and water to remove debris and let them dry thoroughly.
Are there any specific storage containers or bags that are best for storing bicycle tires?
The best way to store bicycle tires is to use airtight containers or bags to prevent moisture and dust. Before storage, clean the tires thoroughly with mild soap and water. To prevent mold and mildew, ensure the tires are completely dry before storing.
Can bicycle tires be stored vertically or should they always be stored horizontally?
Bicycle tires can be stored vertically or horizontally, but vertical storage may lead to tire degradation. When stored vertically, the weight of the tire can cause deformation and stress on the sidewalls, potentially reducing their lifespan.
Is it necessary to inflate bicycle tires before storing them?
It’s best to inflate bicycle tires before storing them to prevent dry rot. Using tire sealant for long term storage has advantages, such as maintaining tire pressure and preventing air leaks.
Conclusion
Well folks, it turns out that bicycle tires in storage are quite the delicate creatures. With factors like temperature, humidity, and even the tire’s age playing a role in their lifespan, it’s no wonder they can’t handle the pressure.
But fear not, fellow cyclists, for there are recommended storage methods and tips to keep those tires in top shape. And just how long can they last? Well, that depends on a variety of factors, but with proper care and handling, you can certainly squeeze some extra miles out of them.
So remember, treat your tires right and they’ll keep you rolling for years to come. And if all else fails, there’s always recycling and disposal options for those worn-out wheels.
Happy cycling, everyone!
-
Electric Bike4 months ago
How To Turn Your Bike Into An Electric Generator
-
Beginners Guides1 year ago
A Guide to Right Hybrid Bike Posture: How to Sit on the Bike for Optimal Performance
-
Electric Bike4 months ago
Where To Get Free Electric Hybrid Bike
-
Beginners Guides1 year ago
Where Are KTM Motorcycles Made?
-
Gravel Bike4 months ago
Where To Ride Gravel Bike San Diego
-
Electric Bike4 months ago
How To Send A Electric Bike To Hawaii
-
Electric Bike3 months ago
How Do I Fix Error 30 On My Electric Bike
-
Bike1 year ago
Advantages and Disadvantages of a Carbon Fiber Bike Frame