To adjust your bike seat for maximum comfort, start by finding the right saddle height. Use the heel-pedal method: place your heel on the pedal at the 6 o’clock position; your leg should be fully extended. If it bends, adjust the seat height. Next, make sure your saddle is level using a spirit level for the correct angle. Tweaking these settings will enhance comfort and performance. If you want to learn more effective adjustment tips, just keep going!
Key Takeaways
- Use the Heel-Pedal Method to ensure proper saddle height, achieving full leg extension with a slight knee bend at the bottom of the pedal stroke.
- For optimal comfort, aim for a knee angle of 25-35° during cycling, adjusting saddle height as needed.
- Set saddle height according to bike type: lower for mountain bikes, appropriate for road bikes, and slightly higher for electric bikes to accommodate added weight.
- Start with a horizontal saddle angle using a spirit level, then adjust based on personal comfort preferences and secure it properly.
- Regularly test adjustments on short rides to ensure ongoing comfort and efficiency in your cycling experience.
Understanding Saddle Height Adjustment

Getting your saddle height right is essential for a comfortable ride. Proper adjustment guarantees ideal leg extension, allowing for a slight bend in your knee when the pedal is at the bottom.
Achieving the correct saddle height is crucial for comfort, ensuring optimal leg extension and a slight knee bend while pedaling.
To adjust the height, you can use methods like the Lemond method, which involves measuring your inseam against a wall and multiplying by 0.883 for perfect saddle positioning.
Regularly check that your knee aligns over the pedal axle when the crank is horizontal to prevent discomfort and knee pain.
Remember, it may take a few test rides to find that perfect saddle height, as individual preferences and body measurements vary.
Fine-tuning your saddle position can greatly enhance your cycling experience, similar to how color accuracy impacts the overall image quality in home cinema projectors.
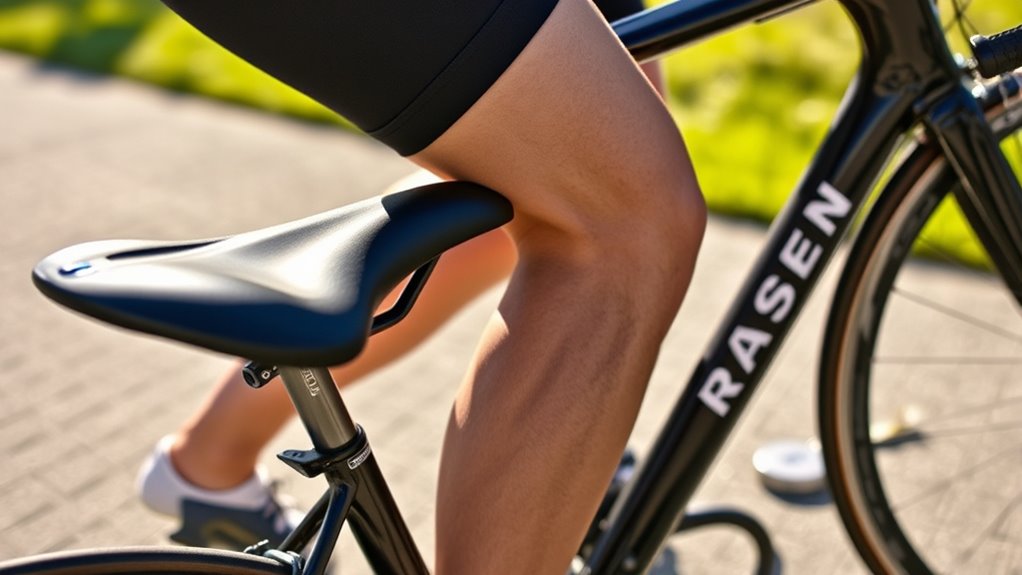
Heel-Pedal Method for Saddle Height

To find the right saddle height, try the Heel-Pedal Method by placing your heel on the pedal at the 6 o’clock position.
If your knee bends, it means your saddle’s too low, while if you can’t keep your heel on the pedal, it’s too high.
A slight bend in your knee when your foot’s in a natural position guarantees you’re set up for comfort and efficiency. Additionally, ensuring your bike is properly adjusted can enhance your overall riding experience, much like how airless sprayers provide a smooth finish for painting projects.
Proper Foot Positioning
Adjusting your bike seat for comfort starts with proper foot positioning, and the heel-pedal method is a simple yet effective technique for determining saddle height.
To use this method, sit on your bike and place your heel on the pedal at the 6 o’clock position. Your leg should be fully extended, with no bend at the knee.
If your knee is bent while your heel is on the pedal, raise the saddle. On the other hand, if you can’t maintain heel contact, lower the saddle.
When the pedal returns to its natural position, aim for a slight bend in the knee. Regularly test ride after adjustments to verify you achieve ideal comfort. Additionally, just as nature connection can enhance emotional well-being, ensuring your bike seat is correctly adjusted can significantly improve your overall riding experience.
Knee Angle Importance
Understanding the importance of knee angle during cycling can greatly enhance your comfort and performance.
To achieve the correct saddle height, use the heel-pedal method: sit on your bike and place your heel on the pedal at the 6 o’clock position. This should allow your leg to extend fully, ensuring a straight knee.
When you return the pedal to its natural position, there should be a slight bend in your knee. Aim for a knee angle of 25-35°, especially for road cycling, to prevent strain and maximize efficiency.
If you’re a beginner, a lower saddle height can help with foot reach, making the heel-pedal method essential for finding the perfect balance and comfort on your rides. Additionally, consider investing in custom insoles for running comfort to further enhance your overall cycling experience.
Adjusting for Comfort
Finding the right saddle height can make a significant difference in your cycling experience.
To use the heel-pedal method, sit on your bike and place your heel on the pedal at the 6 o’clock position. Your leg should be fully extended with a straight knee, indicating ideal saddle height. If your knee bends, raise the saddle; if you can’t maintain heel contact, lower it.
A slight knee bend when your foot returns to its natural position helps prevent discomfort and supports proper leg extension. This method is especially helpful for inexperienced cyclists, ensuring a comfortable foot reach while pedaling efficiently.
Regularly test your saddle height after adjustments, as personal preference plays a key role in achieving ultimate comfort.
Lemond Method for Saddle Height
To achieve ideal comfort while cycling, the Lemond Method for saddle height provides a straightforward and effective approach.
Start by standing straight against a wall, using a hardcover book or wooden stick between your legs to measure your inseam length. Mark this measurement on the wall for calculation.
Next, multiply your inseam by 0.883 to find the best saddle height, which is the distance from the saddle top to the bottom bracket.
Once you have this personal information, make the adjustment by setting the saddle to the calculated height and securing it properly on the seat post.
Finally, take a test ride to confirm comfort and positioning, allowing for any fine-tuning as needed to enhance your cycling experience. This adjustment is crucial for ensuring that you can efficiently utilize the electric bike’s power while maintaining comfort during your rides.
Tips for Setting Saddle Height on Different Bikes

When you’re adjusting your saddle height, using methods like the heel-pedal technique or the Lemond method can really help.
Keep in mind that different bikes may require different settings, especially between road and mountain bikes.
It’s important to find the right fit for your riding style to enhance comfort and performance. Additionally, understanding personal fragrance can also improve your overall biking experience by boosting your confidence while riding.
Heel-Pedal Method Explained
Adjusting your bike seat can make a significant difference in your riding comfort, especially with the heel-pedal method. This technique guarantees your saddle height is just right for peak performance.
Here’s how to use it:
- Sit on your bike with cycling shoes and place your heel on the pedal at the 6 o’clock position.
- Make certain your leg is fully extended, keeping your knee straight for the ideal saddle height.
- If your knee bends, raise the saddle; if you can’t maintain heel contact, lower it.
- Aim for a slight bend in the knee when your foot returns to the natural position during pedaling.
Always follow adjustments with a test ride to confirm comfort and proper knee position! Additionally, ensuring your tire pressure is within the optimal range of 30-40 PSI for gravel can enhance your comfort further while riding on mixed terrain.
Lemond Method Overview
While many cyclists rely on personal feel for saddle height, the Lemond Method offers an objective and reliable approach that can enhance your riding experience.
To get started, stand straight against a wall with a hardcover book or wooden stick between your legs. Mark the wall at this position to measure your inseam length accurately.
Next, multiply your inseam measurement by 0.883 to calculate your ideal saddle height. This method guarantees the distance between the saddle top and bottom bracket is tailored to your body, promoting comfort during rides.
After setting your saddle height based on this calculation, take a test ride and make any necessary adjustments.
The Lemond Method is effective for all bike types, whether you’re a beginner or experienced cyclist. Additionally, proper gear selection is essential for ensuring a comfortable and enjoyable ride.
Considerations for Different Bikes
The right saddle height can vary considerably depending on the type of bike you ride. To maximize comfort and efficiency, consider these tips:
- Mountain Bikes: Lower your saddle for better maneuverability on uneven terrain.
- Road Bikes: Aim for a knee angle of 25-35° at the lowest pedal position for ideal efficiency.
- Hybrid Bikes: Set a versatile saddle height that allows a slight bend in your knee at the bottom of the pedal stroke.
- Electric Bikes: Raise the saddle to maintain comfort and prevent strain, as added weight may alter your riding posture.
Adjusting your saddle height based on your bike type helps enhance your overall riding experience and guarantees proper knee alignment. It’s also important to remember that maintaining indoor air quality can affect your comfort levels while riding, especially if you have allergies.
Setting the Correct Saddle Angle

Getting the saddle angle right is essential for a comfortable ride, as an improper angle can lead to discomfort, such as numbness in the pubic area during longer journeys.
Start by setting your saddle horizontally, using a spirit level for accuracy. A level saddle nose is a good baseline, but personal adjustments are necessary for ideal comfort.
Remember, the perfect saddle angle varies based on your body weight, age, flexibility, and riding style, so don’t hesitate to test different angles. Understanding tuning laws can help you make modifications that improve your overall riding experience.
If you’re using a single clamp bolt seatpost, loosen the bolt to adjust the angle. If it’s a two-bolt seatpost, loosen one bolt and tighten the other for easier adjustments.
Comfort is key, so make it personal!
Adjusting Saddle Angle on Single Clamp Bolt Seatposts
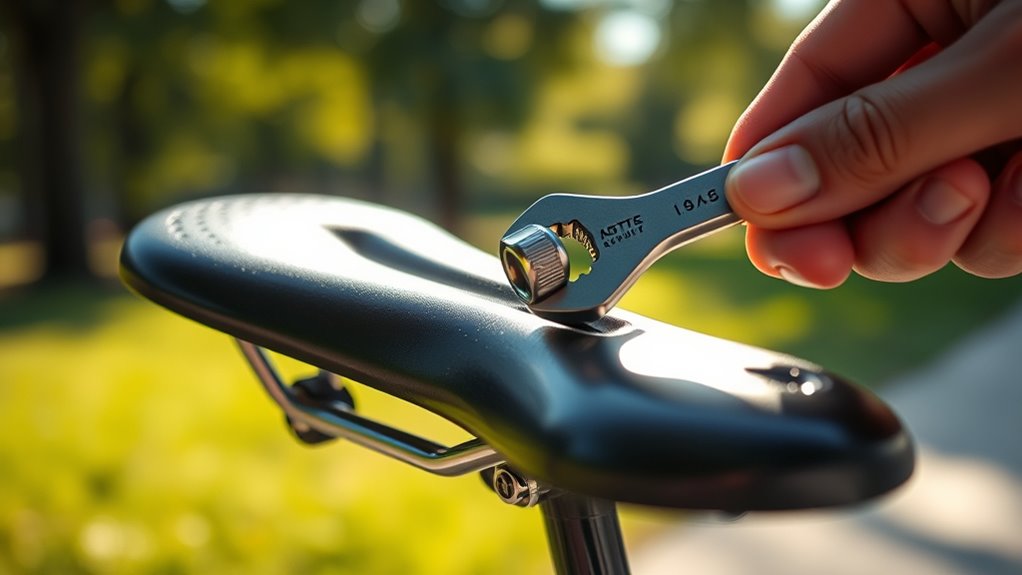
Adjusting the saddle angle on a single clamp bolt seatpost is straightforward and can make a noticeable difference in your comfort.
Adjusting your saddle angle is an easy way to enhance comfort on your ride.
Follow these steps to guarantee proper adjustment:
- Loosen the clamp bolt to allow the saddle to tilt without removing it.
- Check for a horizontal position using a spirit level; this sets the basic angle.
- Adjust the angle as needed, aiming for comfort and improved blood flow.
- Tighten the clamp bolt securely to lock the new position in place.
Adjusting Saddle Angle on Two Clamp Bolt Seatposts
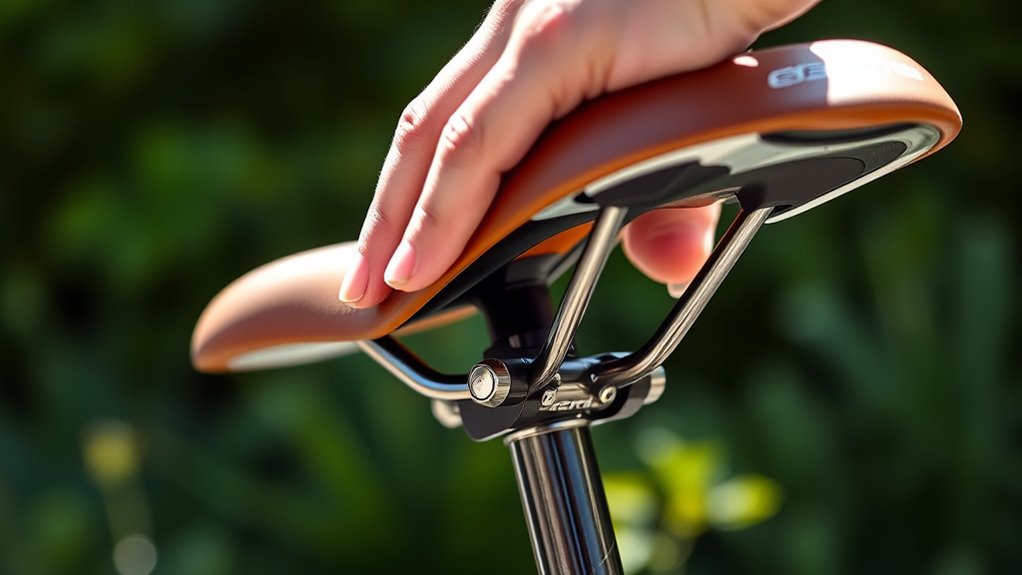
When it comes to adjusting the saddle angle on a two-clamp bolt seatpost, the process is simple yet effective for enhancing your comfort.
Start by loosening one bolt while keeping the other tight, allowing you to easily change the saddle’s angle. Use a spirit level to verify the saddle is set horizontally as a starting point.
Once you find the desired angle, securely tighten both bolts to lock it in place.
Achieving Proper Horizontal Saddle Position

Achieving a proper horizontal saddle position is essential for maximizing your comfort and efficiency while riding. Here’s how to find the right position:
Finding the right horizontal saddle position can greatly enhance your riding comfort and efficiency.
- Center the Saddle: Confirm the saddle is centered horizontally to prevent slipping that can cause discomfort or knee pain.
- Align Kneecap with Pedal: When the pedal’s horizontal, your kneecap should align with the pedal axle, serving as a great starting point.
- Check Level with a Plumb Bob: Use a plumb bob or a DIY version to verify the saddle’s level; the nose should be horizontal.
- Fine-Tune for Preference: Remember, individual preferences matter; minor adjustments may be necessary to achieve that perfect fit.
Following this rule of thumb will enhance your riding experience considerably.
Tools Needed for Saddle Adjustment

To guarantee a comfortable ride, having the right tools for saddle adjustment is vital. Start with an Allen key to loosen and tighten the bolts on your saddle.
A mechanic’s level guarantees your saddle’s horizontal positioning, while a yardstick helps you measure saddle height accurately. For precise alignment, consider using a plumb bob made from string and washers.
Investing in a torque wrench is essential, as it secures adjustments to the manufacturer’s specifications, preventing any accidental loosening during rides. A quick-release lever on the seat post can simplify future adjustments without needing extra tools.
Finally, keep a small toolkit handy, complete with various Allen keys and screwdrivers, for on-the-go saddle adjustment while riding.
Frequently Asked Questions
How to Make a Bike Seat More Comfy?
To make your bike seat more comfy, start by adjusting the height so your knees have a slight bend at the bottom of the pedal stroke.
Consider tilting the seat slightly back for better support, and keep it level if it’s flat.
Check that it’s horizontally aligned to prevent numbness.
You can also add cushioning with a gel cover or padded shorts for extra comfort on long rides.
Regularly inspect your saddle for wear, too!
Why Is My Bike Seat so Uncomfortable?
If your bike seat’s causing discomfort, it might be too high, too low, or misaligned. You might feel knee pain, numbness, or chafing, all signs of an ill-fitting saddle.
It isn’t just about height; the angle and width also matter. If it doesn’t match your body type or riding style, it’ll only get worse over time.
Regular adjustments and a bit of maintenance can transform your ride from painful to pleasurable.
Should You Be Able to Touch the Ground When Sitting on Your Bike?
You might wonder if you should touch the ground when sitting on your bike. Ideally, your toes should just graze the ground for stability while stopped, but it’s essential to prioritize saddle height for efficient pedaling.
A properly adjusted saddle allows a slight bend in your knee at the bottom of the pedal stroke, enhancing comfort and performance. So, while touching the ground is helpful, focus on finding the right saddle height for best riding.
How Can I Make My Bike Seat Less Painful?
Think of your bike seat as a bridge, connecting you to the open road.
If that bridge isn’t comfortable, your ride becomes a struggle. To ease the pain, start by adjusting the height for a slight knee bend at the bottom of the pedal stroke.
Experiment with different saddle shapes and guarantee it’s level. Consider options with cutouts to relieve pressure.
Finding the right fit transforms your journey, turning discomfort into delight.
Conclusion
Now that you know how to adjust your bike seat for maximum comfort, you’re just a few tweaks away from feeling like you’re floating on a cloud while pedaling! Say goodbye to discomfort and hello to the ride of your dreams! With your perfectly positioned saddle, you’ll zoom past your friends, leaving them in awe as you conquer every hill and curve. So hop on, adjust that seat, and get ready for the ultimate cycling experience that’ll make you feel like a biking superstar!