Tuning the front brakes of your bike is a vital activity for every cyclist. Having brakes that work well is key to ensuring your safety while riding, particularly when dealing with steep inclines or navigating through crowded roadways.
Fortunately, adjusting your front brakes is a relatively straightforward process that can be done with just a few basic tools and some know-how.
Before diving into the nitty-gritty of adjusting your front brakes, it’s important to identify whether your brakes actually need adjusting in the first place. Signs that your brakes may need adjusting include squeaking or rubbing noises, difficulty applying the brakes, or brakes that feel loose or tight.
If you notice any of these symptoms, it’s time to gather your tools and get to work. In this article, I’ll guide you through the steps necessary to adjust your front brakes, so you can ride with confidence and peace of mind.
Key Takeaways
- Proper front brake adjustment is crucial for safety when riding a bicycle.
- Signs of brake issues include squeaking, difficulty applying, and feeling loose/tight.
- Tools needed for front brake adjustment include Allen keys, wrench, and clean rag.
- Common issues when adjusting front brakes include brake pad positioning and cable tension, which can be adjusted using Allen wrench and pliers respectively.

Under Armour Squeeze Water Bottles, 32 oz Water Bottles, Sideline Sports Water Bottle with Quick-Shot Lid, Quick & Easy Hydration, Gym Water Bottles, Squeeze Bottle, 1 32oz Bottle
- Easy Hydration: Quick-shot lid and one-way valve
- On-the-Go Use: One-hand operation for active hydration
- Measurement Markings: Ounces and milliliters for tracking
As an affiliate, we earn on qualifying purchases.
Identify if Your Brakes Need Adjusting
If you’re experiencing a lack of stopping power or your brakes are rubbing against the wheel, it’s time to check and adjust them. Common issues that may cause this problem include worn brake pads, loose cables, or misaligned calipers.
Signs of wear can be seen on the brake pads, which may appear thinner than usual or have a shiny, glazed surface. Loose cables can cause the brake lever to feel spongy or have excessive travel, while misaligned calipers can cause the brake pads to hit one side of the rim before the other.
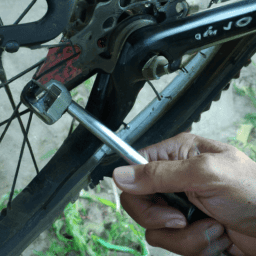
Before you begin adjusting your front brakes, you’ll need to gather the right tools. This includes a set of Allen keys for removing the brake pads and adjusting the calipers, a wrench for adjusting the cable tension, and a clean rag for wiping down the brake components.
With these tools in hand, you’ll be ready to tackle the task of adjusting your front brakes.
Gather the Right Tools
Make sure you’ve got all the necessary gear to get those wheels stopping smoothly. To adjust your front brakes, you’ll need an Allen wrench set, pliers, and a rag.
Before starting, make sure your bike is stable and secure.
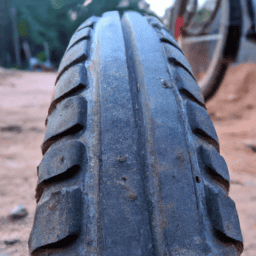
First, check the brake pads for wear and tear. If they’re worn down, replace them.
Then, check if the brake cables are properly lubricated and move smoothly. If they’re not, apply some proper lubrication.
Finally, check if the brake bolts are tight. If they’re loose, use your Allen wrench set to tighten them up.
With all these done, you’re now ready to adjust your front brakes.
Now that you’ve gathered the right tools and checked for wear and tear, you can proceed to adjust your front brakes.
Adjusting Your Brakes
You’re ready to get those wheels stopping smoothly – let’s dive right into adjusting your brake system!
First, let’s talk about common issues you may encounter when adjusting your front brakes. One issue is brake pad positioning. If your brake pads aren’t aligned correctly, they won’t make full contact with the wheel rim, resulting in decreased braking power.
To adjust the positioning, use an Allen wrench to loosen the bolt that holds the brake pad in place. Then, adjust the angle of the pad so that it’s parallel with the rim. Finally, tighten the bolt back up.
Another common issue is brake cable tension. If the cable is too loose, your brakes won’t engage properly. To adjust the tension, locate the brake cable where it meets the brake lever. Use a pair of pliers to loosen the cable clamp bolt. Then, pull the cable tight so that there’s no slack in the cable. Finally, tighten the clamp bolt back up.
Now that we’ve adjusted the positioning of the brake pads and cable tension, it’s time to test your brakes to make sure they’re working properly.
Test Your Brakes
To test your brakes, press down on the brake lever with your palm and pay attention to the pressure and precision. The brake pads should make contact with the rim of the wheel and stop it from turning. If there isn’t enough tension in the brake cable, the brake pads won’t apply enough pressure to the rim to stop the wheel.
Common issues that may arise with front brakes include loose or stretched brake cables, worn brake pads, and misaligned brake calipers. To adjust the brakes, first ensure that the brake pads are aligned with the rim of the wheel. If they’re not, loosen the brake caliper mounting bolt and adjust the position of the brake pads.
Next, check the tension of the brake cable. If it’s loose, tighten the cable by turning the barrel adjuster on the brake lever. If the brake pads are worn, replace them with new ones. These basic brake adjustment techniques can help improve the stopping power and precision of your front brakes.
Moving forward, let’s discuss some tips for maintenance and troubleshooting.
Maintenance and Troubleshooting
Maintaining and troubleshooting your bike’s braking system will ensure a safe and enjoyable ride. Common issues that may arise with front brakes on a bicycle include loose or misaligned brake pads, worn brake cables, and dirty or worn brake calipers. To avoid these issues, it’s important to perform regular inspections and preventive maintenance on your brakes.
To start, check the brake pads for wear and tear. If they’re worn down, replace them immediately. Also, ensure that the brake pads are properly aligned with the rim of the wheel. If they’re not aligned, loosen the mounting bolts and adjust the position of the pads until they’re centered on the wheel.
Next, inspect the brake cables for damage or fraying. If the cables are worn, replace them as soon as possible. Finally, clean the brake calipers and ensure that they’re properly tightened to the frame of the bike.
By doing these preventive measures, you can ensure that your bike’s front brakes will work properly and keep you safe while riding.
In case you encounter any issues with your front brakes, there are a few troubleshooting steps you can take. If the brakes aren’t grabbing properly, adjust the cable tension by turning the barrel adjuster counterclockwise until the brakes engage. If the brakes are rubbing against the wheel, adjust the position of the brake pads or realign the wheel. If none of these steps solve the issue, it may be time to replace the brake pads or cables entirely.
With these tips, you can keep your front brakes in top shape and enjoy a smooth and safe ride.
Frequently Asked Questions
How often should I adjust my front brakes on my bicycle?
I typically adjust my front brakes on my bicycle every few months, depending on how often I ride. Signs of wear include squeaking or reduced stopping power. It’s important to stay on top of regular maintenance to ensure safe and efficient braking.
Can I use any type of brake pads for my front brakes?
When choosing brake pads for my front brakes, I consider factors like durability, stopping power, and noise. Pros of metallic pads include longevity and stopping power, while cons include noise and wear on rims. Organic pads offer a quieter ride but wear out faster.
What should I do if my front brakes are not responding after adjusting them?
When my front brakes don’t respond after adjusting them, I troubleshoot by checking the brake lever tension, cable routing, and alignment of the brake pads. Making small adjustments can make a big difference in braking performance.
How do I know if my brake cables need to be replaced?
To determine if brake cables need replacing, inspect them for fraying or kinks. Check for tension when squeezing the brake lever. If the lever feels loose or the brakes are not responding, replacing brake cables may be necessary.
Is it necessary to adjust both my front and rear brakes at the same time?
Adjusting both front and rear brakes at the same time has pros and cons. It ensures uniformity of braking power but may require more time. Safety concerns arise if one brake is stronger than the other.
Conclusion
So there you have it, folks! Adjusting the front brakes on your bicycle isn’t as complicated as it may seem. By following these simple steps, you can ensure that your bike stops smoothly and safely every time you hit the brakes.
Remember to always check your brakes before riding and perform regular maintenance to keep them in top condition.
In conclusion, adjusting your front brakes is like tuning an instrument. It requires patience, attention to detail, and a willingness to make small adjustments until everything is just right. With these tips in mind, you can fine-tune your brakes like a pro and enjoy a safe, smooth ride every time you hit the road.
So go ahead and give it a try – your bike (and your safety) will thank you!