Were you aware that, as per the National Highway Traffic Safety Administration, 45% of bike crashes are a result of a collision with an automobile? This highlights the critical importance of maintaining your bicycle in excellent shape, with a special emphasis on the brakes.
As someone who loves to ride my bike, I know how crucial it is to have functioning brakes to ensure a safe and enjoyable ride. In this article, I will guide you through the process of adjusting V brakes on your bicycle, so you can have the peace of mind knowing your brakes are in good working order.
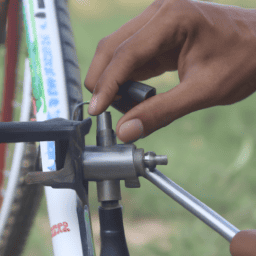
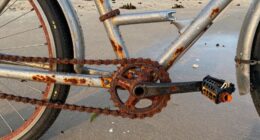
Before we begin, make sure you have the necessary tools on hand. You will need a 5mm Allen wrench, a pair of pliers, and a cable cutter or a pair of wire cutters. It’s also a good idea to have a clean work area and a stand to hold your bike steady.
Once you have everything you need, it’s time to assess your brakes and determine if they need adjusting. Don’t worry, I’ll walk you through the process step by step. Let’s get started!
Key Takeaways
- Regular brake maintenance is crucial to prevent accidents and costly repairs.
- Adjusting V brakes requires specific tools and a clean workspace.
- Proper alignment of brake pads is important for optimal braking performance.
- Testing brakes before riding is essential for safety.

Magicshine HORI1300S Bike Headlight, Compatible with Garmin/Wahoo, 1300 Lumens High & Low Beam Front Light, USB-C Rechargeable, IPX6 Waterproof for Night Riding and Urban Cycling-Black
DUAL OPTICS, HIGH & LOW BEAM: Max 1300LM high beam conquers the darkest trails. The anti-glare low beam...
As an affiliate, we earn on qualifying purchases.
Gather Your Tools
Gather your tools, including a 5mm Allen key and a pair of pliers, to adjust the v brakes on your bicycle. Before starting the process, it’s important to organize your workspace and take the necessary safety measures.
Find a flat and well-lit area to work on your bike, and make sure that it is stable before touching any brake components. Put on gloves to protect your hands from any sharp edges, and keep a small towel or rag nearby to wipe off any dirt or grease.
Once you have your workspace set up, it’s time to assess your brakes. Squeeze both brake levers to see if they are working properly and if they are stopping your bike effectively. If the brake pads hit the rim with too much force or not enough, or if the brake levers feel loose or difficult to pull, then you’ll need to adjust your v brakes.

Wahoo Fitness KICKR CORE 1
CONTROLLED RESISTANCE - When connected to your smartphone, tablet, computer, or GPS bike computer, KICKR CORE indoor smart...
As an affiliate, we earn on qualifying purchases.
Assess Your Brakes
Before adjusting my V brakes on my bicycle, I always make sure to assess my brakes. This involves checking the brake pads and their alignment, as well as inspecting the cable tension.
I ensure that the brake pads are properly positioned and have enough life left in them, and that the cable tension is neither too loose nor too tight.
Check Brake Pads and Alignment
First, take a close look at your brake pads and make sure they’re not worn down to the metal. Brake pad wear is a common issue that can impact the effectiveness of your V-brakes. The table below outlines some signs of wear and alignment issues to look out for when inspecting your brake pads.
| Issue | Description | Solution |
|---|---|---|
| Uneven Wear | One side of the brake pad is more worn than the other | Adjust alignment of the brake pad |
| Glazing | Brake pad surface is shiny and smooth, reducing friction | Sand the brake pad surface or replace pads |
| Embedded Particles | Small rocks or debris are embedded in the brake pad | Remove debris with pliers or replace pads |
| Cracking | Signs of fatigue or age, can lead to brake failure | Replace pads immediately |
| Worn Down | Brake pad has no material left, exposing metal | Replace pads immediately |
Ensuring proper alignment of your brake pads is crucial for optimal braking performance. Once you have inspected your brake pads for wear and alignment issues, it’s time to move on to inspecting cable tension.
Inspect Cable Tension
Now it’s time to make sure you’ve got the proper cable tension to ensure smooth and responsive braking, giving you peace of mind while riding.
Start by loosening the pinch bolt that secures the cable to the brake arm. Next, pull the cable tight and re-tighten the pinch bolt.
Check the cable tension by squeezing the brake lever. If the lever feels too loose, tighten the adjusting barrel on the brake lever. Conversely, if the lever feels too tight, loosen the adjusting barrel.
Once you’ve got the desired cable tension, inspect the brake pivots for any dirt or debris. If necessary, clean them and apply lubricant to ensure smooth operation.
With the cable tension and pivot lubrication taken care of, you’re ready to adjust your brakes for optimal performance.

ThinkRider X2Max Smart Bike Trainer Cycle Trainer Bicycle Trainer, Quiet Portable Design for Indoor Driving, Simulates 18% Slope, ANT + & BLE
Strong compatibility: Supports BLE and ANT + dual mode protocols and is compatible with mainstream cycling software such...
As an affiliate, we earn on qualifying purchases.
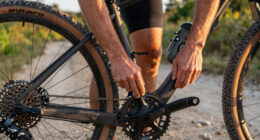
Adjust Your Brakes
Perfectly positioned brake pads provide powerful stopping power on your bike. To adjust your v brakes, start by loosening the brake noodle and squeezing the brake pads together. This will allow you to adjust the position of the brake pads. The brake pads should be positioned so that they touch the rim of the wheel evenly. If one pad is closer to the rim than the other, adjust the position until they are even.
Next, adjust the tension on the brake cable. Use the table below to troubleshoot common issues and adjust the cable tension accordingly. Once the cable tension is adjusted, tighten the brake noodle and test your brakes. Remember, if your brakes are not functioning properly, it is important to fix the issue before riding your bike.
| Common Issue | Troubleshooting Technique |
|---|---|
| Brakes are too loose | Tighten cable |
| Brakes are too tight | Loosen cable |
| One brake pad is closer | Adjust brake pad position |
| Brake pads are worn | Replace brake pads |
With your brake pads positioned and cable tension adjusted, it’s time to test your brakes. Pull the brake lever and make sure the brake pads contact the rim evenly. If they do not, adjust the position of the brake pads until they do. Once the brakes are functioning properly, you’re ready to hit the road.
Saris Fluid2 Indoor Bike Trainer, Fits Road and Mountain Bikes, Compatible with Zwift App, Made in USA
REALISTIC ROAD-LIKE RIDE: Precision fluid resistance mimics outdoor cycling with progressive resistance that increases as you pedal harder,...
As an affiliate, we earn on qualifying purchases.
Test Your Brakes
Make sure your brakes work properly before hitting the road, or you may find yourself in a dangerous situation. To test your brakes, follow these safety tips:
- Find a safe and flat area to test your brakes.
- Squeeze the brake levers to check if the brakes engage properly.
- Listen for any unusual noises or squeaks while applying the brakes.
- Test the braking power by riding at a slow speed and applying the brakes gradually.
By performing these brake maintenance steps, you can ensure that your brakes are functioning properly and prevent any accidents on the road.
In the next section, I’ll explain how to maintain your brakes to keep them in top condition.
Maintain Your Brakes
You can ensure your brakes stay in top condition by giving them a little TLC every now and then, like cleaning and lubricating them regularly. Regular maintenance is crucial to ensure your brakes function properly and are safe to use.
Neglecting your brakes can cause them to wear out faster, which can lead to costly repairs or even accidents. One of the most common brake issues is brake pad wear. Over time, the brake pads will wear down and need to be replaced.
It’s important to replace them before they become too worn down, as this can cause damage to the brake rotor and affect your ability to stop. Other common issues include loose or sticky brake cables, worn out brake levers, and misaligned brake calipers.
By regularly maintaining your brakes, you can catch these issues early and prevent them from becoming more serious problems.
Frequently Asked Questions
Can I use v brake pads on a bike with disc brakes?
I wouldn’t recommend using V brake pads on a bike with disc brakes due to compatibility issues. Instead, consider alternative options such as purchasing disc brake pads or upgrading your entire braking system to accommodate the desired brake pads.
How often should I replace my v brake pads?
I replace my v brake pads every 1,000 miles or when they reach their wear limit of 1mm. Regular inspection during maintenance intervals is crucial to ensure proper braking performance and avoid premature wear.
Can I adjust the tension of my v brake cables?
Yes, I can adjust the tension of my V brake cables by adjusting the barrel adjuster or by manually pulling the cable tighter. Troubleshooting V brake cable tension involves checking for any frayed or damaged cables and adjusting as needed.
What should I do if my v brakes are making a squeaking noise?
My v brakes were making an unbearable squeaking noise. After troubleshooting the issue, I found that the brake pads were worn and needed to be replaced. Silencing v brake noise can be as simple as replacing the brake pads.
How do I know when it’s time to replace my v brake cables?
I check for wear on my V brake cables by examining them closely for fraying, kinks, or rust. If I notice any of these signs, I replace the cables to ensure safe and effective braking performance.
Conclusion
In conclusion, adjusting V brakes on a bicycle is a simple process that can be done with just a few tools and some patience. By following the steps outlined in this article, you can ensure that your brakes are working properly and safely.
However, some may argue that it’s easier to take your bike to a professional for brake adjustments. While this may be true for some, learning how to adjust your own brakes can save you time and money in the long run.
Imagine being out on a trail and suddenly realizing that your brakes aren’t working properly. You’re miles away from the nearest bike shop and have no idea how to fix the problem. By learning how to adjust your own brakes, you can avoid this scenario and have the confidence to tackle any brake issues that may arise.
So, grab your tools and get to work – your bike (and your safety) will thank you.