
Swapping out a bike tube might initially seem like a tough job, however, with the appropriate equipment and a little bit of training, it becomes a swift and straightforward process. As an avid biker, I’ve experienced plenty of punctures and have gotten pretty skilled at replacing tubes while out and about. In this piece, I’ll guide you through the process of changing a bike tube, enabling you to hit the road again without delay.
First and foremost, gather your tools and supplies. The essentials include a new tube, tire levers, a bicycle pump, and a wrench if your bike has bolts securing the wheel. It is also helpful to have a patch kit and a small multi-tool in case of any other difficulties.
Once you have gathered all the necessary items, find a flat surface to work on and let’s get started.
Key Takeaways
- Necessary tools for changing a bicycle tube include a new tube, tire levers, a bicycle pump, and a wrench if bolts secure the wheel.
- Proper wheel maintenance can prevent punctures, unstable handling, increased wear and tear on bike parts, and frequent repairs.
- To change a flat tube, one must deflate it completely, use tire levers to remove the tire from the rim, and be careful not to damage the tube or tire.
- Wheel maintenance is an essential aspect of bike tire replacement that can lead to a smooth ride, better control, longer bike lifespan, and less money spent on repairs.

SY Bicycle Speedometer and Odometer Wireless Waterproof Cycle Bike Computer with LCD Display & Multi-Functions by YS
【Auto Wake-up Function】Automatically wakes from sleep mode upon sensing vibration in the bicycle. Bright LCD display to easily...
As an affiliate, we earn on qualifying purchases.
Gather Your Tools and Supplies
Now it’s time to gather all the tools and supplies you’ll need to change your bicycle tube, so let’s get started!
First and foremost, you’ll need a replacement tube that’s the correct size for your bike. There are different types of tubes available, such as road, mountain, and hybrid tubes, so make sure to choose the right one. You can buy them at your local bike shop or online. It’s always a good idea to have an extra tube on hand, in case you need to replace it while on a ride.
Aside from the tube, you’ll also need a few tools to change it. You’ll need tire levers to remove the tire from the rim, a pump to inflate the new tube, and a wrench to remove the wheel from the bike. If you don’t have these tools already, you can purchase them at a bike shop or online.
Once you have everything you need, it’s time to move on to the next step of removing the wheel.
![Lamicall Bike Frame Bag Waterproof - [1s Release] [2 in 1] Bike Phone Mount Holder, Bicycle Top Tube Bag, Cycling Pouch with Rain Cover, Bikes Accessories Gifts for Phones Under 7"](https://m.media-amazon.com/images/I/41WyOmmNsYL._SL500_.jpg)
Lamicall Bike Frame Bag Waterproof - [1s Release] [2 in 1] Bike Phone Mount Holder, Bicycle Top Tube Bag, Cycling Pouch with Rain Cover, Bikes Accessories Gifts for Phones Under 7"
【 Quick Install and Remove】 The installation process for this bike frame bag is quick and easy, you...
As an affiliate, we earn on qualifying purchases.
Remove the Wheel
First, you’ll want to loosen the bolts on the wheel axle before removing the wheel entirely. This will make it easier to take off the wheel and replace the tube. Wheel maintenance is an essential aspect of bike tire replacement, and you want to make sure that you do it correctly.
Before removing the wheel, it’s essential to check the tire for any damage. If you notice any cuts, punctures, or bulges, it’s best to replace the tire. Once you’ve checked the tire, you can proceed to remove the wheel. A table is an excellent way to show the importance of wheel maintenance and how it affects your ride.
| Without Proper Wheel Maintenance | With Proper Wheel Maintenance |
|---|---|
| Tire punctures and flats | Smooth ride |
| Unstable handling | Better control |
| Increased wear and tear on bike parts | Longer bike lifespan |
| Frequent repairs needed | Less money spent on repairs |
To remove the flat tube, you’ll need to locate the valve stem and unscrew the valve nut. From there, you can easily remove the tube from the tire.

Ascher Ultra Bright USB Rechargeable Bike Light Set, Powerful Bicycle Front Headlight and Back Taillight, 4 Light Modes, Easy to Install for Men Women Road Mountain Cycling Black
Bright Bike Lights for Night Riding: This bike light set includes both a bright headlight and taillight. Powerful...
As an affiliate, we earn on qualifying purchases.
Remove the Flat Tube
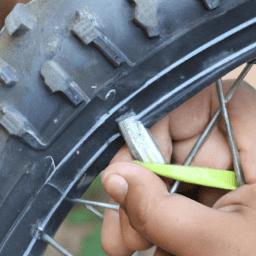
First, I need to deflate the flat tube completely by pressing down on the valve stem.
Next, I’ll use tire levers to remove the tire from the rim, being careful not to damage the tube or the tire in the process.
Once the tire is removed, I’ll gently pull out the flat tube from inside the tire, being careful not to snag it on any sharp edges.
Don’t forget to double-check for any remaining debris or damage before installing the new tube.
Deflate the Tube
To start changing your bicycle tube, you’ll need to let the air out of the tire. This is an important step as it ensures your safety while working on the bike. You don’t want to accidentally burst the tube while removing it, which could cause injury. To deflate the tube, I use a simple tool called a valve core remover. This tool unscrews the valve stem from the tube, allowing air to escape quickly and easily.
It’s important to note that there are several ways to deflate a tube, but using a valve core remover is the quickest and safest method. As you deflate the tube, it’s a good idea to check the tire for any sharp objects or debris that may have caused the flat. I recommend using a table like the one below to keep track of the tools you’ll need and the safety precautions you should take before starting the repair process.
| Tools Needed | Safety Precautions |
|---|---|
| Valve core remover | Wear gloves to protect your hands |
| Tire levers | Use eye protection to avoid debris from entering your eyes |
| New tube | Make sure the bike is stable and won’t fall over |
| Hand pump or CO2 inflator | Use caution when removing the tire to avoid damaging the rim |
With the tube deflated, it’s time to move on to the next step: removing the tire and tube.
Remove the Tire and Tube
Now that the air’s out of your tire, you can move on to removing the tire and tube. Using your tire levers, gently pry the tire away from the rim. Be sure to work your way around the tire, using the levers to loosen it evenly. Avoid using excessive force, as this can damage the tube.
As you remove the tire, take note of the condition of the inner tube. Inspect it carefully for any signs of wear, including cuts, bulges, or punctures. If you find any damage, replace the tube.
It’s also a good idea to check the proper tire pressure for your bike before installing the new tube. Common causes of punctures include underinflated tires, so be sure to inflate your tire to the recommended pressure.
With the old tube removed, it’s time to move on to installing the new one.
ROCKBROS Bike/Bicycle Phone Front Frame Bag, Waterproof, Tube Bag,Cycling Pouch, Bike Accessories for Men Compatible Phone Under 7”
LARGE SPACE: Bike bag has enough inside room for long rides, holds a lot of stuff like phone,...
As an affiliate, we earn on qualifying purchases.
Install the New Tube
As I slide the new tube into the tire, I make sure to feel the smooth rubber against my fingertips. It’s important to choose the right tube size to avoid any issues with proper inflation.
Once the tube is in place, I gently push the tire back onto the rim, being careful not to pinch the tube with the tire lever.
I then inflate the tube to the recommended pressure, which can be found on the sidewall of the tire. It’s important to not overinflate the tube, as this can cause it to burst and potentially cause injury.
Once the tube is properly inflated, I quickly reinstall the wheel and tighten the bolts.
Now I’m ready to hit the road with a new tube and a smooth ride.
Reinstall the Wheel
Next, you’ll need to line up the wheel with the fork and smoothly slide it back into place, making sure the axle is securely seated in the dropouts.
Once the wheel is in place, you’ll need to tighten the bolts. To do this, I use a 15mm wrench to hold the nut on one side of the axle while using a 5mm Allen wrench to tighten the bolt on the other side. Make sure to tighten the bolts evenly, alternating back and forth between each bolt until they are snug.
Proper alignment is important to ensure safe riding and prevent future flats. Check that the wheel is centered between the fork blades and that there is equal clearance on both sides. Also, make sure that the quick-release lever is securely tightened.
Finally, don’t forget to check the tire pressure and inspect the tire for any cuts or debris before hitting the road. Following these tips for reattaching bike wheels and maintaining bike tires can help ensure a smooth and safe ride.
Frequently Asked Questions
What is the difference between a Presta and Schrader valve, and how do I know which one my bike has?
Choosing the right valve for your bike is crucial. Presta vs Schrader: pros & cons. The Presta valve is lighter and more aerodynamic, while the Schrader is sturdier and easier to inflate. Check your bike’s manual or ask a bike shop to determine which one you have.
Can I patch a punctured tube instead of replacing it with a new one?
Yes, it is possible to patch a punctured bicycle tube instead of replacing it with a new one. The benefits of patching vs. replacing tubes include cost-effectiveness and eco-friendliness. However, if the puncture is too large or the tube is old, it’s best to seek professional help.
How do I prevent getting a flat tire in the future?
To prevent flat tires in the future, I follow these tips and prevention strategies: regularly check tire pressure, avoid riding over sharp objects, use puncture-resistant tires, and replace worn-out tires.
What do I do if my tire won’t fully inflate after installing a new tube?
If my tire won’t inflate after installing a new tube, I troubleshoot by checking for leaks, valve issues, and proper installation techniques. To prevent this, ensure proper tube installation and avoid punctures.
How often should I replace my bike’s tubes and tires?
For optimal bike maintenance, it is recommended to replace your bike’s tubes every 2-3 years, or sooner if you experience frequent flats. Tire wear depends on usage, but inspect them regularly for wear and replace when tread is worn or cracking is present.
Conclusion
In conclusion, changing a bicycle tube is a straightforward process that anyone can learn to do. With the right tools and a little bit of practice, you can become an expert in no time.
Just remember to take your time and follow the steps carefully to avoid any mistakes. As I’m finishing up my own tube replacement, I can’t help but think about how much easier it is to do things now than it was back in the day.
With all the advancements in technology, we have access to tools and resources that make our lives so much simpler. It’s amazing how far we’ve come, and I can’t wait to see what the future holds for us.
So go ahead, grab those tools, and get to work on that tube replacement. You’ve got this!