Replacing the brake pads on your bike is an essential upkeep chore that every cyclist must be adept at. It not only ensures your safety during rides but also helps you economize over time by preventing expensive repairs or replacements.
In this article, I will guide you through the step-by-step process of changing your bicycle brake pads, from understanding the basics of brake pads to testing your brakes and making any necessary adjustments.
Before diving into the steps, it’s important to note that the process of changing brake pads can vary slightly depending on the type of brake system your bicycle has. In this article, I will be focusing on rim brakes, which are the most common type of brake system found on bicycles.
With that said, let’s get started!
Key Takeaways
- Proper alignment is crucial for effective brake performance
- Different types of brake pads should be chosen based on the type of riding
- Regular maintenance is necessary for longevity and safety of the bike
- Brake pads need to be replaced when worn to ensure optimal performance.
Understand the Basics of Brake Pads
Hey, you need to know the basics of brake pads if you want to stop safely on your bike – so let’s get started!
Brake pads are a crucial component of your bicycle’s braking system, providing the necessary friction to slow down or stop the wheels. Understanding the basics of brake pad materials and choosing the right type for your bike is essential for optimal performance and safety.
Brake pads are typically made of three types of materials: rubber, organic, or metallic. Rubber brake pads are the most commonly used and are suitable for general use. Organic brake pads are made of non-metallic materials and provide better stopping power in wet conditions. Metallic brake pads, on the other hand, are made of metal fibers and provide the strongest stopping power, but they can also wear out the rim of your wheel faster.
It’s important to choose brake pads that are compatible with your bike’s braking system and the type of riding you’ll be doing. Consider factors such as weather conditions, terrain, and your own level of experience to make the right choice.
With that said, let’s move on to gathering the necessary tools for changing your brake pads.
Gather the Necessary Tools
First, you’ll need to gather a few tools, including a hex wrench, pliers, and a screwdriver. Tool selection is important because using the wrong size or type of tool can damage your bike and make the brake pad replacement process more difficult. Before starting, it’s also important to take some safety precautions. Make sure your bike is stable and won’t tip over while you work on it, wear gloves to protect your hands, and avoid touching the rotor because it can get very hot.
To help you understand what tools you’ll need and their purpose, refer to the table below:
| Tool | Purpose |
|---|---|
| Hex wrench | To remove the brake pad retaining bolt |
| Pliers | To hold the brake pad while removing the retaining bolt |
| Screwdriver | To adjust the brake caliper and brake pad position |
It’s important to have all the necessary tools on hand before starting the brake pad replacement process. Once you have them, you can move onto the next step of removing the old brake pads.
Removing the Old Brake Pads
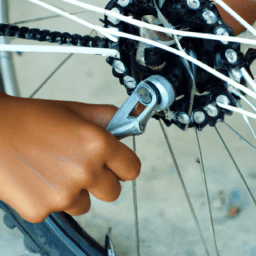
Now is the time to take a closer look at your bike’s brake system and start removing those worn-out pads. First, you’ll want to locate the brake caliper, which is the part of the brake that holds the pads in place. Look for two bolts that attach the caliper to the frame of the bike. Use a wrench to loosen these bolts, but don’t remove them completely just yet.
Next, you’ll need to remove the old brake pads from the caliper. This is usually done by pulling them out of the caliper or by sliding them out of the back of the caliper. If the brake pads are stuck, you may need to use pliers to pull them out.
Once you have removed the old pads, take a moment to clean the caliper with a cloth or brush. This will help ensure that the new pads will fit properly and function correctly. Some common issues you may encounter when removing brake pads include difficulty removing the pads, damage to the caliper, or worn-out hardware. Troubleshoot these issues as necessary before moving on to the next step.
Now that the old brake pads have been removed and the caliper is clean, it’s time to move on to the next step: installing the new brake pads.
Installing the New Brake Pads
Now that I’ve removed the old brake pads, it’s time to install the new ones.
The first step is to adjust the brake caliper to accommodate the new pads. This can be done by loosening the bolt that holds the caliper in place and sliding it up or down until the pads are centered on the rim.
Once the caliper is adjusted, I can insert the new brake pads into the caliper arms and tighten them in place.
It’s important to make sure the pads are securely in place before testing the brakes.
Adjusting the brake caliper for new pads
Don’t let your bike’s worn brake pads compromise your safety; adjust the brake caliper for new pads. Proper alignment of the caliper is crucial for the brake pads to work effectively. Follow the steps below to adjust your brake caliper:
| Steps | Actions | Tips |
|---|---|---|
| 1 | Loosen the brake caliper | Use a hex wrench to loosen the bolt that attaches the brake caliper to the bike frame |
| 2 | Align the caliper | Align the caliper with the rotor, making sure the brake pads are touching the rotor evenly |
| 3 | Tighten the bolt | Once the caliper is aligned, tighten the bolt back up. Be careful not to over-tighten and strip the threads. |
Common mistakes when adjusting the brake caliper include not aligning the caliper properly or over-tightening the bolt, which can cause damage to the threads. Once the caliper is properly aligned, it’s time to move on to inserting the new brake pads.
Remember, taking the time to properly adjust your brake caliper will ensure that your new brake pads work effectively and keep you safe on your rides.
Inserting the new brake pads
It’s important to make sure your stopping power is at its best by replacing the worn friction material with fresh ones to keep you feeling confident while riding.
When it comes to inserting new brake pads, there are a few things to keep in mind to ensure proper alignment and avoid common mistakes. Firstly, it’s important to choose the right type of brake pad for your bike. Different types of brake pads are designed for different types of riding, so make sure to choose the one that best suits your needs.
Secondly, when inserting the new brake pads, make sure they are properly aligned with the rim or rotor. Improper alignment can cause uneven wear on the pads and reduce stopping power. By taking these steps, you can ensure that your new brake pads will perform at their best.
To test your brakes and adjust if necessary, squeeze the brake lever and make sure the pads make even contact with the rim or rotor. If you notice any issues, such as squeaking or uneven wear, you may need to adjust the brake caliper or re-align the pads.
Keep in mind that proper maintenance of your brakes is crucial for your safety and the longevity of your bike.
Test Your Brakes and Adjust If Necessary
First, you’ll want to test your brakes to make sure they’re working properly and adjust them if necessary.
Common brake issues can include loose cables or worn brake pads, both of which can affect the performance of your brakes.
It’s important to regularly maintain your brakes to ensure they’re functioning correctly and to prevent accidents.
To test your brakes, start by squeezing the brake lever and checking the response time.
If the brake pads aren’t gripping the rim or disc properly, you may need to adjust the cable tension.
This can be done by turning the barrel adjuster located on the brake lever or near the brake caliper.
If the brake pads are worn, they’ll need to be replaced.
Once any necessary adjustments have been made, test your brakes again to ensure they’re working properly.
Remember, regular brake maintenance is key to keeping your bicycle safe and functioning properly.
Frequently Asked Questions
How often should brake pads be changed?
As a cyclist, I know it’s important to keep my brakes in top condition. Brake pad lifespan varies depending on usage, but generally they should be changed when worn down to 1-2mm. Signs of wear include squeaking and reduced stopping power.
Can I use any type of brake pad on my bicycle?
I can’t use any brake pad on my bicycle; different brake systems require specific pad types. Comparing different brake pads, I must ensure compatibility with my system. Technical differences, such as compound and shape, impact performance.
How do I know if my brake pads need to be replaced?
During a visual inspection, I check wear by measuring the thickness of my brake pads. Interesting statistic: brake pads wear out every 1,000 miles on average. If they are less than 1/16 inch thick, it’s time to replace.
Is it necessary to clean the brake calipers before installing new brake pads?
Yes, it is necessary to clean the brake calipers before installing new brake pads, especially if the old pads were worn out. Additionally, it’s important to ensure brake pad compatibility with the calipers to avoid any malfunction during braking.
What should I do if my brakes still feel spongy or don’t work properly after installing new brake pads?
Why are my brakes spongy after changing the pads? Brake bleeding may be needed to remove air from the brake system. Check rotor alignment, as misalignment can cause poor braking performance.
Conclusion
In conclusion, changing brake pads on a bicycle is not as difficult as it may seem. It’s a relatively simple process that can be done with the right tools and a little bit of patience.
By understanding the basics of brake pads and following the steps outlined above, you can successfully replace old and worn out brake pads with new ones.
Remember, safety should always be your top priority when working on your bike. Take the time to test your brakes and make any necessary adjustments before hitting the road. As the old saying goes, "an ounce of prevention is worth a pound of cure."So, take the time to properly maintain your bike and its components, and you’ll be sure to enjoy a smooth and safe ride every time.