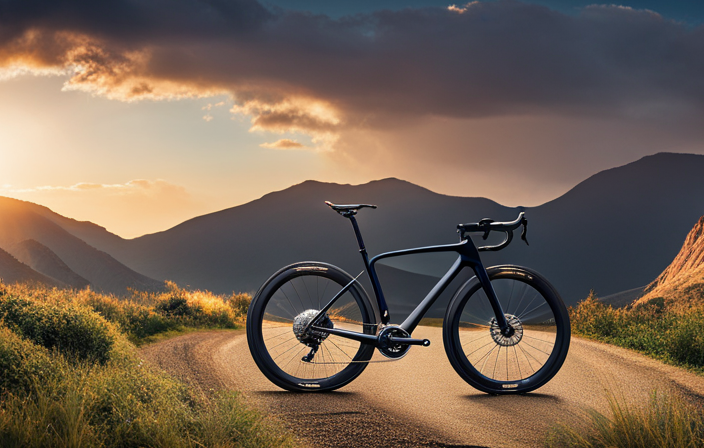
Are you interested in improving your gravel bike riding experience? This article will provide you with step-by-step instructions on how to change your handlebars.
By carefully assessing your riding style and needs, choosing the right handlebar type, and following a few simple steps, you can upgrade your bike to better suit your preferences.
With the right tools and a little know-how, you’ll be able to enjoy a more comfortable and customized ride in no time.
So let’s dive in and discover how to change handlebars on your gravel bike!
Key Takeaways
- Assess the riding style and needs to determine the balance between comfort and performance.
- Evaluate the benefits of different handlebar types such as drop, flat, and riser handlebars.
- Choose the handlebar type based on the riding style, with wider handlebars for rough terrain and narrower handlebars for smoother surfaces.
- Follow the step-by-step process of removing existing handlebars, adjusting the height and angle, and finalizing the handlebar change, ensuring stability before riding.
![LISEN Bike Phone Holder, [Super Easy Install] Motorcycle Phone Mount Ebike Accessories Bicycle Handlebar Holder Mount Gifts for Adults Kids Men Mountain Mini Bike Scooter Gear Accessories for iPhone](https://m.media-amazon.com/images/I/41f8iCmkMsL._SL500_.jpg)
LISEN Bike Phone Holder, [Super Easy Install] Motorcycle Phone Mount Ebike Accessories Bicycle Handlebar Holder Mount Gifts for Adults Kids Men Mountain Mini Bike Scooter Gear Accessories for iPhone
[Ultra-Secure Hold] – LISEN bike phone holder mount keeps your phone firmly in place even on bumpy or...
As an affiliate, we earn on qualifying purchases.
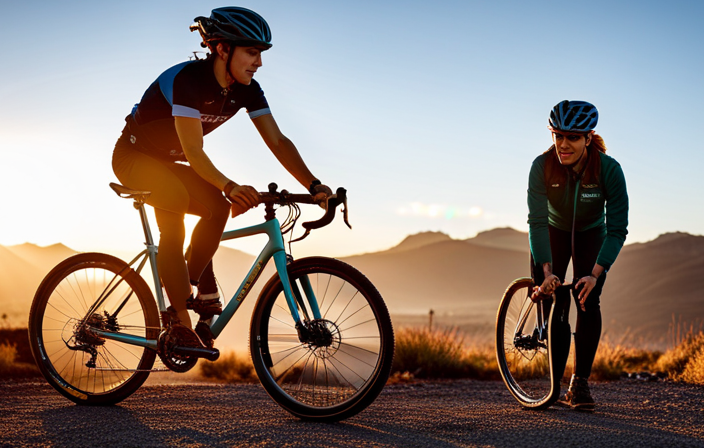
Assess Your Riding Style and Needs
Assess your riding style and needs to determine how to change the handlebar on your gravel bike. When it comes to handlebars, there are various options available that cater to different preferences and riding styles.
One important factor to consider is the balance between comfort and performance. If you prioritize comfort, a wider handlebar with more sweep might be suitable for you as it offers a relaxed riding position and better control over rough terrain. On the other hand, if performance is your primary concern, a narrower handlebar with less sweep will provide a more aerodynamic position, allowing for faster speeds on smoother surfaces.
Another consideration is the benefits offered by different handlebar types. Flat handlebars are popular among mountain bikers as they provide an upright riding position and improved maneuverability in technical terrain. Drop bars, commonly found on road bikes, offer multiple hand positions which can enhance comfort during long rides. They also provide a more aerodynamic posture when riding at higher speeds.
Now that you understand the importance of assessing your riding style and needs when choosing a new handlebar for your gravel bike, let’s move on to selecting the right handlebar type that suits you best.

Ascher Ultra Bright USB Rechargeable Bike Light Set, Powerful Bicycle Front Headlight and Back Taillight, 4 Light Modes, Easy to Install for Men Women Road Mountain Cycling Black
Bright Bike Lights for Night Riding: This bike light set includes both a bright headlight and taillight. Powerful...
As an affiliate, we earn on qualifying purchases.
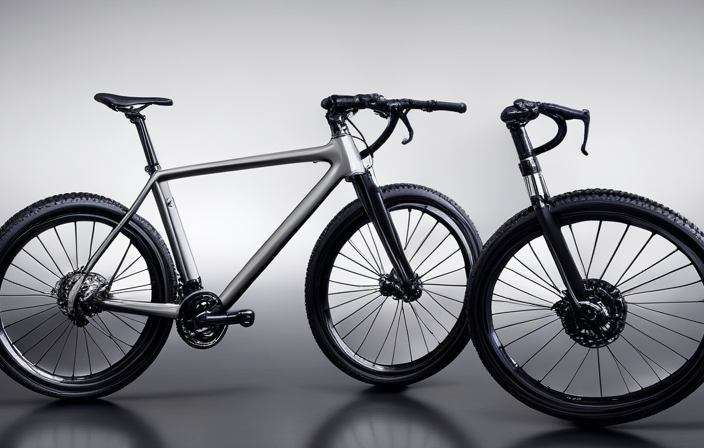
Choose the Right Handlebar Type
When choosing the right handlebar type for my gravel bike, I need to consider three key options:
-
Drop handlebars: These provide a more aerodynamic position and multiple hand positions, making them ideal for long rides or road racing.
-
Flat handlebars: These offer a more upright riding position and better control on technical terrain, making them suitable for off-road adventures.
-
Riser handlebars: These provide an even more upright position with added height, offering comfort and control for leisurely rides or commuting.
Drop Handlebars
To change the handlebars on a gravel bike, start by removing the existing drop handlebars. The drop handlebars are a popular choice for gravel bikes due to their versatility and comfortable hand positions. They provide multiple grip options for different riding situations, allowing for better control and stability on rough terrain.
When it comes to handlebar positioning, it’s important to find the right balance between comfort and aerodynamics. Adjusting the height and reach of the drop handlebars can make a significant difference in your riding experience. A lower position can improve aerodynamics but may be less comfortable for longer rides, while a higher position offers more comfort but may sacrifice efficiency.
Incorporate this table:
| Position | Description |
|---|---|
| Drop | Provides an aggressive, aerodynamic position |
| Hoods | Allows for easy access to brakes and shifting |
| Tops | Offers a relaxed upright position |
Now that you understand how drop handlebars work, let’s move on to discussing flat handlebars in the next section.
Flat Handlebars
Flat handlebars are a popular alternative for riders seeking a more upright and relaxed position on their bikes. They provide increased comfort by allowing the rider to sit in a more natural position, reducing strain on the back and neck. When evaluating performance, flat handlebars offer better control and stability, especially when navigating rough terrains or technical trails. The wider grip allows for easier maneuverability and responsiveness while riding.
Assessing comfort is essential when considering handlebar options, as it can greatly affect your overall riding experience. Additionally, evaluating performance is crucial to ensure that the handlebars meet your specific needs and riding style.
Transitioning into the subsequent section about riser handlebars, these bars offer a slight rise in height compared to flat handlebars, providing even more comfort and control for riders craving an enhanced biking experience.
Riser Handlebars
Riser handlebars provide a slight rise in height that enhances comfort and control for riders seeking an improved biking experience. By adjusting handlebar height, riders can find their optimal riding position and reduce strain on their back and shoulders. The benefits of riser handlebars extend beyond just comfort. They also offer better maneuverability, especially when navigating through tight spaces or technical trails.
To illustrate the advantages of riser handlebars, consider the following table:
| Benefit | Description |
|---|---|
| Comfort | Increased height allows for a more relaxed riding posture, reducing strain on the body. |
| Control | Better grip and leverage provide enhanced steering control, improving overall bike handling. |
| Maneuverability | The higher position offers greater clearance for obstacles, making it easier to tackle tricky terrains. |
| Customization | Adjustable riser handlebars allow riders to fine-tune their bike fit for maximum performance and comfort. |
Now that we understand the benefits of riser handlebars, let’s gather the necessary tools to proceed with the handlebar change process smoothly.

SY Bicycle Speedometer and Odometer Wireless Waterproof Cycle Bike Computer with LCD Display & Multi-Functions by YS
【Auto Wake-up Function】Automatically wakes from sleep mode upon sensing vibration in the bicycle. Bright LCD display to easily...
As an affiliate, we earn on qualifying purchases.
Gather the Necessary Tools
First, gather the necessary tools for changing the handlebars on your gravel bike. Here are five items you’ll want to have on hand:
- Allen wrench set: This will be essential for loosening and tightening bolts throughout the process.
- Torque wrench: It’s important to use a torque wrench to ensure that you tighten the bolts to the correct specifications and avoid damaging your bike.
- Cable cutters: If you’re planning on replacing your handlebars, you may need to trim or replace your cables as well. Cable cutters will make this task much easier.
- Tape measure: Assessing your riding position is crucial when choosing new handlebars. Use a tape measure to accurately measure the width of your current bars so you can select an appropriate replacement.
- Grease: Applying a thin layer of grease to any metal-to-metal contact points will help prevent rust and make future adjustments easier.
Once you’ve gathered these tools, it’s time to move on to removing the existing handlebars.

Rehook Original - Black Get Your Chain Back on Your Bike in 3 Seconds. Without The Mess Present for Any Cyclist or Gadget Lover
AS SEEN ON DRAGONS' DEN (Shark Tank UK) – Featured on BBC Dragons' Den where Rehook received investment...
As an affiliate, we earn on qualifying purchases.
Remove the Existing Handlebars
To remove the existing handlebars on a gravel bike, the first step is to loosen the stem bolts using an Allen wrench. This will allow you to detach the handlebars from the bike’s stem.
Next, you’ll need to remove the handlebar tape or grips by carefully peeling them off or using a utility knife if necessary.
Lastly, it’s important to disconnect the brake and shift cables from the handlebars before fully removing them. This can be done by unscrewing any cable clamps or releasing any cable tension using barrel adjusters.
Loosen the Stem Bolts
Before you start, make sure your gravel bike is on a stable surface. This will keep the bike steady and ensure your safety while working. Now, let’s move on to the next step in changing your handlebars.
-
Assess handlebar height: Take a moment to determine if the current handlebar height suits your riding style and comfort level. Adjusting it can enhance your overall biking experience.
-
Adjust handlebar angle: Consider if the current angle of your handlebars feels comfortable or if it needs adjustment. A small tweak can make a big difference in your riding experience.
-
Locate the stem bolts: You can usually find these at the front of the bike where the stem connects to the fork steerer tube. Use an appropriate Allen wrench or tool to loosen them.
-
Loosen the stem bolts: Gradually loosen each bolt by turning counterclockwise until they are fully loosened, but not completely removed.
Now that these steps are completed, we can move on to removing the handlebar tape or grips without any hassle or distractions.
Remove the Handlebar Tape or Grips
Now, you’ll want to carefully remove the tape or grips from your handlebars. Start by assessing the comfortability of your current tape or grips. If they are worn out or uncomfortable, this is a perfect opportunity to consider alternative grips that may provide a better riding experience.
To remove the tape, start at one end and peel it off slowly, being careful not to tear it. If you have grips instead of tape, look for screws or bolts holding them in place and use the appropriate tool to loosen and remove them.
Once the tape or grips are removed, you can move on to disconnecting the brake and shift cables. These steps will ensure a smooth transition as we proceed with changing your gravel bike’s handlebar setup.
Disconnect Brake and Shift Cables
After removing the handlebar tape or grips, the next step is to disconnect the brake and shift cables. This is an important step in changing the handlebars of a gravel bike as it allows for easier removal and installation of the new handlebars.
To begin, I assess the cable tension by squeezing both brake levers and shifting through all gears. If any cables feel loose or tight, adjustments can be made using barrel adjusters located near each brake lever or derailleur. Once I am satisfied with the cable tension, I proceed to disconnect them from their respective components.
Firstly, I remove any cable housing clips or zip ties holding the cables in place. Then, by loosening the pinch bolts on both brakes and derailleurs, I am able to detach the cables.
Now that the brake and shift cables are disconnected, it’s time to move onto reconnecting them once we install the new handlebars…
Install the New Handlebars
To install the new handlebars on your gravel bike, start by removing the old ones. Once you have disconnected the brake and shift cables as explained in the previous subtopic, you can proceed with installing the new handlebars.
First, choose a handlebar width that suits your riding style and comfort preferences. Measure the width of your shoulders and select a handlebar that is slightly wider for better control and stability. Keep in mind that wider handlebars offer more leverage but may be less aerodynamic.
Next, position the new handlebars onto the stem and align them with your desired angle. Tighten the bolts on both sides of the stem to secure it in place. Make sure that the handlebars are centered and straight before tightening fully.
Now it’s time to adjust the handlebar height and angle to ensure optimal comfort during rides. Loosen any bolts or screws that hold these adjustments in place and make necessary changes. Remember to maintain a neutral wrist position for reduced strain on hands and wrists.
With the new handlebars installed, you can now move on to adjusting their height and angle for an optimal riding experience without discomfort or fatigue.
Adjust the Handlebar Height and Angle
You can easily find the optimal height and angle for your handlebars by loosening the bolts or screws that secure them in place. Once they are loose, you can adjust the handlebar height and angle to your desired position.
Here are three important steps to follow when adjusting the handlebar height and angle:
-
Experiment with different heights: Start by raising or lowering the handlebars to a comfortable level. It’s important to find a position that allows you to maintain good posture while riding.
-
Consider your riding style: Adjusting the handlebar angle can greatly impact your comfort and control on the bike. Play around with different angles until you find one that suits your riding style, whether it’s more upright for better visibility or slightly angled forward for increased aerodynamics.
-
Properly grip the handlebars: Once you have found your ideal height and angle, make sure to grip the handlebars correctly. Your hands should be positioned comfortably on the bars, with a light but firm grip.
Now that you have adjusted the handlebar height and angle, let’s move on to reinstalling the handlebar tape or grips without compromising their integrity.
Reinstall Handlebar Tape or Grips
To reinstall the handlebar tape or grips, start by carefully removing any old tape or grips that may still be on the handlebars. This can usually be done by peeling off the tape or loosening the screws on the grips. Once you have removed the old tape or grips, clean the handlebars thoroughly to remove any residue or dirt.
If you are reusing handlebar tape, unwind it from one end and carefully peel it off without tearing it. Inspect the tape for any signs of wear or damage, as it may need to be replaced if it is in poor condition. If you prefer a different option, there are alternative handlebar grips available in various materials and styles.
When installing new handlebar tape or grips, ensure that they are aligned properly and wrap them tightly for a secure fit. Use adhesive or bar plugs to secure the ends and prevent unraveling. Remember to leave enough room at the ends of the bars for brake levers and shifters.
Incorporating a 3 column and 4 row table:
| Step | Instructions |
|---|---|
| 1 | Remove old tape/grips |
| 2 | Clean handlebars |
| 3 | Unwind reusable tape |
| 4 | Inspect for damage |
To test and fine-tune the handlebar position, follow these steps…
[Transition sentence into subsequent section about testing and fine-tuning]Test and Fine-tune the Handlebar Position
After reinstalling the handlebar tape or grips, it is important to test and adjust the position for optimal comfort and control. Testing different handlebar positions allows you to find the most comfortable setup that suits your riding style and body mechanics.
Start by sitting on the bike and gripping the handlebars in a natural riding position. Pay attention to any discomfort or strain in your wrists, arms, or shoulders. If you feel any discomfort, try adjusting the angle of the handlebars slightly up or down.
Next, take the bike for a short test ride around a safe area. This will give you a better sense of how the new handlebar position feels while in motion. Pay attention to how your body feels as you ride – are you able to maintain a relaxed grip without putting too much weight on your hands? Is it easy to maneuver and control the bike?
Once you have found a comfortable handlebar position, take note of its alignment with respect to other components such as stem length and saddle height. This will help ensure proper ergonomics across all parts of your bike setup.
To transition into ensuring proper cable routing and tightening all bolts, double-check that everything is secure before proceeding with further adjustments.
Ensure Proper Cable Routing and Tighten All Bolts
Make sure that all the bolts are tightened and ensure that the cables are properly routed in order to maintain optimal performance and safety. When adjusting the handlebar height on a gravel bike, it is important to assess cable tension and make any necessary adjustments. Proper cable routing ensures smooth shifting and braking, while tightened bolts prevent any unwanted movement or instability.
To assist you in understanding the importance of proper cable routing and bolt tightening, refer to the table below:
| Issue | Consequence | Solution |
|---|---|---|
| Loose cables | Poor shifting and braking performance | Check for loose cables and tighten them if necessary |
| Improper routing | Inefficient power transfer, increased friction | Reroute cables along the designated paths |
| Loose bolts | Handlebar movement, compromised control | Tighten all handlebar bolts using an appropriate torque wrench |
Assessing cable tension should be done by pulling on each cable individually while shifting gears or engaging the brakes. Make sure there is no excessive slack or resistance. Adjust as needed until optimal tension is achieved.
After ensuring proper cable routing and tight bolt connections, you can proceed to check for any issues or misalignments in your gravel bike’s handlebar setup. This will help identify any potential problems before they become major concerns.
Check for Any Issues or Misalignments
After ensuring proper cable routing and tightening all the bolts, it’s important to check for any issues or misalignments with the handlebar on your gravel bike. This step is crucial in assessing handlebar fit and troubleshooting common handlebar issues that may affect your riding experience.
First, visually inspect the handlebar alignment by standing in front of the bike and looking straight down the centerline. The handlebars should be parallel to the front wheel and centered with the stem. If there is any noticeable misalignment, loosen the stem bolts slightly and adjust accordingly before re-tightening them.
Next, sit on your bike and grip the handlebars firmly. Move them side to side while observing if there is any excessive play or movement. If you feel any looseness or hear clicking sounds, it could indicate a loose headset or stem clamp. In this case, tighten these components as necessary.
Lastly, check for any discomfort or unnatural positioning of your hands on the handlebars. Adjusting the angle or height of the bars may help alleviate any strain on your wrists or shoulders.
With these assessments complete, we can move onto our next section where we will test ride and make further adjustments if necessary to ensure optimal performance and comfort.
Test Ride and Make Further Adjustments if Necessary
To ensure optimal performance and comfort, take your gravel bike for a test ride and make any necessary adjustments. Start by finding a safe and open area where you can ride freely without any obstacles or traffic.
Begin the test ride by cycling at a moderate pace, paying close attention to how the handlebars feel. Are they aligned properly? Do they feel comfortable in your hands? If not, stop and make adjustments accordingly.
First, check if the handlebars are at the correct height and angle. You want them to be positioned in a way that allows for a natural and relaxed grip. Use an Allen wrench to loosen the bolts on the stem, adjust as needed, then tighten them back up.
Next, evaluate how responsive the bike feels when turning corners or maneuvering through tight spaces. If it feels too sluggish or unsteady, consider adjusting the handlebar width. Loosen the bolts on both sides of the stem clamp, adjust to your desired width, then retighten.
During the test ride, also pay attention to any discomfort or strain in your wrists or shoulders. This could indicate that your handlebar position needs further fine-tuning. Experiment with different angles and heights until you find a position that feels comfortable for long rides.
After making these adjustments during your test ride, if you’re still unsure about whether everything is set up correctly or if you encounter any difficulties along the way, consider seeking professional help from a bike shop or mechanic who can provide expert guidance.
Now let’s move on to considering professional help if unsure about handlebar changes…
Consider Professional Help if Unsure
If you’re unsure about properly adjusting your handlebars, it may be wise to seek professional help. Seeking professional guidance can ensure that your handlebars are adjusted correctly and in line with industry standards. Here are a few reasons why considering professional help is beneficial:
-
Expertise: Professional bike mechanics have the knowledge and experience to properly adjust handlebars on a gravel bike. They can assess your specific needs and make adjustments accordingly.
-
Efficiency: While adjusting handlebars yourself might save money initially, it can be time-consuming and frustrating if you’re unfamiliar with the process. Professionals can efficiently handle the task, allowing you to focus on enjoying your ride.
-
Safety: Incorrectly adjusted handlebars can lead to discomfort, poor handling, and even accidents. By seeking professional assistance, you prioritize safety on the road or trails.
-
Cost-effectiveness: Although there may be a fee for professional help, it’s essential to evaluate the cost effectiveness. Investing in proper adjustments now can prevent potential damage or costly repairs down the line.
Once your handlebars have been professionally adjusted, it’s crucial to maintain and clean them regularly to ensure their longevity and optimal performance.
Maintain and Clean Your New Handlebars Regularly
Regular maintenance and cleaning of your newly adjusted handlebars will help maintain their performance and longevity. Maintaining handlebar cleanliness is crucial for ensuring optimal functionality and preventing any potential issues down the road. By regularly inspecting your handlebars for dirt, debris, or any signs of wear and tear, you can address any minor problems before they become major ones.
To clean your handlebars, start by removing them from your bike using the appropriate tools. Then, use a mild soap or bike-specific cleaner to gently scrub away any grime or residue that has accumulated. Pay close attention to hard-to-reach areas such as crevices and corners. After thoroughly cleaning, rinse off the soap with water and dry the handlebars completely before reattaching them to your bike.
Regular maintenance not only keeps your handlebars in excellent condition but also offers several benefits. It ensures smooth operation by preventing friction between moving parts and reduces the risk of corrosion due to exposure to moisture or sweat during rides. Additionally, maintaining cleanliness can enhance grip and control while riding.
As you explore different handlebar accessories for added comfort, it’s important to consider how regular maintenance will contribute to their effectiveness. Keeping your handlebars clean will optimize both their performance and the overall riding experience without compromising on safety or comfort.
Explore Different Handlebar Accessories for Added Comfort
One way to enhance your riding experience is by exploring various handlebar accessories for added comfort. When it comes to gravel biking, having a firm grip on the handlebars is crucial, especially when encountering rough terrains. To achieve this, you can explore handlebar accessories that provide added grip. Options such as silicone grips or textured tape can greatly improve your control and confidence while riding.
Another aspect to consider is enhanced visibility. Riding in low-light conditions or at night can be risky without proper visibility measures. That’s why it’s worth exploring handlebar accessories that incorporate reflective elements or built-in lights. These additions not only make you more visible to others on the road but also increase your own awareness of your surroundings.
By exploring these handlebar accessories for added grip and enhanced visibility, you can significantly improve your overall riding experience with your upgraded gravel bike. Not only will you feel more secure and confident during challenging rides, but you’ll also have peace of mind knowing that you’re taking proactive steps towards safety.
Now that we’ve covered how to explore different handlebar accessories for added comfort, let’s move on to the next section where we’ll discuss how to enjoy your upgraded gravel bike riding experience!
Enjoy Your Upgraded Gravel Bike Riding Experience!
To fully embrace and savor the experience of riding your improved gravel bike, make sure to relish every moment on the trails. Upgrading handlebar components is a game-changer when it comes to enhancing your riding experience. By customizing your handlebars, you can enjoy numerous benefits that will take your gravel biking adventures to new heights.
One of the main advantages of upgrading handlebar components is improved comfort. With the right handlebar setup, you can reduce strain on your wrists, elbows, and shoulders, allowing for longer rides without discomfort or fatigue. Additionally, customization options such as adjustable reach and width allow you to find the perfect fit for your body mechanics and riding style.
Another benefit of handlebar customization is increased control and stability. Different handlebar shapes provide varying levels of leverage and maneuverability, allowing you to navigate technical terrain with ease. Whether you prefer a wider bar for more stability or a narrower bar for better aerodynamics, finding the right setup will enhance your confidence on the trails.
Furthermore, upgrading handlebar components can also improve overall bike handling. By fine-tuning factors such as grip position and bar height, you can optimize weight distribution and balance on your gravel bike. This translates into better responsiveness when cornering, climbing steep inclines or descending challenging descents.
In conclusion, don’t underestimate the impact that upgrading handlebar components can have on your gravel biking experience. From increased comfort to enhanced control and improved bike handling, customizing your handlebars will undoubtedly elevate every ride you take on your newly upgraded gravel bike.
So get out there and enjoy exploring new trails like never before!
Frequently Asked Questions
What are the different types of handlebars available for gravel bikes?
There are several different types of handlebars available for gravel bikes, each with their own pros and cons.
Some common handlebar materials include aluminum, carbon fiber, and steel.
Aluminum handlebars are lightweight and affordable but can be less comfortable due to increased road vibrations.
Carbon fiber handlebars offer a smoother ride and are lighter, but they tend to be more expensive.
Steel handlebars provide durability and a comfortable feel, but they can add weight to the bike.
Can I change the handlebars on my gravel bike without any specialized tools?
Yes, you can change the handlebars on your gravel bike without any specialized tools. However, it’s important to note that the process may vary depending on the specific bike model and handlebar type.
When considering handlebar grip options, some popular choices include cork tape, rubber grips, and foam grips.
Additionally, different handlebar materials such as aluminum and carbon fiber offer their own set of pros and cons in terms of weight, durability, and vibration dampening.
How do I adjust the handlebar height and angle to fit my riding preferences?
To adjust the handlebar position on your gravel bike for optimal comfort and ergonomics, start by loosening the stem bolts using an Allen key.
This will allow you to raise or lower the handlebars to your desired height.
To change the angle, simply loosen the faceplate bolts and rotate the handlebars accordingly.
Once adjusted, tighten all bolts securely to ensure stability.
Remember to test ride and make further adjustments as needed for a personalized fit.
What are some common issues or misalignments to look out for after installing new handlebars?
Handlebar alignment issues can arise after installing new handlebars on a bike. It’s important to check for misalignments such as an uneven bar height or angle.
Proper handlebar grip techniques are crucial to ensure comfort and control while riding. Make sure the bars are aligned with your wrists and that your grip is relaxed yet firm.
Regularly inspecting and adjusting the handlebars will help prevent any potential issues and ensure an enjoyable riding experience.
Are there any specific maintenance steps I need to follow to keep my new handlebars clean and in good condition?
To keep your new handlebars in good condition, regular cleaning is essential.
Start by removing any dirt or debris with a soft brush or cloth.
Then, use a mild soap solution and warm water to gently wipe down the handlebars, paying attention to any grooves or crevices.
Avoid using harsh chemicals that could damage the finish.
Once clean, apply a silicone-based lubricant to protect and maintain the handlebars’ surface.
Some recommended products for handlebar maintenance include Finish Line’s Bike Wash and Pedro’s Bike Lust.
Conclusion
In conclusion, changing the handlebars on your gravel bike can greatly enhance your riding experience. By assessing your needs and selecting the right handlebar type, you can customize your bike to suit your preferences.
With the necessary tools and a step-by-step approach, you can easily remove the old handlebars and install the new ones. However, if you’re unsure or uncomfortable with DIY work, seeking professional help is always an option.
Remember to maintain and clean your new handlebars regularly for optimal performance. So go ahead, explore different accessories and enjoy an upgraded ride like never before!