
Are you ready to take your electric bike maintenance skills to the next level?
In this article, I will guide you through the step-by-step process of changing the rear wheel on your electric bike.
Whether you’re a seasoned DIY enthusiast or a beginner looking to learn new skills, this detailed and informative guide will equip you with the necessary knowledge and tools to successfully replace your rear wheel.
Get ready to dive into the world of bike maintenance and discover the satisfaction of getting your hands dirty.
Key Takeaways
- Consult the bike’s manual or manufacturer for the appropriate replacement wheel and gather the necessary tools.
- Inspect the current rear wheel for any damage or wear and measure its size for a correct replacement.
- Address any compatibility issues with the e-bike’s drivetrain before installing the new wheel.
- Follow proper steps to remove the axle nut, quick release skewer, release the brake and derailleur, and remove the old rear wheel before installing the new one.
Gathering the Necessary Tools and Equipment
You’ll need to gather the necessary tools and equipment to change the rear wheel on your electric bike.
First, make sure you have a suitable replacement wheel. Electric bikes often have specific rear wheels due to the motor and gearing system. Consult your bike’s manual or contact the manufacturer to ensure you choose the right replacement wheel for your specific model.
Next, avoid common mistakes when changing a rear wheel. Firstly, make sure to release the tension from the chain by shifting to the smallest rear cog. This will prevent any damage to the chain or derailleur. Additionally, always remember to deflate the tire before removing it from the rim to ease the process.
Lastly, gather the required tools such as a wrench, Allen key, and a tire lever to effectively remove and install the rear wheel.
Preparing Your Electric Bike for Wheel Replacement
First, make sure your e-bike is ready for a wheel replacement. This involves taking the necessary steps to prevent wheel damage and ensuring that you choose the right rear wheel size.
Here are three important things to consider:
-
Inspect your current rear wheel: Before replacing your rear wheel, carefully examine it for any signs of damage or wear. Look for cracks, dents, or loose spokes. If you notice any issues, it’s crucial to address them before installing a new wheel.
-
Measure the rear wheel size: To choose the right replacement wheel, you need to know the correct size. Most e-bikes have the wheel size printed on the tire sidewall. Make sure to match the replacement wheel to the existing one in terms of diameter and width.
-
Consider compatibility: Apart from size, ensure that the replacement wheel is compatible with your e-bike’s drivetrain. Check the number of gears, axle type, and brake compatibility to avoid any compatibility issues.
By following these steps, you can ensure a smooth and successful rear wheel replacement for your electric bike.
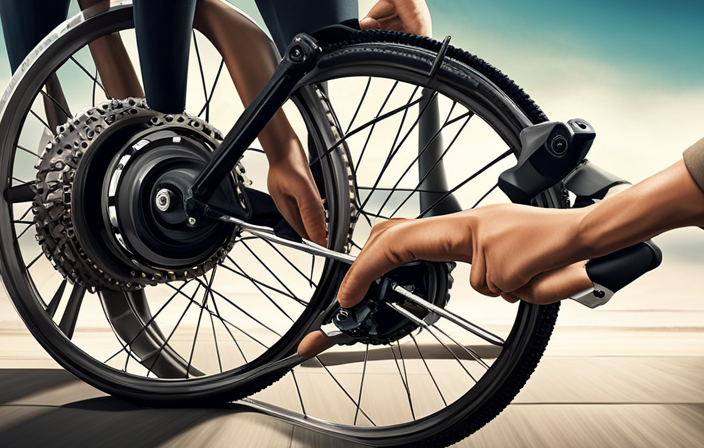
Removing the Axle Nut and Quick Release Skewer
To remove the axle nut and quick release skewer, simply loosen and unscrew them using a wrench or pliers. The axle nut is a crucial component that secures the rear wheel to the frame of your electric bike. In case you encounter any issues with the axle nut, there are alternatives available. One option is to use a quick release skewer, which allows for easy removal and installation of the rear wheel. Another alternative is a bolt-on axle nut, which provides a more secure and permanent attachment. If you are experiencing any problems with the axle nut, such as it being too tight or difficult to remove, troubleshooting may be necessary. Check for any debris or damage in the threads of the nut or the axle itself. Applying lubricant or using a penetrating oil can help loosen a stubborn axle nut. Remember to always follow the manufacturer’s instructions and consult a professional if needed.
| Axle Nut Alternatives | Troubleshooting Axle Nut Issues |
|---|---|
| Quick Release Skewer | Check for debris or damage |
| Bolt-on Axle Nut | Apply lubricant or penetrating oil |
| Follow manufacturer’s instructions | Consult a professional if needed |
Releasing the Brake and Derailleur
When releasing the brake and derailleur, make sure to double-check that they are in the open position before proceeding.
To begin, adjust the brake pads by loosening the brake cable pinch bolt and sliding the pads closer to the rim. This will create more clearance for the wheel removal.
Next, remove the derailleur cables by loosening the cable anchor bolt and pulling the cable out of the derailleur. Be careful not to lose any small parts or springs during this process.
Once the brake pads are adjusted and the derailleur cables are removed, you can safely release the brake and derailleur. This will allow the wheel to be removed without any interference.
Remember to take your time and be cautious when handling these components to avoid any damage.
Removing the Old Rear Wheel
Once you have released the brake and derailleur, you can proceed to remove the old rear wheel. To do this, follow these steps:
-
Start by flipping your electric bike upside down or placing it on a bike stand to give you easy access to the rear wheel.
-
Use a wrench or quick-release lever to loosen the nuts or bolts that secure the wheel to the frame. Keep in mind that the specific method may vary depending on the type of axle your electric bike has.
-
Once the nuts or bolts are loosened, gently pull the wheel out of the dropouts. Be careful not to damage the derailleur or any other components.
-
After removing the old wheel, you can proceed to install a new tire if needed. Refer to the manufacturer’s instructions for the specific tire installation process.
-
Before installing the new wheel, it’s important to check the wheel alignment to ensure proper functioning. Use a ruler or alignment tool to ensure the wheel is centered and aligned correctly.
By following these steps and paying attention to detail, you can successfully remove the old rear wheel and prepare for the installation of a new tire while ensuring proper wheel alignment.
Installing the New Rear Wheel
After loosening the nuts or bolts, I gently pulled out the old wheel from the dropouts.
Now it’s time to install the new rear wheel. First, I align the rear wheel with the dropouts, making sure it sits straight and centered. Once aligned, I insert the axle into the dropouts, ensuring that it goes all the way through.
Next, I tighten the nuts or bolts on each side, making sure they are secure but not overly tight.
To adjust the rear wheel alignment, I check that it spins freely without any wobbling or rubbing against the brake pads. If needed, I make small adjustments by slightly loosening the nuts or bolts and repositioning the wheel until it spins smoothly.
Finally, I double-check the alignment and tighten the nuts or bolts to the recommended torque specification.
With the new rear wheel installed and properly aligned, the bike is ready to go.
Aligning the Brake and Derailleur
Now that the new rear wheel is installed, it’s important to properly align the brake and derailleur to ensure optimal performance.
To begin, start by checking the alignment of the brake pads with the rim of the wheel. Adjust the brake caliper position if necessary, making sure the pads are evenly spaced and centered on the rim.
Next, adjust the cable tension by turning the barrel adjuster. This will fine-tune the braking power and ensure smooth operation. It’s important to test the brakes after each adjustment to ensure they engage properly and release smoothly.
If you encounter any issues, such as uneven braking or rubbing noises, check for any cable fraying or excessive tension. Troubleshoot by readjusting cable tension and realigning the brake pads as needed.
With careful attention to detail, aligning the brake and derailleur will result in a smooth and safe ride.
Tightening the Axle Nut and Quick Release Skewer
To ensure a secure fit, tighten the axle nut and quick release skewer. This step is crucial in ensuring the stability of your electric bike’s rear wheel.
Here are three key actions to take when tightening the axle nut and quick release skewer:
-
Adjusting the Tension: Before tightening the axle nut, make sure to adjust the tension on the quick release skewer. This will ensure that the wheel is properly aligned and centered within the frame.
-
Lubricating the Axle: Apply a small amount of lubricant to the axle threads before tightening the nut. This will help prevent any rust or corrosion, ensuring that the nut can be easily tightened or loosened in the future.
-
Checking the Security: After tightening the axle nut and quick release skewer, give the wheel a firm shake to ensure that it is securely attached to the frame. If there is any movement or play, re-adjust the tension and tighten again.
By following these steps, you can confidently tighten the axle nut and quick release skewer, ensuring a safe and stable ride on your electric bike.
Testing and Adjusting the Wheel
Testing and adjusting the wheel involves ensuring its proper alignment and stability. To test the wheel alignment, start by spinning the wheel and observing if it wobbles or rubs against the brake pads. If any issues are detected, adjustments will be required. One effective technique is to use a truing stand, which holds the wheel in a stable position and allows for precise adjustments. By tightening or loosening the spokes, the wheel can be straightened. Additionally, a dishing tool can be used to check if the wheel is centered between the hub flanges. This tool measures the distance between the rim and the hub on both sides, ensuring equal alignment. Once adjustments are made, it’s crucial to retest the wheel to ensure proper alignment and stability.
Maintaining and Caring for Your Electric Bike’s Rear Wheel
Make sure you regularly clean and lubricate the components of your e-bike’s rear wheel to keep it in good working condition. Electric bike maintenance is crucial for optimal performance and longevity of your bike.
Start by cleaning the rear wheel with a mild detergent and water, making sure to remove any dirt, debris, or grease. Inspect the wheel for any signs of damage such as loose spokes or bent rims.
Troubleshooting common rear wheel issues involves checking the tire pressure, ensuring it is within the recommended range. Additionally, inspect the brake pads for wear and adjust them if necessary.
It’s also important to regularly check the wheel bearings for any signs of wear or play. Proper maintenance and care of your electric bike’s rear wheel will ensure a smooth and safe ride.
Frequently Asked Questions
How do I know if my rear wheel needs to be replaced?
To check the condition of the rear wheel, look for signs of wear such as uneven tread, cracks, or bulges. Also, check if the spokes are loose or broken. These indicators suggest it may need replacement.
Can I change the rear wheel on my electric bike without any specialized tools?
No, specialized tools are required to change the rear wheel on an electric bike. These tools are necessary to remove the axle nuts or quick-release skewer, disconnect the motor wires, and properly align and tighten the wheel.
What should I do if I encounter resistance when removing the axle nut and quick release skewer?
If I encounter resistance when removing the axle nut and quick release skewer, I would think to myself, "Oh joy, another exciting challenge!" To troubleshoot, I would try loosening the nut and skewer gradually, using lubricant if needed, and ensuring proper alignment.
Is it necessary to release the brake and derailleur when removing the old rear wheel?
Yes, it is necessary to release the brake and derailleur when removing the old rear wheel. This ensures that the wheel can be taken out smoothly without any obstructions from the brake pads or derailleur components. Proper maintenance of brakes and derailleurs is crucial for electric bikes. When removing and installing a rear wheel, it is important to follow these tips for safety.
How often should I check and adjust the alignment of the brake and derailleur after installing a new rear wheel?
Regular maintenance for electric bike brakes and derailleurs is crucial to ensure optimal performance. After installing a new rear wheel, it’s important to check and adjust the alignment of the brake and derailleur to prevent potential issues. Here’s a step-by-step guide to properly align them.
Conclusion
In conclusion, changing the rear wheel on an electric bike is a task that requires careful attention to detail and proper maintenance.
Just as the wheel is the backbone of a bike, it symbolizes the foundation of a smooth and efficient ride.
By following the step-by-step instructions outlined in this article, you can ensure that your electric bike’s rear wheel remains in optimal condition.
Remember to regularly maintain and care for your bike to prolong its lifespan and enjoy countless adventures on the open road.
Related Posts:


Ralf is a devoted husband and father who loves spending time with his family. He enjoys riding his bicycle as much as possible, and takes every opportunity he can to get out on the open road. Ralf is a kind and gentle person who wants only the best for those around him.